Anti-Hero Cupcakes
These cute cupcakes, inspired by the music video for Taylor Swift's hit song Anti-Hero, are flavoured with Earl Grey and reminiscent of classic Fondant Fancies, making them a perfect treat for tea time (everybody agrees!).
Servings 12
Equipment
- 1 piping bag
- 1 large round piping nozzle (I used a #1A tip).
- small rolling pin
Ingredients
For the infused milk:
- 100 ml milk
- 4 Earl Grey tea bags (see Note 1).
For the Earl Grey cupcakes:
- 150 g caster sugar
- 150 g Stork (see Note 2).
- 3 eggs
- 150 g self-raising flour
- 1 tsp baking powder
- 1 pinch salt
- 3 tbsp infused milk
- 3 drops vanilla extract
For the Earl Grey buttercream:
- 100 g unsalted butter, softened
- 220 g icing sugar, sifted
- 2.5 tbsp infused milk
- 1 pinch salt
To decorate:
- 12 giant chocolate buttons (I used Cadbury)
- 12 Rolos
- 24 (about 7-8g) dark chocolate chips
- Black edible ink marker (see Note 3).
- 180 g white modelling chocolate (see Note 4).
- Icing sugar, for dusting.
Instructions
Make the infused milk:
- Put the milk and tea bags into a small saucepan. Place over medium heat and bring to a simmer. Remove from the heat and cover, then leave to cool down to room temperature- about 30 minutes. When the milk has cooled, remove the tea bags, squeezing out any excess milk for extra flavour, and discard.
Make the Earl Grey cupcakes:
- Preheat the oven to 170°C. Line a 12-hole cupcake tray with dark brown cupcake cases and set aside.
- Place all of the cupcake ingredients into the bowl of a stand mixer, fitted with the whisk attachment. Mix on low speed until most of the flour is incorporated, then gradually increase the speed to high. Beat until light and fluffy- about 30 seconds.
- Use a spatula to scrape down the sides of the bowl and ensure everything is fully combined. Use a regular-sized ice cream scoop to divide the batter between the 12 cupcake cases, then bake in the oven for 25-30 minutes, or until the cupcakes spring back when touched gently.
- When the cupcakes are baked, remove them from the oven and transfer immediately to a wire rack, to prevent the bottom of the cases from becoming greasy. Allow to cool completely before decorating.
Make the Earl Grey buttercream:
- Place the softened butter into a medium-sized bowl. Using an electric whisk, whip on high speed until the butter is pale and fluffy.
- Add half of the icing sugar to the whipped butter. Use a spatula to incorporate the sugar (this will prevent an icing sugar cloud), then beat with the electric whisk, on high speed, for a further minute.
- Add the infused milk, then beat for another minute. Add the remaining icing sugar, stir in with a spatula, then beat the whole thing for a final minute. Transfer the icing to a piping bag, fitted with a large, round tip, ready to decorate the cupcakes.
To decorate:
- Pipe the buttercream onto each cupcake- you are aiming for a tall-ish cone in the centre of the cupcake. To achieve this, hold the piping bag vertically in the centre of the cake, then apply gentle pressure, lifting as you go to add height. Place the iced cakes into the fridge for about 15 minutes, to allow the buttercream to firm up, while you make the other decorations.
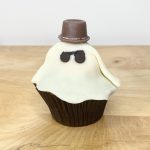
- To make the chocolate fedoras, warm a small frying pan over medium-high heat. Once the pan is hot, turn off the heat. Use the heat from the pan to melt the base of a Rolo (be careful of your fingers near the hot pan!). When the base has melted a little, stick the Rolo to the flat side of a giant chocolate button, making sure it is centred. Repeat 11 more times, for a total of 12 chocolate fedoras, then set all the chocolates aside to harden.
- When the buttercream on the cakes is firm, you can start making the 'sheets' for the ghosts. Knead your modelling chocolate to bring it back to a smooth, pliant dough, then break off a small piece (about 15g). Dust your work surface and rolling pin with icing sugar, then roll out the ball, keeping the chocolate in a roughly circular shape, very thinly (about 12cm diameter). Use a small, sharp knife to cut off any messy edges with a wavy line, then carefully lift up the chocolate and drape it over the chilled cupcake. Press it against the central buttercream dollop and arrange the folds evenly.
- Before the modelling chocolate firms up, press two dark chocolate chips into the chocolate, to act as eyes. Using the black edible marker, draw a bar connecting the two chips to create the sunglasses (see Note 3).
- Heat the same, small frying pan you used to make the fedoras back up over a medium heat. Once the pan is hot, turn off the heat and use the warmth of the pan to melt the bottom of each fedora slightly (this will allow them to stick to the top of the modelling chocolate). Press one fedora on top of each ghost cupcake. Be careful not to over-melt the chocolate, or it will ooze out when you push it down onto the cupcake.
- I recommend adding the chocolate decorations (from the modelling chocolate 'sheets' onwards) on the day you plan to serve the cakes, to prevent any 'sweating'. The iced cupcakes will keep for 2-3 days in an airtight container (or the fridge), while the fully decorated cupcakes are best eaten on the same day.
Notes
- I like to use decaf tea when I'm baking with it, so that I can have a cake at any time of the day without worrying, but feel free to use caffeinated tea, if you prefer.
- As always, I like to use Stork in place of butter for my cakes- I think it makes for a fluffier, moister cake. If you don't want to use Stork, just substitute it with an equal quantity of softened, unsalted butter.
- I used an edible ink marker to join the two chocolate chip 'eyes' into sunglasses, but it was a little bit finicky and I wasn't super happy with the result. If you want to use an edible marker, I recommend you press the chips in, then remove them and draw the bar between them, before pressing the chips back in, to make the process easier. Otherwise, you could use some melted dark chocolate, either by placing it into a piping bag fitted with a very fine tip OR by dipping a cocktail stick into it and etching a small line that way.
- As always, you can use any edible modelling paste for this. I've opted to use white modelling chocolate, because I like the taste and the colour, but you could also use fondant or marzipan, if you prefer. All of these modelling pastes will 'sweat' if left on the cakes for too long though, so I would still only add them to the cupcakes on the day you plan to serve them, no matter which paste you choose to use.