Carrot Cake
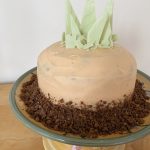
Cinnamon-spiced carrot & walnut cake, decorated with cream cheese icing, white chocolate 'leaves' and chocolate soil to look like a carrot top.
Servings 8
Equipment
- Food processor
- 2 6-inch round cake pans
Ingredients
For the cake:
- 140 g plain flour
- 1/2 tsp baking powder
- 1/2 tsp bicarbonate of soda
- 1 pinch salt
- 3/4 tsp ground cinnamon
- 85 g walnuts, finely ground
- 2 eggs
- 160 g caster sugar
- 150 ml sunflower oil (or other flavourless oil)
- 125 g carrot, grated
For the icing:
- 55 g unsalted butter, softened
- 90 g cream cheese
- 310 g icing sugar, sifted
- orange food colouring
To decorate:
- 40 g white chocolate
- green food colouring (powdered or oil-based)
- 3 bourbon biscuits (see Note 1)
Instructions
For the cake:
- Preheat the oven to 175°C fan (see Note 2). Grease and line 2 6-inch tins, then set aside.
- Sift the flour, baking powder, bicarbonate of soda, salt and cinnamon together. Mix in the ground walnuts until evenly distributed within the dry ingredients. Set aside.
- Place the eggs and the sugar into the bowl of an electric stand mixer fitted with a paddle attachment. Beat on high speed for about 1 minute, until pale and the consistency of double cream (see Note 3).
- With the mixer on a medium-high speed, slowly pour in the oil, allowing the mixture to combine fully.
- Add the grated carrots and, with the mixer on a low speed, fold in gently.
- Keeping the mixer on a low speed, add the dry ingredients, a spoonful at a time, into the mixture. Stop the mixer as soon as the dry ingredients have been incorporated- be careful not to overmix.
- Divide the batter between the two tins and bake in the preheated oven for 25-28 minutes, until cakes spring back when touched. Once cooked, allow to cool for 5 mins, then remove from tins and place on a wire rack to cool completely.
For the white chocolate 'carrot tops':
- Temper the white chocolate (see Note 4). Add a little green food colouring (see Note 5), mix well to ensure the colour is even, then pour onto a tray lined with baking paper. Using an offset spatula and working quickly before the chocolate sets, spread it out into a thin layer (1-2mm thick). Tap the tray firmly on the work surface to smooth out the surface and get rid of any air bubbles. Set aside at room temperature to set completely.
- Once the chocolate has hardened, snap it into large, pointy shards and set aside.
For the icing:
- Place the softened butter into the bowl of a stand mixer and beat on high for 2-3 minutes, until smooth, light and creamy. Add in the cream cheese and mix briefly on medium to combine.
- With the mixer on a medium speed, add the icing sugar, a spoonful at a time, to the butter/cream cheese mixture, allowing the sugar to incorporate fully after each addition. Do not worry if the icing goes a little sloppy at first, just keep adding the icing sugar and it will come back to a normal buttercream consistency.
- Once the icing sugar has been fully incorporated, add a little orange food colouring to the icing. Beat the icing on high for another 1-2 minutes to distribute the colour evenly and to ensure that the icing is light and smooth.
To assemble:
- Place one of your cooled cakes onto a cutting board. Using a small serrated knife, lightly mark out a smaller circle on top of the cake, about an inch in from the edge on all sides (I used a large tea cup as a guide- a small saucer or 4-inch cake tin would also work well). Once you have the inner circle marked out, use the same serrated knife to carve off a bevelled edge all around the cake (see photo in post and Note 5). The aim here is to mimic the rounded shape of a carrot top, but don't worry about being too precise, because this will be covered in icing later on!
- Place the offcuts of cake from the previous step into the bowl of a food processor, along with the bourbon biscuits (I used a mini processor for this, because it was such a small quantity). Blitz until you have a fine crumb, then set aside.
- Set your uncarved cake on a serving plate. Place 1/5th of the cream cheese icing on top and spread out. Carefully place your carved cake on top, with the flat edge facing down. Taking about 1/3rd of the remaining icing, cover the whole cake in a light crumb coat, following the bevelled edges along the top. Once done, place into the fridge for 15-20 minutes, until the buttercream has formed a crust.
- After the crumb-coated cake has chilled, take it out of the fridge and ice liberally using the remaining icing. Take your time smoothing out the sides and rounding out the bevelled edge. When you are happy with the icing, start positioning your white chocolate shards on top of the cake, in the centre, varying heights and directions. You may want to use a knife to create a small incision for each shard, instead of trying to force the chocolate in, which may break the thin shards. Fill in any gaps with smaller shards and splinters of the chocolate.
- Finally, use a teaspoon to scatter the cake crumb/biscuit 'soil' all around the base of the cake, pressing it up the sides a little as you go.
Notes
- Feel free to use your favourite chocolate biscuit- I love bourbons, but you could also use Oreos, double chocolate cookies etc.
- Cupcake Jemma's recipes all use a fan oven. The equivalent temperature for a conventional oven is 195°C, but I have not tested this recipe using this setup.
- Typically, you would whip eggs and sugar together using a whisk attachment, until thick, pale and fluffy - i.e. the 'ribbon stage'. You don't need to take the egg/sugar mix this far for this recipe (indeed, it would be difficult to get it quite as light and aerated with a paddle attachment). When the mixture is smooth and a little paler, it will be perfect!
- I have a whole post about tempering chocolate! You can check it out here. White chocolate is notoriously difficult to temper- especially with such small amounts! If your tempering doesn't quite work out, use a sharp knife to score the chocolate into crisp shards, then place into the fridge/freezer for a little while, until 'snappable'. Your shards won't stay crisp and snappy, but they will be firm enough to poke into the cake and give the 'carroty' impression.
- If you're having trouble carving your cake, place it in the fridge for 30 minutes (or freezer for 10 if you're in a rush!). This will firm up your cake, making it easier to carve without it crumbling.