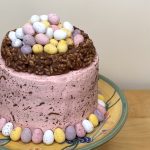
Easter Nest Cake
A 6-inch, 4-layer vanilla cake, iced with white chocolate buttercream, decorated with a Rice Krispy chocolate nest, cocoa speckles and a multitude of Mini Eggs.
Servings 10
Equipment
- 2 6" round cake tins
- 1 pastry brush, with firm bristles
Ingredients
For the Rice Krispy nest:
- 30 g Rice Krispies (or other cereal, e.g. cornflakes or shredded wheat)
- 100 g milk chocolate, finely chopped (can be substituted with an equal amount of dark chocolate)
- 20 g unsalted butter, cubed
- 1 tbsp golden syrup
For the vanilla cake:
- 170 g unsalted butter, softened (I use Stork)
- 170 g caster sugar
- 3 eggs
- 170 g self-raising flour
- 1 tsp baking powder
- 1 pinch salt
- 1/8 tsp vanilla extract
- 1 tbsp milk
For the white chocolate buttercream:
- 140 g white chocolate, melted and cooled
- 190 g unsalted butter, softened
- 210 g icing sugar, sifted
- 1 pinch salt
- 2 tbsp milk
- gel food colouring (pink, purple and yellow)
To decorate:
- 1 tsp cocoa powder
- 2 tsp vanilla extract (see Note 1)
- 300 g Mini Eggs
Instructions
For the Rice Krispy Nest:
- With a pencil, draw a 5 1/2" diameter circle on a piece of baking paper. Flip the paper upside down and place onto a baking tray. Set aside.
- Place the chocolate, butter and golden syrup into a heatproof bowl. Melt gently (either in microwave or over a pan of barely simmering water), until smooth. Stir in the Rice Krispies until completely incorporated.
- Working quickly, tip the Rice Krispy mixture onto the lined baking tray, into the centre of the marked circle. Using the pencil as a guide, push the mixture into shape. Use a spoon to press the centre down and build up the sides to mimic a nest.
- Place the nest into the fridge to firm up while you make the rest of the cake.
For the cake:
- Preheat oven to 170°C (150°C fan). Grease and line 2 6" round cake tins
- Place the butter and sugar into the bowl of a stand mixer fitted with a paddle attachment. Beat on high until light and fluffy.
- With the mixer on a medium-low speed, add the eggs, one at a time, making sure to incorporate fully between each addition.
- Sift together the flour, salt and baking powder. Add to the butter mixture, and mix on medium-low speed until just incorporated.
- Add the vanilla extract and milk, and mix to combine.
- Divide the mixture between the two tins and bake in preheated oven for 25-30 minutes, until cakes spring back when touched.
- Leave cakes to cool in tins for 5-10 minutes, then remove carefully and transfer to a wire rack to cool completely. Once cool, use a serrated knife/cake leveller to level each cake, then split each in half horizontally, to leave you with 4 even layers.
For the white chocolate buttercream:
- Place the softened butter into the bowl of a stand mixer, fitted with the paddle attachment. Beat on high speed for about 3 minutes, until very pale and fluffy.
- Pour the cooled white chocolate into the whipped butter, then mix on medium speed for a further minute to combine fully.
- With the mixer on low speed, add the icing sugar, a spoonful at a time, until fully incorporated.
- Add the salt and milk, mix on medium speed to combine, then turn the speed up to high, and beat for a further 3-5 minutes, until fluffy and significantly paler. Turn the mixer down to its lowest setting, and mix for a further 30 seconds (this will help to reduce the air bubbles in the icing).
- Once the icing is ready, divide it into 4 for colouring. You will need 3x100g bowls of icing for filling, while the rest will be used for decorating. Colour one each of the smaller bowls yellow, purple and white (see Note 2). Colour the final, largest portion pink.
To assemble:
- Place one layer of cake onto a serving plate. Place all of the yellow buttercream on top and spread out into an even layer. Add another layer of cake, then repeat the process with the purple buttercream. Add another layer, top with the white buttercream, then add the final layer.
- Use an offset spatula to smooth out any icing that has squished out from the filling. Smooth a thin layer of pink icing all over the top and sides of the cake, to act as a crumb coat (see Note 3). Put the cake into the fridge for about 15 minutes, to allow the buttercream to firm up before proceeding.
- When the crumb coat has set, use the remaining pink icing to generously ice the top and sides of the cake, using an offset spatula to smooth it out as much as you can (see Note 4).
- At this point, you'll want to remove your chocolate nest from the fridge. Carefully peel the baking paper off the bottom, then set the nest on top of the cake, making sure to centre it. Once you have added the nest, put the whole cake back into the fridge for a further 15 minutes, to firm up the final buttercream layer.
- When the buttercream has chilled for 15 minutes, mix together the cocoa powder and vanilla extract in a small bowl. Remove the cake from the fridge, then dip the pastry brush into the cocoa mixture. Use your finger to pull back the bristles and flick the mixture towards the cake to make little chocolate speckles, reminiscent of a Mini Egg.
- The cocoa mixture will set relatively quickly, so you can move onto adding the Mini Eggs. Place a row of the eggs all around the base of the cake, then pile the remaining eggs into the chocolate nest on top of the cake.
- The cake can be served immediately, or left at room temperature until you are ready to eat it. As always, cake is best eaten on the day it is made, but it will last for about 2-3 days if necessary.
Notes
- You don't need to use a particularly good quality vanilla extract for this stage- it's just to dissolve the cocoa powder and counteract the bitter taste.
- To colour icing that has a slight yellow tinge white, add a very (very) small amount of purple gel food colouring. The purple will neutralise the yellow tone, leaving you with a much whiter icing.
- Because of the high icing-to-cake layer ratio in this cake, your cake may be a little unsteady when you come to crumb coat it. If this is causing you problems, smooth out any residual filling icing on the sides as best you can, then pop the filled cake into the fridge for about 15 minutes before crumb-coating. This will firm up the filling icing, making your cake a bit sturdier and easier to deal with.
- If you're having trouble getting a smooth edge on your cake, try using warm water to rinse off your spatula. The clean, slightly warm spatula will make it much easier to smooth out the icing, and you can repeat this as many times as you need to when icing.