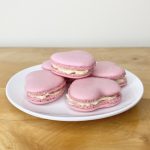
Heart-Shaped Macarons
The 14th of February is fast approaching and, whether you'll be celebrating Valentine's, Galentine's or just getting through another wintery Wednesday, these pink, heart-shaped macarons with a vanilla cream filling are the perfect treat to make your day super-sweet!
Servings 24 Macarons
Ingredients
For the vanilla cream filling:
- 110 ml double cream
- 2 1/4 tsp corn flour
- 1/4 tsp vanilla bean paste
- 50 g caster sugar
- 50 g white chocolate, finely chopped.
- 55 g unsalted butter, diced and at room temperature.
For the macaron shells:
- 95 g ground almonds
- 103 g icing sugar
- 72 g egg whites, split into two equal portions (2x36g).
- 95 g caster sugar
- 30 ml water
- pink gel food colouring (see Note 1).
Instructions
Make the vanilla cream filling:
- Whisk the cornflour and 2 tbsp of the cream together in a medium bowl. Set aside.
- Place the remaining cream, vanilla bean paste and caster sugar into a small saucepan over low heat. Stirring every now and then, gently bring to just below a simmer.
- Pour the hot cream into the cornflour mixture, a little at a time, whisking continuously, until all of the cream has been added and the mixture is smooth.
- Return the mixture to the saucepan and place over low heat, whisking continuously, until custard thickens slightly and reaches just below a simmer again.
- Pour the custard back into the bowl, then add a small amount of the chopped white chocolate. Stir, using a spatula, until the chocolate has melted into the custard. Repeat this process until all of the chocolate has been incorporated.
- Transfer the mixture to a food processor and add a few cubes of the room temperature butter. Process until the butter is fully incorporated into the custard mixture, then repeat this process until all of the butter has been incorporated. The mixture should be thick, pale and fluffy at this point.
- Transfer the mixture to a bowl, cover with clingfilm, making sure to press the clingfilm directly onto the surface of the filling to prevent it from forming a skin, then place into the fridge to chill for at least 2 hours.
Make the macaron shells:
- Line 2 baking trays with baking paper. Fit a piping bag with a small(ish), round nozzle (mine was 6mm in diameter) and set aside.
- Place the ground almonds and icing sugar into a food processor. Pulse 10 times, then sift into a large bowl, discarding any large lumps. Repeat this process once more, so that you are left with a very fine powder.
- Add one of the 36g portions of egg white to the almond/icing sugar mixture, along with 3-5 drops of pink food colouring. Mix well to form a paste with an even, deep pink colour, then set aside.
- Place the remaining 36g of egg white into the clean (see Note 2), metal bowl of a stand mixer, fitted with the whisk attachment. Leave aside while you make the sugar syrup.
- Place the caster sugar into a small saucepan with the 30ml of water. Place over a medium heat and bring to a boil. Do not stir- swirl gently if necessary. Allow the syrup to continue bubbling, while monitoring the temperature with a digital sugar thermometer.
- When the syrup has reached 114°C, turn the stand mixer to high speed and begin to whip the egg whites to soft peaks. Keep the syrup over the heat.
- Once the sugar syrup reaches 118°C, the egg whites should have reached soft peaks. With the mixer still running on high speed, carefully pour the syrup down the side of the bowl in a slow, steady stream. Once all of the syrup has been added, turn the mixer up to full speed and beat for 5 minutes, or until stiff peaks are achieved and the metal bowl has come to room temperature.
- When the meringue is ready, add 1/3 of it to the pink almond mixture. Mix vigorously to combine the two mixtures and loosen the thick paste.
- Add the rest of the meringue and fold it in, using a figure of eight motion, until the mixture is cohesive and comes off the spatula in ribbons- if you leave those ribbons for 30 seconds they should level themselves out into the rest of the mixture.
- Transfer the macaron batter to the prepared piping bag. Holding the bag vertically to the baking tray, pipe heart shapes with the batter (see Note 3).
- Once the macarons are piped, lift the whole tray and drop it down onto the work surface a few times to bring any air bubbles to the surface. Use a sharp knife/cocktail stick to burst any remaining bubbles, letting the mixture fall back on itself.
- Set the macarons aside at room temperature to form a skin- on a relatively dry day, this should take about 30-40 minutes, but can take less time on drier, warmer days and more time on cold, humid days. Check on the macarons every 10-15 minutes or so, if unsure. The macarons will be ready when you can gently touch their surfaces without any batter coming off on your finger.
- When the macarons are almost ready, preheat the oven to 165°C fan. When the macarons are ready and the oven is hot, bake the macarons in the centre of the oven, one tray at a time, for 11 minutes. To check if they are done, place a finger on top of the shells and wiggle gently. When done, the tops of the macarons should not wobble. Remove from the oven and allow to cool completely on the tray.
To assemble the macarons:
- Once the macaron shells have cooled completely, check the consistency of the filling. If it is too solid, warm it very gently in the microwave, until it softens slightly, then use an electric hand whisk to beat the filling, until it is smooth, fluffy and spreadable/pipeable.
- Pair the macarons up, trying to match them in terms of size/shape. Pipe/spread a small amount of vanilla cream filling onto the underside of half of the shells, then sandwich the corresponding half on top.
- Store the assembled macarons in an airtight container in the fridge. Kept like this, the macarons will keep for 3-5 days.
Notes
- The type of colouring you use is very important. You need to use a water-based, concentrated gel food colouring that can withstand baking. For these macarons, I used 5 drops of Colour Mill's Aqua Blend in the shade Candy.
- To clean the bowl and the whisk for meringue, rub a small amount of white wine vinegar over both using a piece of kitchen roll. This will remove any traces of fat/residue that might prevent your meringue from whipping up properly.
- For more detailed instructions on how to pipe heart-shaped macarons, and to find the template I created for this purpose, please go to the 'Piping the Hearts' section in the post above.