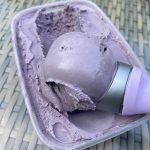
Honey Lavender Ice Cream
Homemade ice cream, flavoured with sweet honey and floral lavender: a perfect summer treat!
Servings 8 big scoops
Ingredients
- 300 ml double cream
- 300 ml milk
- 100 g caster sugar (split into 2x50g portions)
- 1 tbsp dried lavender (see note 1)
- 3 egg yolks
- 1 tbsp honey
- purple food colouring (optional)
Instructions
- The day before you make the ice cream, put the bowl of the ice cream maker into the freezer (see note 2).
- Put the cream, milk, 1 of the 50g portions of sugar and the dried lavender into a medium-sized saucepan. Place over a low heat and, stirring every now and then, bring to just below a boil (when it's ready, you'll be able to see bubbles forming around the edge of the pan and some steam rising from the mixture). Remove from the heat and set aside, covered, to infuse for 30 minutes.
- When the cream mixture has infused for 30 minutes, strain it through a fine mesh sieve to remove the lavender (the lavender can now be discarded). Set about 125ml of the strained mixture aside, then put the rest of the cream back into the saucepan. Slowly, bring the cream mixture in the pan to just below the boil again.
- While the cream mixture is heating up, put the egg yolks, the remaining 50g of sugar and the honey into a large bowl. Using an electric hand whisk, beat until the mixture becomes pale and thick (when you lift the whisk, it should form thick ribbons that stay on the surface for a few seconds before settling back into the mixture: the 'ribbon stage'). Once the 'ribbon stage' has been reached, beat in the 125ml of the reserved cream mixture to slacken the egg mixture.
- When the cream mixture has been heated to just below a boil, take it off the heat and, whisking continuously, pour into the slackened egg mixture in a slow, steady stream.
- Once all of the cream mixture has been incorporated, pour the whole mixture back into the saucepan through a fine mesh sieve to ensure the custard is completely smooth. Place the saucepan over a low heat and cook, stirring frequently, until the custard has thickened slightly (it should coat the back of the spoon- about 8-10 minutes). Do not let the custard boil, or it will curdle- if you start to see bubbles rise to the surface in the centre of the pan, remove from the heat immediately (your custard will definitely be thick enough at this point).
- Once the custard has thickened, remove from heat and stir in the purple food colouring until evenly distributed (see note 3). Transfer to a jug, cover with clingfilm (place the clingfilm directly onto the surface of the custard, to prevent it from forming a skin) and allow the custard to cool slightly at room temperature before putting it into the fridge to chill for at least 3-4 hours, or overnight.
- Once the mixture is completely cold, set up the ice cream machine. With the mixer running, pour in the cold custard and churn for 10-30 minutes, as per your machine's instructions. Once it has churned, transfer the ice cream to a container, cover with a lid and freeze for at least 3 hours (preferably overnight) before serving. The ice cream will keep in the freezer for up to 3 months.
Notes
- Make sure you use culinary grade lavender. You can purchase the brand I used here.
- If you plan to chill your custard overnight, before churning, you wait to freeze the canister of your ice cream maker until the day you make the custard. If you are chilling and churning your custard in the same day, you'll need to remember to freeze the canister the day before.
- Because of the high fat content of the custard, the food colouring might take a little while to incorporate fully. Just keep stirring! Additionally, after the custard has sat for a while in the fridge, some food colouring can collect at the bottom of the jug. Give the custard a good stir, right before you churn it, to avoid any unwanted streaks.