In the words of Taylor Swift, my smile is like a won a contest because it’s time for the fourth instalment of my Taylor Swift Cupcakes series! We’re continuing on with baking our way through Swift’s album Midnights and, this time, we’re all about Track 4: Snow on the Beach. This track is the only song (on the standard album, at least!) with a featured artist (Lana Del Rey), so I felt like I really had to do it justice! Stay tuned, because I think you’re going to LOVE how this one turned out (I sure do!).
Table of Contents
- The ‘Snow on the Beach’ Cupcake: Explained
- Salted Caramel Ice Cream
- Making the Buttery Biscuit Bases
- Making the Chocolate Cupcakes
- Making the Marshmallow-y Meringue Icing
- Decorating the Cupcakes
- Notes on Making Ahead/Serving
- Recipe
The ‘Snow on the Beach’ Cupcake: Explained
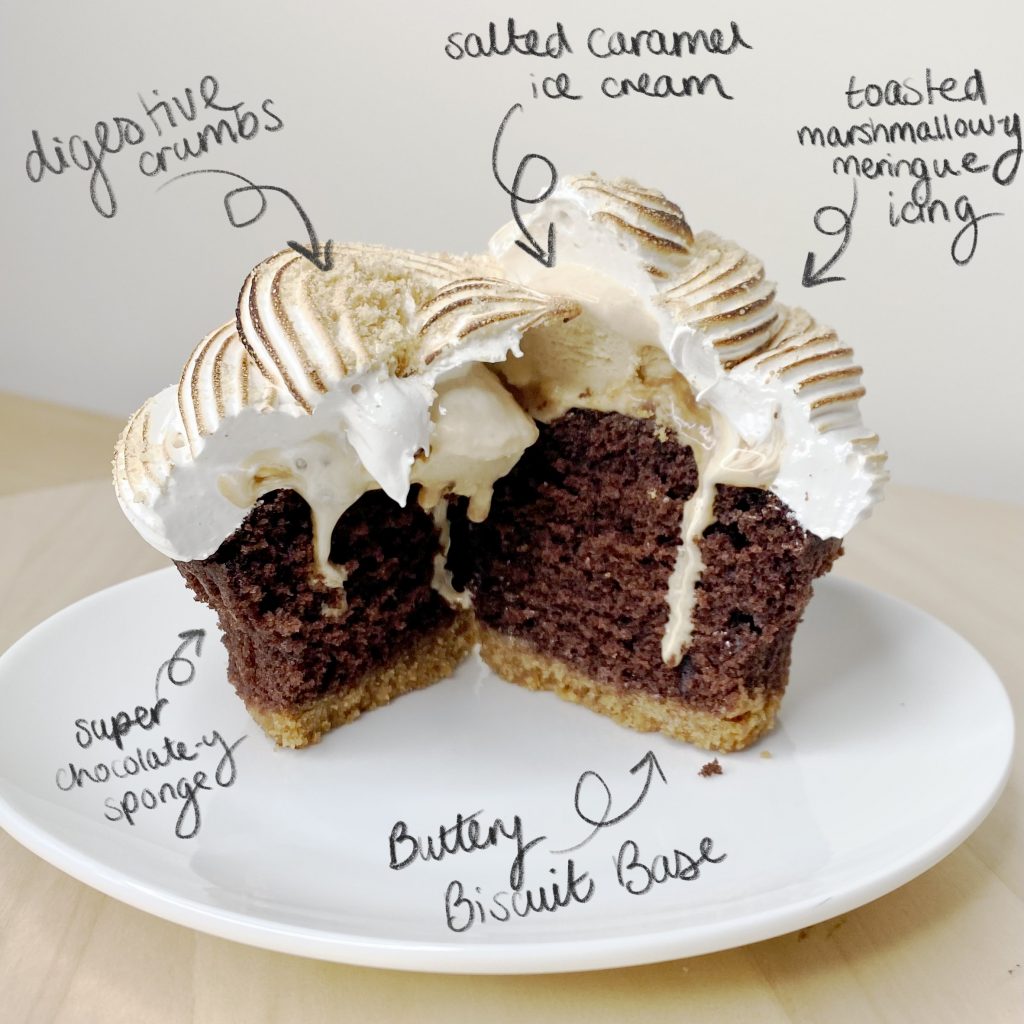
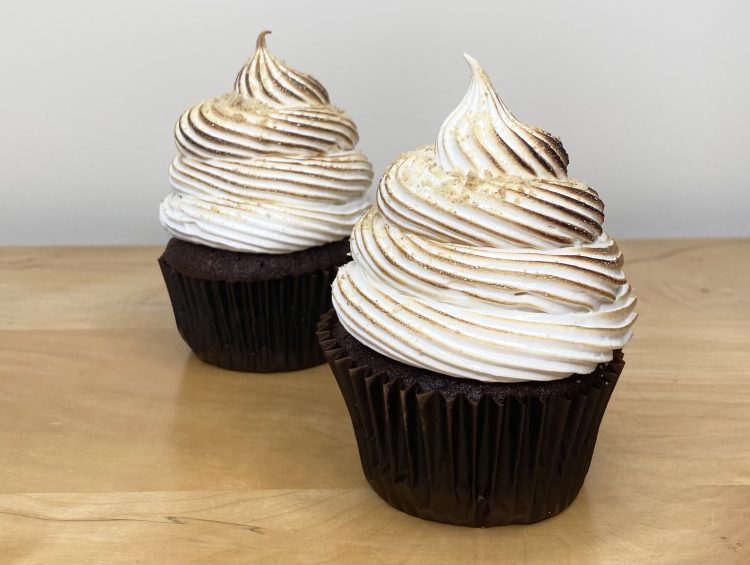
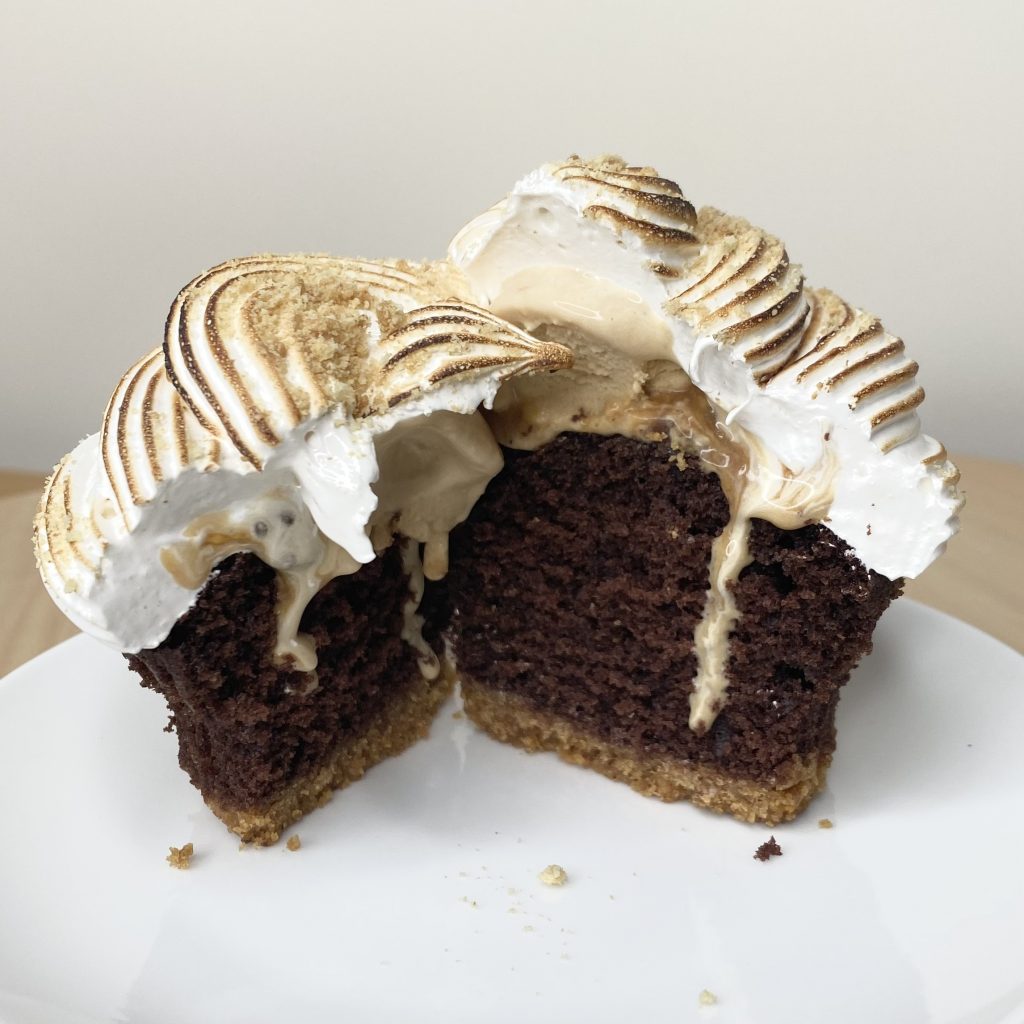
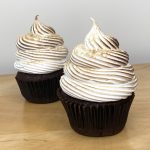
The Snow on the Beach Cupcake is a Salted Caramel S’mores Baked Alaska Cupcake. I know, I know… so extra, right? But I ask you, what says beach more than S’mores (and Ken, obviously)? What says sea more than salt(ed caramel)? What says snow more than ice cream? Frankly, my hands were tied. Anyway, this Salted Caramel S’mores Baked Alaska Cupcake can be broken down into 5 main elements:
- Buttery biscuit base (the digestive/graham cracker part of the S’more).
- Chocolate cupcake (the chocolate part of the S’more and the cake part of the Baked Alaska).
- Salted caramel ice cream (the ice cream part of the Baked Alaska– salted caramel because the sea water is salty!).
- Marshmallow-y meringue icing (the marshmallow part of the S’more and the meringue part of the Baked Alaska).
- Digestive crumb (just for some extra sandy decoration!).
Essentially then, this is a chocolate cupcake, baked directly on top of a buttery, digestive biscuit base, topped with a scoop of salted caramel ice cream, which is covered in a super-tasty, marshmallow/meringue hybrid, which is sprinkled with some more digestive crumbs, for good measure. The meringue is then toasted a little to give it some colour and there you have it! A Salted Caramel S’mores Baked Alaska Cupcake. It is, quite literally, Snow on the Beach. In the words of Taylor, it’s weird, but it’s f****** beautiful. Also, it’s super delicious and I want to eat it forever and ever. Let’s get into it, shall we?
Salted Caramel Ice Cream
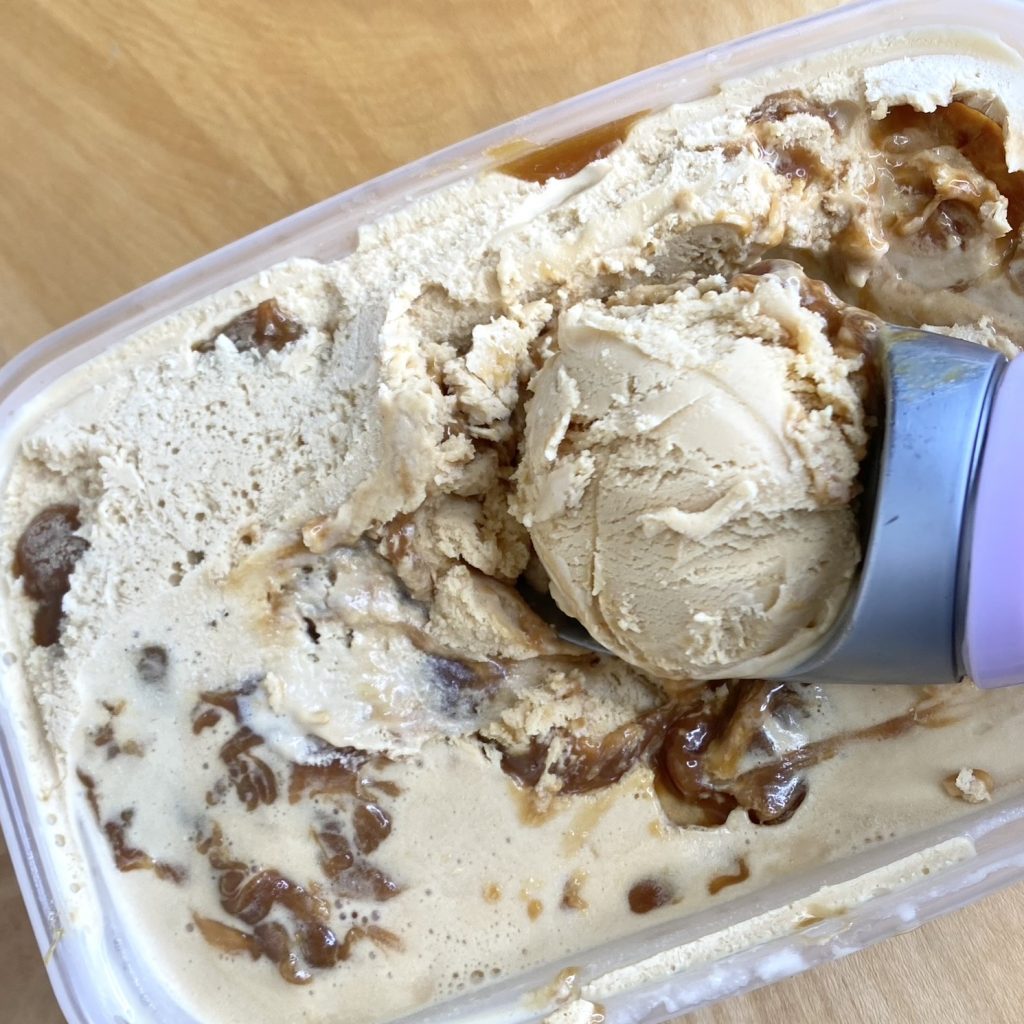
You’ll need some salted caramel ice cream for these cupcakes. I’m using my homemade version (you can find the recipe for that here!), but you can use shop-bought if you prefer! Salted Caramel is a super popular ice cream flavour, so you’ll likely be able to find some at your local supermarket.
If you do want to make your own, remember to make the ice cream in advance! Ice cream isn’t too tricky to make, but it does require a significant amount of freezing/chilling time. The ice cream needs to be fully churned and frozen before you scoop it onto the cakes, so try to make it at least the day before you want to assemble your cupcakes.
Of course, if you don’t like salted caramel ice cream, you can absolutely use any other flavour of ice cream you like- you won’t get the same salty vibe, but you’ll still get the snow!
Making the Buttery Biscuit Bases
I am such a fan of a buttery biscuit base. I mean… cheesecake? Sign me up. Banoffee pie? YES, please. One of my FAVOURITE ways to utilise the buttery biscuit base, though, is to bake it right into brownies and chocolate cakes. As with most of my baking techniques, I learnt this method from Cupcake Jemma. Essentially, you make a buttery biscuit base as usual, then press it into your baking tin, add the batter right on top and bake the whole thing as usual. You end up with cakes and bakes with a super fun, deliciously crunchy base. I love to use this method when I’m making S’mores-inspired bakes: think S’mores brownies, S’mores cakes & S’mores cupcakes- the latter of which, of course, is exactly what we’re doing here. These buttery biscuit bases are going to represent the digestive biscuit/graham cracker element of a S’more, lending the required biscuit-y taste and texture to our bake.
Buttery biscuit bases are super easy to make- you only need 3 ingredients:
- Digestive biscuits
A buttery biscuit base obviously requires some sort of biscuit and, here in the UK, the most traditional biscuit for this purpose is the digestive. Of course, you can use any biscuit you like- just remember that a) using biscuits with a cream filling will affect the moisture content in the biscuit base (you may want to reduce the butter slightly if you do this!) and b) S’mores are traditionally made with Graham Crackers, so you’ll want to use a biscuit as similar to that for the most authentic vibe. If you live in a country where Graham Crackers are readily available, go ahead and use them. Here in the UK, digestives are the most similar alternative.
- Unsalted butter
Melted butter binds the dry biscuit crumbs together, so you have a buttery biscuit base rather than a buttery biscuit rubble!
- Golden syrup
A slightly rogue addition, but golden syrup helps to bind the base together. I learnt this trick from Cupcake Jemma (what’s new?) and I find that it really does make a difference.
Making the buttery biscuit bases is a super quick process- only 4 steps!
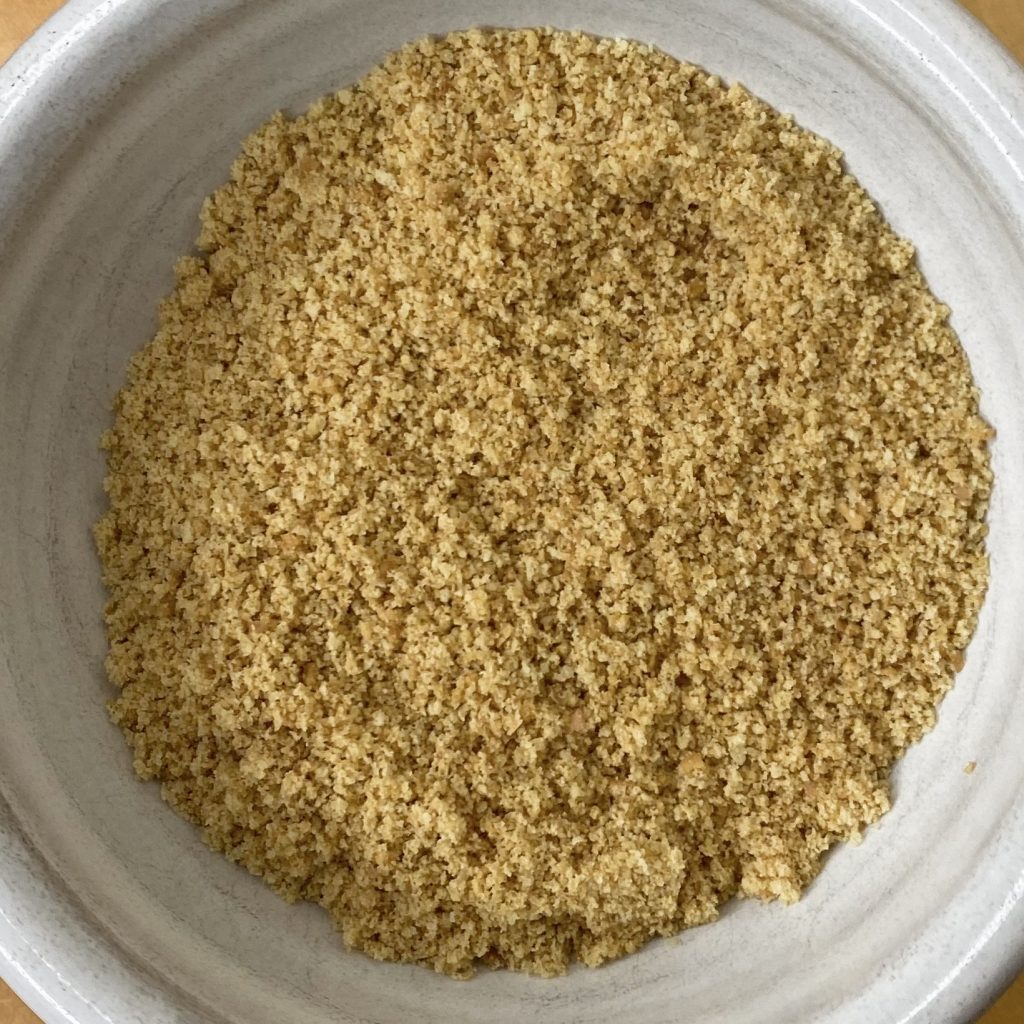
- Finely crush the biscuits: I like to use a food processor for this, because it’s so quick and you can get a really fine crumb, super easily. If you don’t have a food processor, you can use a rolling pin to break up the biscuits- it will just take a little longer (and require a little more of an arm workout!). In the recipe below, the amount of biscuits listed is enough for the bases and some extra for decorating. You only need 135g of biscuit crumbs for 12 cupcake bases, so make sure to reserve the remaining 15g for decoration, or your biscuit bases will be too dry and might fall apart!
- Melt the butter: I like to do this in the microwave, but you can do it on the hob if you prefer.
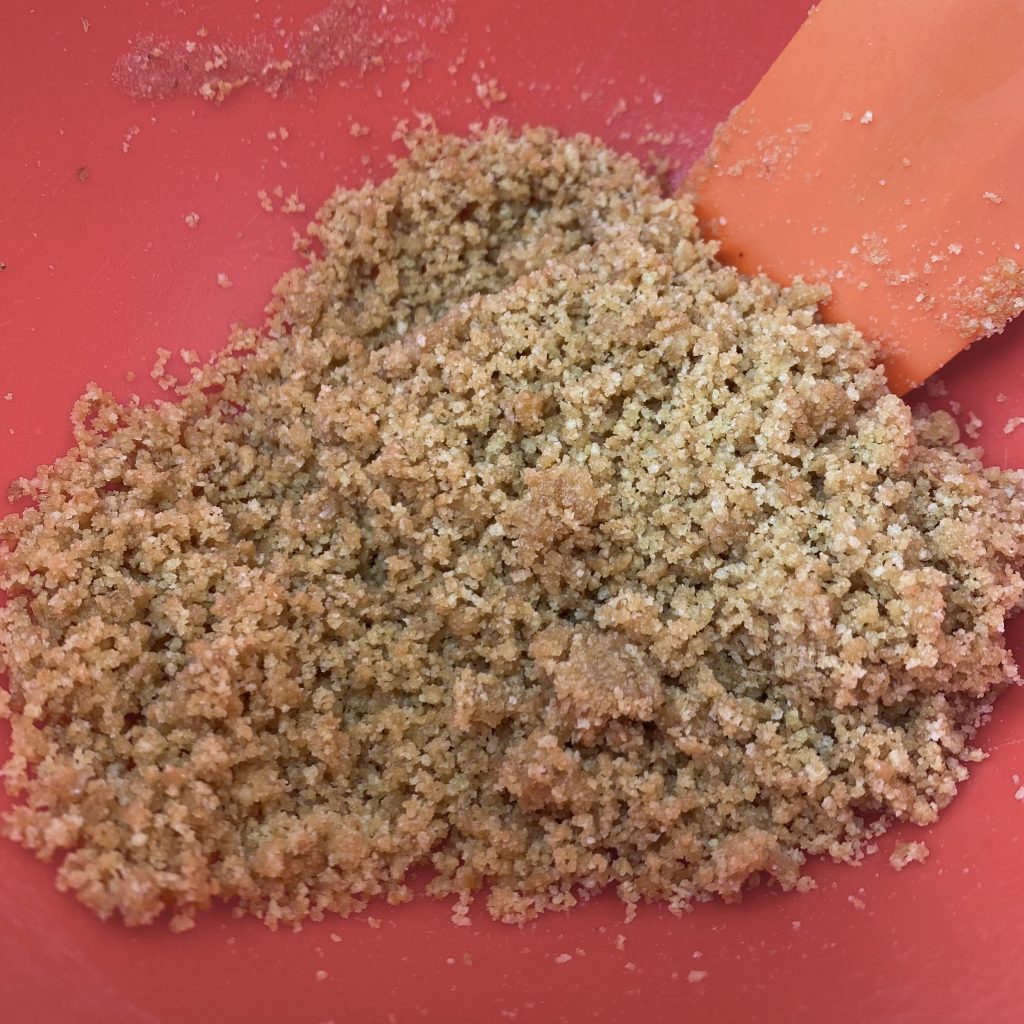
- Mix everything together: Put the biscuit crumbs, butter and golden syrup into a bowl and mix well, until everything is combined. You should end up with a mixture that looks like damp sand and holds together if you press it with the back of a spoon.
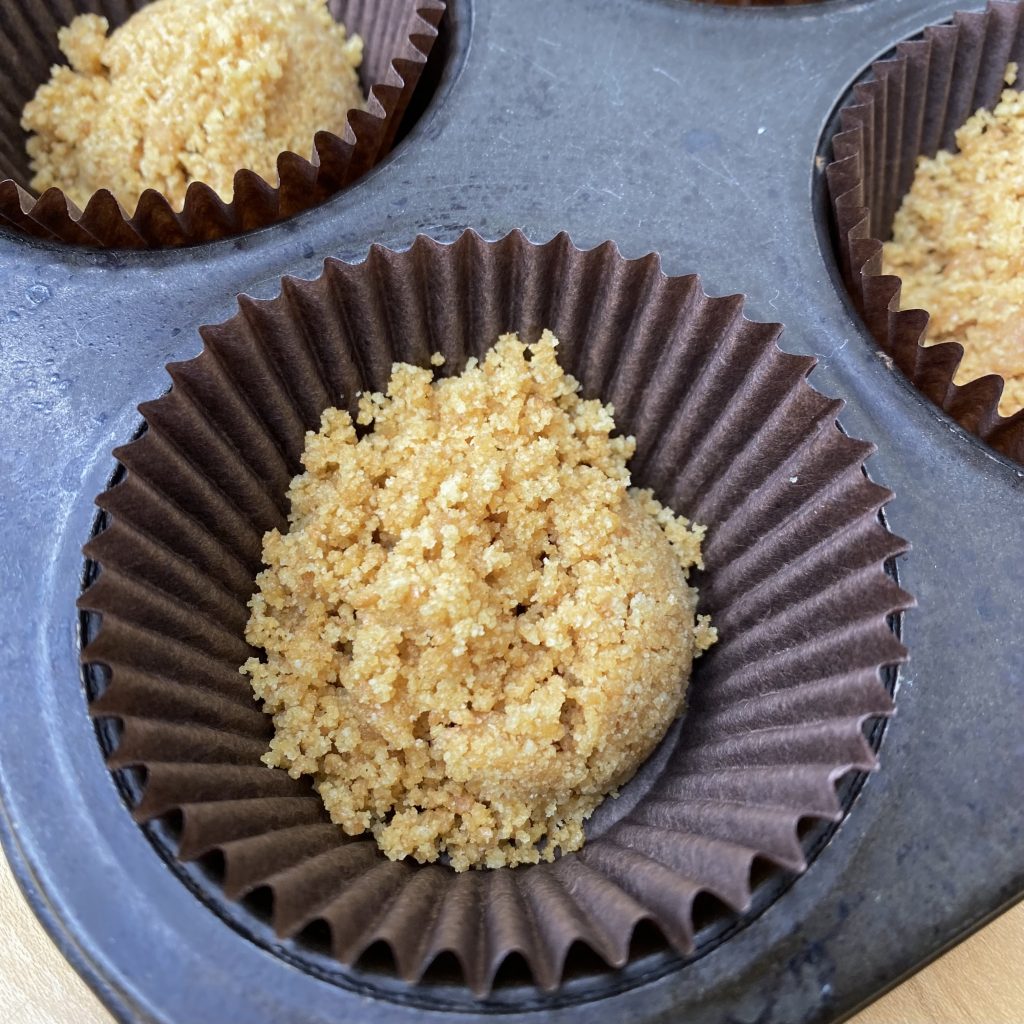
- Divide the mixture between the cupcake cases: Line a 12-hole cupcake tray with cupcake cases and divide the biscuit mixture evenly between them (this works out as a little over 1 tbsp per case). Use the back of a teaspoon, or the end of a small rolling pin, to press down on the bases to compact them. Make sure the bases are as compressed as possible, as this will ensure they hold together after baking.

And that’s it! Your buttery biscuit bases are complete. At this point, you can set them aside while you prepare the cupcake batter.
Making the Chocolate Cupcakes
The next step is to make the chocolate cupcakes. I like to use the All-In-One Method for making cake batter because it is just SO easy, but you can use the more traditional-creaming method using the exact same ingredient quantities listed in the recipe, if you prefer. I have used both methods in previous posts here on the blog, so you can check those out if you would like a more in-depth explanation of either one:
This chocolate cupcake recipe is super basic, but I have made a few modifications to my standard chocolate cake recipe, to really heighten the chocolate-y flavour:
- Additional cocoa powder: This recipe uses a cocoa powder:flour ratio of just over 1:3, which is pretty high! You still get a lovely, fluffy and well-risen cake, but it has a super chocolatey flavour.
- Salt: You only need a pinch of salt, but it really does enhance the chocolate flavour.
- Vanilla extract: My biggest pet peeve is when you buy a chocolate cake from a shop and it tastes more like vanilla than it does chocolate. WHY?! However, the pro bakers are (unsurprisingly) right when they tell you that vanilla actually enhances chocolate flavour- you just have to use it in moderation. A small splash is all you need for super chocolate-y, not vanilla-y, cupcakes.
- Hot coffee: Coffee is another ingredient that really enhances the flavour of chocolate. You only need a little coffee for these cakes, but it makes a world of difference. I like to use hot coffee because a) I’m too lazy to wait for it to cool and b) when I was younger I watched Nigella make a Devil’s Food Cake with boiling water on the Food Network and it changed my life. Using brewed coffee, rather than espresso powder/instant coffee granules will not only make sure your cake has a super smooth texture, it will also ensure you get the best flavour out of the coffee. You can either use coffee made from a coffee machine or you can make exactly the amount you need using boiling water and instant coffee granules. To do that, just add 1 tbsp of boiling water to 1/8 tsp instant coffee granules and stir to dissolve.
These adjustments are only small, but they make SUCH a difference. Truly, this is my go-to chocolate cake recipe now. It’s SO good.
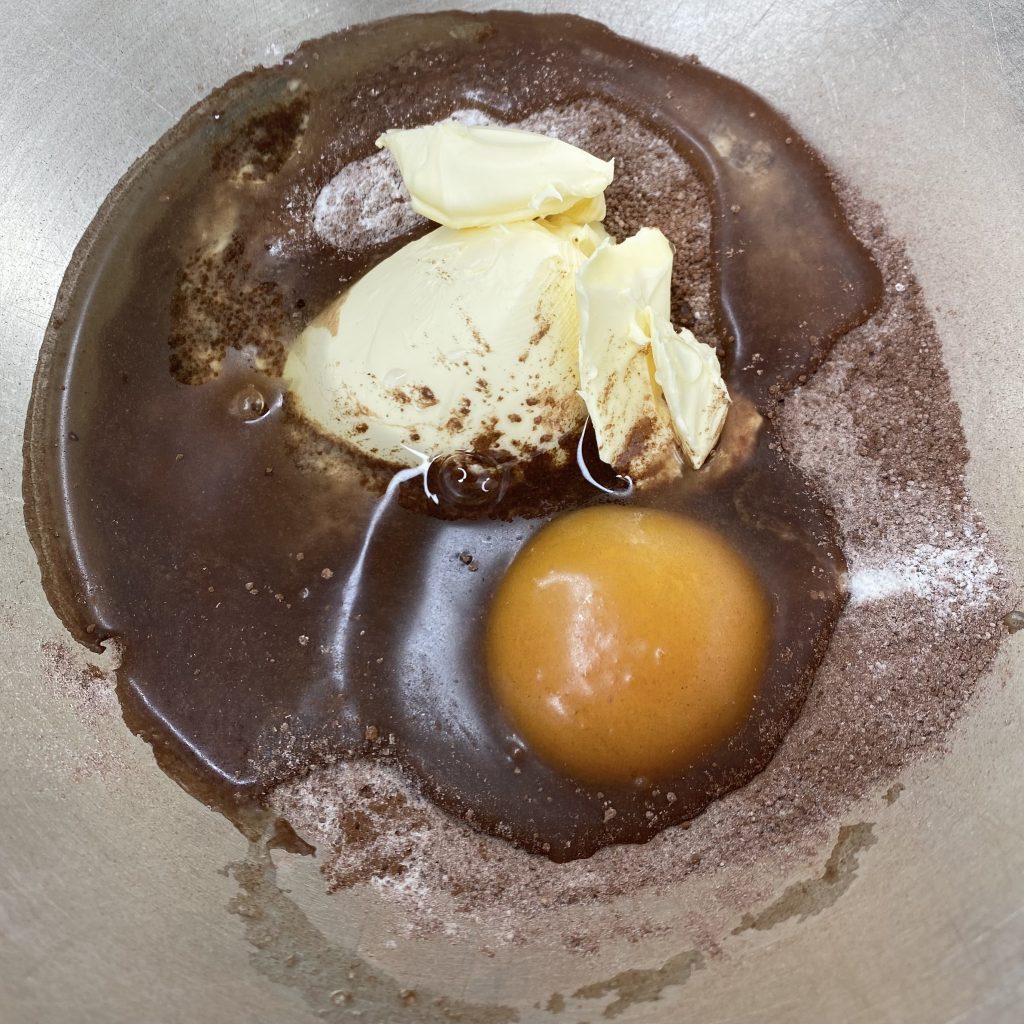
As I said, today I’m using the All-In-One Method to make this batter. For this, you just need to put all of the batter ingredients (EXCEPT the coffee- more on that in a second!), making sure to sift all of the dry ingredients beforehand, into the bowl of a stand mixer (fitted with the whisk attachment) and mix on low speed to incorporate everything. The reason you want to leave out the coffee initially is that it is hot and you don’t want to risk cooking the eggs! Wait until the eggs have incorporated into the batter, then add the coffee, turn the mixer up to full speed and beat for about 30 seconds, until the batter is light and fluffy. You’ll need to scrape down the sides of the bowl, intermittently, throughout the whole process, just to make sure everything is fully incorporated.
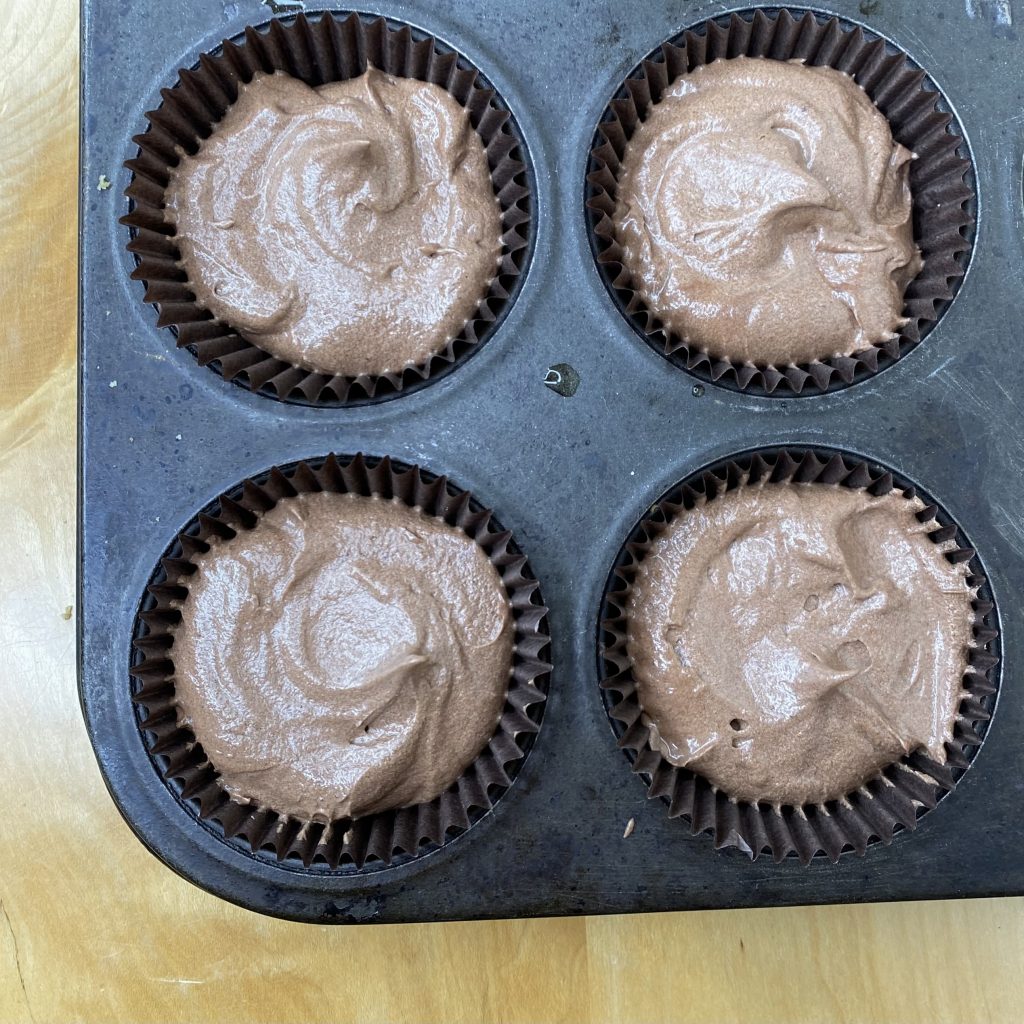
Once your batter is ready, you can divide it between the cupcake cases, dolloping it right on top of the buttery biscuit bases you just made. You can use two spoons to divide up the batter, but I like to use a regular-sized ice cream scoop (about 2 1/2 inches in diameter). This allows me to divide up the batter super quickly, but also makes sure that all of the cupcakes are even- which is a win in my book! Your cupcake cases will be filled a little higher than normal- about 3/4 of the way up, but don’t worry! That’s just because of the biscuit base on the bottom.
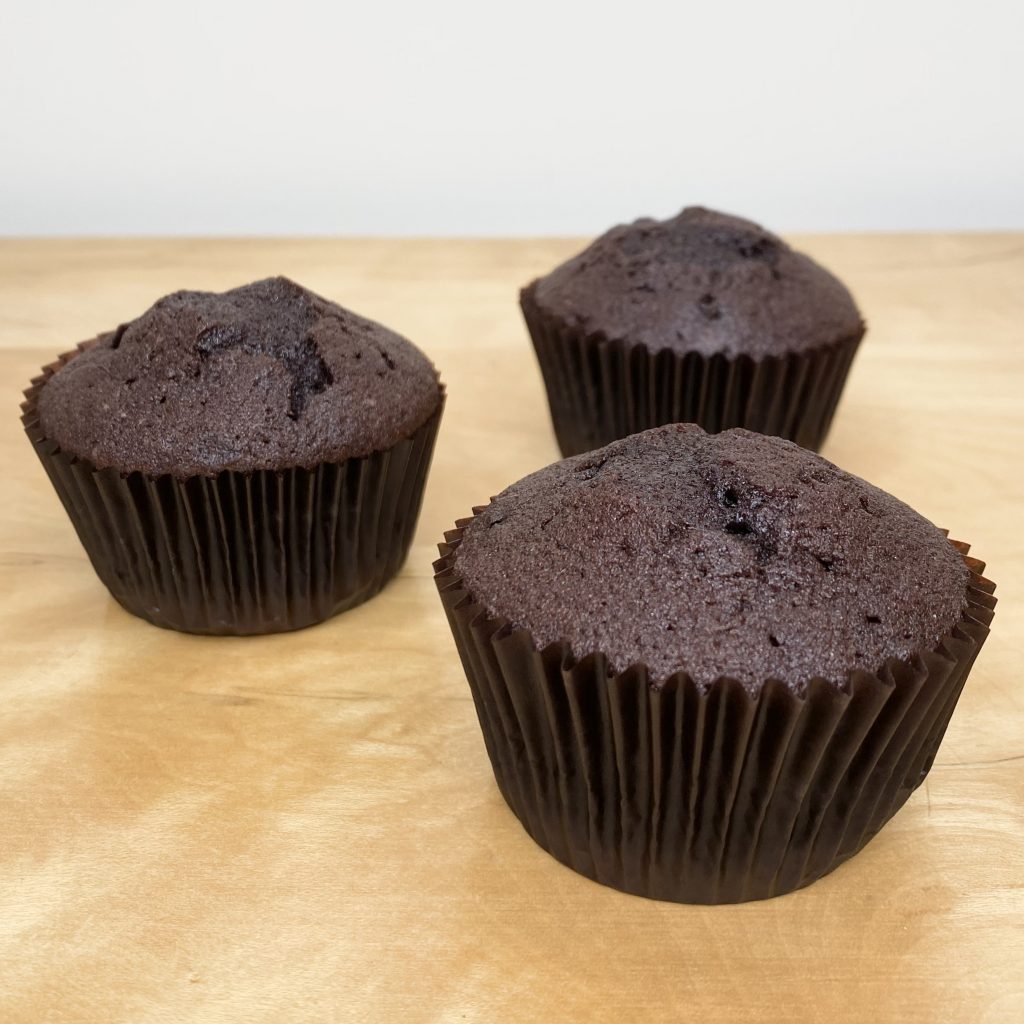
Bake the cakes at 170°C for 25-30 minutes, until they spring back when touched gently. As always, I like to remove my cakes from the tin and transfer them to a wire rack as soon as they come out of the oven, to prevent the cases from becoming greasy. If you do this, just remember to be careful, because both the cupcakes and the tray will be very hot. Be particularly careful with these cupcakes, because the buttery biscuit bases will be a little fragile when the cakes are still warm. Try not to smack the tray down or place the cupcakes down too heavily!
Make sure to let the cupcakes cool completely before decorating them- this is always important, but particularly so for this recipe, because we will be topping them with ice cream!
Making the Marshmallow-y Meringue Icing
This icing is one of my most favourite things in the whole world. It tastes just like a marshmallow, it has the consistency of a fluffy meringue icing, it holds its shape perfectly (which is ideal for getting those pretty ridges that brown up so beautifully) and, surprise surprise, it’s another Cupcake Jemma recipe. Well, kind of. I’ve noticed some slight variations in ingredient quantities across the iterations of this recipe on Cupcake Jemma’s YouTube channel & various cookbooks and it was making me so CONFUSED! As a result, while the basic recipe concept is from Cupcake Jemma, I have adapted the quantities myself to achieve my ideal Marshmallow-y Meringue Icing recipe, that I can come back to whenever I need, without getting confused.
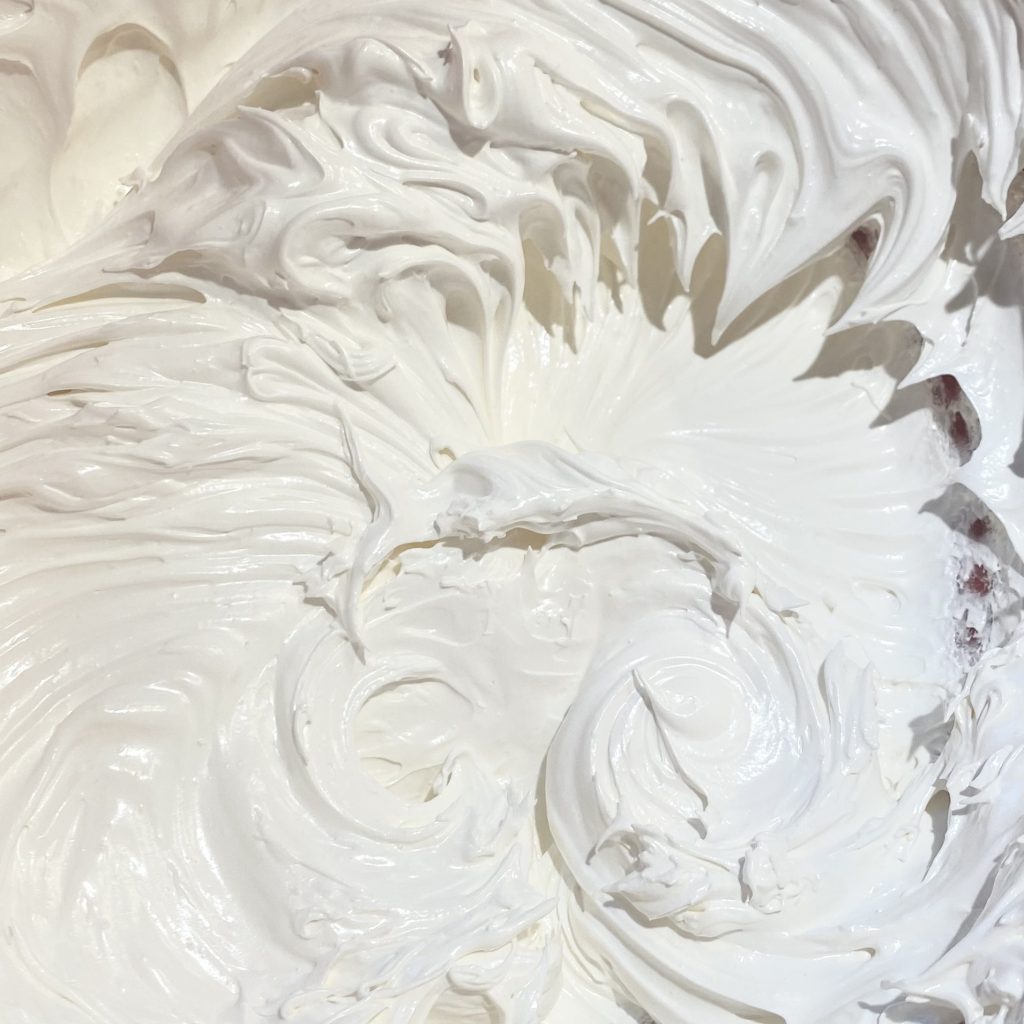
This meringue is kind of like a spin on the classic Swiss Meringue icing. The main difference is that, while with Swiss Meringue, you heat the egg whites and sugar over a double boiler, then remove it from the heat before whisking, with this recipe, you whisk it right over the heat. It requires a little bit more of an arm workout, but it also makes for such a fluffy icing. I’m a big fan. This recipe also includes cream of tartar and golden syrup- both of which help to stabilise the meringue and help it to hold its shape. I think there’s something in the US called ‘Seven-Minute Frosting’, which, from what I can tell, is very similar to this Marshmallow-y Meringue Icing. This variation just seems a little stiffer, which makes it perfect for these cupcakes.
This icing is deceptively simple to make, but it does, unfortunately, require a little bit of elbow grease, which is ironic because you use an electric hand whisk for the whole thing. However, you do end up whisking it for 6-8 minutes straight, in total, and take my word for it, you’ll be feeling it when the time is up. On the bright side, perhaps if we all make this icing enough we’ll finally be able to execute an adequate overhand throw! (Please, do not tell me if the overhand throw is just a struggle for me, I need solidarity right now). Anyway, I highly recommend setting a timer for the whisking stages, or you might be inclined to stop too early.
For the icing, you need the following ingredients:
- Egg whites
Serendipitously, this icing uses the exact number of egg whites as the number of yolks used in my Salted Caramel Ice Cream recipe. That means, if you’re clever about it, you can use the yolks for the ice cream, save the whites for the icing and use all the eggs up completely! This is a huge win for me, because leftover yolks/whites are the continual bane of my existence.
- Caster sugar
Yes, it’s a lot. No, I do not recommend eating this cupcakes if you are trying to cut down on your sugar intake.
- Golden syrup
I know that it sounds like a lot of golden syrup (150g), but, in reality, that works out at about 7 1/2 tbsps, which (I feel?) sounds much less horrifying.
- Cream of tartar
Please don’t be tempted to substitute baking powder/baking soda- not only would it not work, but it would be downright icky. Cream of Tartar helps to give the meringue icing structure and stability, which will help you get those clean ridges when you pipe it, which will really stand out when you torch the meringue.
- Fine sea salt
This icing is kind of salty, but in the best possible way? The salt counters the super-sweet vibe it has going on, making the whole thing much more balanced and infinitely tastier. Make sure to use fine salt, otherwise it might not dissolve fully in time and your icing won’t be silky smooth.
- Water
I’ve listed this in the recipe ingredients, against tradition, because I always seem to forget it if I don’t! You need the water to help everything combine and melt together easily.
- Vanilla extract
This is quite a lot of vanilla extract, but it’s really important for ensuring that this icing really tastes like marshmallow. Vanilla is the main flavour in store-bought marshmallows, so its important to get that flavour across in this homemade tribute to them.
To make the icing, you just need to put all of the ingredients (except the vanilla- vanilla has the best flavour when it has not been heated, so you want to leave it out at this point and add it after the icing comes off the heat) into a large, heatproof bowl. Set the bowl over a pan that has about an inch of barely simmering water in the bottom and keep the whole thing over a low heat, so that the water stays barely simmering. While the bowl is over the heat, you need to be whisking constantly. Use an electric hand whisk on high speed.
After 5-7 minutes of whisking over the heat, your icing should be opaque, holding stiff peaks and all of the sugar should be dissolved. You can check to see if the sugar is dissolved by picking up a small amount of icing on your (clean, obviously) finger and rubbing it between your finger and thumb. If you can’t feel any sugar granules, you’re good to go! Take it off the heat and stop whisking as soon as the sugar has dissolved- while it would take a long time, you can over-whisk this icing. All meringue reaches a point where it stops getting stiffer and starts losing its shape instead- if this happens, you’ve over-whisked it and will need to start again :(. Don’t worry though, you’d have to whisk for about 15 minutes or so before that happens!
Also, no, I do not want to talk about how I know that/why I was whisking it for 15 minutes. I am still haunted by the experience.
With the icing off the heat, you can add the vanilla extract. Beat the whole thing for a further minute, to incorporate the vanilla, help the icing to cool down a little and make sure it holds it shape perfectly.
Once the icing is ready, transfer it to a piping bag, fitted with a large, open star tip, ready to decorate. You can use any piping tip you want, but I like to use this one, because the ridges lend themselves very well to being toasted!
Decorating the Cupcakes
Now comes the part where you need to be pretty speedy: assembling the cupcakes. Essentially, there are 4 steps involved in decorating these cupcakes:
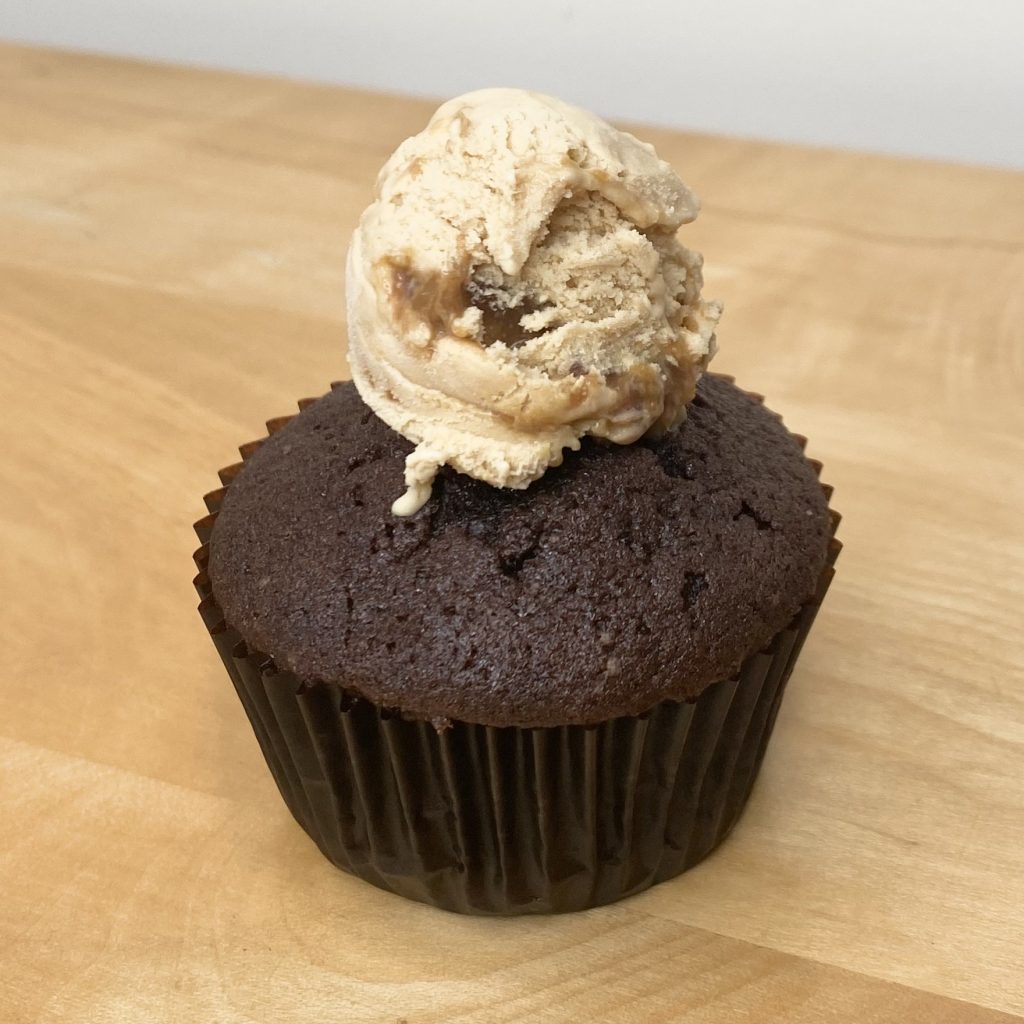
- Add a scoop of salted caramel ice cream to the top of each cupcake:
I like to use a 1 1/2-inch diameter ice cream scoop for this. A regular-sized ice cream scoop would be too big, as you need space to pipe the icing around the base of the ice cream. If you don’t have a smaller scoop, you could use a dessert spoon to make a similarly sized ball. Make sure the ice cream ball is centred on top of the cupcake, or your icing will look askew!
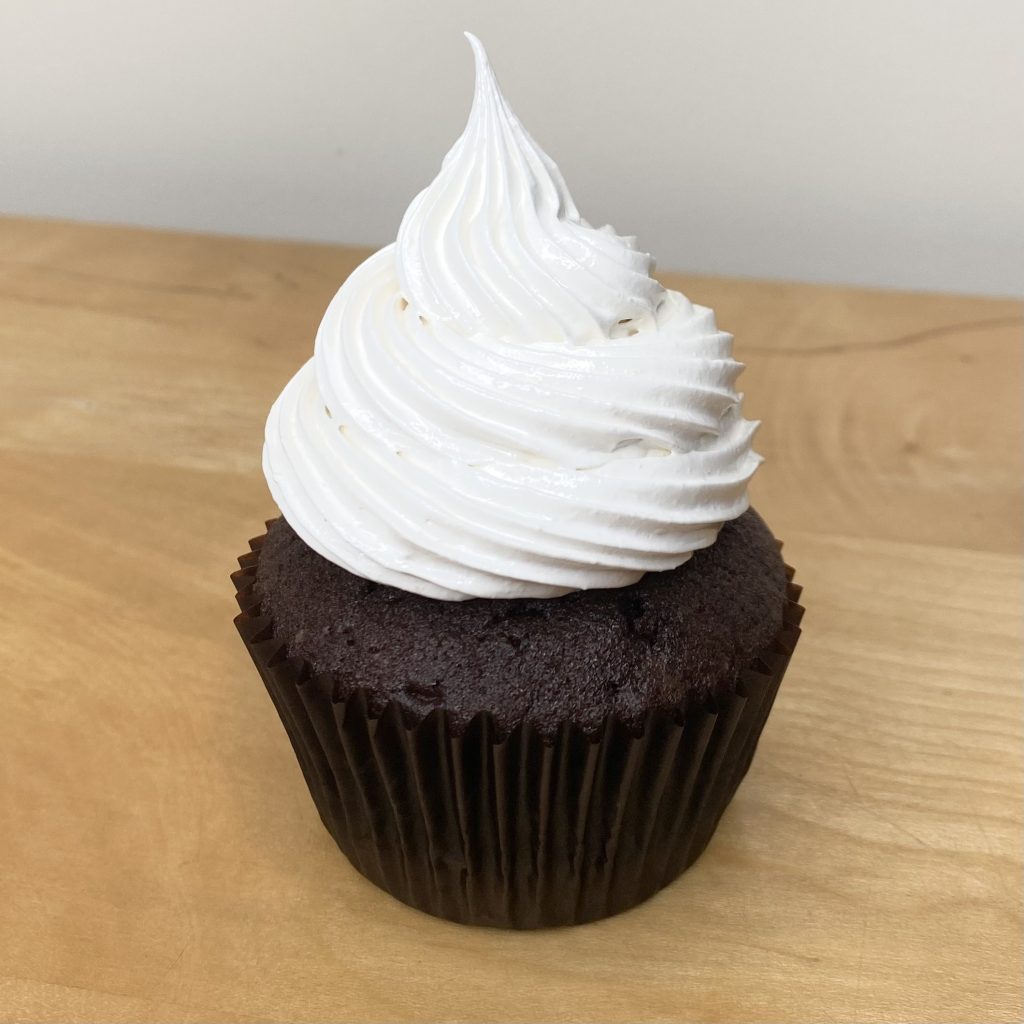
- Pipe a swirl of Marshmallow-y Meringue Icing onto each cake, surrounding the ice cream scoop:
Holding the bag vertically, pipe a circle around the base of the scoop. When you come back to the beginning of the circle, keep applying pressure and raise the bag slightly as you move around, so that you are piping a continuous spiral, which fully encloses the ice cream. Keep going around in a spiral, gradually moving into the centre once you pass the top of the ice cream, until you reach the top, then stop applying pressure to finish off the spiral.

- Toast the marshmallow-y meringue icing:
There are a couple of different ways you can do this:
A) Use a blow torch: This will give you lots of control and will allow you to toast the sides evenly- I think it makes for the most attractive end result, but it does require you to actually own a blow torch.
B) Grill the cupcakes: This is a more accessible method, but you won’t be able to brown the sides of the icing- only the top. I recommend assembling your cupcakes on a baking tray, then putting the whole thing under a hot grill for about 2 minutes, until the meringue has browned in a few spots.
C) Bake the cupcakes: This is another more accessible method but, while it will brown the sides of the icing a little more, it won’t achieve the same toasty colour as the other methods- you’ll end up with a more uniform, but significantly paler meringue. Like the grilling method, I recommend assembling your cupcakes on a baking tray, then baking them in the oven at 230°C for 2-3 minutes, until the meringue is golden.
For the last two methods, make sure your oven/grill is fully up to temperature before you assemble your cakes, so that your ice cream does not melt before the cakes have a chance to go in the oven.
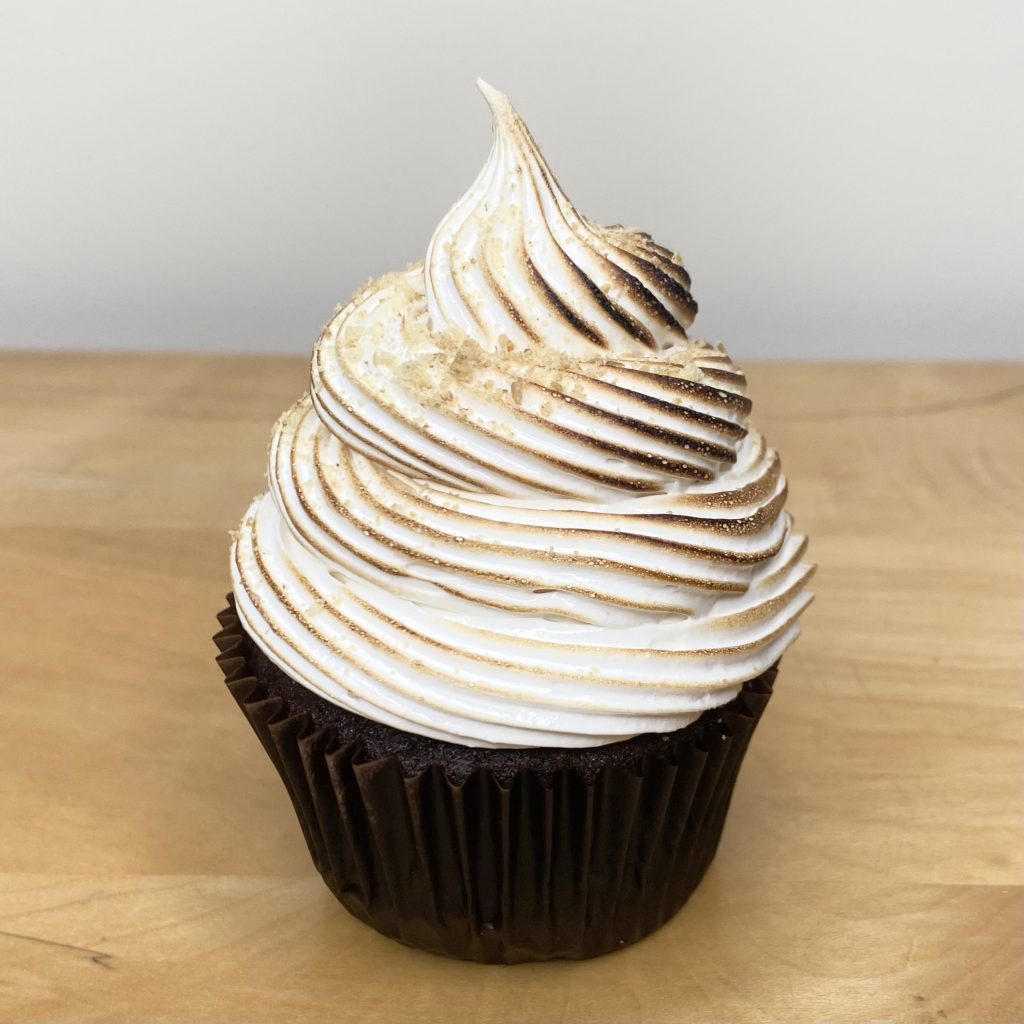
- Sprinkle the cupcakes with digestive crumbs:
Sprinkle the reserved digestive crumbs on top of the toasted cupcakes, making sure to work quickly. Serve immediately.
The common theme throughout all of these steps is to work quickly! While the meringue does act as an insulator to the ice cream, which will help to prevent it from melting quite as quickly as usual, there is only a small amount of ice cream on top, so it will still melt more quickly than your typical Baked Alaska. Don’t fret though, I have a few tips for making these ahead/minimising the last minute stress of assembling these cakes, which you can read about in the next section.
Notes on Making Ahead/Serving
I recognise that assembling and serving these cupcakes can seem like quite an intense process, because the ice cream is, frankly, a liability (sorry, ice cream, I still love you). Admittedly, I do not recommend attempting to serve these cakes to a large crowd, or at an event where it would not be possible to assemble things last minute. However you approach making these cakes, there will always be some last minute faffing about- alas, it is the nature of the Baked Alaska. However, I do have a few tips/recommendations for making the separate components ahead/making the process a little less last-minute heavy:
- The cakes (along with their buttery biscuit bases) can be made 2-3 days in advance- just keep them, undecorated, in an airtight container until you’re ready to serve.
- Store the extra digestive crumbs in an airtight container until you’re ready to decorate.
- If you’re making your own ice cream from my recipe, you can make this up to 3 months in advance and keep it in the freezer until you’re ready to decorate the cupcakes.
- You can pre-scoop the ice cream balls to save time during assembly. 1-3 days before you plan to assemble the cakes, scoop out 12 ice cream balls and place them on a lined baking tray. Put the whole tray into the freezer and leave it until you’re ready to assemble. When you come to decorate the cakes, just pop one of the pre-scooped balls onto each cupcake as normal.
- The marshmallow-y meringue icing is best made fresh, but if you’re truly desperate you can make it in advance, cover it with cling film and store it in the fridge for up to 2 days. Give it a quick beat before using it, then decorate the cakes as normal.. You might notice a slight difference in the texture, but it will still taste delicious!
And those are my ‘Snow on the Beach’, Salted Caramel S’mores Baked Alaska Cupcakes. They are really, truly, honestly, DELICIOUS. If you make them, I’d love to hear about it! Let me know in the comments.
Gemma
xxx
Recipe
Snow on the Beach Cupcakes
Equipment
- 2 1/2-inch diameter ice cream scoop (optional)
- 1 1/2-inch diameter ice cream scoop
- Blow torch (optional)
- Electric hand whisk
- 1 Piping bag, fitted with a large, open star tip.
Ingredients
For the Digestive Base:
- 150 g digestive biscuits (about 10 standard digestives) (see Note 1).
- 45 g unsalted butter, melted
- 1 tbsp golden syrup
For the Chocolate Cupcakes:
- 150 g caster sugar
- 110 g self-raising flour
- 40 g cocoa powder
- 1 tsp baking powder
- 1 pinch salt
- 150 g Stork (see Note 2).
- 3 eggs
- 1 tbsp brewed coffee (see Note 3).
- 1 splash vanilla
For the Marshmallow Icing:
- 3 egg whites
- 255 g caster sugar
- 150 g golden syrup
- 3/4 tsp cream of tartar
- 1/8 tsp fine sea salt
- 3 tbsp water
- 1 tsp vanilla extract
To finish:
- Salted caramel ice cream (see Note 4).
Instructions
- Preheat the oven to 170°C. Line a 12-hole cupcake tray with dark brown cupcake cases and set aside.
Make the buttery biscuit bases:
- Use a food processor to grind the digestive biscuits into a fine, sand-like texture (you could also use a rolling pin to bash the biscuits, but make sure they are finely ground). Remove 15g of the ground biscuits and set aside for decoration later. Tip the remaining biscuit crumbs into a bowl, along with the butter and golden syrup. Mix well, until all of the ingredients are well incorporated. The mixture should look like slightly damp sand, and hold together if you compress it with the back of a spoon.
- Divide the biscuit mixture between the 12 cupcake cases (a little over 1 tbsp per case). Use a teaspoon/the end of a small rolling pin to compact the biscuit base as much as possible. Set the tray aside while you make the cake batter.
Make the chocolate cupcake batter:
- Sift the caster sugar, self-raising flour, cocoa powder, baking powder and salt into the bowl of a stand mixer. Add the Stork (or softened, unsalted butter, if you are using that), the eggs and the vanilla extract, then, using the whisk attachment, beat on medium/low speed until the ingredients are just incorporated.
- Add the hot coffee, then beat on full speed until the mixture is light and fluffy- about 30 seconds.
- Divide the mixture evenly between the 12 cupcake cases (I like to use a regular-sized ice cream scoop for this), then bake in the preheated oven for 25-30 minutes, or until the cupcakes spring back when touched gently.
- When the cupcakes are baked, carefully remove them from the tin and transfer to a wire rack as soon as they come out of the oven. This will prevent the cupcake cases from becoming greasy. Allow to cool completely before decorating.
Make the marshmallow-y meringue icing:
- Place of all the ingredients for the icing, except the vanilla extract, into a large, heatproof bowl. Set the bowl over a pan of barely simmering water and, using an electric hand whisk, beat on high speed for 5-7 minutes, or until the mixture reaches stiff peaks and all of the sugar has dissolved- you should be able to rub the mixture between your thumb and index finger and not feel any grains of sugar.
- Turn off the heat and remove the bowl from the pan. Add the vanilla extract, then beat on high speed for a further minute off the heat.
- Transfer the icing to a piping bag, fitted with a large, open star tip and set aside while you get everything ready to decorate the cupcakes.
Decorate the cupcakes:
- If you plan to grill the cupcakes instead of blowtorching them, turn the grill on now, to give it time to heat up. If you would prefer to bake the cupcakes, preheat the oven to 230°C. Do not start assembling your cupcakes until the oven has come to temperature (if you plan to use a blowtorch to brown the meringue, skip this step). If you plan to use the oven to brown the meringue, I recommend assembling your cupcakes on a baking tray, so that you do not have to transfer them all in and out of the oven individually.
- Working quickly, place a small scoop of ice cream on top of each cupcake, making sure it is centred. Immediately pipe a swirl of Marshmallow-y Meringue Icing around the ice cream scoop, making sure it is completely covered.
- At this point, either carefully blow torch the meringue (try to evenly brown all of the sides!), or transfer them to the preheated oven/grill for 2-3 minutes, until the meringue is slightly toasted. Sprinkle with the reserved digestive crumbs, then serve immediately, before the ice cream melts!
Notes
- I live in the UK, so I use digestives for my S’mores-inspired baked goods. If you live in a country where Graham Crackers (the more traditional biscuit used for S’mores) are readily available, feel free to use them instead, You only need 135g of biscuits for the buttery biscuit base, but I like to save some digestive crumbs to decorate the finished cupcakes with. I only used a little, so 1 extra digestive was fine for me, but if you want more digestive decoration, feel free to add more! Just make sure that you use 135g of digestives for the base, or the ratios will be off and your base may not hold together right.
- As always, I like to use Stork in place of butter when I make cakes, because I think it gives them a fluffier, moister crumb. If you would prefer to use butter, you can use an equal amount of softened, unsalted butter in place of the Stork.
- You can either use coffee straight from a coffee machine, or you can make exactly 1 tbsp using instant coffee granules: place 1/8 tsp instant coffee granules into a small bowl, then add 1 tbsp of boiling water and stir to dissolve.
- 1x batch of my Salted Caramel Ice Cream makes just a little more than you need for this recipe, but you can also buy any salted caramel ice cream from a store, if you prefer. You only need 1x small scoop per cupcake (about 1.5 tbsp), so you don’t need too much- an average pint will be plenty.