Update 6/2/24:

This recipe previously recommended baking the macarons at 165°C fan. I have recently started using a different oven and find that 160°C fan works better for my macarons now. I have updated the recipe to reflect this, but please feel free to use the original oven temperature if that worked for you.
We have already established here on the blog that I am a big tennis fan. Being from the UK, I am also, inevitably, a big Wimbledon fan. With Finals Weekend kicking off today, I wanted to make a cake to celebrate (& snack on while I’m watching the matches!).
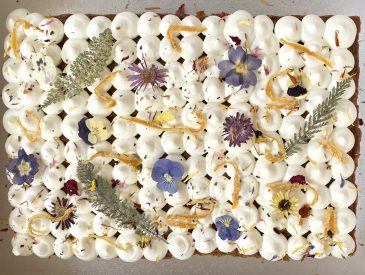
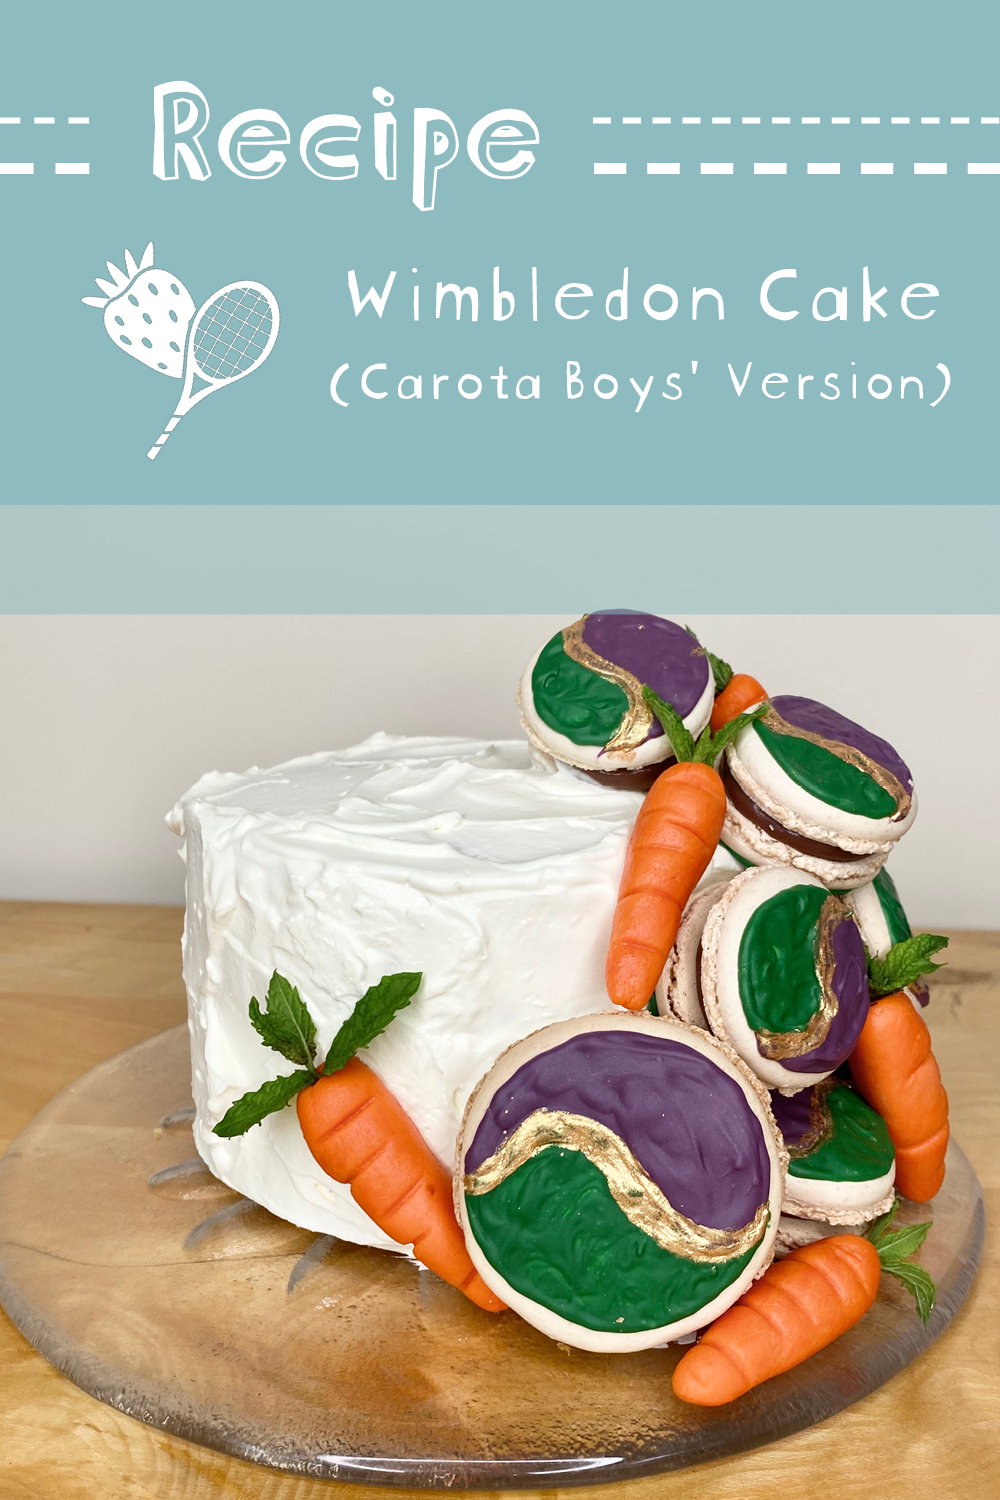
You may have noticed that this cake, which I am fondly dubbing my ‘Wimble-cake’, features carrots, rather than the iconic strawberries. Do not fret! I did not get my fruits & vegetables mixed up! The decoration for this cake is inspired by this photo:
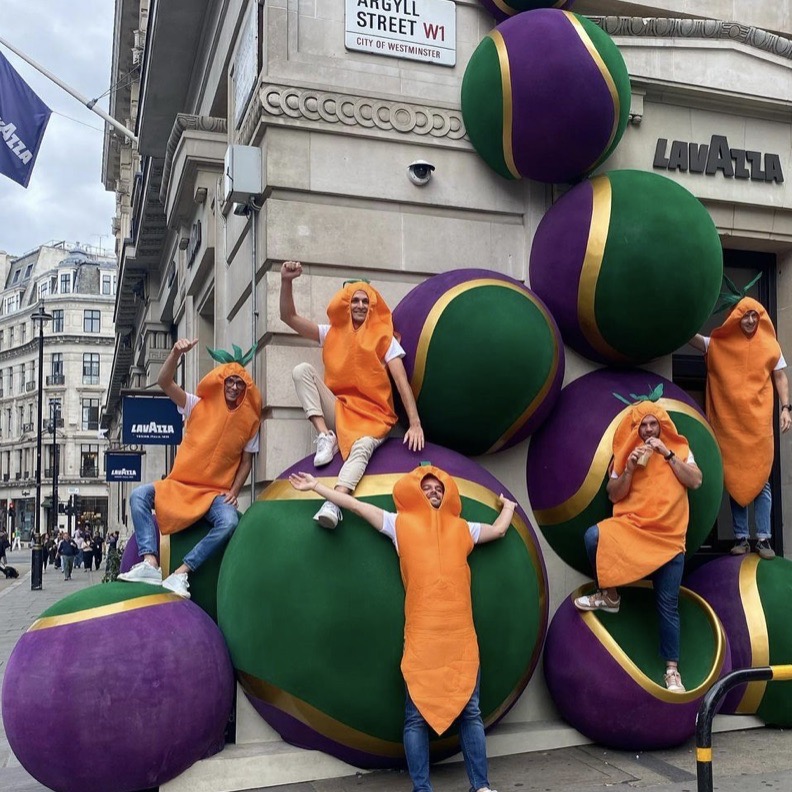
The Carota Boys are the (very devoted) fan club of the Italian tennis player (my favourite!), Jannik Sinner. They have been going to tennis tournaments around the world, dressed as, well, carrots, to show their support (it’s a long, bizarre and very niche story). Anyway, they make me laugh and I love them. When they attended Wimbledon last week, they took this photo outside the Lavazza flagship store. Obviously, my immediate reaction to seeing the photo was: “I could cake that!”. So I did.
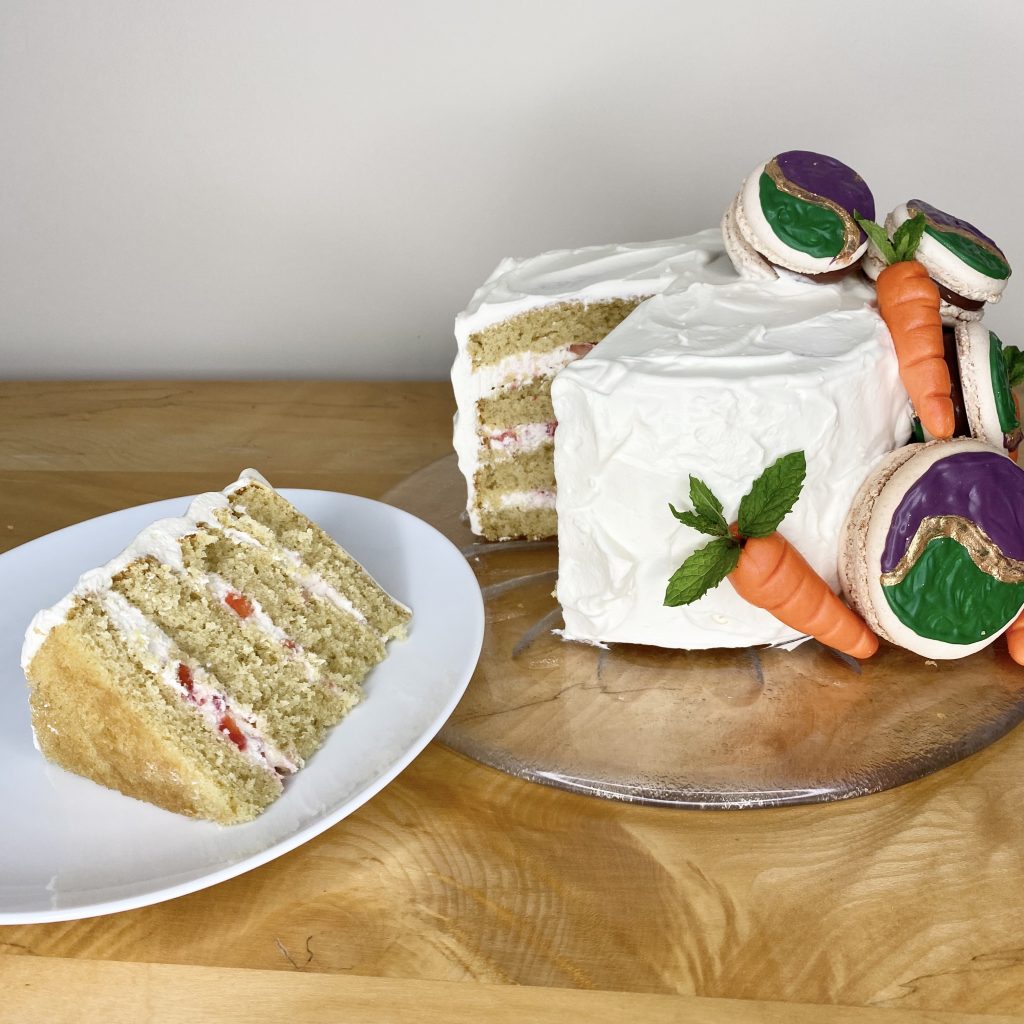
As always with my cakes, taste comes first. I put a lot of effort into making my cakes look nice, but I never want to make a cake that is all style over substance! My Wimble-cake, therefore, is a 4-layer, strawberries & cream cake, decorated with macaron tennis balls & marzipan carrots. Quick note though: if you did want a more traditional Wimble-cake, you could absolutely replace the marzipan carrots with marzipan strawberries for a more classic Wimble-vibe.
Let’s get into it, shall we?
Table of Contents
- Making the Macaron Tennis Balls
- Making the Marzipan Carrots
- Making the Vanilla Cake (All-In-One Method)
- Making the Strawberries & Cream Filling
- Assembling the Wimble-Cake
- Making the Whipped Cream Icing
- Decorating the Wimble-Cake
- Recipe
Making the Macaron Tennis Balls
These macaron tennis balls are just plain macarons, topped with coloured white chocolate & gold lustre dust, then filled with a milk chocolate ganache. For this cake, I made 6 standard-sized macarons (about 3.5cm diameter) and 1 large macaron (about 4.5cm diameter). To make these macarons, you will need the following ingredients:
- Ground almonds (macarons are almond cookies, so almonds are a must!).
- Icing sugar (one of the two types of sugar in Italian macarons).
- Egg white (for the amount of macarons you need to decorate this cake, you only need 2x15g portions of egg white. This works out to be just a little less than 1 egg’s worth of white in total. I find the easiest way to divide an egg white is to separate your egg slowly into a bowl that is set on a digital scale. When you hit 15g, switch in a new bowl and repeat the process. If you go a bit over, you can use a fork to take out a little white at a time, until you have the perfect amount!).
- Caster sugar (the second of the sugars! You need both, because they are used for different elements. The icing sugar is mixed into a paste with the almonds, while the caster sugar is combined with water and used to make a sugar syrup).
- White chocolate (you don’t need a lot of this, because we’re just adding a thin layer onto the top of each macaron, but I’d still recommend using a chocolate you like the taste of! We’ll be tempering this chocolate to ensure a snappy, shiny coating on each macaron).
- Purple and green food colouring (because we’ll be using these colourings to tint chocolate, you need to use an oil-based colouring. With other colourings, you won’t get an even colour and the consistency of your chocolate may be affected (it might even seize, if you use a liquid colouring!). I used the Colour Mill colourings and they worked perfectly. They achieved the most even colour I have ever managed with tinting chocolate!).
- Gold lustre dust (I used this lustre dust, from Sugarflair. When mixed with alcohol, lustre dust turns into a watercolour-esque ‘paint’, which can be applied directly onto baked goods).
- Vanilla extract (you need some sort of alcohol to mix with the lustre dust. While you can get special alcohol mixing solutions from specialist cake decorating stores, you can also use the much more readily available vanilla extract, which is made by macerating vanilla pods in, you guessed it, alcohol! Don’t bother using a super good quality extract though- it would be a bit of a waste, seeing as you don’t taste it and vanilla extract can get expensive!).
- Milk chocolate (we’ll be using the chocolate to make a ganache to fill the macarons with. If you prefer a dark/white chocolate ganache, go ahead and switch this milk chocolate out! You could also fill the macarons with cream, buttercream, jam, whatever takes your fancy.).
- Double cream (the other key ingredient for ganache- if you’re in the US, use heavy cream instead).
You will also need the following specialist equipment:
- 4x piping bags (you’ll need 1 piping bag for making the macaron shells, 1 for each colour of the white chocolate decoration and 1 for the chocolate ganache filling).
- 2x round piping tips (1x very fine, 1x medium) (you’ll use the medium tip for making the shells and filling the macarons, and the fine tip for decorating the shells with the chocolate. If you have multiple tips, you won’t have to do quite so much washing up as you go, but it’s not a requirement. If you do wash the fine tip between the chocolate colours, though, use warm water (cold water will set the chocolate!) and a reusable straw/piping tip cleaner brush, and make sure the tip is completely dry before you use it again- remember: chocolate hates water- it makes it seize!)
- Fine, food-safe paintbrush (we’ll use this to add the gold lustre dust paint onto the macaron shells. The finer the brush, the more control you’ll have over the placement of the gold line).
I already have a post here on the blog that details how to make perfect macarons, every time. You can find that here. For this post, we’ll focus on how to decorate those macarons to make them into these cute tennis balls. For this cake, I used a 1/2 batch of my macaron recipe, to make a total of 6 standard macarons and 1 larger macaron (12x standard halves and 2x larger halves). Bake up your macarons, as per the instructions in my previous post, and allow them to cool completely before proceeding. Then, you’re ready to decorate!
Melt, temper & colour half of the white chocolate purple: I have an in-depth tutorial for how I temper chocolate here on the blog. You can find that post here. When I’m colouring the chocolate as well, I like to add the oil-based colouring during the cooling stage. That way, there’s plenty of stirring ahead, during which that colour can get really well incorporated. Start with half of the chocolate and one of the two colours (I used purple first, but either is fine!), decorate with it, then we’ll come back and repeat the process for the other colour. That way, your chocolate won’t set before you get a chance to use it!
Put the purple chocolate into a piping bag, fitted with a fine round tip: You need to ensure that there are no unmelted bits of chocolate before you put it into the piping tip! Using a super fine tip will give you increased control and allow you to create more intricate shapes, but it also means that any tiny unmelted piece of chocolate will block the tip- not what you want at all. Make sure your chocolate’s smooth and you’ll have a much less stressful piping experience.
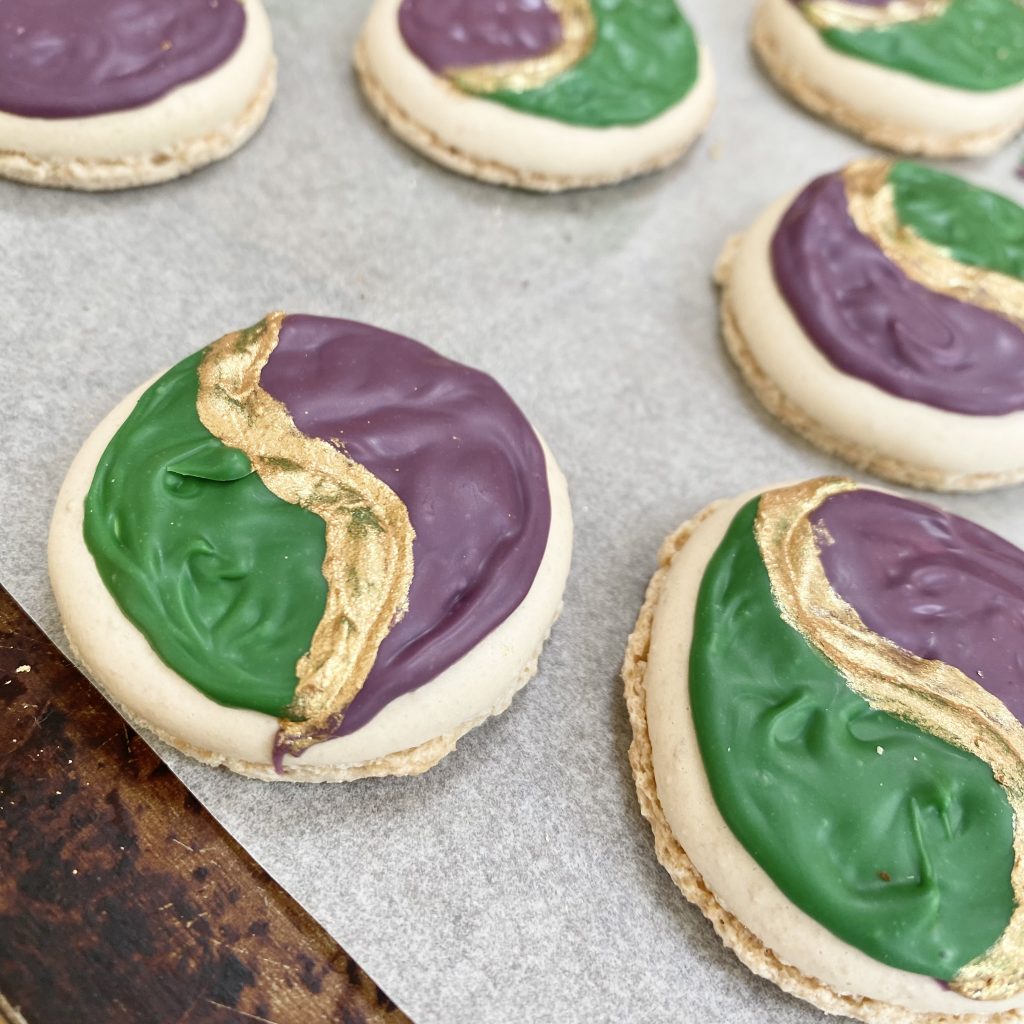
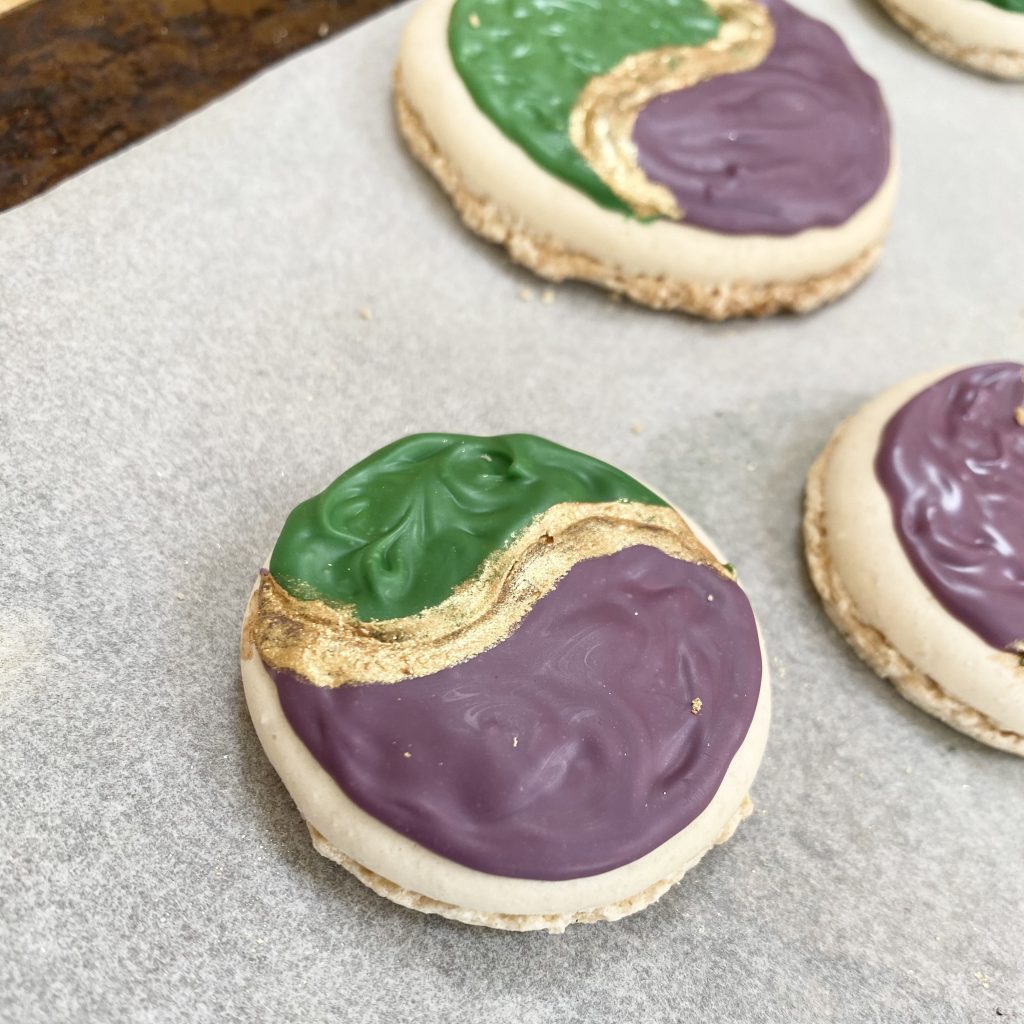
Pipe the purple chocolate onto the domed surface of each macaron shell: Pipe the outline of a curved teardrop shape (think half of the yin & yang symbol) on top of the macaron. Add a little more chocolate inside that outline (I like to zig zag from side to side a couple of times). Then, using the point of a small, sharp knife, or a cocktail/skewer, push the chocolate to meet the outline, so that you are left with a very thin, smooth & even layer of chocolate, covering half of the macaron. Repeat for all of your macaron halves, then set aside while you deal with the green chocolate.
Repeat the process for the green chocolate: Melt, temper & colour the remaining half of the white chocolate green. Put it into another piping bag fitted with the fine, round tip, then pipe it onto the macarons. Follow the curve of the centre line, making sure the green chocolate touches the purple chocolate, the finish off the circle around the edge. Fill in this outline as before. You should now have a full circle of thin chocolate on top of each macaron shell, half purple, half green. Allow these to set at room temperature until hard.
Mix up your lustre dust ‘paint’: Add a generous amount of gold lustre dust to a small bowl. Add the vanilla extract, a few drops at a time, and mix until you achieve a smooth, fluid consistency. Use a fine paintbrush to paint the gold colour directly into the seam between the two colours, following the curve, right across the middle of each ‘tennis ball’. Let this dry before sandwiching your macarons.
After that you just need to fill and sandwich your macarons! I have the best results when I make the ganache the day before and allow it to firm up in the fridge overnight. You can spread it on your macarons with a knife or spoon, but I like to pipe it. If you are piping it, use a medium round nozzle. It will be a little tricky to pipe at first (because it will be quite firm), but you can use scissors to ‘snip off’ the ganache (a bit like a churro!) if you’re struggling to finish it off. The ganache will warm up super quickly under the heat of your hands though, so try to pipe your macarons quickly, otherwise things will get messy!
Once your macarons are sandwiched, keep them in the fridge until you’re ready to decorate the cake.
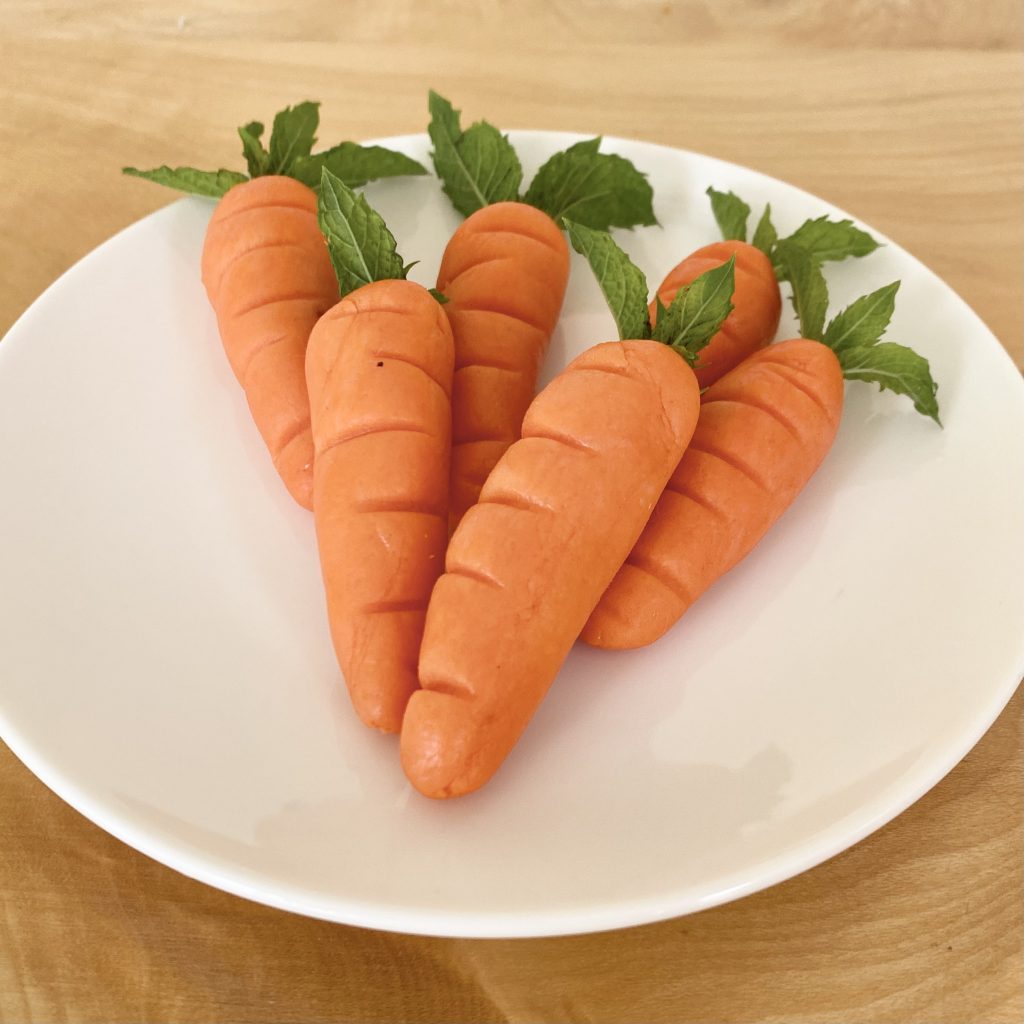
Making the Marzipan Carrots

As marzipan vegetables go, carrots are one of the most straightforward- they are essentially just a slightly tapered log! To make your own marzipan carrots, you’ll need the following ingredients:
- Marzipan (I used store-bought, but you can make your own. Using a white marzipan will give you more control over the final colour, but, because you’ll be dying it orange, you can absolutely get away with a golden marzipan).
- Orange food colouring (I used Colour Mill, in the shade Orange).
- Mint leaves (ideally, you want to pick off the very top of the stems, so that you have several smaller leaves, connected by a single stem: aim to keep the stem about 1-2cm long, so you can poke it into the marzipan more easily).
- Icing sugar, for dusting
You’ll also need the following equipment:
- Baking paper (this will protect your countertop from the food colouring, which can (and will) stain).
- Food-safe disposable gloves (this will protect your hands from the food colouring- trust me, you don’t want to skip them!).
- A dinner knife (you’ll be using the flat edge to make indents horizontally along the carrots).
- A chopstick, or other similar item (this is to make the round indent on the top of each carrot- use whatever you have around that is about the right size! I used the end of the paintbrush that I used for the gold lustre dust).
- A cocktail stick (this will be helpful when you are inserting the mint leaves into your carrots).
When you have everything assembled, you can start making your carrots!
Prep your area and ingredients: You want to start out by spreading a piece of baking paper out on your worksurface. Dust it with icing sugar, then break off enough marzipan for all of your carrots (I made mine about 12g each and made 6 carrots in total, but you can make your carrots smaller/bigger, if you prefer).
Colour your marzipan: Put your gloves on and knead the marzipan, until you have a smooth ball. Make a dent in the centre of the ball and add several drops of food colouring into it. Keep kneading the marzipan, working the colour in as you go, until you have an even colour throughout.
Divide your marzipan into equal portions: Cut your marzipan into 6 equal portions (if you want to make more/fewer carrots, you’ll need more/fewer portions!). Roll each portion into a ball.
Form the carrot shape: Roll each ball into a log. Apply more pressure to one end as you roll, to taper it slightly.
Add some detail: Use the flat side of a dinner knife to make horizontal indents all the way up the carrots, rolling the carrot as you go, so that the marks go around the carrot. Use a chopstick (or similar utensil) to make a round indent in the top of the carrot.
Add the carrot tops: Poke a little sprig of mint into the indent on top of each carrot. This is easier to do while the marzipan is still soft, but the mint will wilt if left too long. I recommend allowing your carrots to harden up for at least a few hours (this will prevent the orange colour from coming off on your hands!), then using a cocktail stick to make an incision in the top indent, which you can then push your mint sprig into.
And there you have it! Marzipan carrots, all ready to go. As I said earlier, if you want a more traditional Wimble-cake, you can absolutely make marzipan strawberries, instead of carrot (though you will need red food colouring, instead of orange!) I would suggest adding sesame seeds (to mimic the strawberry seeds) and keeping the mint leaves on top.
Making the Vanilla Cake (All-In-One Method)
For this cake, I kept things super simple with a plain, vanilla cake. Growing up, my mum always swore by Mary Berry’s All-In-One method for making sponge, and, now that I am older, I can totally see the appeal. It’s quick, easy, and incredibly low-fuss. With this method, I can get a cake in the oven in less than 10 minutes! It’s perfect for when you just want delicious cake, now, but it’s also great for recipes like this, where the decorations take a little while to create and you don’t want to use up too much energy making the cake! For the sponge, you will need:
- Stork (if you’ve read my cake recipes before, you’ll know that I prefer to use Stork baking margarine for a moister, fluffier cake. If you don’t want to use Stork, you can substitute it for the same quantity of softened unsalted butter).
- Eggs (I always use large eggs in my baking).
- Self-raising flour (self-raising flour helps these cakes to rise. If you don’t have any, you can substitute plain flour. You’ll need to add an extra 1 1/2 tsp of baking powder though, to substitute the leavening agent included in self-raising flour).
- Caster sugar (I like to use golden caster sugar, because I like the flavour, but you can use white if you prefer).
- Baking powder (this will help your cake to rise. This is a particularly key ingredient when you’re using the all-in-one method, because there is no creaming stage to incorporate extra air).
- Milk (ideally, you want to use full fat milk for this recipe. However, I usually only have skimmed milk on hand, so I always use that- it works out fine!).
- Vanilla extract (use a good quality vanilla extract- it’s the only flavouring in the cake!).
The method seems like it shouldn’t work, but it really does! You literally put all of the ingredients for the sponge in the bowl of an electric mixer, fitted with a whisk attachment. You mix on medium-low speed to incorporate the flour (no flour-clouds here, please!), then turn up the speed to high and whisk until you have a smooth, airy batter- about 1 minute. I took some progress photos to show you what you’re aiming for:
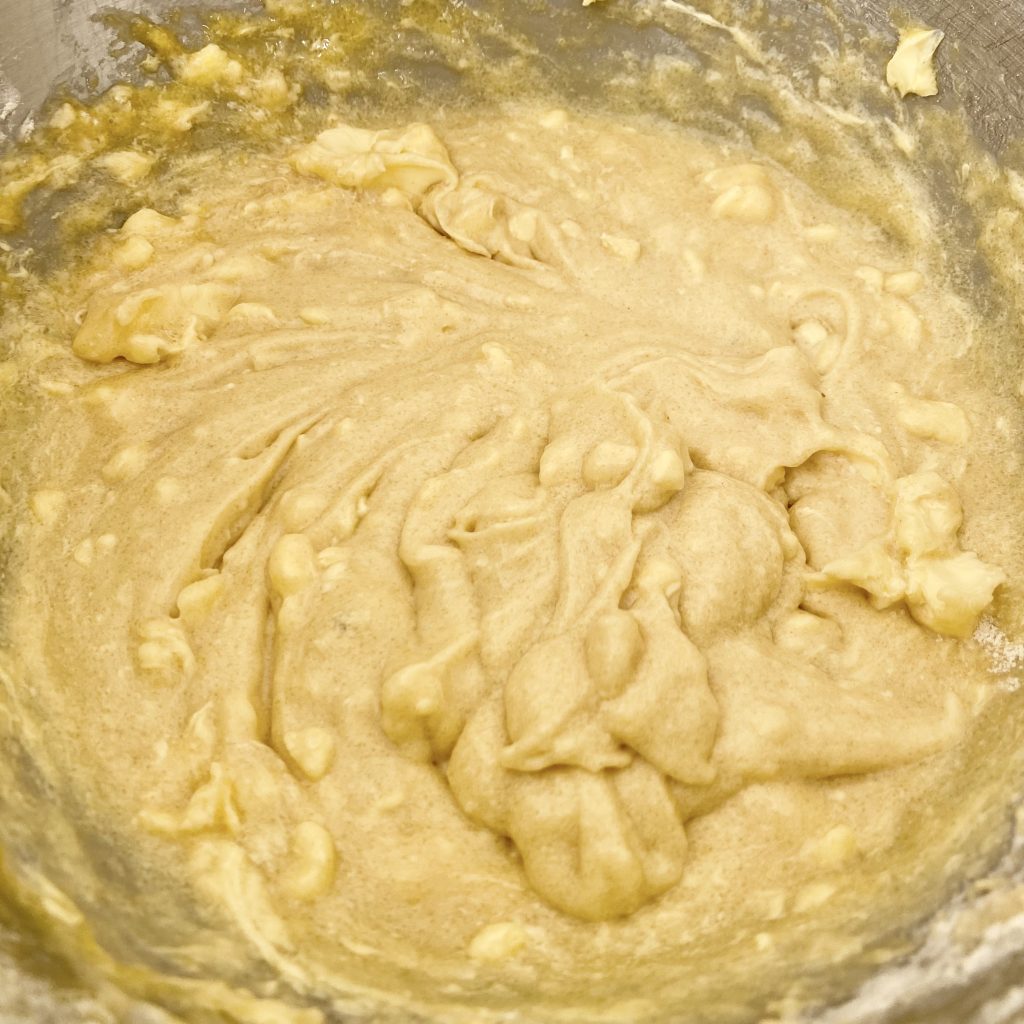
After mixing on medium-low speed for about 30-40 seconds, you’ll end up with something a bit like this: the beginning of a batter, with quite a few lumps of butter remaining. Honestly, it doesn’t look particularly appetising at this point, but don’t worry- it’ll be perfect in the end!

Once all the flour has been incorporated, you can turn the speed up to high. This intense beating will break down all those lumps of butter, leaving you with a smooth, but not overly fluffy, batter.
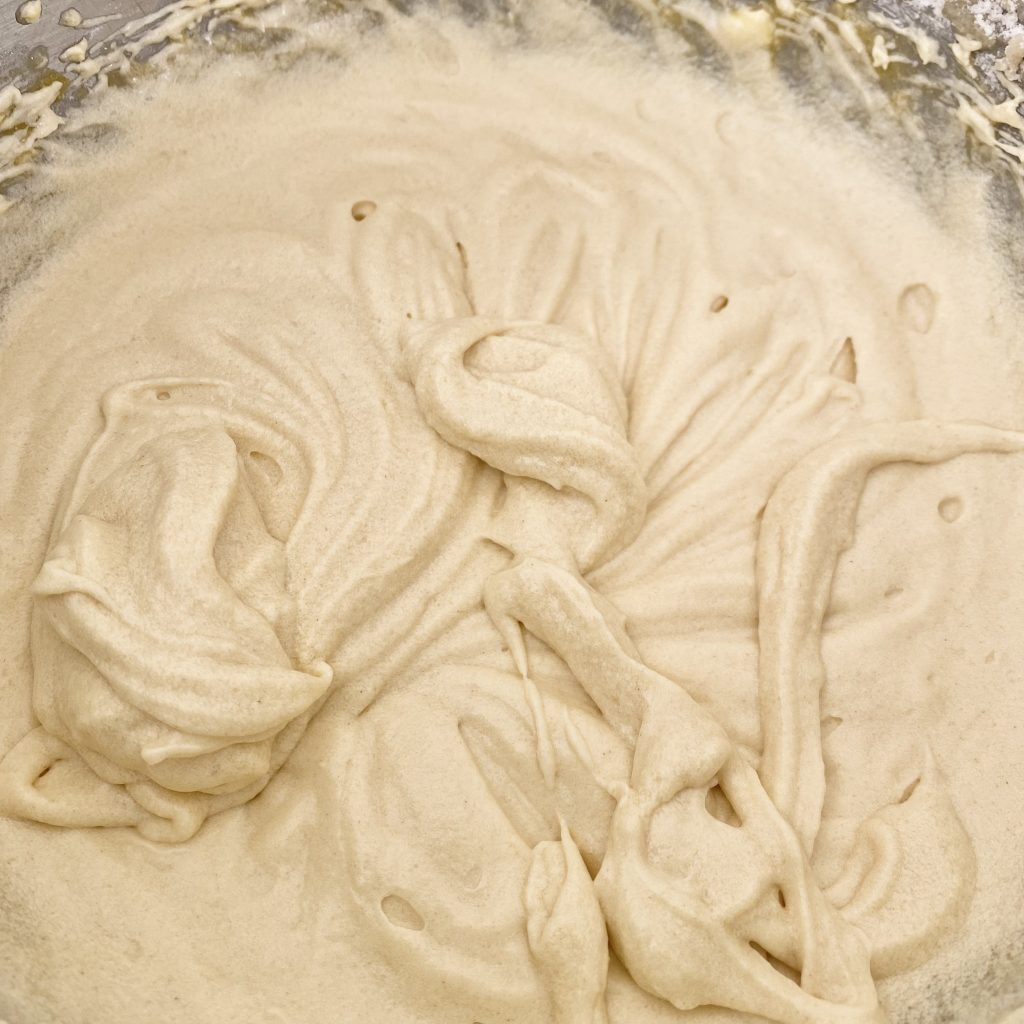
At this point, you’ll want to continue whisking the batter until its smooth, fluffy and holds its shape slightly better. It won’t take long- probably less than 30 more seconds at high speed. And that’s it! Your batter is done. How easy is that?
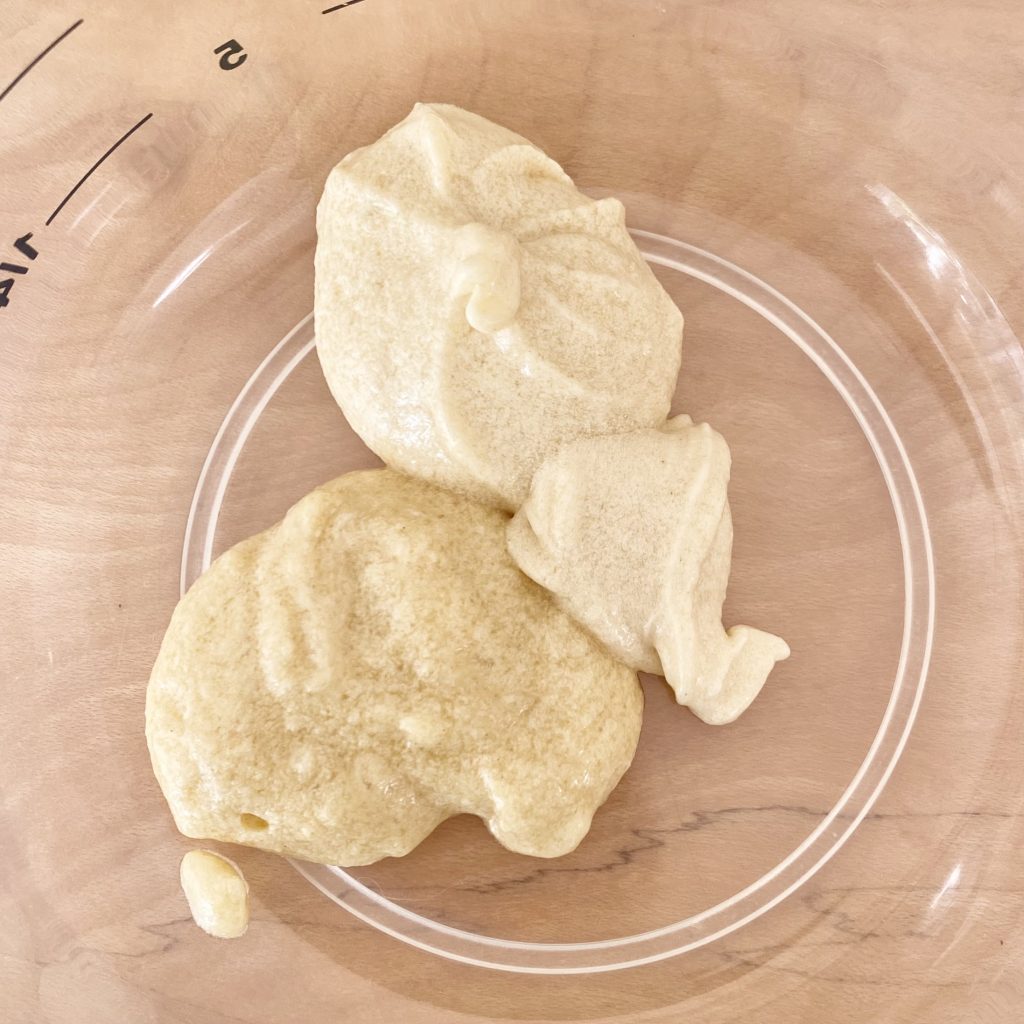
Here, you can see the difference in colour between the three stages. When the flour has just been incorporated, the mixture is a deep yellow colour (bottom). After a bit more whisking, it lightens up slightly (top). When it’s ready, it’s pale and super fluffy (right)!
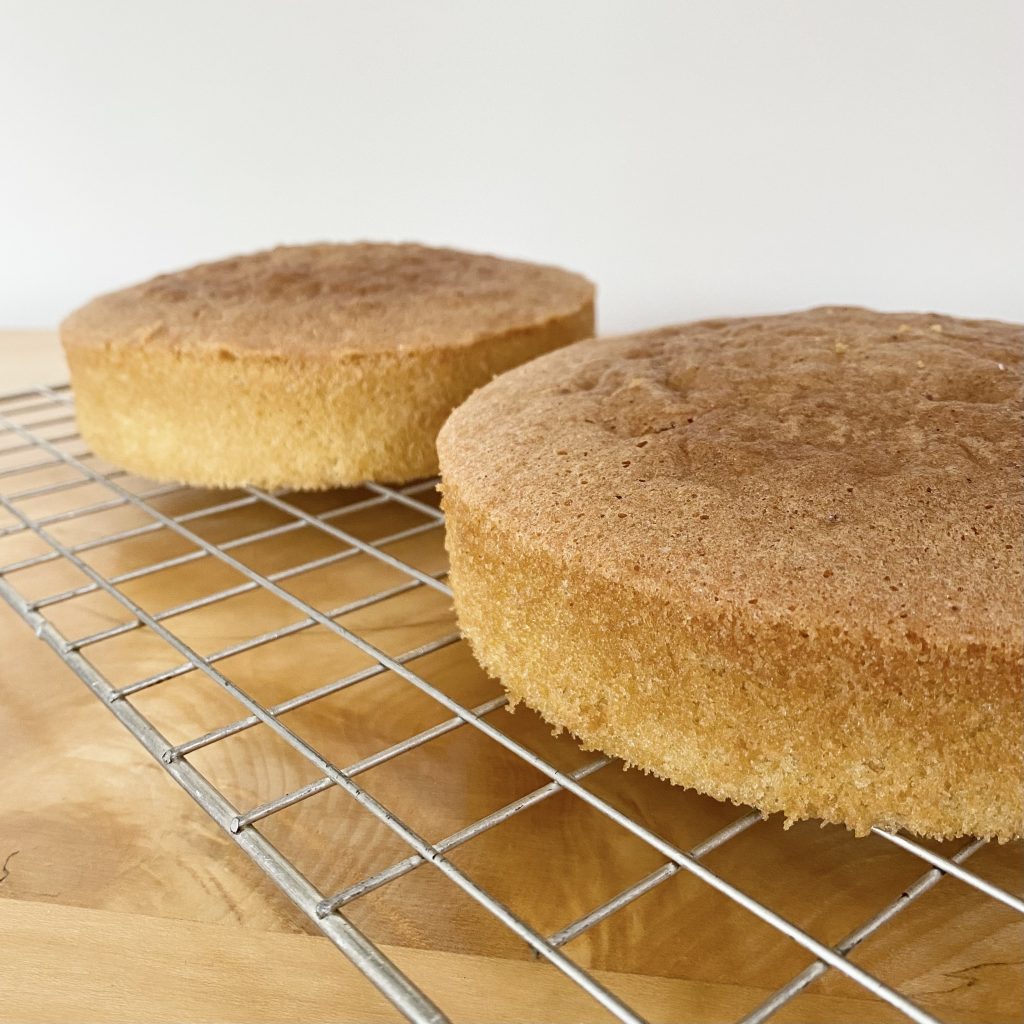
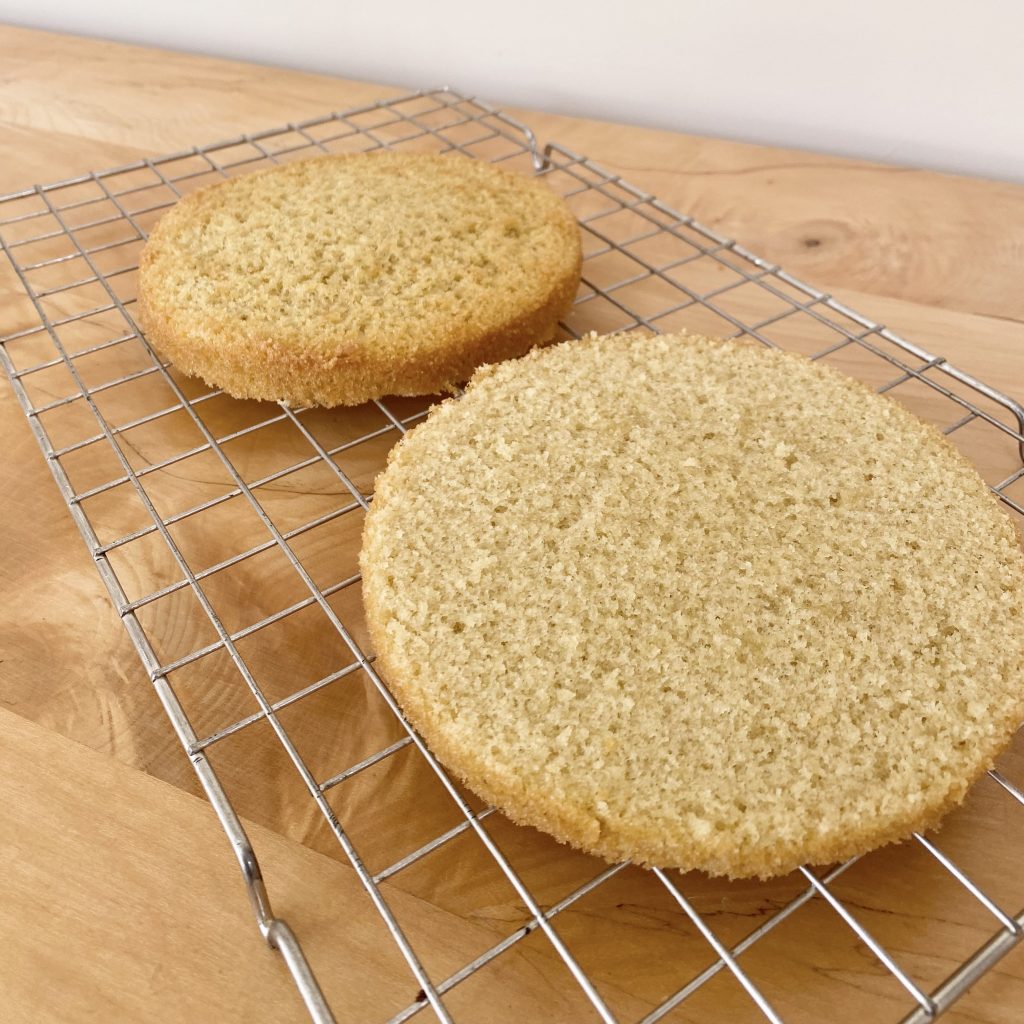
Once you have your batter, you need to divide it equally between 2x 6-inch cake tins (don’t forget to grease and line them beforehand!). Bake them at 170°C for about 30 minutes, or until they spring back when touched gently. Allow the cakes to cool for 5-10 minutes in their tins, before carefully taking them out and transferring them to a wire rack to cool completely.
Making the Strawberries & Cream Filling
I sandwiched the cake layers with a super easy strawberries & cream filling. It’s only 3 ingredients, but it’s incredibly delicious and very Wimbledon-esque. You’ll need:
- Strawberries (try to find really good strawberries, so they’ll have a stronger, sweeter flavour!).
- Double Cream (again, if you’re in the US, you’ll want to use heavy cream).
- Icing sugar (this helps to stabilise the cream slightly, so it will hold up under the cake layers).
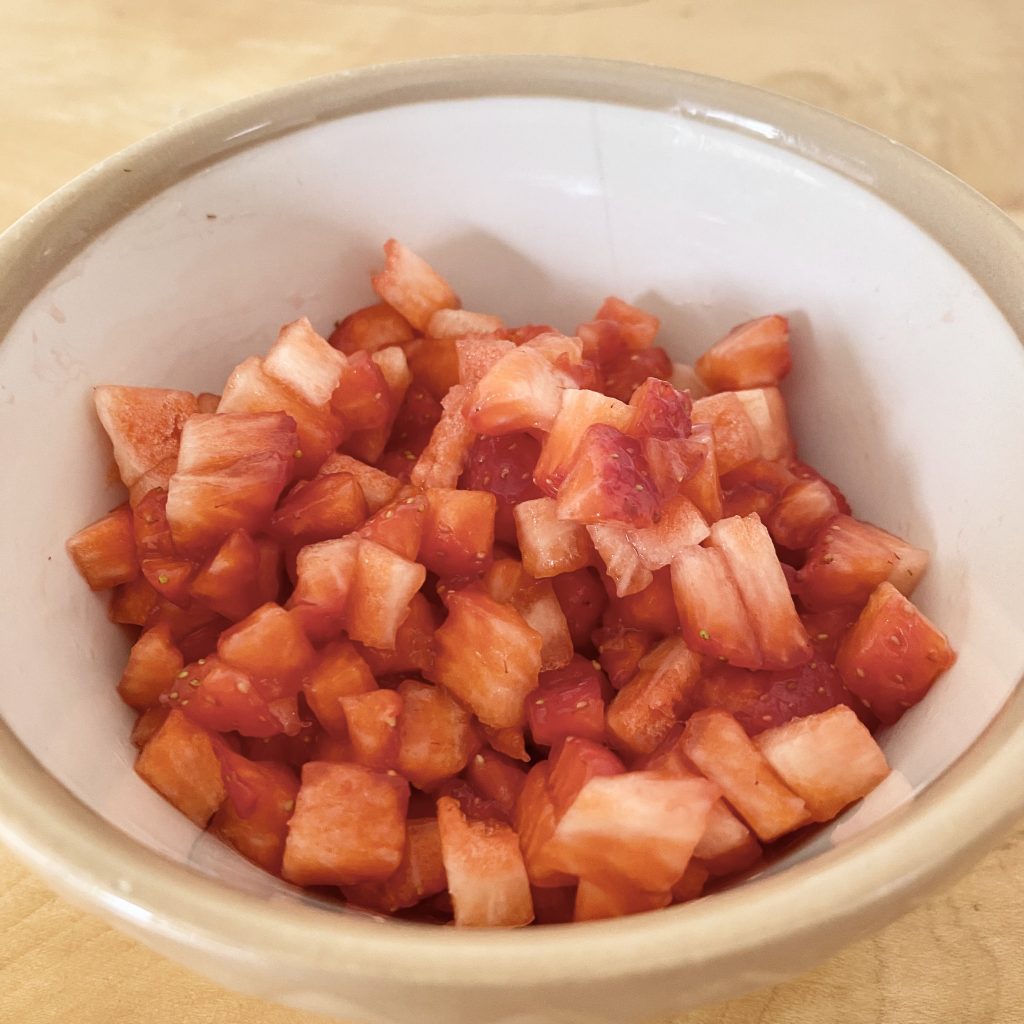
That’s it! All you need to do is hull and chop the strawberries into a small dice. This will ensure every bite of cake gets a piece of strawberry, without it affecting the structure of the layered-up cake.
You then want to sift the icing sugar into the cream, and whip it with an electric mixer until it is just below stiff peaks. Once cream gets stiff, it will keep thickening up, even as you spread it- so you don’t want to overwhip it at this stage. However, it needs to be firm enough that the layers do not slip and slide- it’s a fine line! I found that whipping it to just below stiff peaks was the perfect amount.
Assembling the Wimble-Cake
Because whipped cream, even with the added icing sugar, is significantly less stable than icing, you’ll want to split & layer up your cake with the strawberries & cream filling, then put it into the fridge to firm up for about 20-30 minutes. This will make decorating the finished cake much easier!
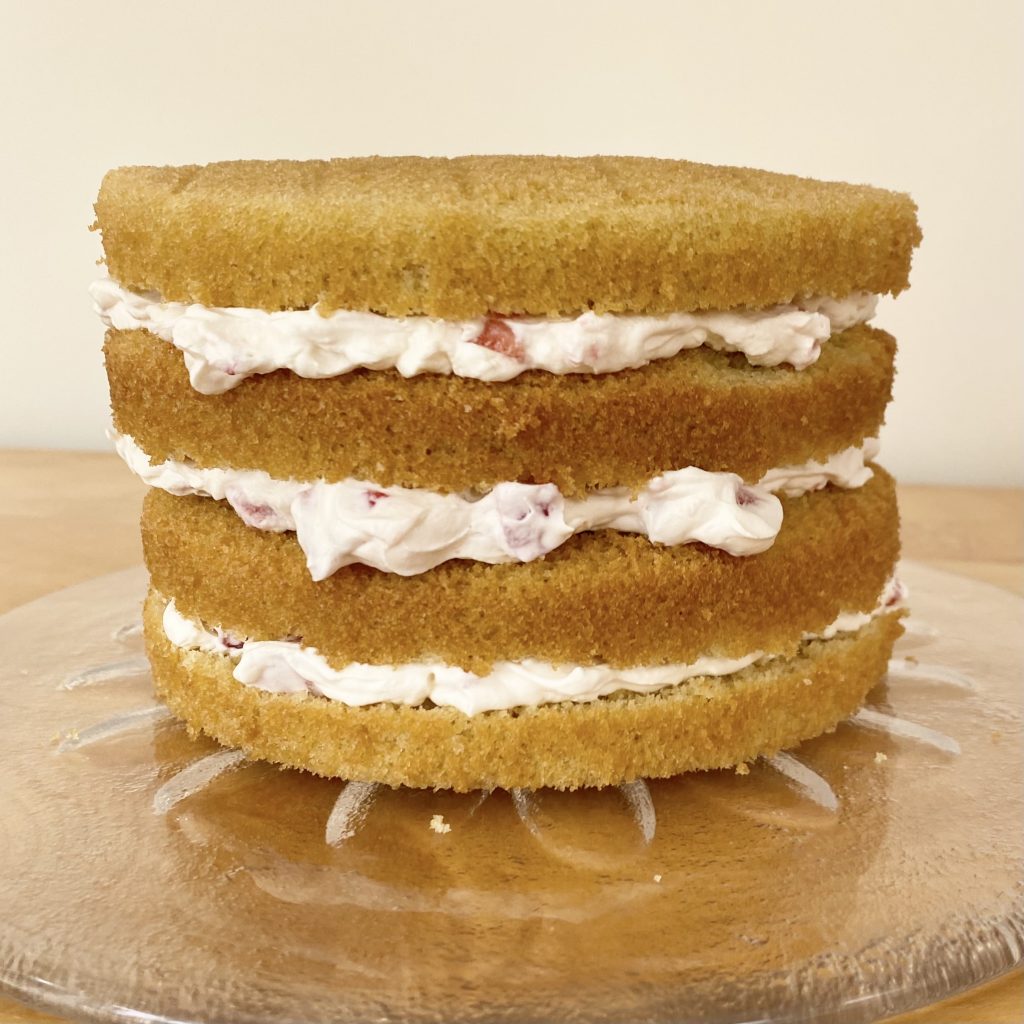
This is a 4-layer cake: to make these, I like to make 2x 6-inch cake layers and split them each horizontally, leaving me with 4, thin layers. This is perfect for this cake, because it means the cake:whipped cream ratio is more even! It also means more chance for strawberries, so, really, it’s a win/win. I use a cake leveller to do this, but you can use a large, serrated knife if you prefer. Place one of the cooled cakes on a chopping board, then place your palm on top of the cake and cut straight across the middle- taking care to be gentle! When you reach the opposite side of the cake, be super careful- the cake has a tendency to crumble at this point. If you’re using a cake leveller (these are usually not sharp, but are just a taut wire), go even more slowly and place your hand against the side of the cake, so the leveller meets it (this won’t hurt- you’ll be going too slowly! If your cake leveller has a sharp blade, obviously do not do this). If you’re using a knife, it’s safer to remove the knife and start cutting again from the opposite side.
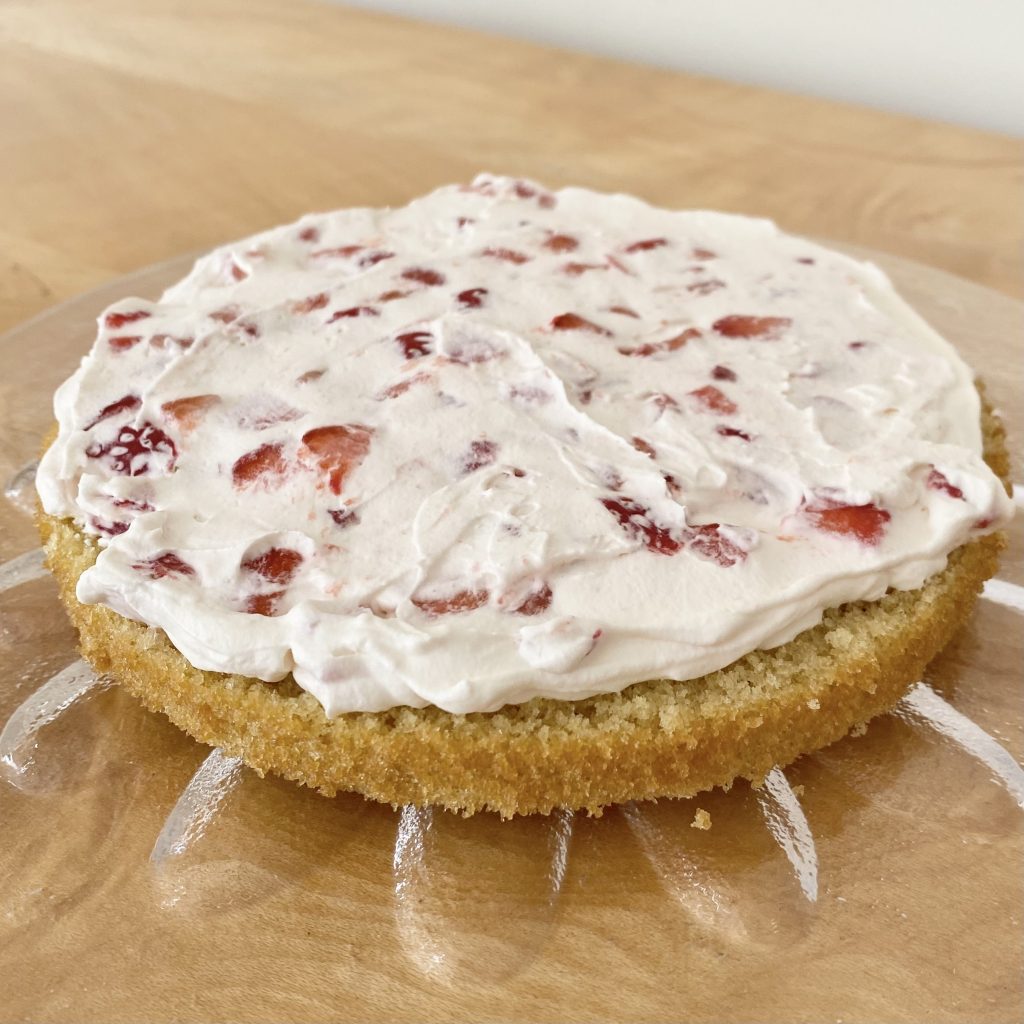
Once you’ve levelled your cakes, you can start layering up! I like to smear a little whipped cream onto the cake board, so that my cake does not slide off. Then, place a layer onto the board. Top it with 1/3 of the strawberries & cream filling and spread that out into an even layer, right across the surface of the cake, then top that with another cake. Repeat this process twice more, until all of the filling is used up- your final layer should be the 4th layer of cake. Run a palette knife around the sides of the cake, to smooth out any icing that might have smushed out, then pop the whole cake into the fridge to chill for 20-30 minutes, before decorating.
Making the Whipped Cream Icing
The whipped cream icing is exactly the same as the filling, minus the strawberries (though you could absolutely use the filling to decorate the sides if you want- just remember you’ll need a lot more of it and your finished cake will have chunks of strawberry visible on it!). I opted to use just plain whipped cream, so I only needed two ingredients:
- Double cream (as before, if you’re in the US you’ll want to use heavy cream).
- Icing sugar (to stabilise the cream slightly).
Much like the filling, all you need to do is sift the icing sugar into the cream, then whip it until you reach just below stiff peaks. Because this icing won’t play any structural role in the cake, it’s just decorative, you can afford to whip it slightly less than the filling- it just needs to be stiff enough to not run off the cake when you ice the sides!
Decorating the Wimble-Cake
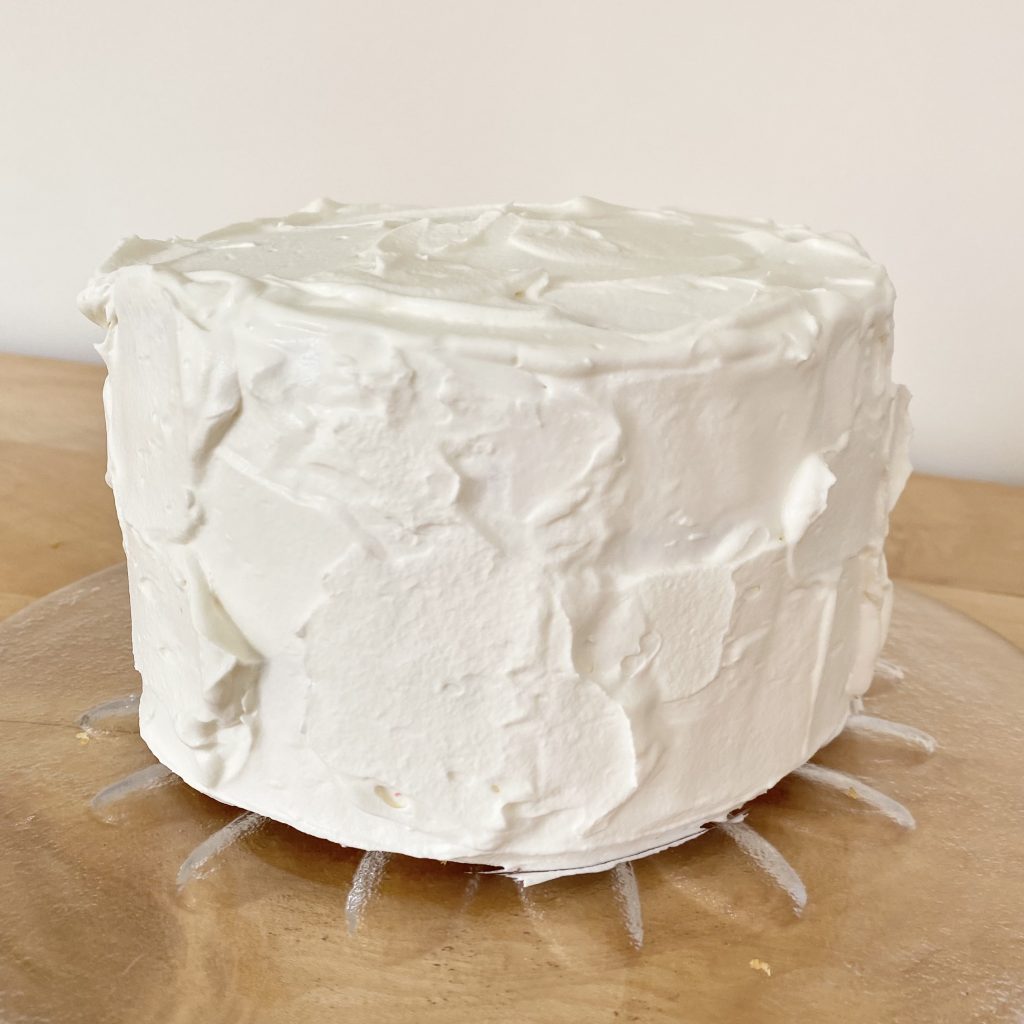
By this point, you’ve done all the difficult parts! All that’s left to do is ice the cake with your freshly whipped cream, then you can pile up the tennis ball macarons and marzipan carrots in an organised-yet-chaotic pile. The amount of cream specified in the recipe is enough to generously cover the top and sides of this 4-layer 6-inch cake, so keep that in mind if you’re making a bigger/smaller version.
A few tips for covering a cake with whipped cream icing:
- Embrace the messy look: There’s a trend at the moment for super smooth, perfect cakes. It’s beautiful, but you don’t need to do that to get an attractive cake at home (in fact, I am yet to succeed at it!). If you embrace the messy look, you can get a pretty cake that looks intentional!
- Place your cake on a turntable: This will make it so much easier to ice the cake, because you can turn it as you go! I recommend placing a non-slip mat underneath the cake though- you don’t want it to slide off mid spin!
- Tuck small pieces of baking paper under the cake to protect the board: Icing the sides of a cake can get messy! I find that the best way to prevent icing from falling onto the cake board is to cut small pieces of baking paper and tuck them between the cake and the board. When you’ve finished icing, you can gently pull out the paper (with any icing that has dropped onto it!). I like to run the flat edge of a knife around the bottom of the cake afterwards, just to neaten up the seam between the cake and the board.
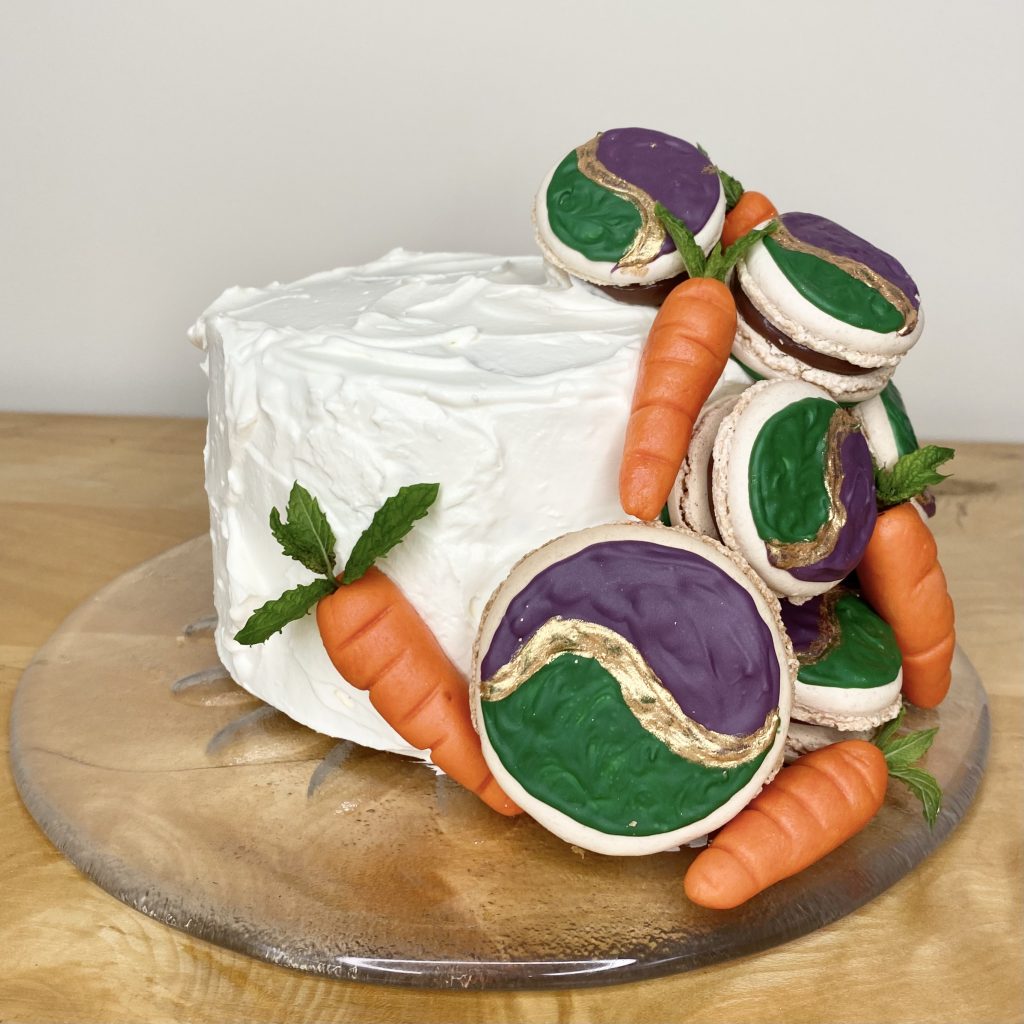
Once you’ve covered the cake, you can decorate it with the tennis ball macarons and marzipan carrots! Place the largest macaron at the front, leaning against the cake, then stack up the others, so that you have a cascading pile of tennis balls. If you have any leftover whipped cream, you can use it to help stick the macarons to the cake/board.
Once you have your tennis ball avalanche, you can add the carrots. Press them into the cake, place them onto the cake board and balance them on the macarons in a variety of positions. Marzipan gets sticky when it touches water, so you can use that knowledge (sparingly!) to help them stick, if necessary. And there you have it! Your Wimble-cake is complete!
One quick note here: The cake absolutely has to be kept in the fridge (it is covered in cream, after all). If you’re preparing it in advance, I would stick the macarons on after you ice it, then put it into the fridge without the carrots. You’ll want to balance/stick the carrots on just before you serve it, because the moisture in the fridge will make them sticky and cause the orange colour to bleed. Not the vibe.
Anyway, that’s it (she says after writing an essay on how to make a single Wimble-cake…)! Let me know what you think and if you’ve been watching Wimbledon this year! I’d love to hear your thoughts.
Gemma
xxx
Recipe

Wimbledon Cake (Carota Boys’ Version)
Equipment
- candy thermometer
- 4 piping bags
- 1 fine round piping tip
- 1 medium round piping tip
- 1 fine, food-safe paintbrush
- cocktail sticks/skewers
- Food-safe disposable gloves
- Chopstick (or other small implement with a rounded point)
Ingredients
For the ganache:
- 50 g milk chocolate
- 50 g double cream
For the tennis ball macarons:
- 48 g ground almonds
- 52 g icing sugar
- 30 g egg whites (about 1 egg white, split into 2x15g portions)
- 48 g caster sugar
- 15 ml water
- 80 g white chocolate
- purple and green food colouring (see Note 1)
- gold lustre dust (see Note 2)
- vanilla extract (see Note 3)
For the marzipan carrots:
- 72 g marzipan
- orange food colouring
- 6 sprigs mint
- icing sugar for dusting
For the vanilla cake:
- 150 g Stork (see Note 4)
- 150 g self-raising flour
- 150 g caster sugar
- 1 tsp baking powder
- 3 eggs
- 3/4 tsp vanilla extract
- 1 tbsp milk
For the strawberries & cream filling:
- 150 g strawberries
- 150 ml double cream
- 1 tbsp icing sugar
To decorate:
- 175 ml double cream
- 1 tbsp icing sugar
Instructions
For the ganache:
- Place the chocolate and cream into a microwave safe bowl. Microwave on low, in 30 second bursts, stirring well between each burst, until you have a smooth ganache. Cover with cling film, pressing it directly onto the surface of the ganache to prevent a skin forming, then chill in the fridge overnight before using.
For the macarons:
- Line a baking tray with baking paper. Fit a piping bag with a medium, round nozzle and set aside.
- Place the ground almonds and icing sugar into a food processor. Pulse 10 times, then sift into a large bowl, discarding any bits of almond that do not pass through the sieve. Add 1 of the 15g portions of egg white to the almonds/sugar and mix well to form a paste. Set aside.
- Place the other 15g portion of egg white into the clean, metal bowl of an electric stand mixer, fitted with the whisk attachment. Put the caster sugar and water into a small saucepan and place over medium heat. Use a candy thermometer to measure the temperature of the syrup.
- When the syrup reaches 112-114°C, start mixing the egg white in the bowl of the stand mixer on high speed. When the syrup reaches 118°C, remove it from the heat and pour it down the side of the bowl, into the egg white (which should be at soft peaks). When you have added all of the syrup to the bowl, turn the mixer up to full speed and whisk until the meringue reaches stiff peaks. When the meringue is ready, the outside of the bowl should only have a slight hint of warmth, when touched.
- Add 1/3 of the meringue to the almond paste and, using a metal spoon, mix it in thoroughly until well combined. Add the rest of the meringue and fold it in, using a figure of eight motion, until the mixture is cohesive and comes off the spatula in ribbons (if you leave those ribbons for 30 seconds, they should settle back into the mixture). Do not overmix at this stage.
- Place the macaron mixture into the piping bag. Hold the piping bag vertically and pipe your shells, leaving plenty of space between each one. You will need 12x 3.5cm diameter shells and 2x 4.5cm diameter shells.
- Once you have piped your macarons, lift the tray slightly and tap it down on the surface a couple of times, to raise any air bubbles to the surface. Use a small, sharp knife or cocktail stick to pop any remaining bubbles, allowing the mixture to fall back on itself. Set the macarons aside to form a skin- about 30-40 minutes on a dry day, longer if it is more humid. The macarons will be ready when you can gently touch the surface of the macarons, without any batter coming off on your finger.
- While the macarons are forming a skin, preheat the oven to 165°C fan. Bake the macarons for 11 minutes, or until you can gently wiggle your finger on top of the shells without them wobbling independently from their feet. Remove the macarons from the oven and let them cool completely on their tray before decorating.
For the tennis ball decoration:
- Melt, temper & colour half of the white chocolate purple. Place the chocolate into a piping bag, fitted with a fine, round tip. Pipe the outline of a curved, teardrop shape (a bit like half of the yin & yang symbol) onto half of each macaron shell. Pipe a little bit more chocolate within the outline, then use a small, sharp knife/cocktail stick to push that chocolate to the outlines, so that you have a smooth layer of purple chocolate on each shell. Leave at room temperature to set while you move on with the next batch of chocolate.
- Repeat the process, colouring the second batch of chocolate green, instead of purple. Pipe the green chocolate up against the set purple chocolate, so there is no gap between the two colours, then finish off the circle and fill it in in the same way. Allow this to set at room temperature, as well.
- When the chocolate has set completely, mix some gold lustre dust with a few drops of vanilla extract in a small bowl, until you have a smooth, fluid 'paint'. Use a fine, food-safe paintbrush to paint the gold colour into the seam between the green/purple chocolate halves. You can do a couple of layers of this, waiting for each layer to dry in between, to get a more opaque colour. Allow this to dry completely before sandwiching the macarons.
- To fill the macarons, place the chilled ganache into a piping bag, fitted with a medium round tip. Pipe a small amount of ganache onto half of the shells, then gently press an unfilled shell on top of each filled shell. Place the macarons into the fridge to chill while you make the rest of the cake.
For the marzipan carrots:
- Cover your work surface with a piece of baking paper. Wear disposable gloves to protect your hands. Knead the marzipan until it forms a smooth ball, then use your thumb to make an indent in it. Add a generous amount of orange food colouring to the indent.
- Knead the colour into the marzipan until it is even. Split the orange marzipan into 6 equal portions (each about 12g) and roll each into a ball. Form one ball into a log shape, applying more pressure to one end to taper it slightly. Use the blunt edge of a knife to press horizontal indents around the carrot, and a chopstick (or similar implement) to press a round indent in the top (the wider end) of it. Repeat for all of the portions of marzipan to make 6 carrots. Poke a sprig of mint into the top indent of each carrot, to act as the leaves. Set the carrots on a piece of baking paper to dry out at room temperature.
For the cake:
- Preheat the oven to 170°C (conventional oven). Grease and line 2x 6-inch cake tins and set aside.
- Place all of the cake ingredients into the bowl of an electric mixer, fitted with a whisk attachment. Whisk on low speed to incorporate the flour, then increase the speed to high and whip until the batter is smooth, fluffy and pale- about 1 minute total. Use a spatula to scrape down the sides and bottom of the bowl.
- Split the batter evenly between the two cake tins. Spread out the batter so that it is even, then bake in the preheated oven for 30 minutes, or until the cakes spring back when touched gently. Allow the cakes to cool for 10 minutes, then carefully remove them from their tins and place onto a wire rack to cool completely.
- When the cakes are cool, split each cake in half horizontally, so that you have 4 thin layers of cake.
For the strawberries & cream filling:
- Wash and dry the strawberries, then hull them and chop them into a small dice.
- Place the cream and the icing sugar into a bowl, then whip to just below stiff peaks. Use a spatula to fold the strawberries into the cream.
To assemble the cake:
- Place one of the cake layers onto a cake board/plate. Add 1/3 of the strawberries & cream filling on top, then spread it out into an even layer, before topping with another layer of cake. Repeat the process twice more, until you have used up the filling and cake layers, finishing with the final cake layer. Place the layered cake into the fridge to firm up for 20-30 minutes.
For the whipped cream icing:
- Place the cream and icing sugar into a bowl. Whisk until it reaches just below stiff peaks.
To decorate the cake:
- Remove the chilled cake from the fridge. Spread the plain whipped cream icing generously over the top and sides of the cake.
- Stick the largest macaron to the front of the cake, so that it is resting on the cake board/plate. Use the 6 standard macarons to create a 'cascade' down the side of the cake- prop them against each other and use any remaining whipped cream to help stick them down.
- Add the marzipan carrots to the cake- prop them against the macarons, stick them to the side of the cake and place them on the board, to finish off your Wimble-cake. The finished cake will need to be stored in the fridge, where it will keep for 2-3 days. Note that the marzipan carrots will absorb moisture from the fridge and start to bleed their colour/become sticky. If you want to make this cake in advance, I recommend adding the carrots just before you are about to serve it.
Notes
- You need to use an oil-based food colouring to colour chocolate. I used the shades Purple and Green from Colour Mill.
- I purchased this gold lustre dust, from Sugarflair, but any edible lustre dust will work.
- While you need to use a good quality vanilla extract for the cake, the flavour is barely noticeable when you use it for the lustre dust painting. Therefore, don’t waste a good quality, expensive vanilla extract on this stage- use a cheaper version if you have it.
- As always with my cakes, I prefer to use Stork for a fluffier, lighter cake. If you do not want to use Stork, you can substitute the same amount of softened, unsalted butter.