This week, we’re back with my Taylor Swift Cupcakes series, where I am baking my way through the album Midnights and creating a cupcake for each song. We’ve already tackled the first 4 tracks on the album (you can find those posts here), so today’s post is all about Track 5: You’re On Your Own, Kid.
Table of Contents
- The You’re On Your Own, Kid Cupcake: Explained
- Sugar Daisies
- Blackberry Compote
- Gingerbread Cupcakes
- Filling the Cupcakes
- Cream Cheese Icing
- Assembling the Cupcakes
- Recipe
The You’re On Your Own, Kid Cupcake: Explained
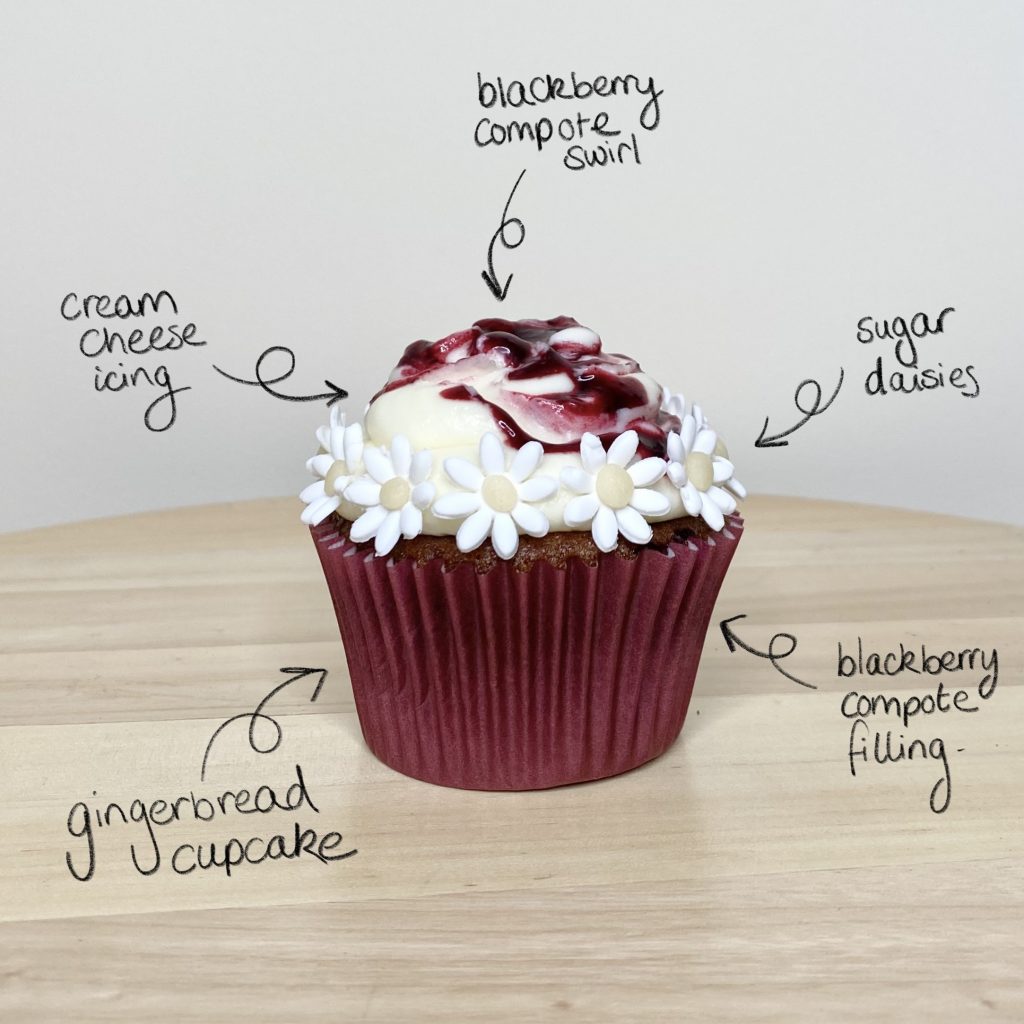
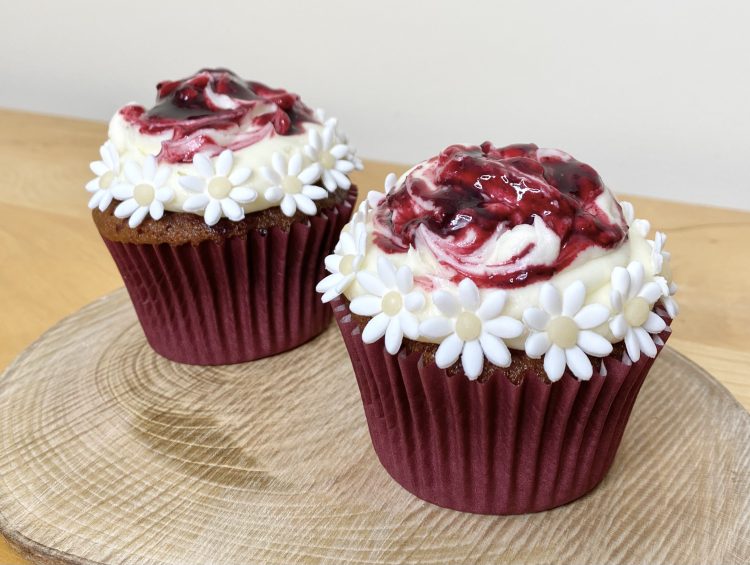
The You’re On Your Own, Kid Cupcake has 4 main elements:
- Gingerbread cake
- Blackberry compote
- Cream cheese icing
- Sugar daisies
It took me a little while to work out what kind of flavours I wanted to use for this cupcake. In the end, I decided to focus on one of the song’s major recurring themes: seasons changing, specifically, summer turning to autumn and, eventually, winter. We can see this theme in the very first line: ‘Summer went away’, but it is picked up again (albeit more subtly), in the first line of the chorus, where Swift sings ‘From sprinkler splashes to fireplace ashes’. I wanted this cupcake to encapsulate that late summer/early autumn feeling, when the nights are getting longer and the weather is cooling down. Luckily, here in the UK, we’ve just been living through that period of the year, so I had plenty of inspiration all round me.
Eventually, I decided on a blackberry and gingerbread cupcake. Gingerbread is such a quintessentially autumn/winter thing for me- I associate it so strongly with Halloween, with Bonfire Night and with Christmas. Blackberry season falls in late summer/early autumn, so it felt like a perfect addition to these cakes (also, we have an abundance of blackberries stashed in our freezer from my parent’s blackberry-picking endeavours this year, so it all worked out!). To get the blackberry flavour into the cakes, I made a homemade compote, which I used to both fill and decorate the cupcakes.
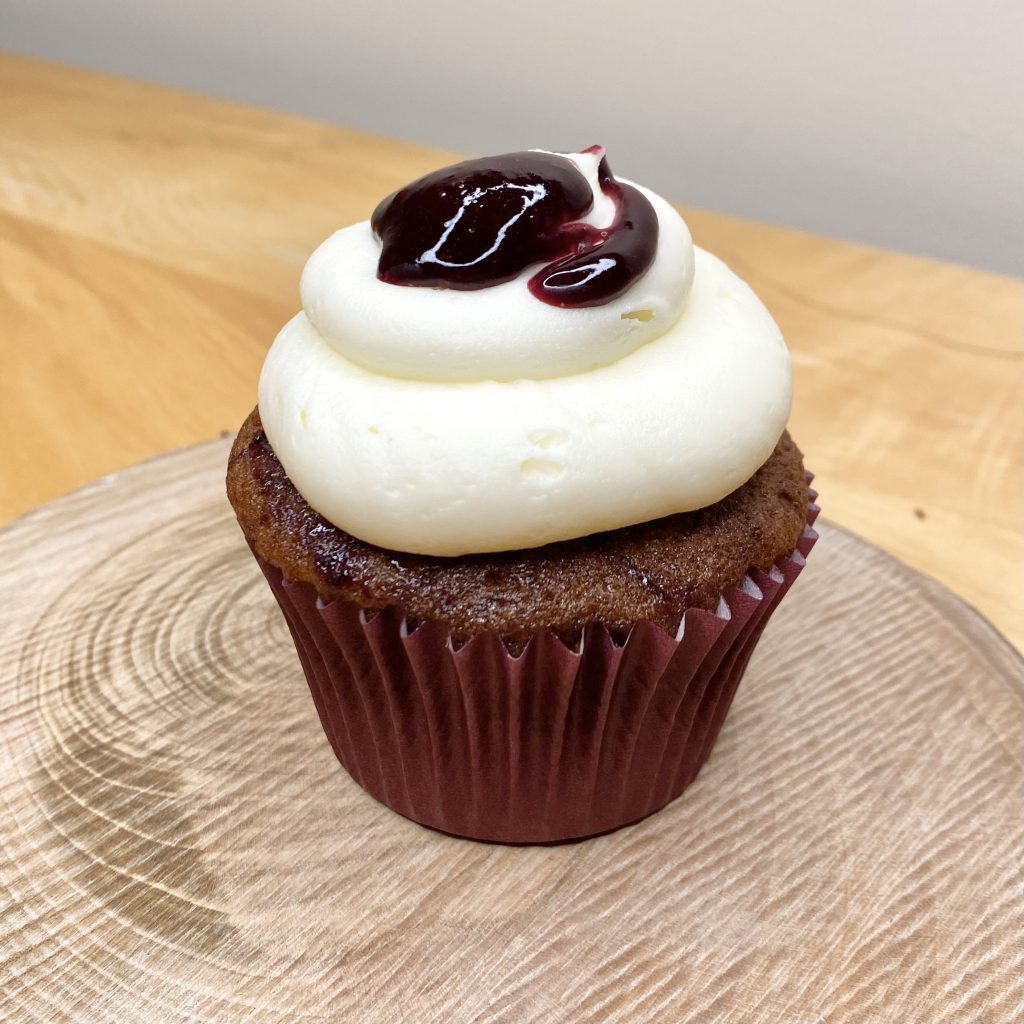
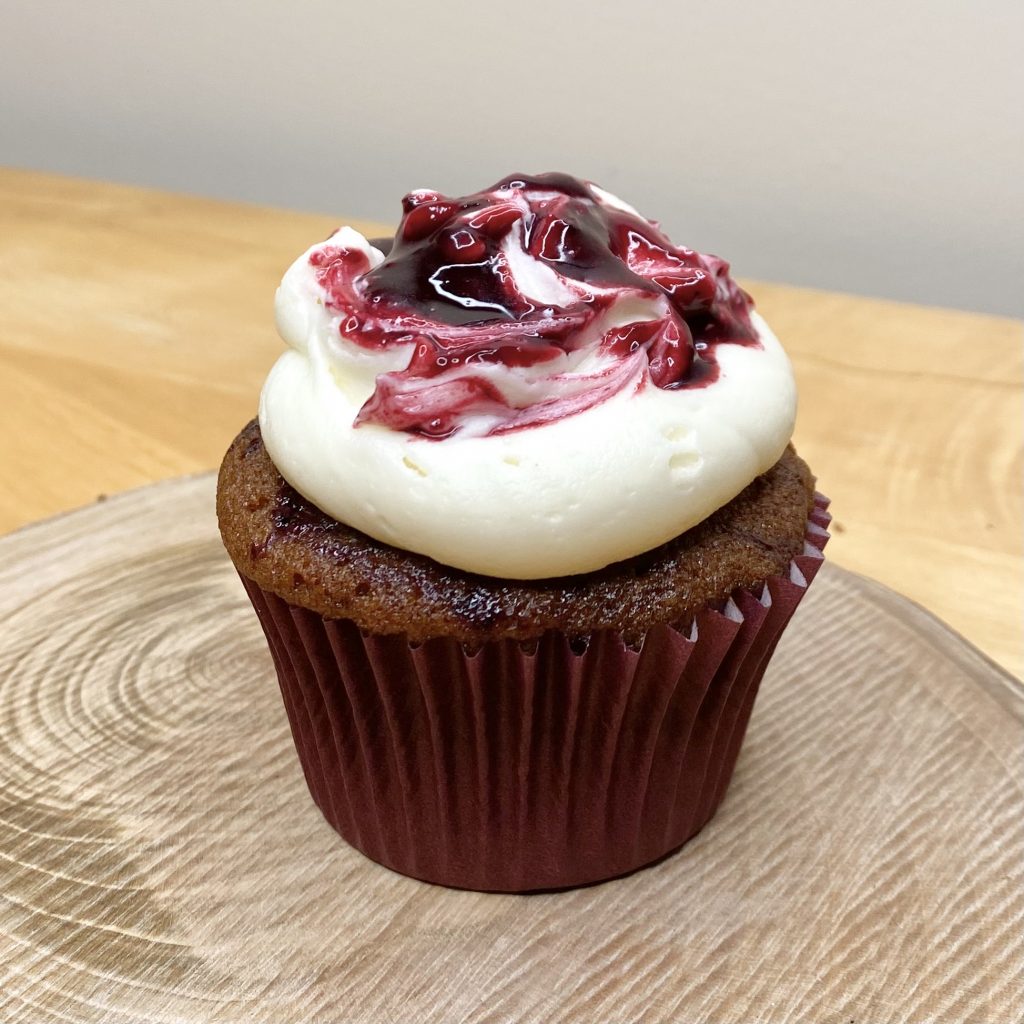
I opted to ice these cupcakes with cream cheese icing because I thought that it would compliment both the gingerbread and blackberry flavours best. To add even more blackberry flavour (and an extra bit of decoration), I swirled some more compote into the icing. Coincidentally (and rather grotesquely- sorry!), this also ended up as a bit of an accidental nod to another line in the song: ‘I looked around in a blood-soaked gown’, so there’s that, too.
For decoration, there were two lines from the song that I really wanted to draw on for inspiration: ‘So long, Daisy May’ (random, I know, but I just like it) and ‘So make the friendship bracelets’. The latter line has become a really significant part of Swift’s recent Eras Tour, with fans making their own friendship bracelets to trade with each other, so I felt I absolutely had to include some sort of reference to it with this cupcake. I decided to make edible daisies from sugar florist paste, then arrange them around the iced cupcake in a circle, like a sort-of daisy chain friendship bracelet. I really love how it turned out!
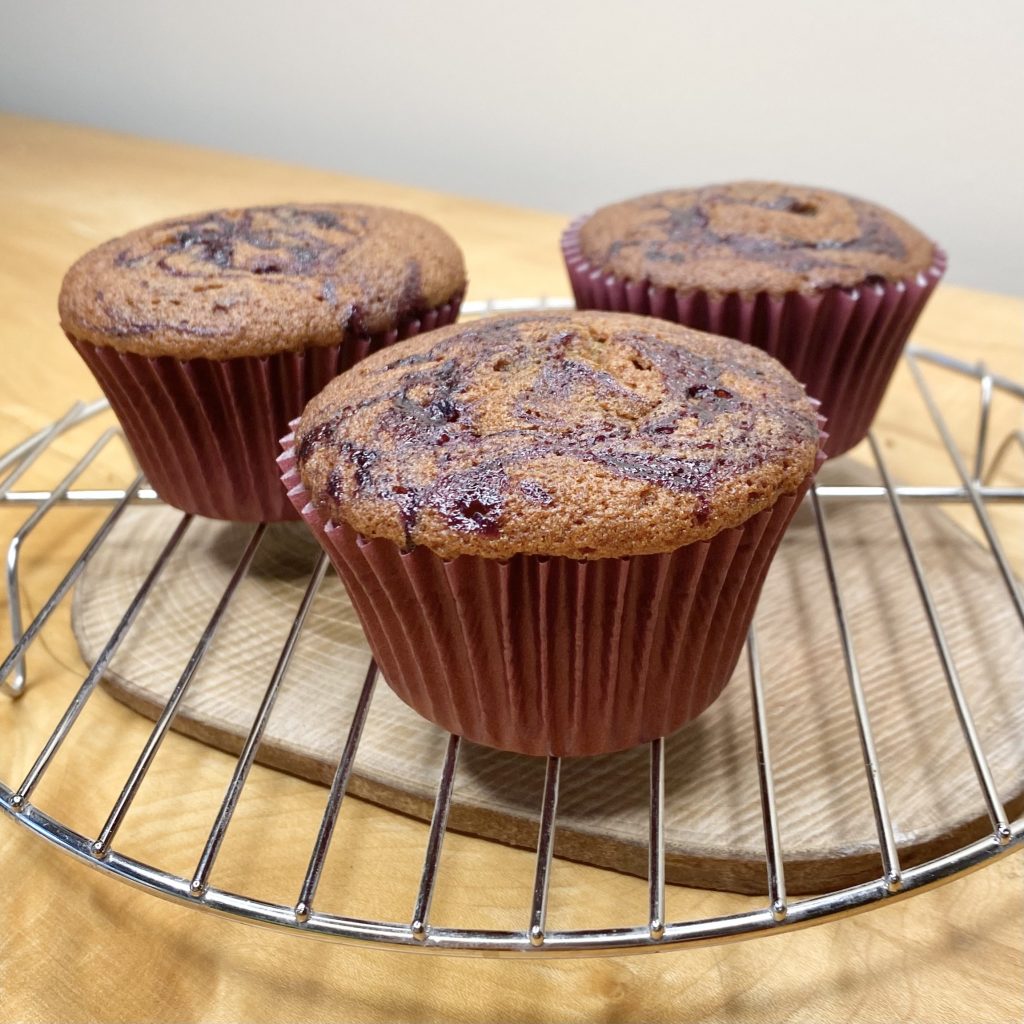
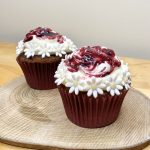
Essentially, then, these are gingerbread cupcakes, filled with homemade blackberry compote, topped with cream cheese icing and more compote, then decorated with an edible daisy ‘friendship bracelet’. I think they look so pretty and I can confirm that they taste DELICIOUS.
Let’s get into some specifics, shall we?
Sugar Daisies
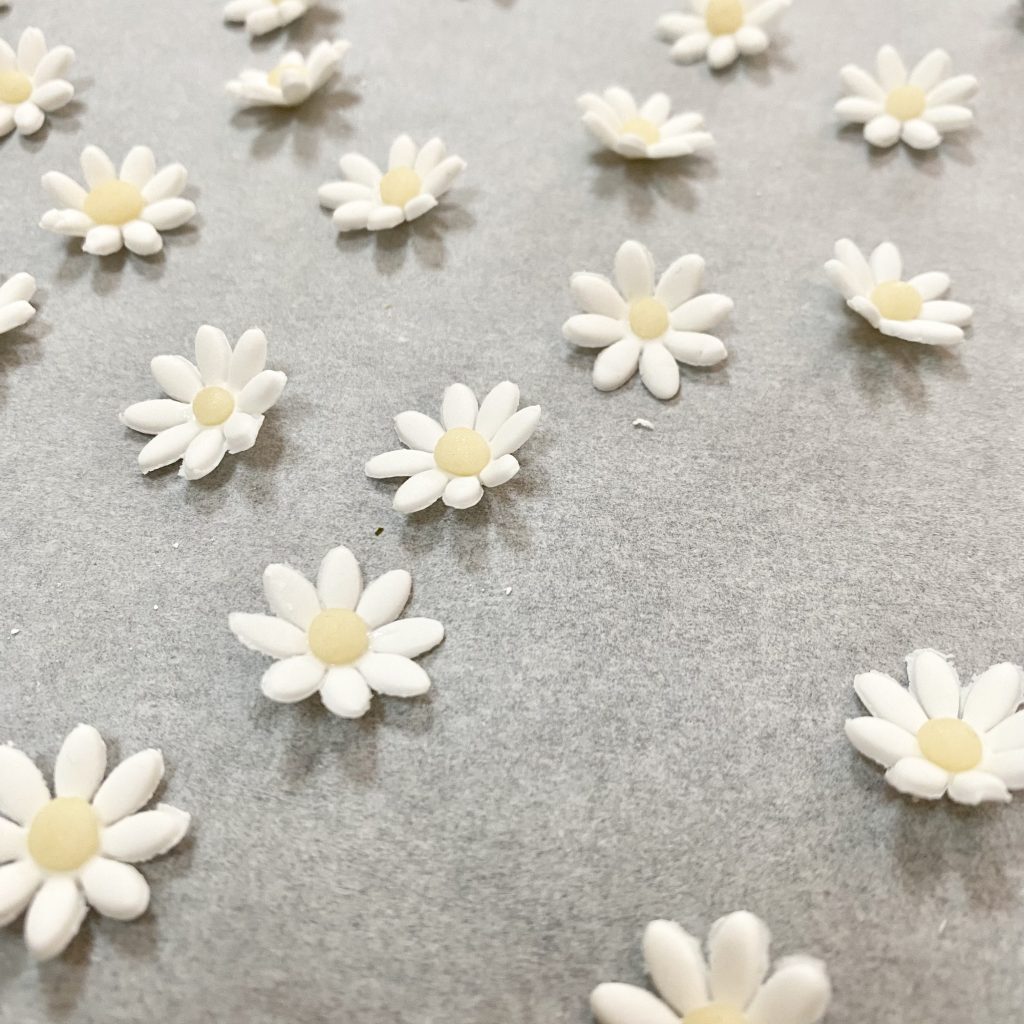
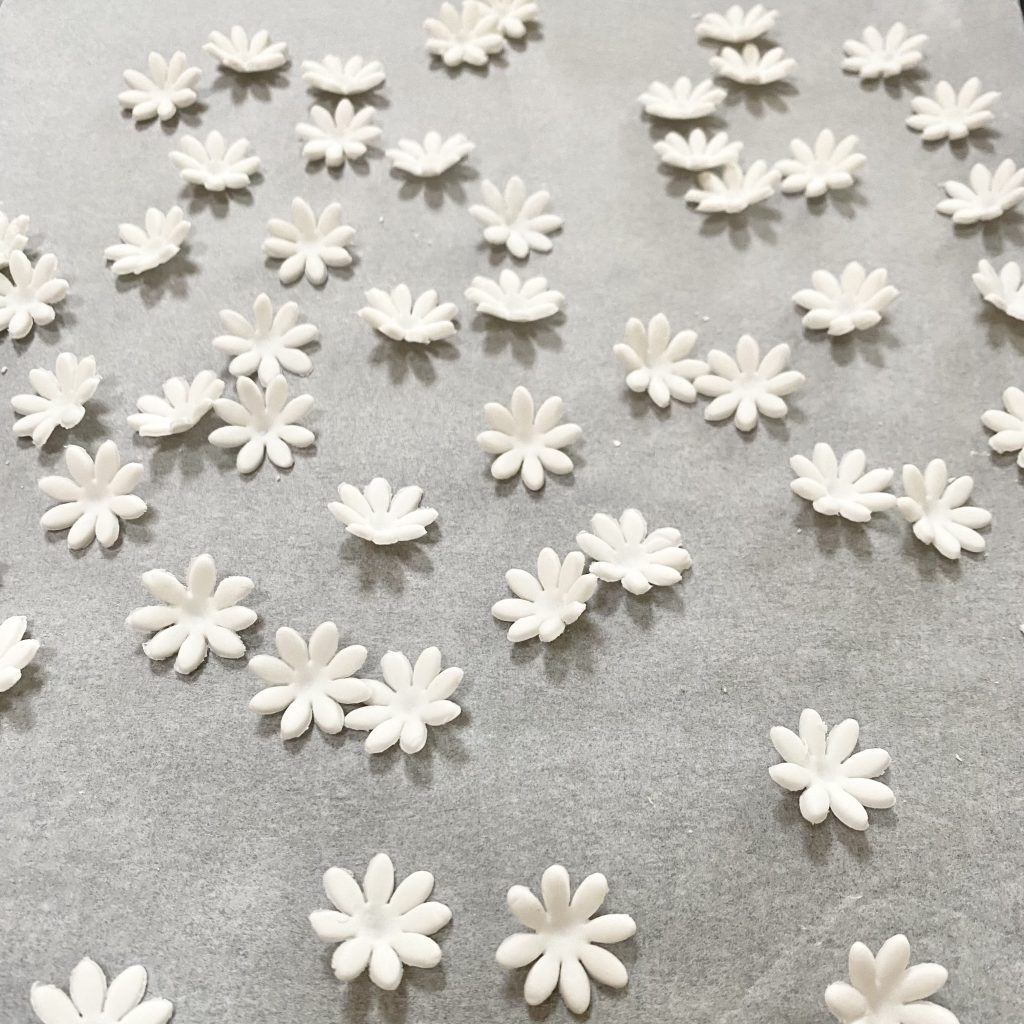
You need to start by making the edible daisy decorations, because they need a while to dry out and harden up. For each You’re On Your Own, Kid Cupcake, you’ll need about 12 daisies. That, of course, is if you plan to decorate your cupcakes like me, with a friendship bracelet of daisies all around the edge of the cupcake. You can absolutely decorate your cupcakes however you please with as many, or as few, daisies as you would like.
To make the daisies, you will need the following ingredients:
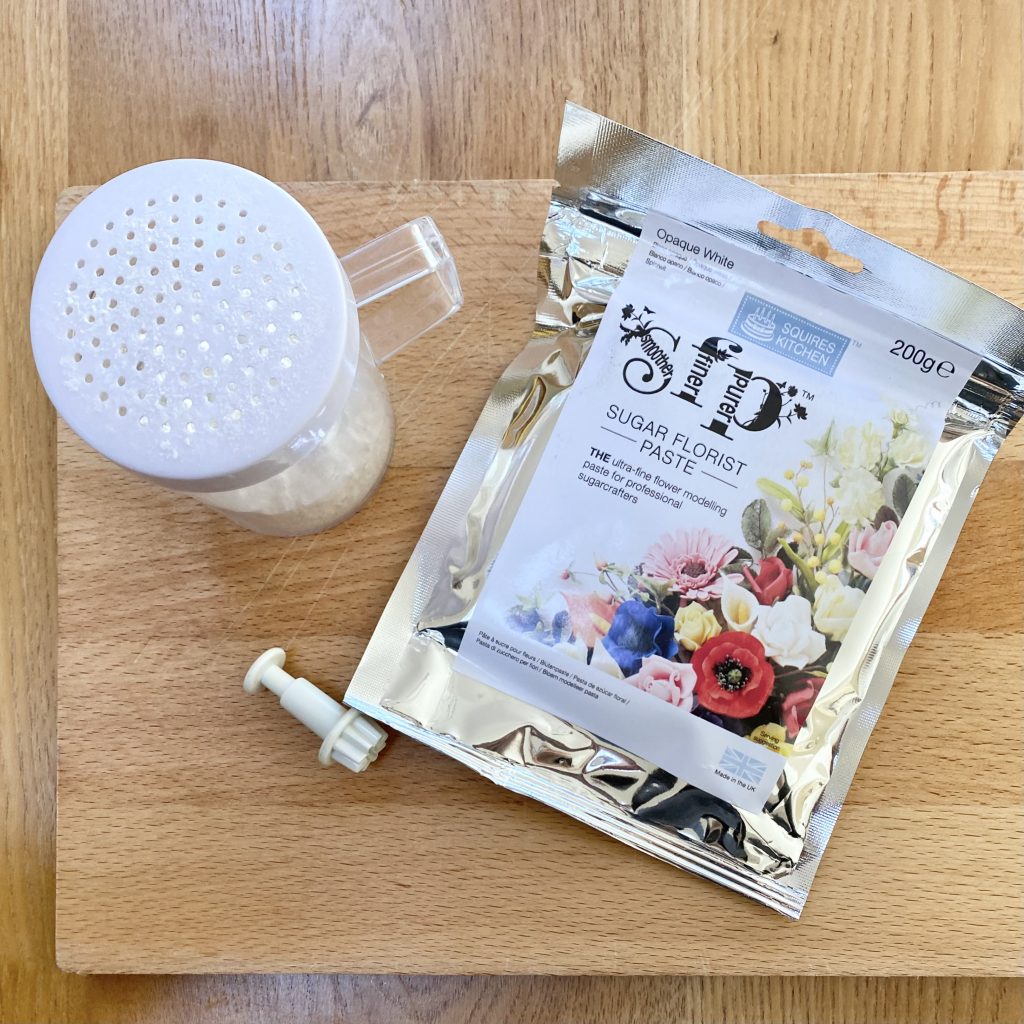
- White sugar florist paste (I used this brand).
Ideally, you want to use sugar florist paste to make the flowers. It’s very similar to sugar paste, modelling paste and even fondant, but it has a few unique attributes that make it perfect for this: firstly, unlike fondant and sugar paste it dries completely hard, so your flowers will keep their shape perfectly once they have hardened. Secondly, it dries much more quickly than modelling paste, which will save you some time. Thirdly (and finally), it is quite a stretchy, flexible paste, so it is perfect for making delicate petals.
None of this is to say you can’t use the other options to make these daisies- just be aware that they might not work quite so well as the florist paste. It is a bit of a specialist item, but it is readily available online. I purchased mine from The Cake Decorating Company, which is my current go-to for specialist baking supplies.
- Marzipan
This ingredient isn’t strictly necessary- you could absolutely substitute it with more of the florist paste, or even some fondant, tinted with yellow food colouring, to make the centres of the daisies. I just happened to not have any yellow food colouring to hand, but I did have some marzipan, so I went with it.
Ironically, I actually used white marzipan for this. The brand I buy (Waitrose own) is actually a creamy yellow colour, as opposed to a perfect white, which is kind of weird, but we’ll roll with it. Essentially, you just need some sort of yellow modelling paste that you can roll into teeny-tiny little balls to place in the centre of each daisy.
- Icing sugar
Just a little, to dust your work surface/rolling pin, so that the florist paste does not stick.
- Dried split peas
A rogue inclusion, I know, but don’t worry- you won’t actually be eating these. I just found that they were the perfect size/shape to dry the flowers over, which gives the daisies a more 3D shape. As a bonus, the flat side of the split peas means they don’t roll around, which makes things much easier.
Please do take into account who will be eating your cupcakes though- obviously no one is going to suspect that their cupcake has come into contact with a split pea, so just be careful of allergies/sensitivities. If you don’t want to use split peas, you can either look for something a similar size and shape, or you can dry the flowers directly over the marzipan centres (the flowers will be a little flatter, but that is obviously preferable to accidentally poisoning your friends).
Alongside these ingredients, you will also need some specialist equipment:
- Daisy plunge cutter
I used the 19mm cutter from this pack, but you can use any daisy-shaped cutter. Plunge cutters make it much easier to keep all of the petals in tact with delicate things like this, so I prefer them here.
- A tapered/ball modelling tool
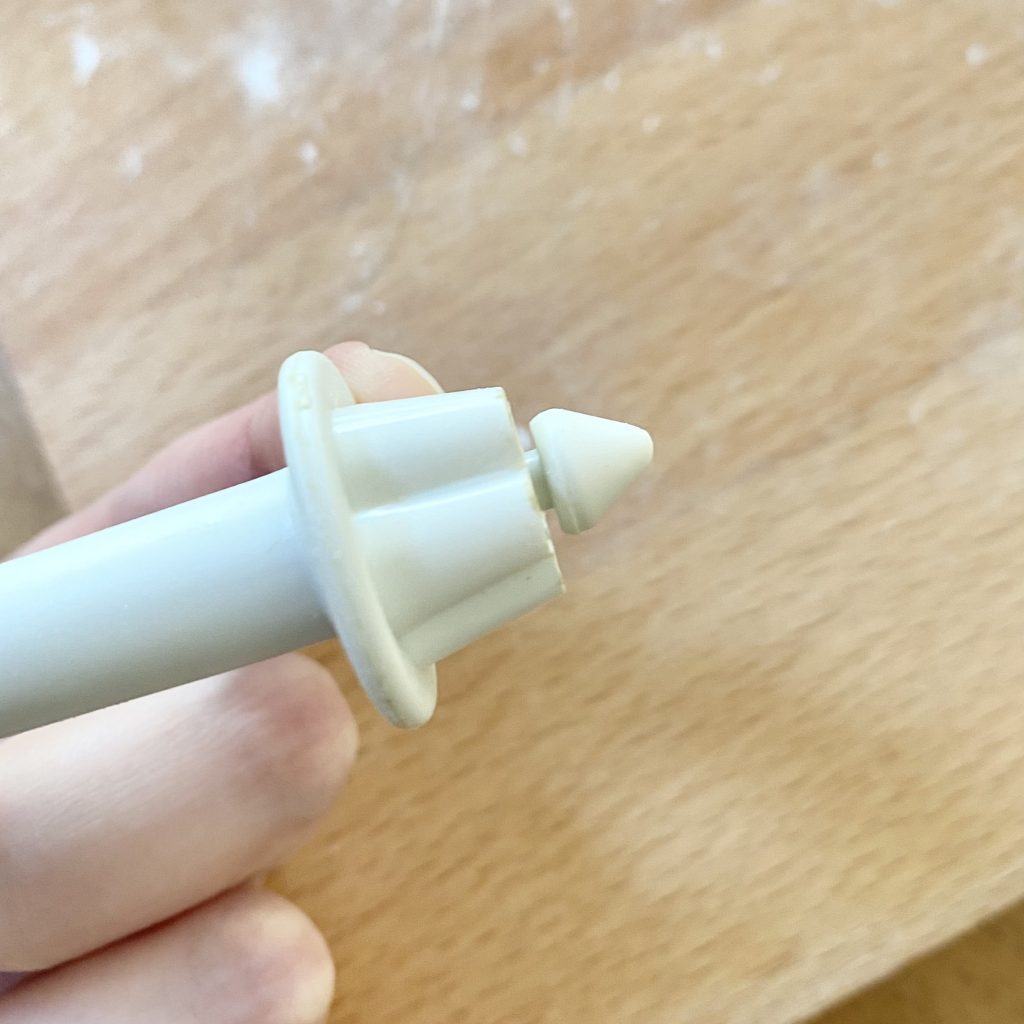
This is entirely optional, but I like to indent the daisies a little before drying them over the split peas, to help them get that 3D shape. I actually used the tapered ‘plunger’ element of one of these plunge cutters, but any small modelling tool will do really. If you don’t have one, try the end of a chopstick, or just skip this step entirely and leave the daisies to set over the split peas- they’ll be slightly less 3D, but will still have some dimension.
You will also need a rolling pin, as well as a large baking tray, lined with greaseproof paper.
Before you start, spread some of the dried split peas onto your baking tray- you’ll need 1 per flower. Position them so the flat sides are sitting against the tray and the rounded side is facing up. This is a little bit time-consuming, but it’s best to get this step out of the way now.
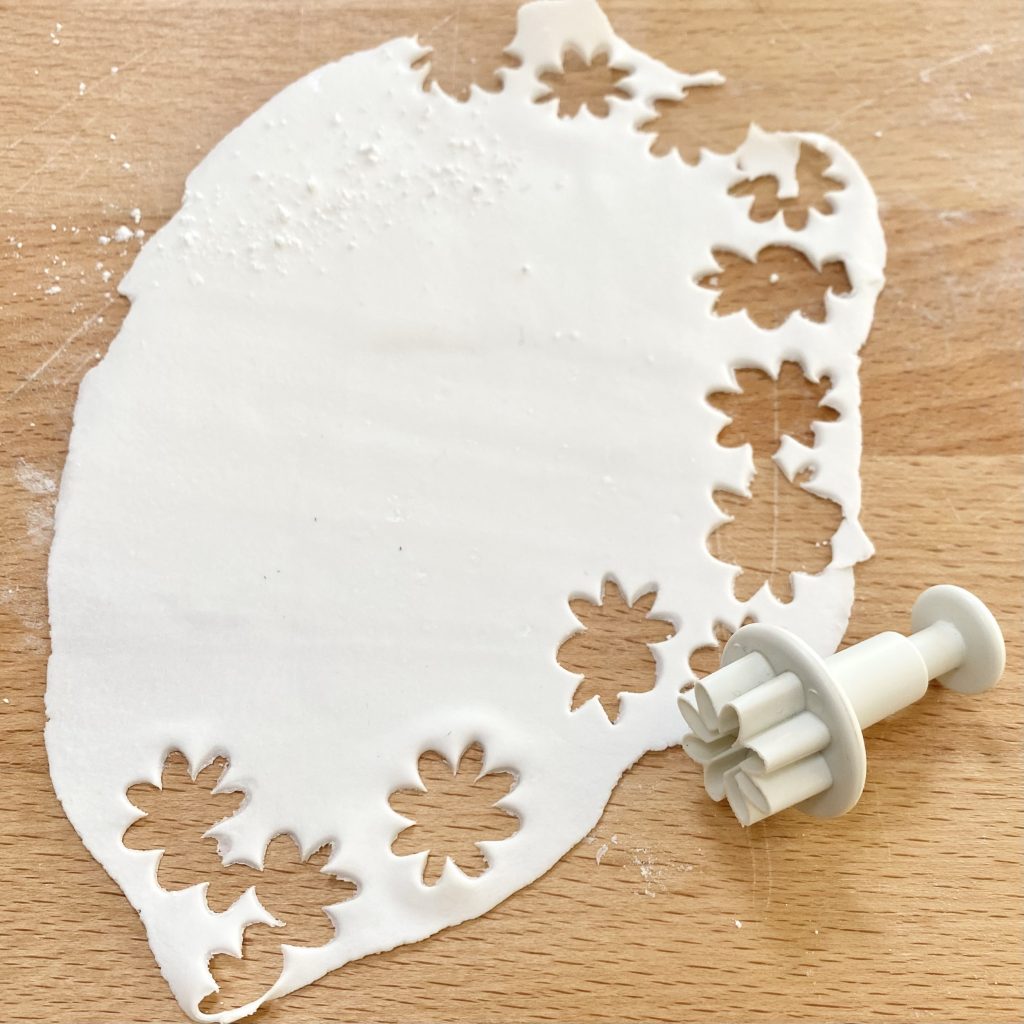
Once you have all of your ingredients/equipment assembled, you can start making the daisies. Knead the florist paste between your hands until it is smooth and pliable. Dust a clean work surface and rolling pin with icing sugar, then roll out the paste very thinly- plunge cutters aren’t really sharp at all, so if your paste is too thick, you won’t get a clean cut on your daisies. Once your paste is rolled out, you can cut the daisies- you’ll need about 12 per cupcake (so 144 in total!).
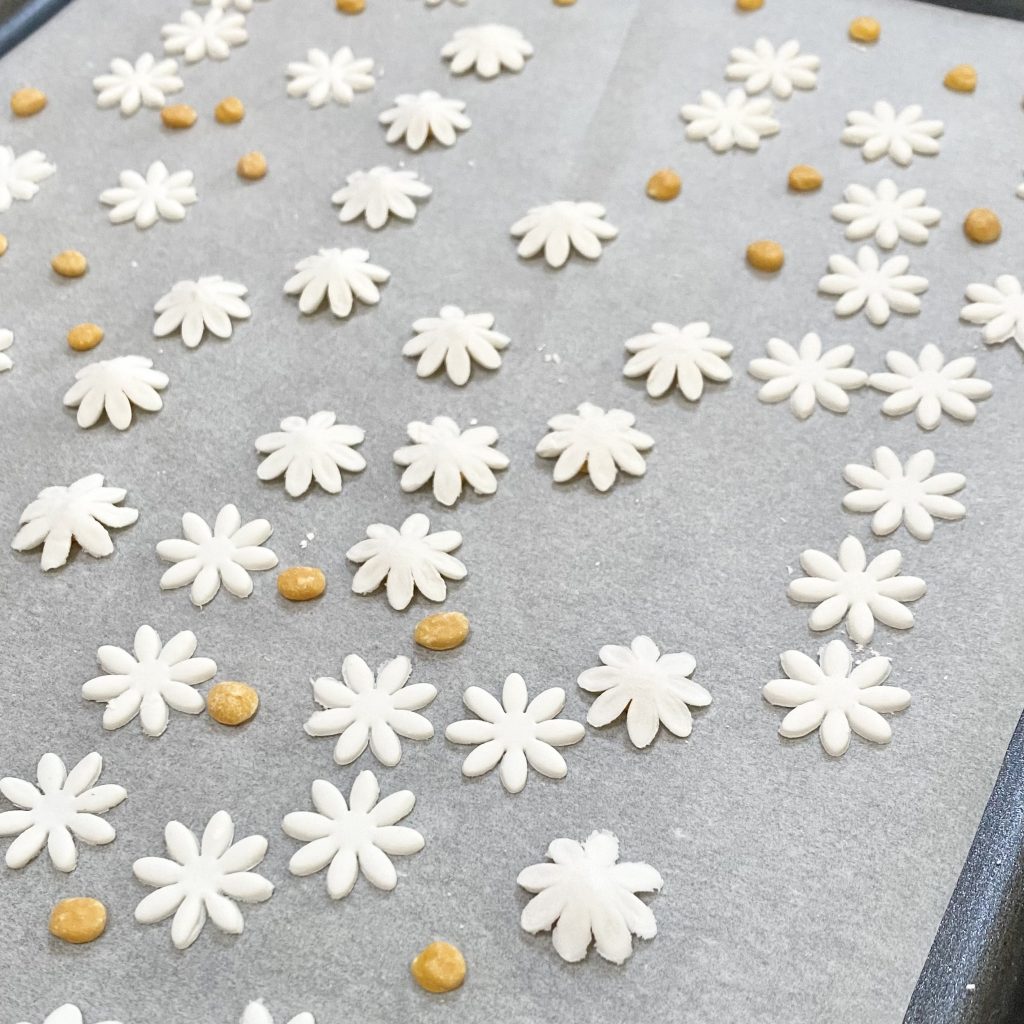
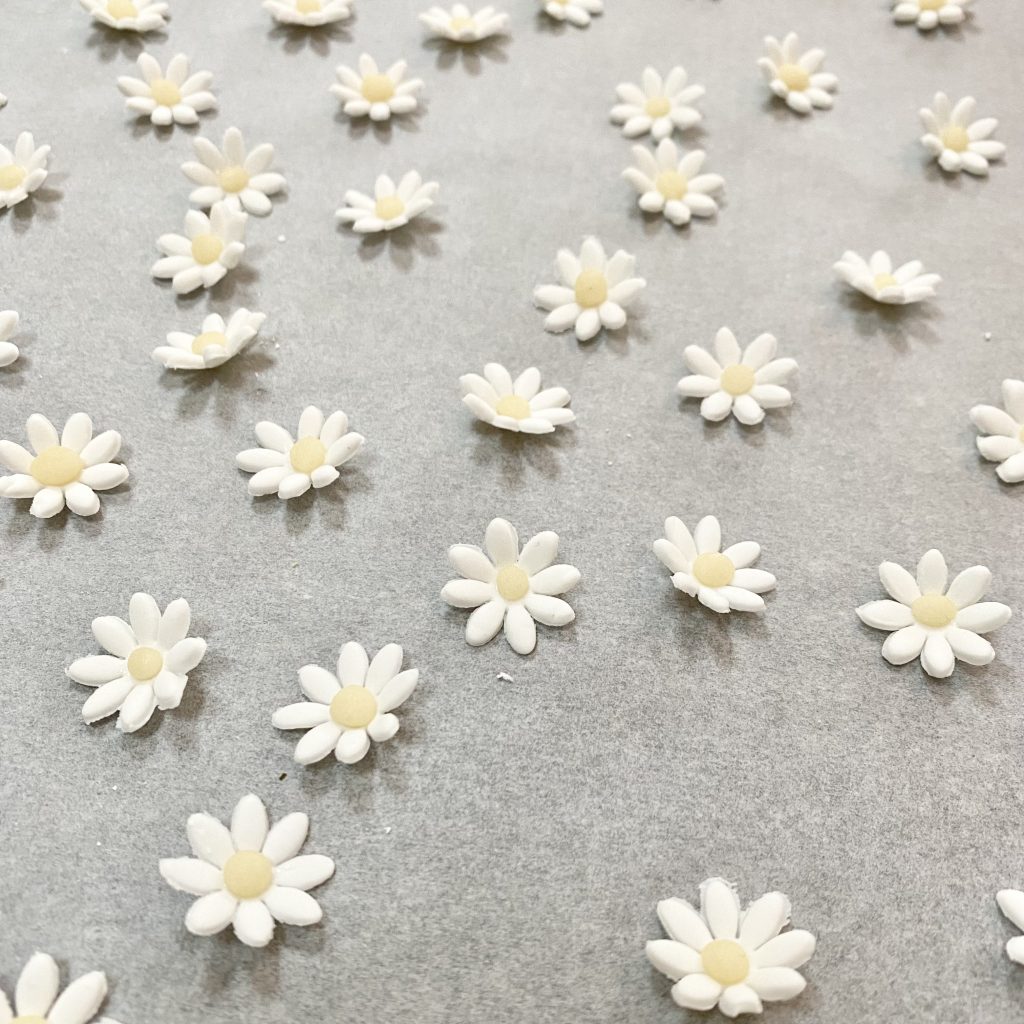
Once you have cut all of the daisies, place them, one at a time, into the palm of your hand, with the right side facing up. Use the modelling tool (if using) to press into the centre of the daisy, making an indent. Flip the daisy upside down and lay it over one of the split peas on the baking sheet, so that it will dry in the shape you have created. Repeat this for all of the daisies, then leave them to dry out overnight, or until hard (otherwise they won’t keep their shape). Once hard, the daisies will keep for a super long time, as long as they are stored in an airtight container and don’t get wet (if you intend to store the daisies for a long time, I recommend storing them without the marzipan centres, as marzipan contains more moisture than sugar florist paste. The marzipan will be fine for a couple of days, but any longer than that and you might encounter some sweating).
To add the yellow centres to the daisy, just take a tiny pinch of your marzipan (or other yellow modelling paste). Roll it into a ball between your dominant index finger and the palm of your non-dominant hand, then gently press it into the centre of the daisy. Repeat as needed.
Blackberry Compote
Next up, you want to make the blackberry compote, so that it can cool down in time for you to assemble the cakes. You can also make the compote ahead of time- stored in an airtight container in the fridge, it will keep for about a week. This compote only requires three ingredients:
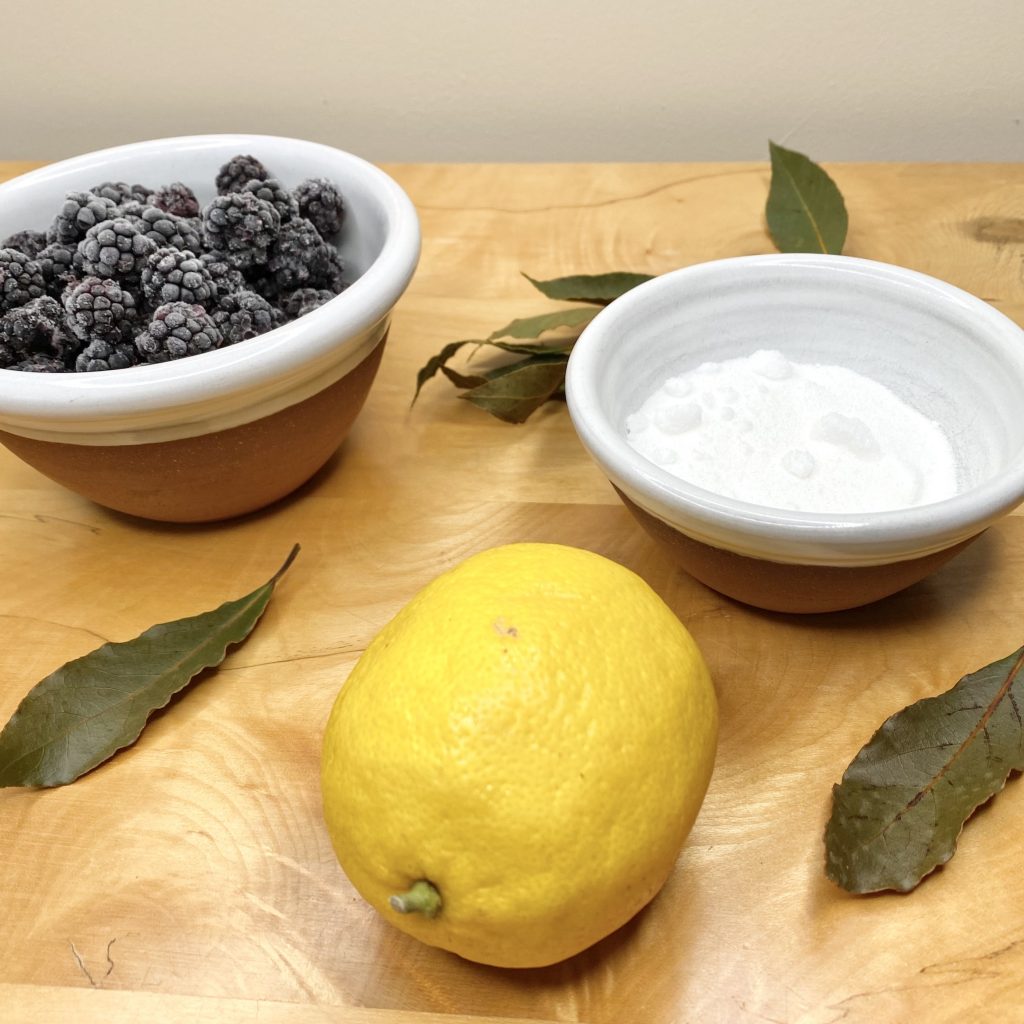
- Frozen blackberries
I like to use frozen blackberries, just because it’s easier to find them year-round, but you can use fresh if you prefer (just be aware that the compote will probably take a little less time than stated- don’t burn it!).
- Caster sugar
You could use granulated sugar, if that’s what you have on hand- just make sure you give it enough time to dissolve fully. I wouldn’t recommend using brown sugar, because it will affect the flavour of the finished compote.
- Lemon juice
You just need a little squeeze of fresh juice, but it makes all the difference- it brings out the flavour of the blackberries, but also livens up the compote with a fresh and zingy tang.
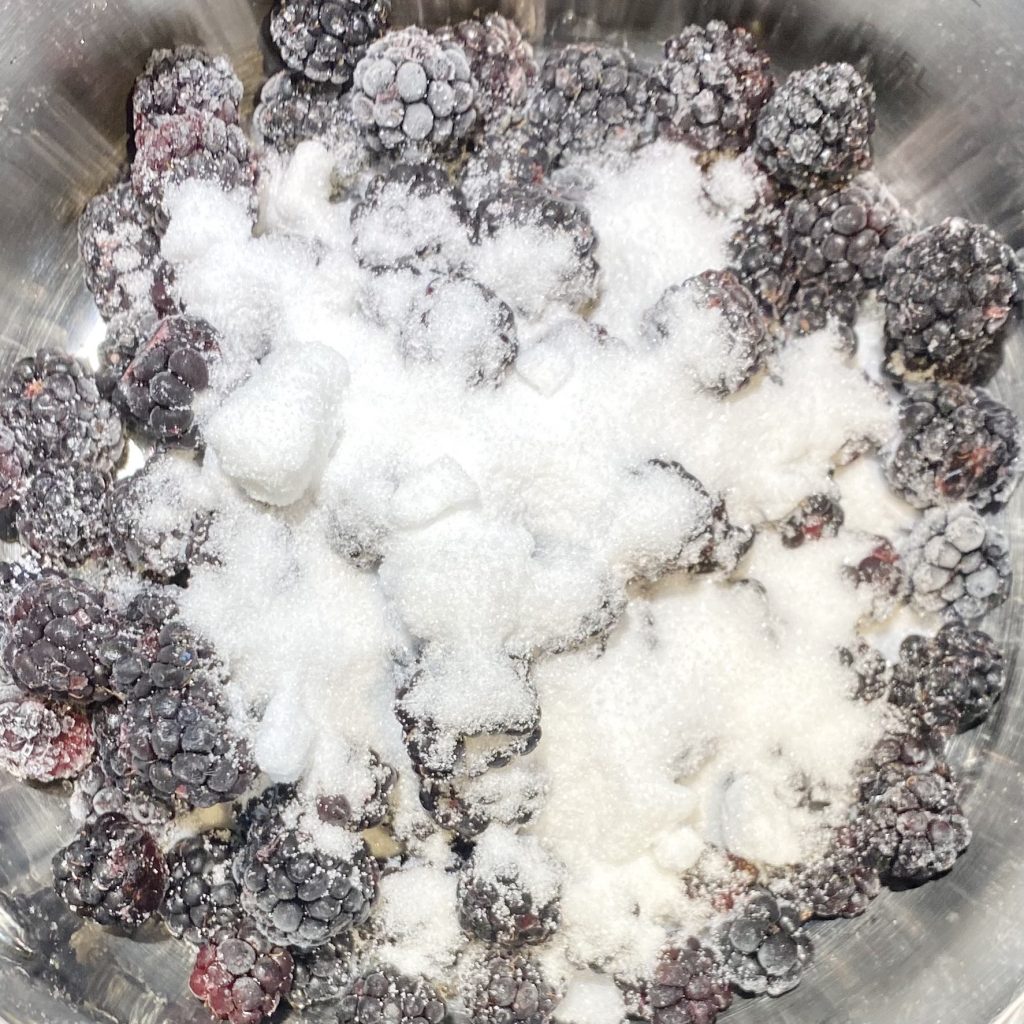
To make the compote, place the frozen berries and the caster sugar into a small saucepan over medium heat.
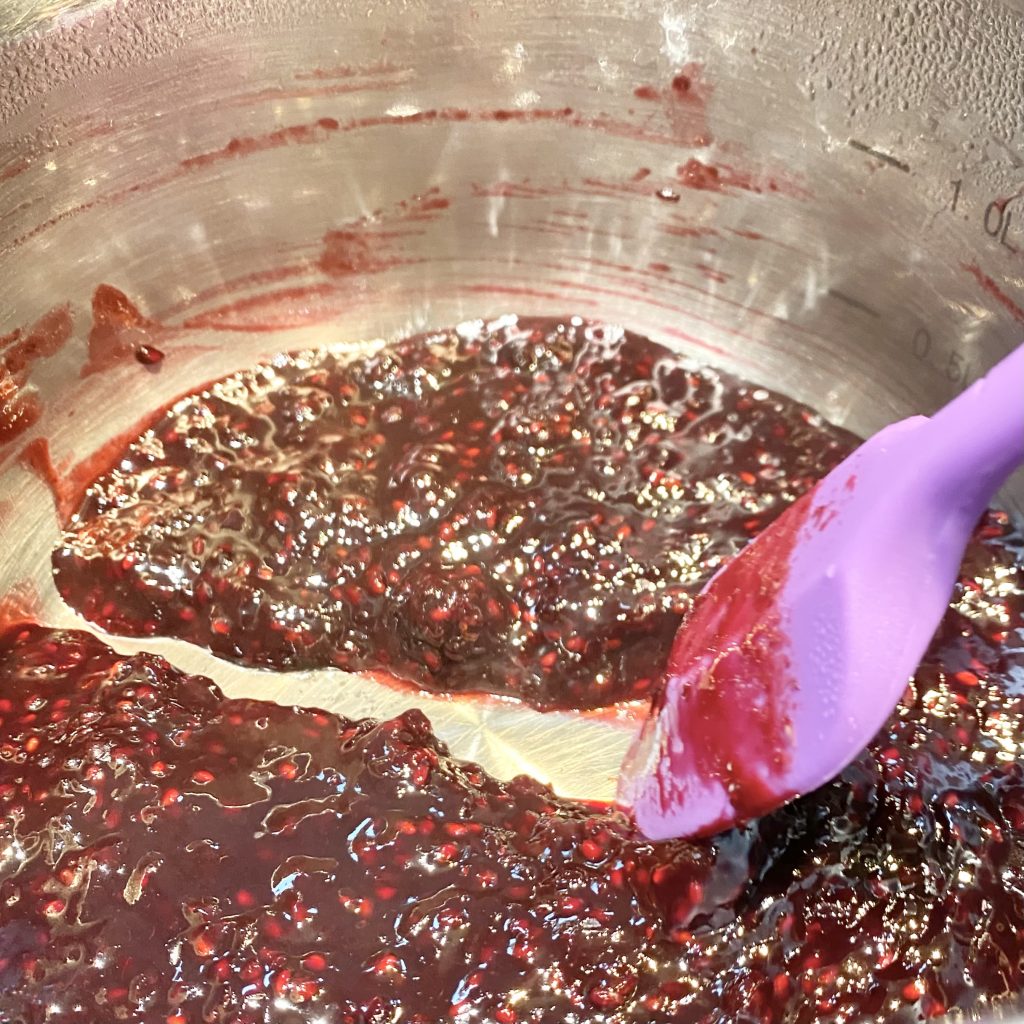
Stir every now and then until the mixture starts to bubble. At this point, reduce the heat to low and simmer gently for 35-40 minutes, stirring frequently to make sure it does not catch (if you see any indications of this, turn the heat down a little more). The blackberries should break down by themselves during this time, but you can give them a little mash with a fork/the back of a spatula to help the process along.
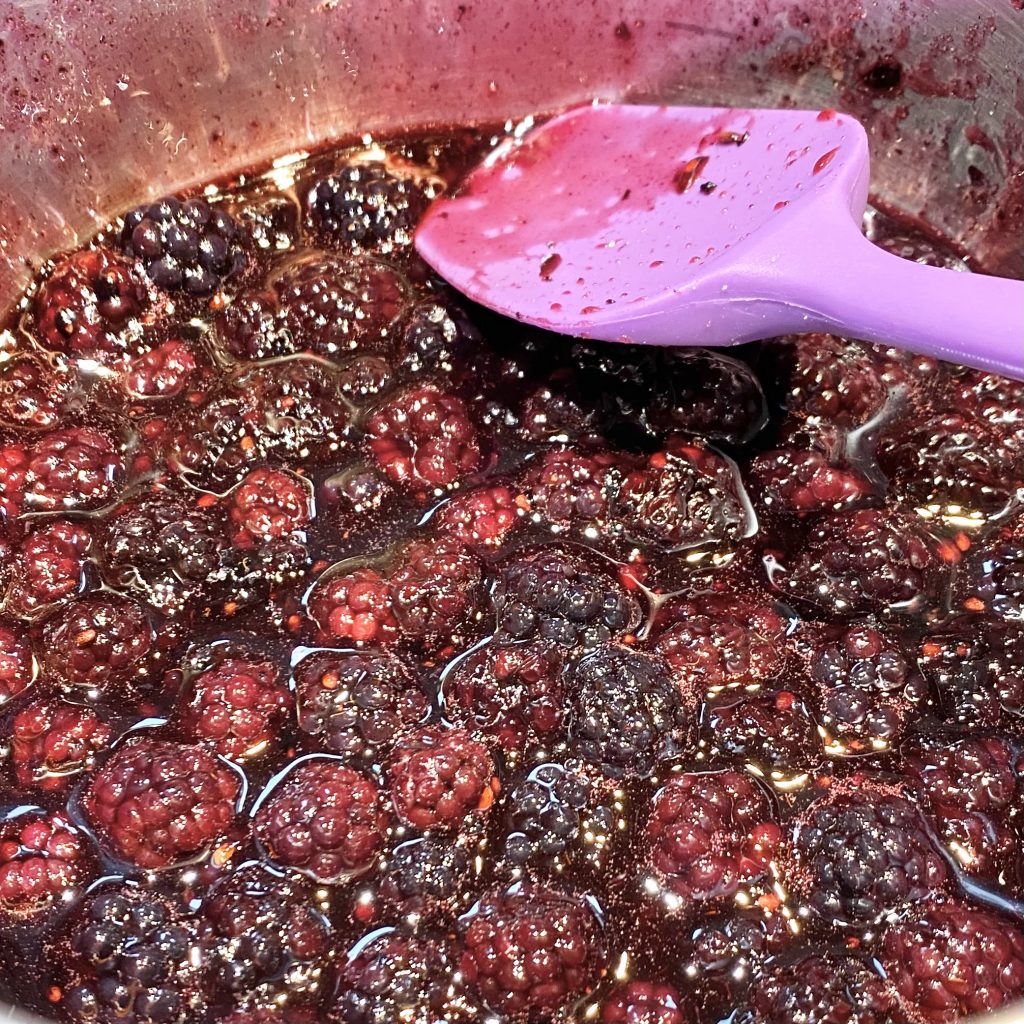
Once the fruit has all broken down and the compote is thick and jammy (see reference photo below), take the pan off the heat.
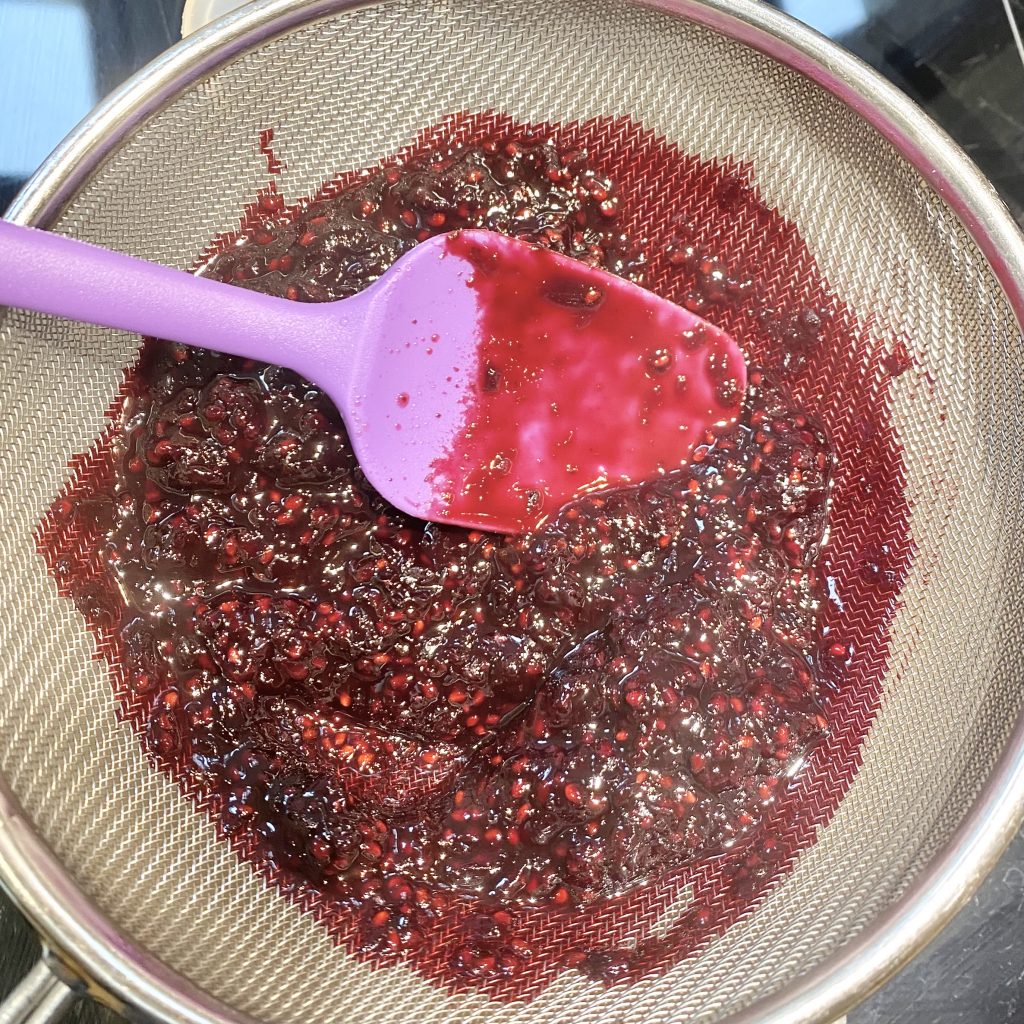
Pass the compote through a heatproof sieve, set over an equally heatproof bowl, and use the back of a spoon to press it through. This will remove the seeds, leaving you with a smooth compote. If your compote is a bit too thin at this stage, you can return it to the saucepan and allow it to simmer gently to reduce it a little more.
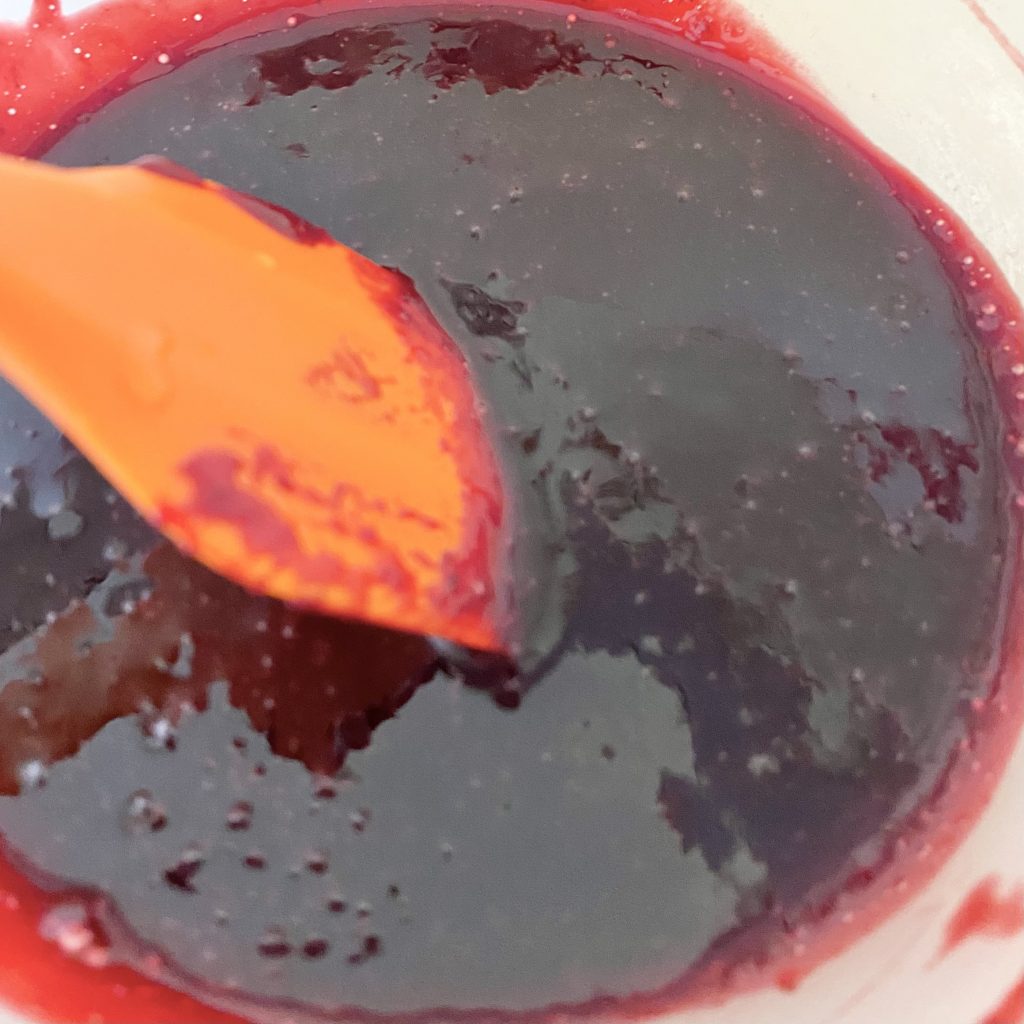
The last step is to add a squeeze of lemon juice to the strained compote and mix it in well. Allow the compote to cool before transferring it to an airtight container and placing into the fridge until it’s time to assemble the cupcakes. Stored like this, it should last for about a week.
Gingerbread Cupcakes
These gingerbread cupcakes have all the flavour of a lightly spiced gingerbread, with the texture of a typical cupcake. That is to say- these cupcakes aren’t dark and sticky in the same way that a traditional gingerbread cake is, but are still warm and spicy, just a little more subtly. I like to think of them as gingerbread biscuits in cake form!
These cupcakes are super easy to make- they use my All-In-One Method for cake batter, so they come together super quickly- the hardest part is measuring the treacle!
For the cupcake batter, you will need:
- Stork
As always with my cake batters, I like to use Stork (a brand of baking margarine), because I think it makes for a lighter, fluffier cake. If you don’t want to use Stork, or can’t find it, you can substitute an equal amount of softened unsalted butter.
- Caster sugar
It’s best to use caster sugar (as opposed to granulated sugar) when using the All-In-One Method, because it incorporates into the batter more quickly.
- Self-raising flour
It’s important to use self-raising flour to help the cupcakes rise. If you only have plain flour, you’ll need to add baking powder.
- Bicarbonate of soda
This recipe uses treacle, which is acidic, so it also contains bicarbonate of soda, which is alkaline, to balance out the flavours.
- Spices
The spices are what make these cupcakes so quintessentially gingerbread-y. I use a combination of cinnamon, ginger and cloves for a warm and spicy gingerbread flavour.
- Eggs
As with all of my recipes, I use large eggs.
- Milk
Ideally, you should use whole milk for all baking. I very rarely have whole milk in the house, so I almost always used skimmed milk and I’ve never had any problems, so just use whatever you have.
- Treacle
You don’t need much, but a little bit of treacle helps to lend that iconic gingerbread flavour to these cupcakes. If you don’t have treacle, you could substitute an equal amount of molasses- the flavour may be slightly more intense, but it will still taste delicious.
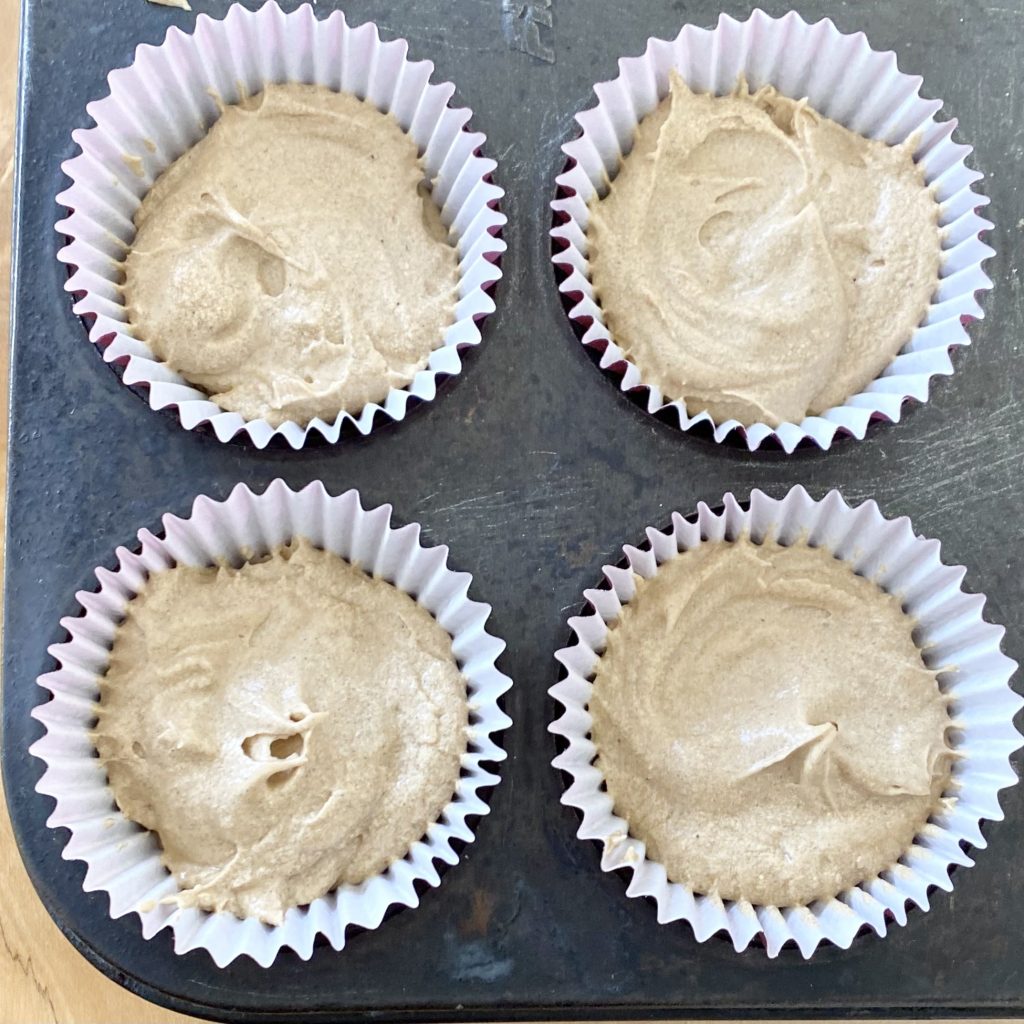
Once you have all of your ingredients, you can get on with making the cupcakes. Start by lining a 12-hole cupcake tray with paper cases (I used these burgundy cases from Purple Cupcakes– the same ones I used for my Maroon cupcakes, because I thought that they matched the colour of the blackberry compote nicely), and preheat the oven 170°C.
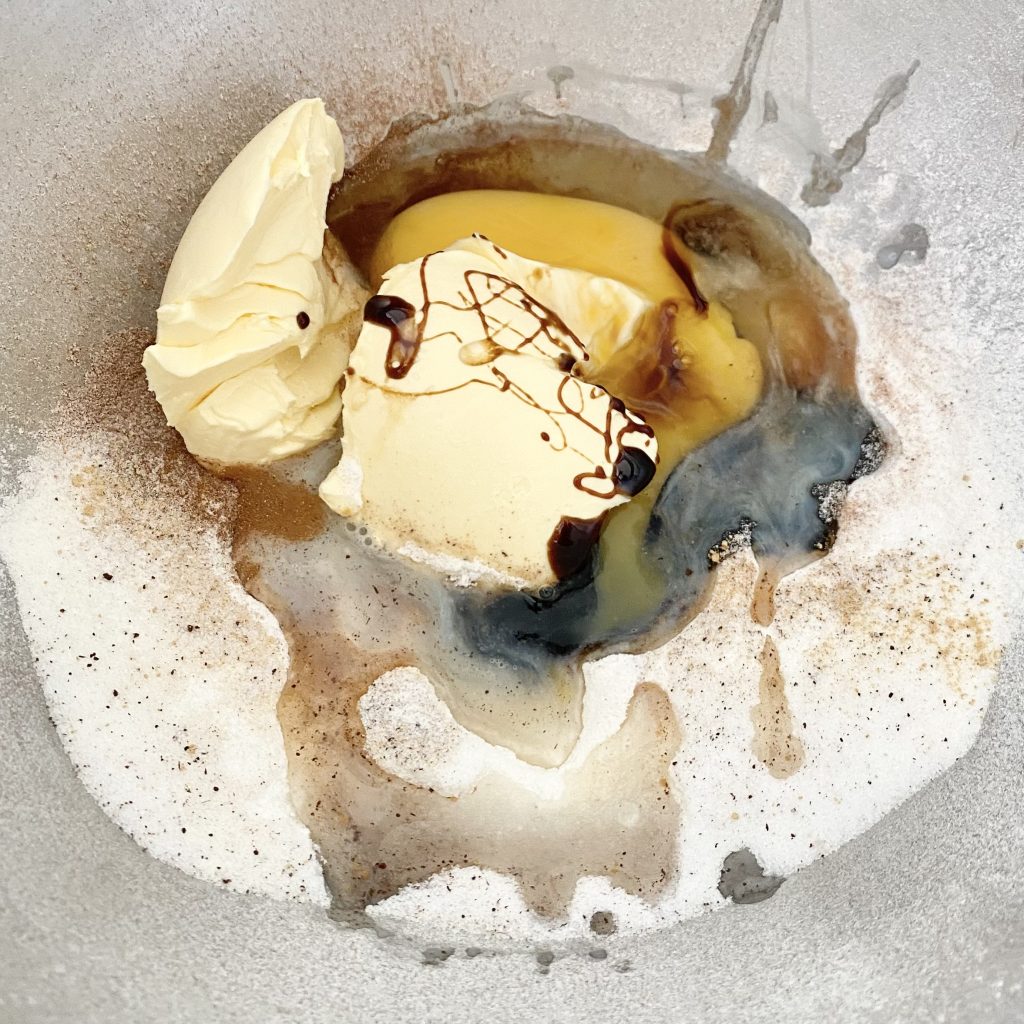
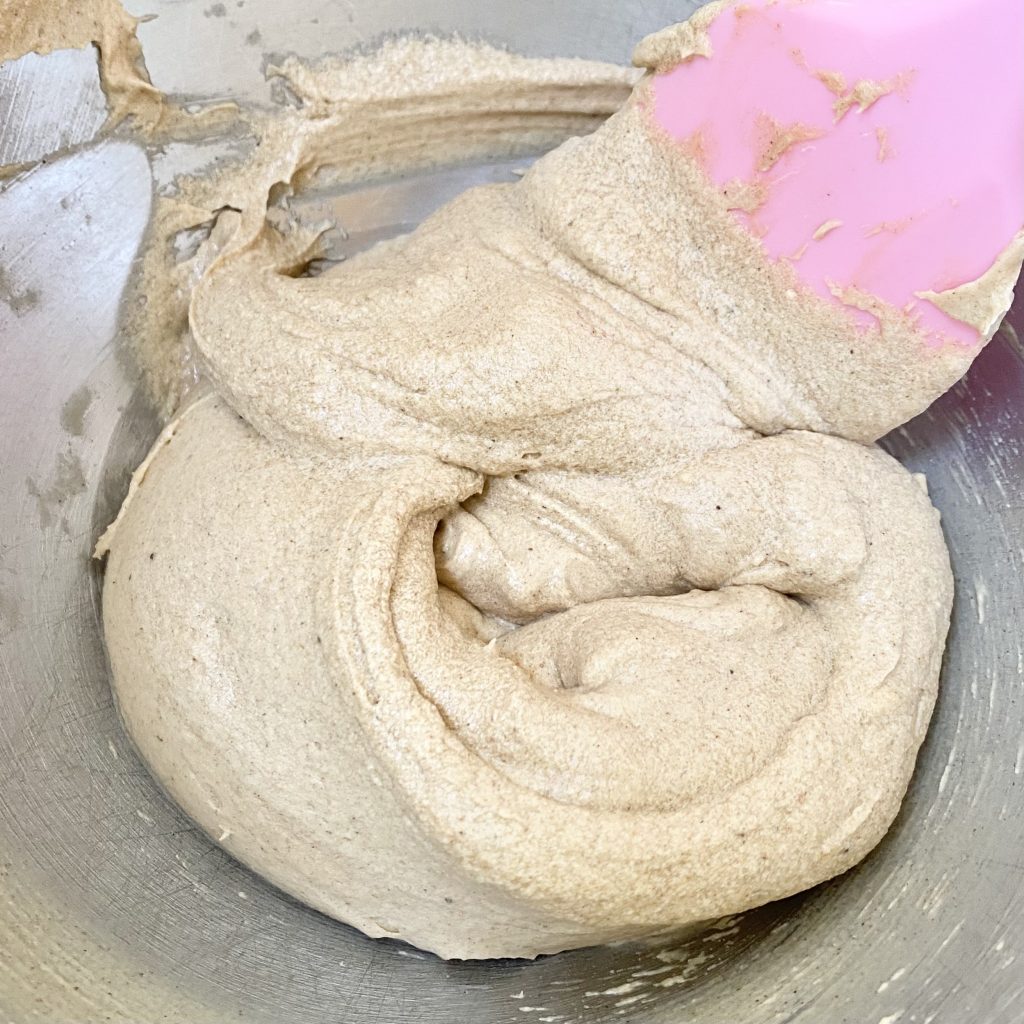
After that, it’s simply a case of putting all of the cake batter ingredients into the bowl of a stand mixer, fitted with the whisk attachment. Starting on a low speed, whisk the batter until it starts to come together, then gradually increase the speed to maximum and beat until the batter is light and fluffy- it will only take about a minute of whisking in total. For a more in-depth walkthrough of this technique, check out my Wimbledon Cake recipe, where I go through the whole thing in much more detail.
Once your batter is ready, divide it between the 12 cupcake cases. I like to use a regular-sized ice cream scoop to do this, but you can use two spoons if you prefer.
Bake the cupcakes in the oven for 25-30 minutes, or until they spring back after being touched gently. I like to remove the cupcakes from the tray as soon as they come out of the oven and transfer them to a wire rack to cool, so that the cases do not become greasy, but do be careful if you do this because they will be very hot. Allow the cupcakes to cool completely before filling/decorating.
Filling the Cupcakes
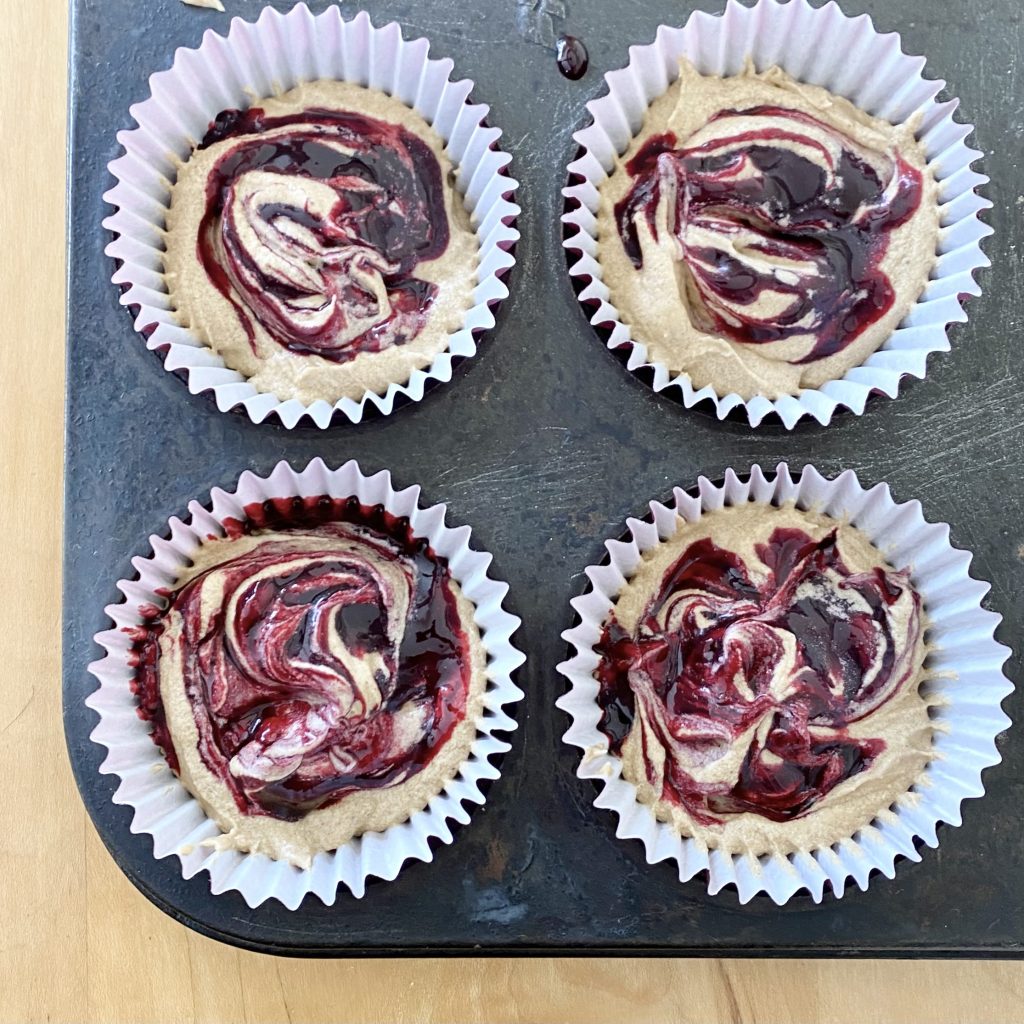
When I made these cupcakes, I swirled a little bit of blackberry compote into the batter before baking the cakes. In all honesty: it looked great, but you could barely taste it! When you’ve gone to all the trouble of making the compote, and when the blackberry plays such a big role in the ‘story’ of these cupcakes, that just wouldn’t do!
Because of this, I have written the recipe to include a different method of incorporating the blackberry compote into the cupcakes, which will really help it to live up to its fullest blackberry potential: I recommend filling the cupcakes with some fresh compote after they have baked- think like a Victoria Sponge, filled with jam, only these are Gingerbread cupcakes, filled with compote. Sounds good, right?
Filling cupcakes is super easy to do. Essentially, you just need to remove some of the cake, fill the leftover hole with compote, then add part of the removed cake back on top to seal in the filling. There are a couple of ways you can do this:
- Use an apple corer
Line the apple corer up with the centre, then apply slight pressure, while twisting slowly. The serrated edge will cut through the cupcake. Go down about half way into the cupcake, then remove the corer (along with the cut cylinder of cake). Add some compote to the cavity (you can use a jug, a spoon or even a piping bag to do this). Finally, use a small, serrated knife to trim the bottom off the cylinder of cake you removed, then push the top back into the cupcake, to seal in the filling.
- Use a knife
If you don’t have an apple corer, you can use a small, serrated knife to create the cavity. Hold the knife as close to vertical as possible, and carve out a small circle in the centre of the cupcake. Use the knife to wiggle the cake out of the circle, then fill and seal up as above.
Once all of your cupcakes are filled with compote, you can decorate them.
Cream Cheese Icing
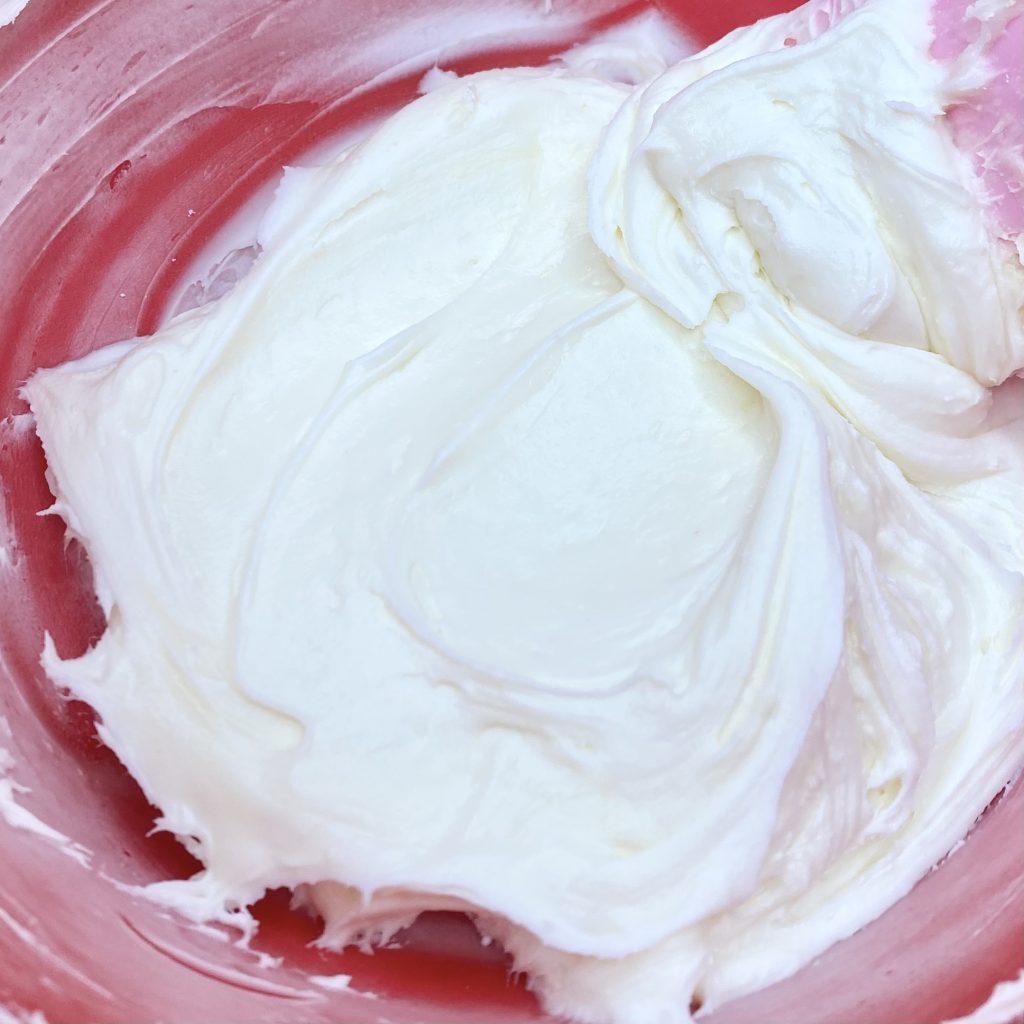
I’ve posted a few recipes that use cream cheese icing here on the blog, so I won’t go into too much detail here. If you would like to read a full walkthrough of how to make perfectly pipeable cream cheese icing, you can find that here. Essentially though, there are two main rules you have to follow if you want a thick and smooth icing, instead of a sloppy mess:
- Use full-fat cream cheese
Trust me, low-fat just won’t work for this- you’ll end up with a super thin icing that just can’t be remedied by adding more icing sugar.
- Don’t overmix the cream cheese
Unlike butter, cream cheese doesn’t really respond well to being whipped up a lot. Try to minimise your mixing once the cream cheese has been added- this will help you to achieve a lovely, thick icing.
Not following one/both of these guidelines will inevitably leave you with soupy cream cheese icing that doesn’t hold up when piped and is kind of… unpleasant to eat? Save yourself the bother and follow my two Cream Cheese Commandments for perfect cream cheese icing, every time.
Assembling the Cupcakes
Finally, we have reached the assembly stage- in the homestretch now!
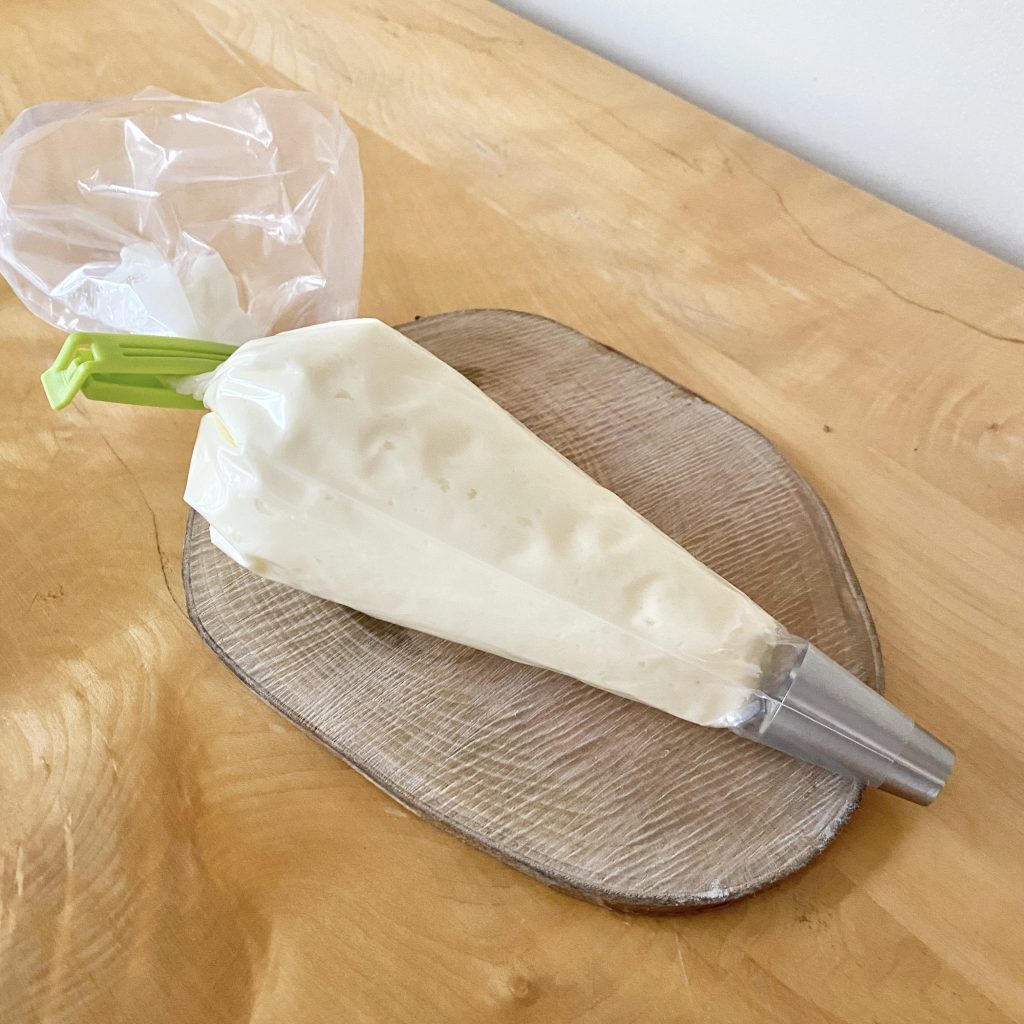
Start by putting your cream cheese icing into a piping bag, fitted with a large round tip. This time, I tried out attaching a food clip to the top of the filled bag, to prevent the icing from coming out the top and I thought it worked really well- I’ll definitely be using this trick again!
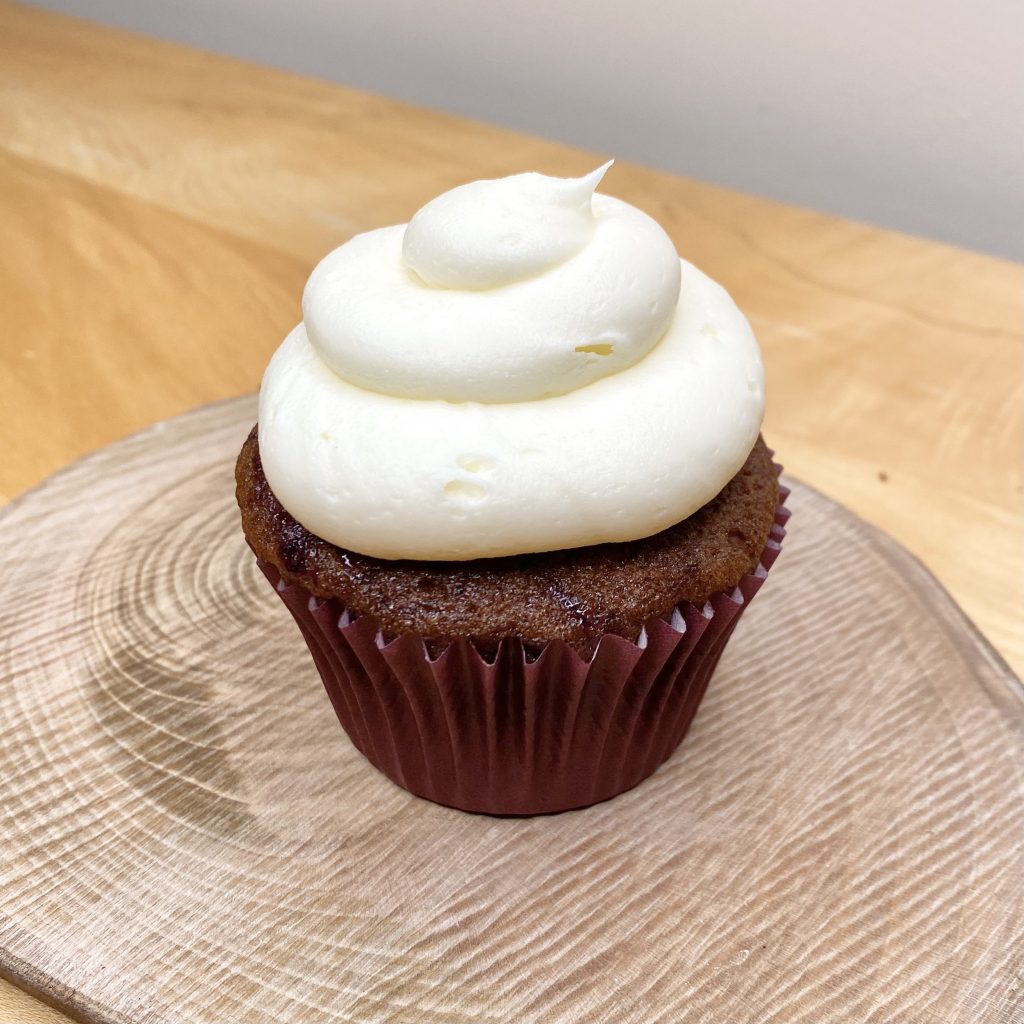
Pipe a big swirl of icing onto each cupcake- I like to start in the middle, applying an even pressure as I slowly move out and draw a circle around the circumference of the cake, then work my way up in a spiral. If you have an ever bigger piping nozzle than me, you could just keep the piping bag in the centre of the cake and lift it up gently as you apply pressure, to achieve one big dome of icing. Either way, the icing is going to be largely obscured by compote, so it doesn’t have to be too perfect.
Next up, you want to add some blackberry compote. I used a teaspoon to drizzle some right on top of the icing but, again, you could use a piping bag for more control, if you prefer.
Using a cocktail stick, or a small, sharp knife, swirl the compote into the icing a little. Don’t overdo this, or you’ll just end up with pink icing, but marbling it slightly will make the cupcakes look super pretty. Embrace the intentionally messy look!
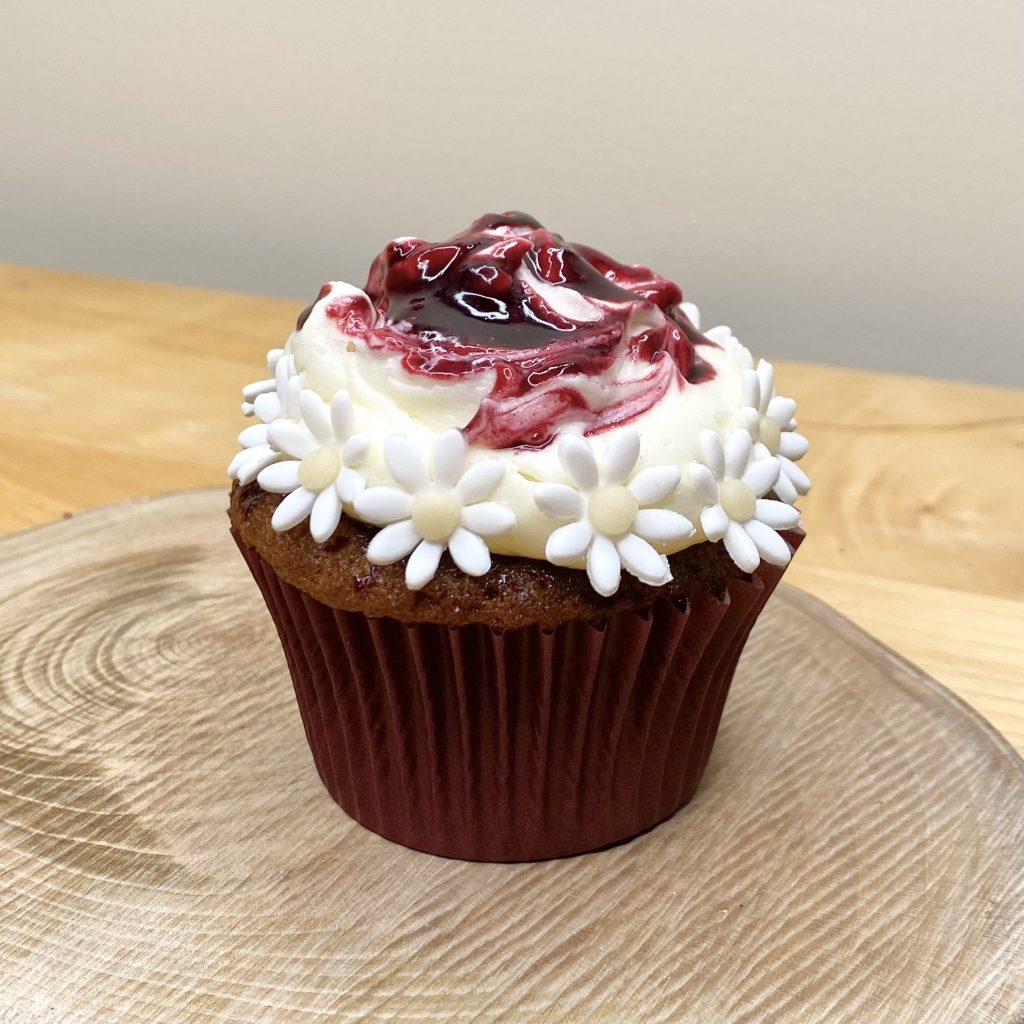
Finally, just press the hardened sugar daisies onto the icing. I did a ring of them all around the base of the icing, to mimic the look of a friendship bracelet, but you can add the flowers wherever you want.
Et voilà! You’ve got yourself 12 blackberry and gingerbread cupcakes, inspired by ‘You’re On Your Own, Kid‘, by Taylor Swift. I hope you’ve enjoyed this 5th instalment of my Taylor Swift Cupcakes Series! Let me know what you think of the latest cupcake in the comments down below!
Gemma
xxx
Recipe
‘You’re On Your Own, Kid’ Cupcakes
Equipment
- 1 19mm daisy plunger cutter (see Note 1).
- 1 tapered/ball modelling tool (see Note 2).
Ingredients
For the sugar daisies:
- 60-70 g sugar florist paste (see Note 3).
- 10-15 g marzipan (see Note 4).
- Icing sugar, for dusting.
- Dried split peas (see Note 5).
For the blackberry compote:
- 200 g blackberries (I used frozen, but you can use fresh if you have them).
- 60 g caster sugar
- 1 lemon
For the gingerbread cupcakes:
- 200 g Stork (see Note 6).
- 190 g caster sugar
- 180 g self-raising flour
- 1/4 tsp bicarbonate of soda
- 1 tsp ground cinnamon
- 1 tsp ground ginger
- 1/8 tsp ground cloves
- 3 eggs
- 2 tbsp milk
- 3/4 tbsp treacle
For the cream cheese icing:
- 100 g unsalted butter, softened
- 160 g full-fat cream cheese
- 560 g icing sugar, sifted
Instructions
For the sugar daisies:
- Line a large baking tray with greaseproof paper. Spread out split peas (1 per cupcake) onto the tray, domed sides up, then set aside.
- Dust a clean work surface and rolling pin with icing sugar. Knead the sugar florist paste between your hands until malleable, then roll out as thinly as possible. Use the daisy-shaped plunge cutter to punch out 144 daisies (maybe a few extra, just in case!). As you make each daisy, push it out of the cutter into the palm of your hand, then use the modelling tool to press the centre of the flower to give it a cupped shape. Place each daisy upside down over a dried split pea on the lined tray and leave to harden for at least 12 hours.
- Once the daisies have hardened, make the marzipan centres. Knead the marzipan between your hands until malleable, then take a tiny pinch of the paste and roll it between the palm of your non-dominant hand and the index finger of your dominant hand, to form a tiny ball. Carefully lift a daisy off its split pea, then press the marzipan ball into the centre, where the pea has made the indent. Repeat for all the daisies and set aside in a cool, dry place until ready to decorate.
For the blackberry compote:
- Place the blackberries and sugar into a small saucepan over medium heat. Stir every now and then, until the mixture starts to bubble, then turn the heat down to low and simmer gently for 35-40 minutes, stirring frequently to prevent the compote from sticking and to help break up the berries.
- Once the fruit has all broken down and the compote is thick and jammy, remove the pan from the heat. Pass the compote through a heatproof sieve, pushing it through with the back of a spoon, to remove the seeds.
- Add a squeeze of fresh lemon juice to the strained compote and stir it through, then transfer the compote to an airtight container and store in the fridge until ready to use, or up to a week.
For the gingerbread cupcakes:
- Preheat the oven to 170°C. Line a 12-hole cupcake tin with cupcake cases and set aside.
- Place all of the cupcake ingredients into the bowl of a stand mixer, fitted with a whisk attachment. Whisk on low speed to incorporate all of the dry ingredients, then gradually increase the speed to full, scraping down the sides of the bowl as needed. Whisk the batter until it is light and fluffy- this shouldn't take longer than about 1 minute.
- Divide the batter between the 12 cupcake cases (I use an ice cream scoop to do this), then bake in the preheated oven for 25-30 minutes, until the cakes spring back when touched gently. Immediately transfer the cakes to a wire rack (to prevent any greasy cases), then leave to cool completely before filling/decorating.
For the cream cheese icing:
- In a large bowl, beat the softened butter for 1-2 minutes with an electric mixer, until smooth and noticeably paler.
- Add the cream cheese and mix into the butter by hand until incorporated.
- Sift in the icing sugar and mix by hand until incorporated. Use electric mixer to beat for 10-15 seconds only, until fluffy, but still thick and stiff. Transfer the icing to a piping bag, fitted with a large, round nozzle, ready to pipe onto the cakes.
To fill the cupcakes:
- Once the cakes are completely cool, use an apple corer/sharp knife to remove a small circle of cake from the top of each cupcake. Use a spoon or piping bag to fill the cavity with a small amount of blackberry compote, then trim the bottoms of the removed cake pieces and insert the tops back into the holes, to seal in the filling.
To decorate:
- Pipe a large swirl of cream cheese icing onto each cupcake. Use a spoon or piping bag to drizzle a small amount of blackberry compote on top of the icing, then use a sharp knife/cocktail stick to swirl it in. Press 12 sugar daisies into the icing, all around the base of the swirl, to give the appearance of a daisy chain-inspired friendship bracelet.
- Because of the cream cheese icing, these cupcakes are best served immediately, or within 1 hour of assembling, if kept at (a cool) room temperature. They will keep for about 2 days if stored in an airtight container in the fridge.
Notes
- Daisy plunger cutter: I used the 19mm cutter from this pack, but any daisy cutter will do. I like the plunge ones because the petals can be tricky to get out of normal cutters, but use what you have.
- Modelling tool: this is optional- it just helps to give your daisies more dimension. If you don’t have one, try using a chopstick instead. You could even skip this step and just set the daisies over the split peas instead, but the finished daisies will be slightly flatter.
- Sugar florist paste: Florist paste is different to sugar paste, fondant or modelling paste- it is more flexible and dries harder. That’s not to say you can’t use the other ones to make the daisies, it might just be a little trickier/more time consuming.
- Marzipan: I used marzipan for the centres of my flowers, because it is what I had, but you could use any sort of modelling paste (even a little sugar florist paste), dyed yellow, if you prefer.
- Dried split peas: worry not- you won’t actually be eating the dried split peas, they are just the perfect size/shape to dry the sugar daisies over to give them the right shape when they have hardened. You’ll need one dried split pea for each daisy.
- Stork: as always, I like to use Stork in place of butter in my cakes, because I think it makes for a lighter, fluffier sponge. If you prefer, you can substitute the Stork for an equal amount of softened, unsalted butter.