Hello again!
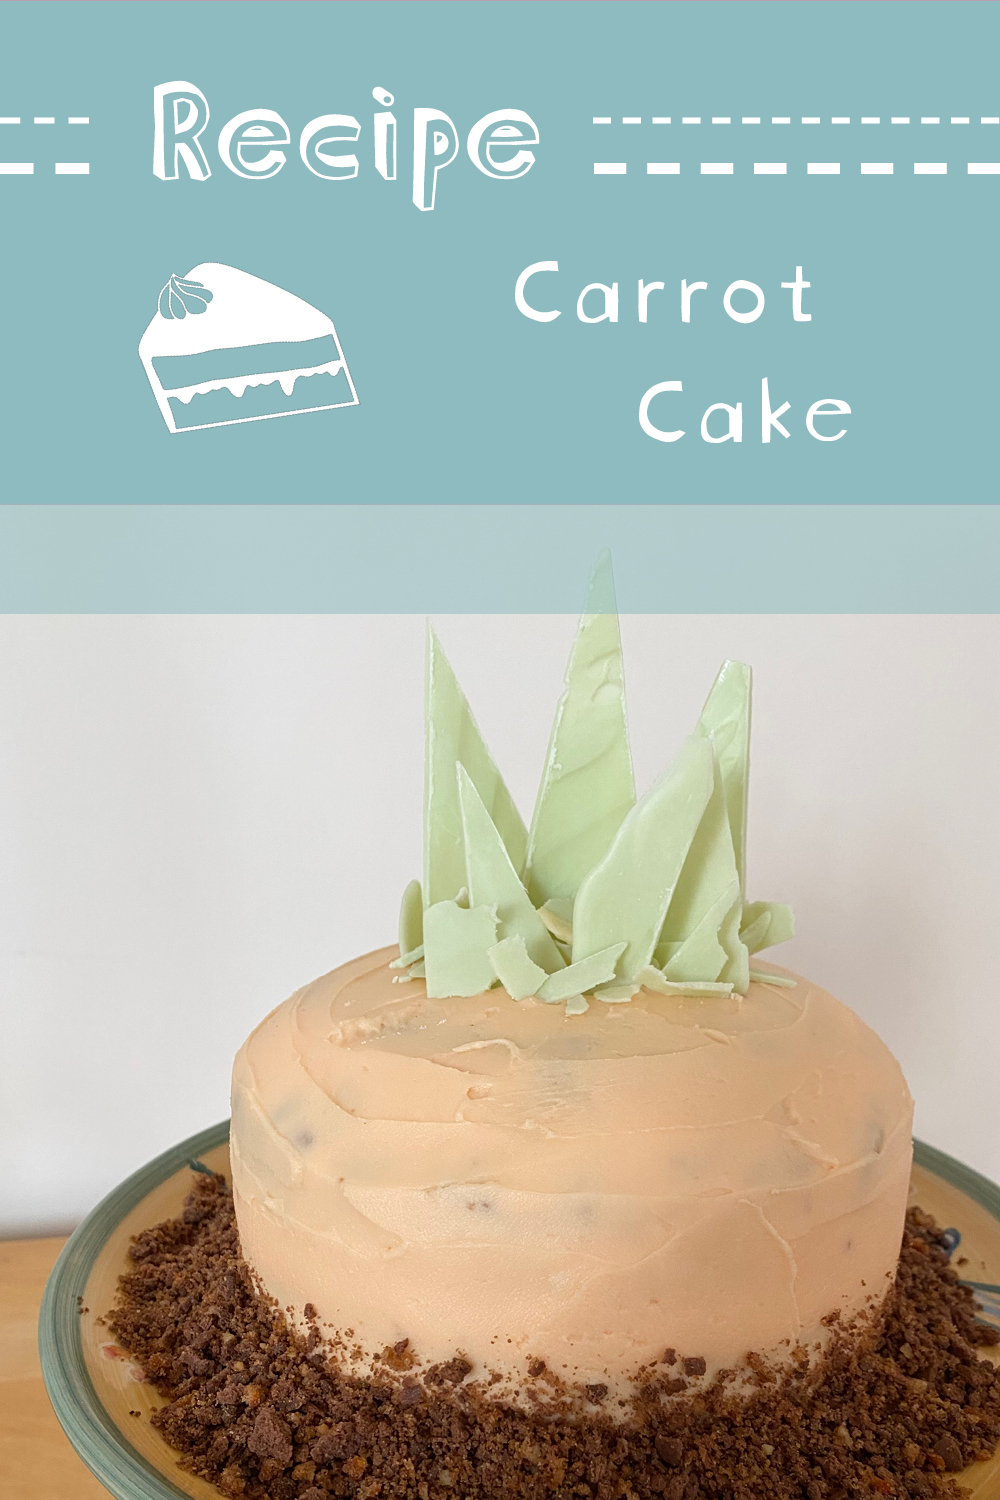
I feel like carrot cake is one of those very marmite things- you either love it or you hate it. As a child, I just could not understand why anyone would want a) vegetables in their cake???? and b) cheese in their icing???? I was, to be perfectly truthful, all-round very suspicious of it. Now, however, I have grown up. My tastes have developed (barely- I would still eat my bodyweight in chocolate on a daily basis if left to my own devices). I am no longer horrified by the prospect of cheese in icing (in fact, my favourite icing ever is a marscapone icing! Go figure). My dislike for carrot cake, however, persevered. That is, until I tried out this recipe, by Cupcake Jemma (owner of my favourite bakery of all time, Crumbs and Doilies, in London). And it was magic. Moist, nutty, carrot-y but in a delicate, normal, not a why-the-heck-is-there-a-vegetable-in-my-dessert kind of way. Dreamy.
Anyway, long story short, I’m a carrot cake convert. Thank you, Cupcake Jemma.
Today, I’m bringing you my (significantly smaller) version of Cupcake Jemma’s cake. Instead of a 4-layer, 8-inch cake, mine is a 2-layer, 6-inch situation. I may be a convert, but I still have limits. Anyway, I’ve done all the required maths for this adaptation, so you don’t have to!
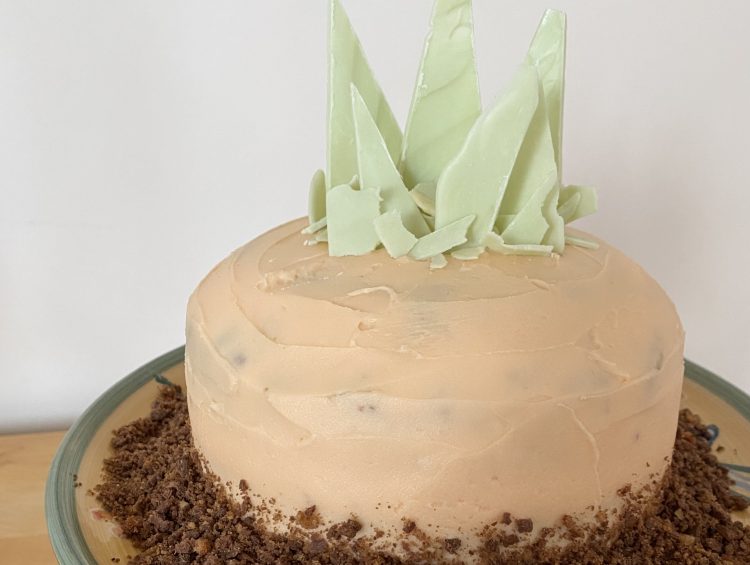
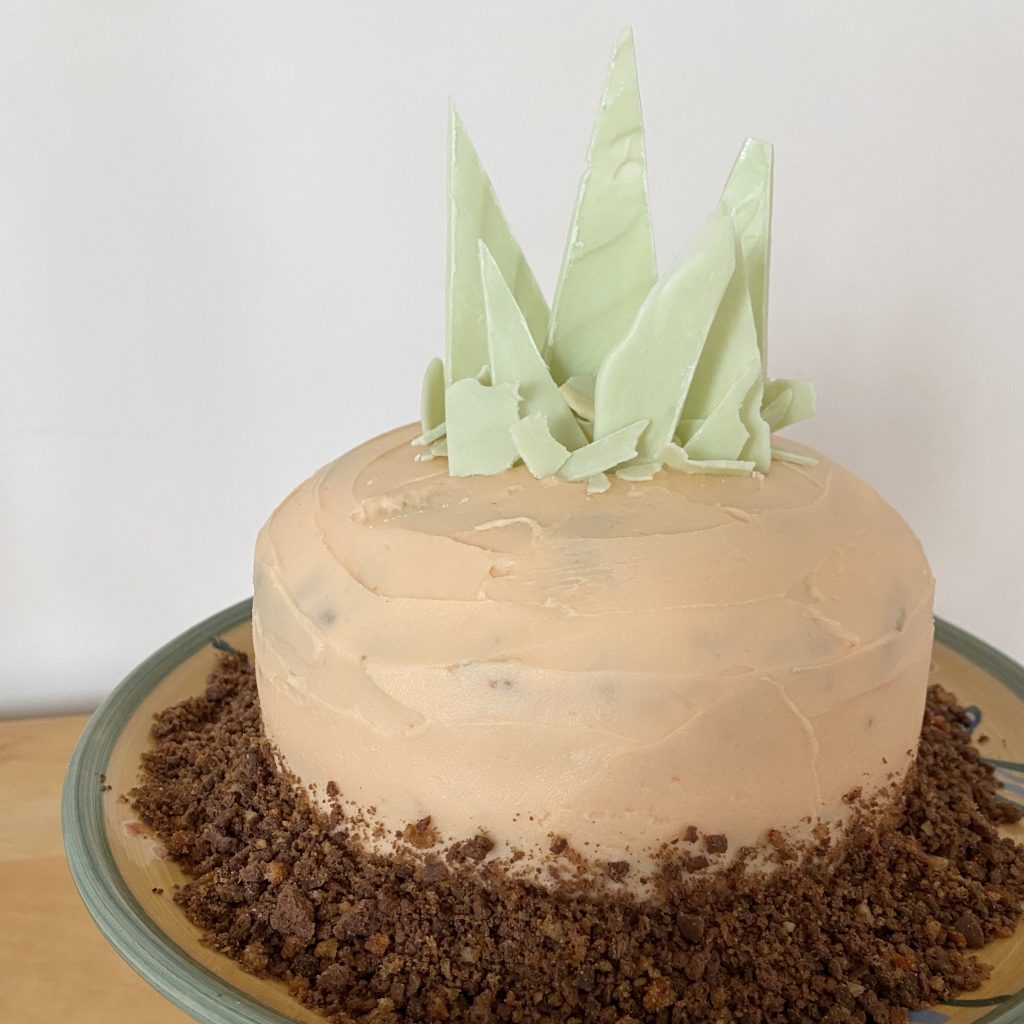
Oh, also- because it’s Easter soon, and because I think it’s funny when cake is made to look like other things, I made my cake look like the top of a carrot poking out of a bed of soil. Obviously, this is totally optional, but I think it’s cute! It’s also a pretty easy process, so it’d be great for an impressive Easter dessert for beginners.
Let’s get into it, shall we?
Making the cake batter:
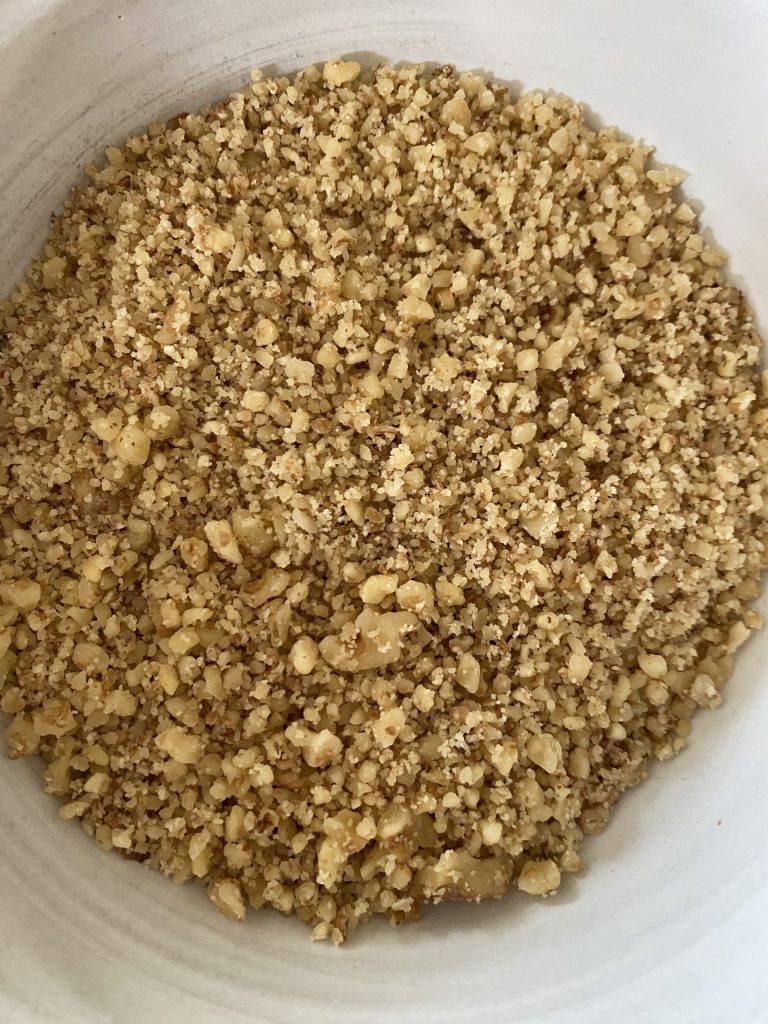
First up, the cake itself. I’m convinced that the reason this cake is so good is because of the ground walnuts. You’ll want to grind them in a food processor until they are pretty fine, like in the photo below. They act a little like ground almonds, giving the cake a lovely moist crumb and a toasty, nutty flavour. However, be careful not to overdo it when you grind the nuts- the more you process them, the more oils they will release and the more likely it is that you will be left with a bowl of walnut butter, instead of ground walnuts! Blitz them until they are finely chopped, but don’t worry if there are some bigger pieces- it will just add to the texture.
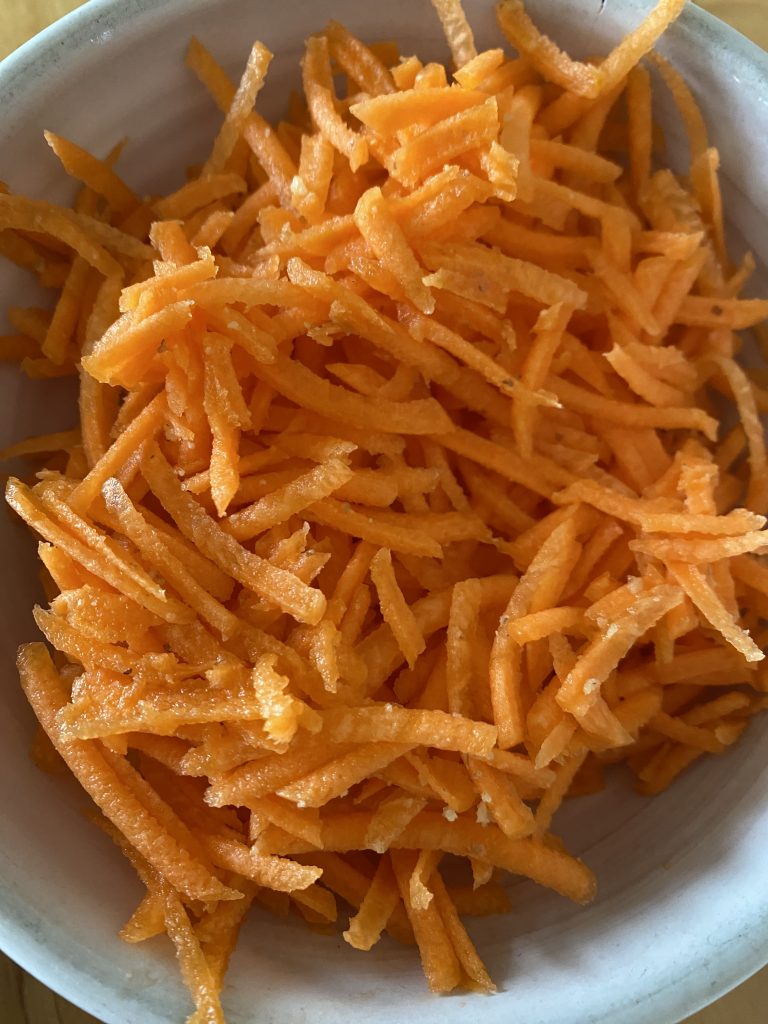
The other thing you’ll want to get ready before you start are the carrots. You need to peel and grate them- I used a food processor for this, because grating carrots by hand takes quite a bit of elbow grease (definitely not within my capabilities). With the food processor, the whole process took about 2 minutes at most. Big fan.
Along with the carrots and walnuts, the main flavour in this cake is ground cinnamon. It lends a lovely autumnal warmth and colour to the cake. I’ve also heard that fresh or ground ginger can be a nice addition in carrot cake- I’ll have to give that a go one day!
Making the cake batter is a relatively straightforward process. You start by sifting the dry ingredients together and combining with the walnuts (like in my Maple Pecan Cupcake recipe, coating the walnuts in flour will ensure that any larger pieces don’t sink during baking). After setting the dry ingredients aside, you beat the eggs and sugar together in a stand mixer, fitted with a paddle attachment, until pale and creamy. You don’t even need to take the egg/sugar mixture as far as you usually would for things like a Genoise sponge, where it’s imperative that the mixture reaches the so-called ‘ribbon stage’, where it is pale, creamy and tripled in volume. For this recipe, just beat the eggs and sugar on high speed for about a minute- the mixture should be pale and creamy, but won’t be overly voluminous. That’s fine! After that, with the mixer on medium speed, you slowly drizzle in the oil, then fold in the carrots and finally, fold in the dry ingredient mixture. That’s it! You just need to divide the batter between the two tins and then you can bake it.
Baking the cakes:
One thing to note about Cupcake Jemma’s recipes is that they all use a fan oven. This cake is baked at 175°C fan. Technically, this should be equivalent to 195°C in a conventional oven, but I have never tried this recipe using this temperature setting. If you do use a conventional oven, you might need to adapt the cooking time slightly and it might change the finished cake a little, so keep this in mind.
On the topic of cooking times, it can be tricky to figure out how long to bake something for when you are decreasing the size of the tins/the volume of the batter. Cupcake Jemma’s original recipe (with 4 8-inch layers) baked the cakes at 175°C fan for 25-28 minutes. While you would expect 2 6-inch layers to take significantly less time to bake, I have found that this often isn’t the case. My layers took the full 28 minutes to bake, despite being smaller! I’d still recommend checking your cake after about 20 minutes, just in case your oven is more powerful than mine.
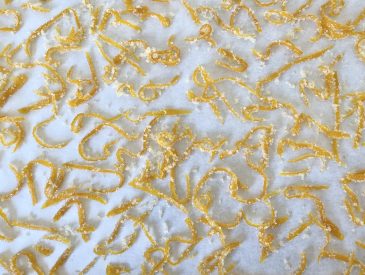
Making the white chocolate carrot tops:
While your cakes are baking, you can work on the white chocolate carrot tops. To do this, you need to temper your white chocolate (I have a whole post walking you through how to do this, you can check it out here). Once your chocolate is in temper, you want to add a little green food colouring, then spread it out in a thin layer (about 1-2mm thick) on a tray lined with baking paper. Give it a couple of firm taps on the countertop to release any air bubbles, then set it aside at room temperature to harden up completely. Once hard, you can crack it into pointy shards, ready to decorate your cake.
A couple of notes on the carrot tops: first up, working with chocolate, particularly white chocolate, and especially in such small quantities, can be super tricky. Don’t panic if your tempering doesn’t quite work out- if this happens, just use a sharp knife to score out the shards, then place the tray into the fridge for about 30 minutes. When you take it out, the chocolate should be snappy enough to break cleanly along the score lines, giving you the required shards. If you do this, the shards will start to lose their snappiness after about 5 minutes of being out of the fridge- so you’ll need to work quickly when pressing them into the cake. Once they’re in the cake and you’re not putting applying any force to them, you shouldn’t have any problems! The second thing to note is that you need to use either a powdered or oil-based food colouring when colouring chocolate. A liquid colouring will cause the chocolate to seize up, while a non oil-based food colouring will give a speckled, uneven colour.
Carving the cake:
Once your cakes are baked, let them cool for about 5 minutes in their tins, then take them out and put them on a wire rack to cool completely. It’s really important that your cakes are completely cool when you come to assemble the cake for two reasons: 1) when you ice the cake, the icing will melt and run off if your cake is too warm (this is particularly icky when you’re using cream cheese icing) and 2) we’re going to be doing a little bit of cake carving to get that ‘carrot top’ shape- if your cake is warm, carving it without breaking it up/it crumbling apart will be practically impossible!
The carving part of this recipe is completely optional, but I did feel it helped to enhance that carrot top shape that I was looking for. You essentially want to trim off the corners, where the sides of the cake meet the top, at a 45° angle, right around the circumference of one of the cakes, to give a more rounded shape. You can see a picture of this below.
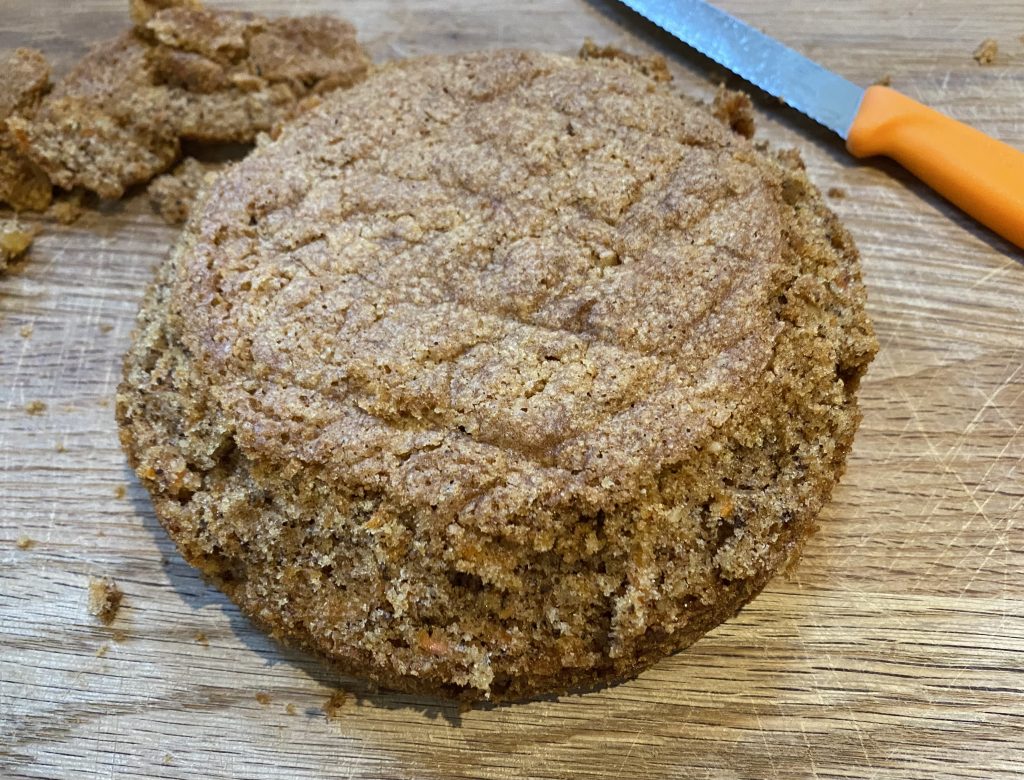
I used a large teacup to mark a smaller circle, about an inch in on all sides, then cut at an angle from there to the sides of the cake. Don’t worry about being too perfect here- the whole thing will be covered in icing in the end anyway! You just want to give it the beginnings of a slightly rounded shape, which can then be perfected during icing. That being said, if you are finding it very difficult to carve the cake without it breaking, even when it is completely cool, try placing it into the fridge for 30 minutes (or the freezer, for about 10), to help it firm up a bit.
Making the chocolate ‘soil’:
In this recipe, I use the offcuts from the carving process as a basis for the soil that surrounds the cake on the plate. Blitz it in the food processor with a few bourbon biscuits (or any other chocolate biscuit), until it resembles soil. If you chose to skip the carving step, just use a couple extra biscuits instead of the additional cake. You’ll get a drier crumb, but it will still be delicious.
Making the cream cheese icing:
With all of the decorations prepared, the only thing left is to make up the cream cheese icing (a staple of a traditional carrot cake). For ages, I really struggled with cream cheese icing- it has an unnerving tendency to get super sloppy when you start adding the icing sugar, before it eventually stiffens up like a proper buttercream. The quantity of icing sugar given in this recipe should be the perfect amount to bring it through that sloppy stage and give a lovely, thick and whippy icing, but, if you find your icing is still too loose for your liking, just add some more sifted icing sugar, a spoonful at a time, until you reach your desired consistency.
Assembling the cake:
Once the icing is made, use a little orange food colouring (or a combination of red and yellow colouring, like I did- ✨colour theory✨ and all that) to dye it a nice carrot-y shade. Then, you can start assembling. Place the uncarved cake layer down first, then use about 1/5th of the icing to cover the top, before adding the second layer on top, carved side facing up. For this cake, because of the sections of exposed cake left over by the carving, I did do a crumb coat. This is essentially a very thin layer of icing across the whole cake that locks in any crumbs, ensuring that you get a neater appearance in the end. You’ll need to put the crumb coat into the fridge to set up for about 15-20 minutes, until the buttercream forms a crust (you should be able to touch it lightly without any buttercream coming off on your finger), before you continue. Once it has set up, You can use the remaining icing to cover the cake all over with a thicker layer, taking care to smooth it out as best you can and rounding out the edges at the top.
Once the cake is iced, you can decorate it! Start by sticking the shards into the top, in the centre. Try to vary shape and sizes, to make it look more ‘natural’. If you’re having trouble inserting the shards without them breaking, use a small serrated knife to make small incisions into the top layer of cake- this will make it easier to push the shards in without putting to much pressure on them. Once your shards are in, fill in the empty spaces between them with any leftover smaller pieces of green chocolate. After that, simply spoon the biscuit ‘soil’ all around the bottom of the cake, pressing it a little way up the sides as you go. And there you have it, a carrot carrot cake (carrot-ception?), perfect for Easter, spring, and people who just really, really like carrots.
Because of the cream cheese icing, you’ll want to store this cake in the fridge, where it will keep for a few days.
I hope you like this fun Easter bake. Let me know if you try it out!
Carrot Cake
Equipment
- Food processor
- 2 6-inch round cake pans
Ingredients
For the cake:
- 140 g plain flour
- 1/2 tsp baking powder
- 1/2 tsp bicarbonate of soda
- 1 pinch salt
- 3/4 tsp ground cinnamon
- 85 g walnuts, finely ground
- 2 eggs
- 160 g caster sugar
- 150 ml sunflower oil (or other flavourless oil)
- 125 g carrot, grated
For the icing:
- 55 g unsalted butter, softened
- 90 g cream cheese
- 310 g icing sugar, sifted
- orange food colouring
To decorate:
- 40 g white chocolate
- green food colouring (powdered or oil-based)
- 3 bourbon biscuits (see Note 1)
Instructions
For the cake:
- Preheat the oven to 175°C fan (see Note 2). Grease and line 2 6-inch tins, then set aside.
- Sift the flour, baking powder, bicarbonate of soda, salt and cinnamon together. Mix in the ground walnuts until evenly distributed within the dry ingredients. Set aside.
- Place the eggs and the sugar into the bowl of an electric stand mixer fitted with a paddle attachment. Beat on high speed for about 1 minute, until pale and the consistency of double cream (see Note 3).
- With the mixer on a medium-high speed, slowly pour in the oil, allowing the mixture to combine fully.
- Add the grated carrots and, with the mixer on a low speed, fold in gently.
- Keeping the mixer on a low speed, add the dry ingredients, a spoonful at a time, into the mixture. Stop the mixer as soon as the dry ingredients have been incorporated- be careful not to overmix.
- Divide the batter between the two tins and bake in the preheated oven for 25-28 minutes, until cakes spring back when touched. Once cooked, allow to cool for 5 mins, then remove from tins and place on a wire rack to cool completely.
For the white chocolate 'carrot tops':
- Temper the white chocolate (see Note 4). Add a little green food colouring (see Note 5), mix well to ensure the colour is even, then pour onto a tray lined with baking paper. Using an offset spatula and working quickly before the chocolate sets, spread it out into a thin layer (1-2mm thick). Tap the tray firmly on the work surface to smooth out the surface and get rid of any air bubbles. Set aside at room temperature to set completely.
- Once the chocolate has hardened, snap it into large, pointy shards and set aside.
For the icing:
- Place the softened butter into the bowl of a stand mixer and beat on high for 2-3 minutes, until smooth, light and creamy. Add in the cream cheese and mix briefly on medium to combine.
- With the mixer on a medium speed, add the icing sugar, a spoonful at a time, to the butter/cream cheese mixture, allowing the sugar to incorporate fully after each addition. Do not worry if the icing goes a little sloppy at first, just keep adding the icing sugar and it will come back to a normal buttercream consistency.
- Once the icing sugar has been fully incorporated, add a little orange food colouring to the icing. Beat the icing on high for another 1-2 minutes to distribute the colour evenly and to ensure that the icing is light and smooth.
To assemble:
- Place one of your cooled cakes onto a cutting board. Using a small serrated knife, lightly mark out a smaller circle on top of the cake, about an inch in from the edge on all sides (I used a large tea cup as a guide- a small saucer or 4-inch cake tin would also work well). Once you have the inner circle marked out, use the same serrated knife to carve off a bevelled edge all around the cake (see photo in post and Note 5). The aim here is to mimic the rounded shape of a carrot top, but don't worry about being too precise, because this will be covered in icing later on!
- Place the offcuts of cake from the previous step into the bowl of a food processor, along with the bourbon biscuits (I used a mini processor for this, because it was such a small quantity). Blitz until you have a fine crumb, then set aside.
- Set your uncarved cake on a serving plate. Place 1/5th of the cream cheese icing on top and spread out. Carefully place your carved cake on top, with the flat edge facing down. Taking about 1/3rd of the remaining icing, cover the whole cake in a light crumb coat, following the bevelled edges along the top. Once done, place into the fridge for 15-20 minutes, until the buttercream has formed a crust.
- After the crumb-coated cake has chilled, take it out of the fridge and ice liberally using the remaining icing. Take your time smoothing out the sides and rounding out the bevelled edge. When you are happy with the icing, start positioning your white chocolate shards on top of the cake, in the centre, varying heights and directions. You may want to use a knife to create a small incision for each shard, instead of trying to force the chocolate in, which may break the thin shards. Fill in any gaps with smaller shards and splinters of the chocolate.
- Finally, use a teaspoon to scatter the cake crumb/biscuit 'soil' all around the base of the cake, pressing it up the sides a little as you go.
Notes
- Feel free to use your favourite chocolate biscuit- I love bourbons, but you could also use Oreos, double chocolate cookies etc.
- Cupcake Jemma’s recipes all use a fan oven. The equivalent temperature for a conventional oven is 195°C, but I have not tested this recipe using this setup.
- Typically, you would whip eggs and sugar together using a whisk attachment, until thick, pale and fluffy – i.e. the ‘ribbon stage’. You don’t need to take the egg/sugar mix this far for this recipe (indeed, it would be difficult to get it quite as light and aerated with a paddle attachment). When the mixture is smooth and a little paler, it will be perfect!
- I have a whole post about tempering chocolate! You can check it out here. White chocolate is notoriously difficult to temper- especially with such small amounts! If your tempering doesn’t quite work out, use a sharp knife to score the chocolate into crisp shards, then place into the fridge/freezer for a little while, until ‘snappable’. Your shards won’t stay crisp and snappy, but they will be firm enough to poke into the cake and give the ‘carroty’ impression.
- If you’re having trouble carving your cake, place it in the fridge for 30 minutes (or freezer for 10 if you’re in a rush!). This will firm up your cake, making it easier to carve without it crumbling.