Happy Easter Weekend!
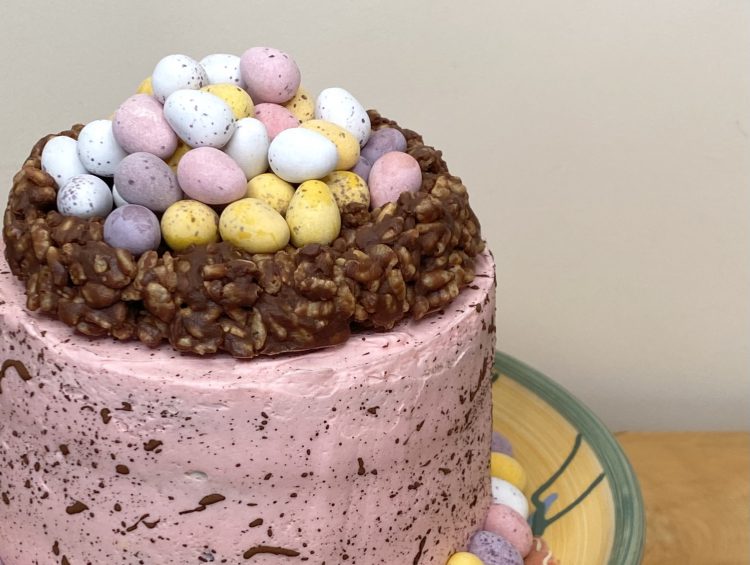
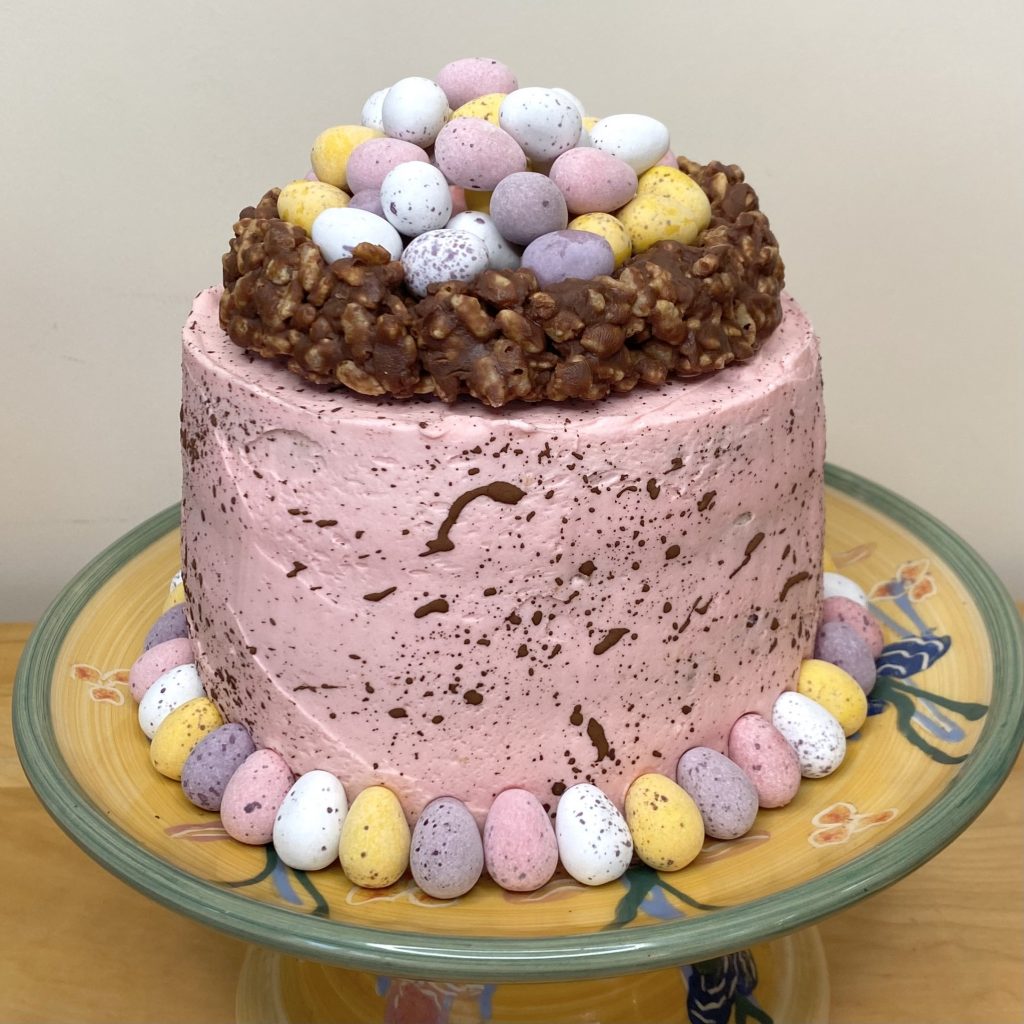
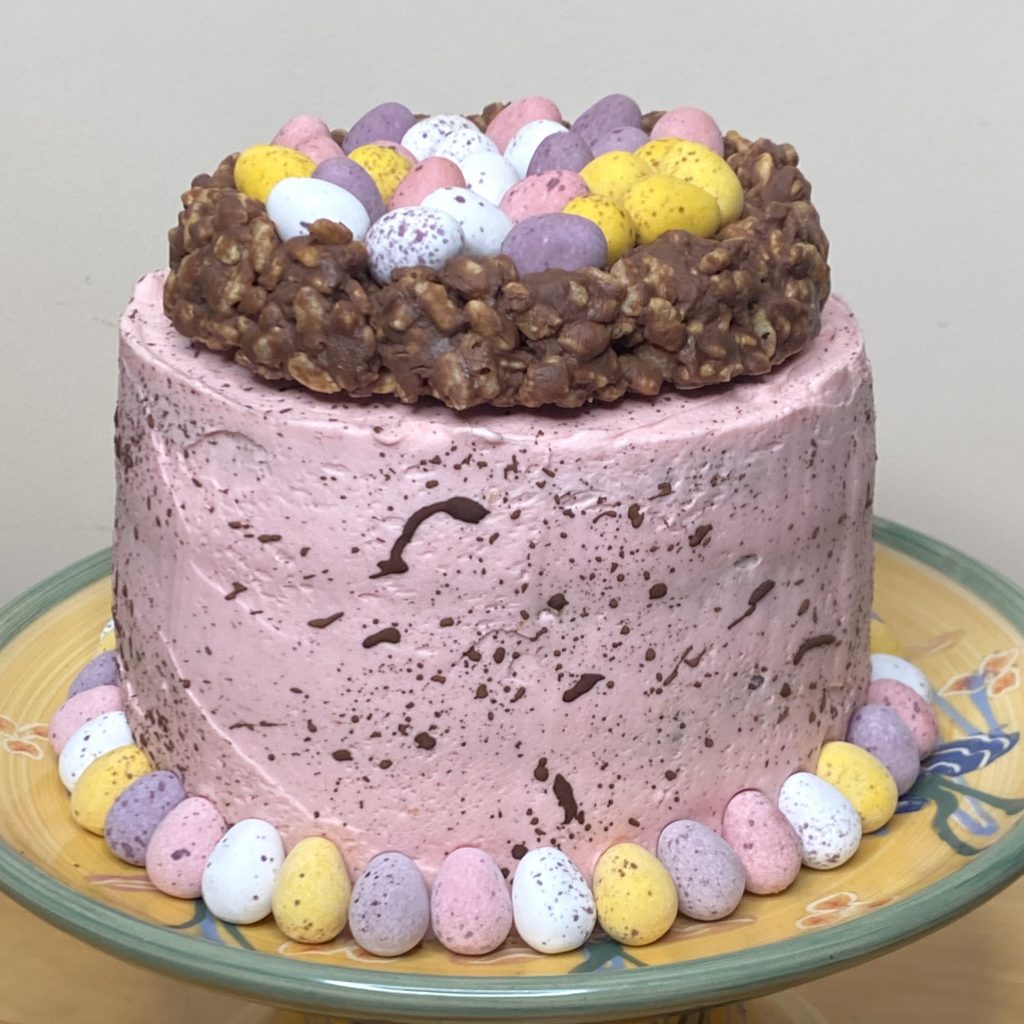
Today’s post is another cake recipe, because it is the season for copious amount of sugar. This time, it’s my Easter Nest Cake, a celebration of the quintessential Easter treat, Mini Eggs. It’s 4 layers of vanilla cake, sandwiched together and covered with white chocolate buttercream (in Mini Egg colours!), decorated with a cocoa speckle, a chocolate Rice Krispy nest and many, many, Mini Eggs. Surprisingly, it’s not sickly-sweet like you would expect! Don’t get me wrong, it is on the sweet side- it’s a Mini Egg cake after all. But it’s not overwhelming! Weirdly, the Rice Krispy nest actually helps to balance out the sweetness. However, if you’re really worried, there are some adjustments you can make to tone down the sweetness a little bit. I’ll touch on those as we go through it.
Just a quick note before we get into it: there are a couple of things I did that I would do differently if I were to make this cake again and I have made sure that the recipe below reflects that. I’ll talk more about these things throughout this post. Baking is a learning curve, particularly when the appearance of a baked good is the main focal point. Some things work and some things don’t, but, ultimately, I figure if there’s sugar, it’s bound to taste okay in the end. And taste is what really matters, right?
This cake is made in 4 stages: the nest, the cake, the icing and the assembly. We’ll go through them in order.
Stage 1: The Nest
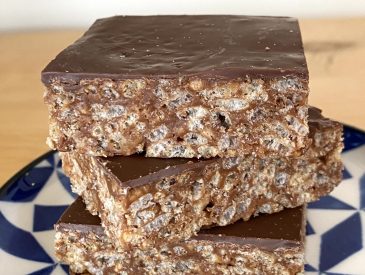
Growing up, we made chocolate nests for Easter basically every year. They were 3 ingredients: milk chocolate, Rice Krispies and Mini Eggs. I wanted a nest to go on top of my cake, but making them like we used to, with straight milk chocolate, would have caused problems. Once nests made with straight chocolate set, they are basically rock solid. Trying to cut through that, with soft cake underneath, would inevitably have caused havoc, so I opted for a rocky road-style chocolate/butter/golden syrup combo for my nest instead. This softens the nest a little bit, making it easier to cut through on top of the cake, without squishing the cake/icing layers.
Some notes here: if you want to make this cake a bit less sweet, you can substitute the milk chocolate in the recipe for the same amount of dark chocolate. You can also substitute different cereals for your nest- we have always used Rice Krispies in my family, so that is what I did here. Shredded wheat gives the most authentic ‘nest’ look (we’re just not as crazy about the taste of it), but cornflakes are also a good option! Whatever you have available will be great. Finally, be careful not to overheat the chocolate mixture when you’re melting it- this will cause the chocolate to seize, rendering it useless- you’ll have to start all over again! Finely chopping the chocolate, dicing the butter, heating the mixture very gently and stirring often will help to prevent this.
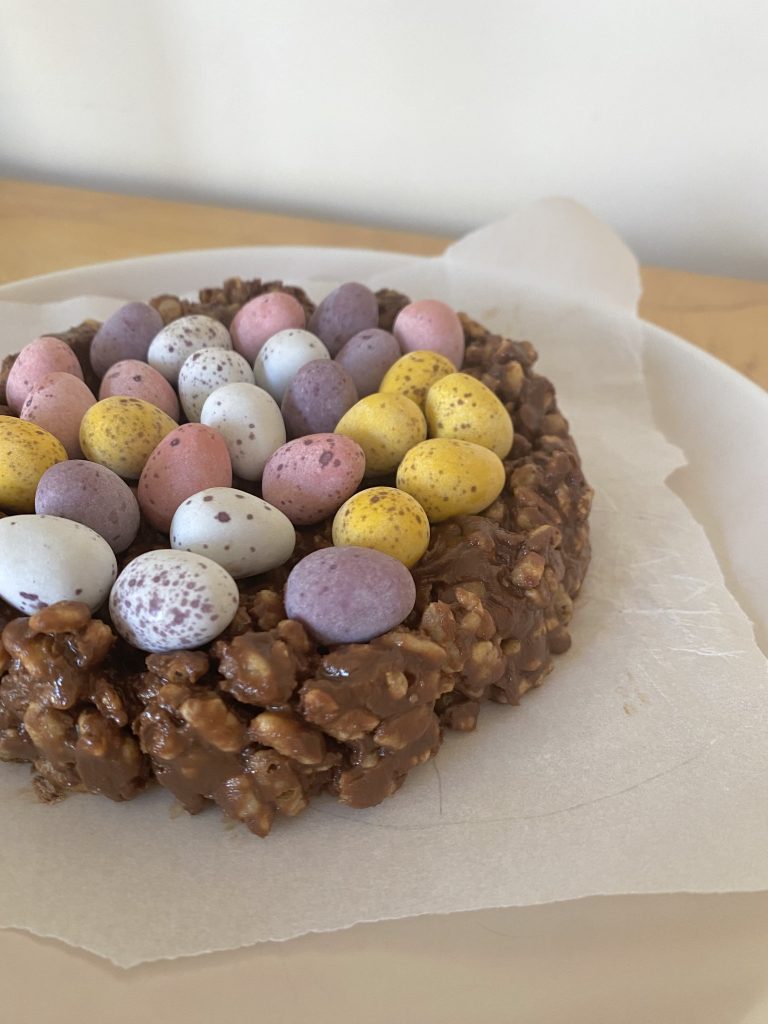
You want your nest to be slightly smaller than the surface of the cake. My cakes were 6 inches in diameter, so I made my nest a circle that was about 5 1/2 inches in diameter. To do this, I used a pencil to draw a circle on some baking paper, then flipped it upside down (you don’t want the pencil to touch anything you’ll be eating!) and put it onto a baking tray to use as a guide. When you’ve made your Rice Krispy mixture, you can use a spoon to press it into the shape you want. Ideally, you want to build the sides of the ‘nest’ up higher than the centre (perhaps even more so than I did, so you have a much thinner layer of Rice Krispies in the centre)- this way you’ll be able to fit more Mini Eggs in later!
On the topic of Mini Eggs, when I made this cake I actually put some Mini Eggs into the nest before I let it set in the fridge, so they would be stuck in there. I wouldn’t recommend doing this for 3 reasons:
1) Mini Eggs don’t love being in the fridge- their sugar coating tends to absorb moisture from the air, so you’ll end up with little damp patches on the surface of the eggs, as you’ll probably be able to spot in some of my photos. Not cute.
2) A single layer of Mini Eggs in the nest ended up feeling a little flat on the cake (see photo below). When I piled more of them on top, I felt it looked much more nest-y and fun. Seeing as you can’t stick them all down by pressing them into the chocolate when they’re piled up, you might as well just skip that stage.
3) As I’ll talk about later on, it’s better to stick the nest into the final layer of icing when it’s still soft, to avoid having a gap between the edges of the nest and the top of the cake. This means you’ll have to add the cocoa speckle while the nest is on the cake. You won’t see any stray speckles on the chocolate nest, but you will definitely see them on the Mini Eggs! Better to leave them off until the messy part is over and done with.
Anyway, you’ll need to set the Rice Krispy nest in the fridge for about 30-45 minutes to firm up completely. While it’s chilling, you can get on with the rest of the cake.
Stage 2: The Cake
The cake itself is just a plain vanilla cake- super simple. It’s a 3-egg cake, baked in 2 6-inch tins, each of which is then levelled (I did not do this, and it cause problems for me later on, so, I guess, do as I say, not as I do?) and cut in half, horizontally, leaving you with 4 thin layers. You could do any flavour you want for the cake- it doesn’t have to be vanilla, chocolate or coconut would also work really well!
I use a cake leveller to cut cakes horizontally- once you get the hang of them it makes the whole process so much easier! I like to put a cake layer on a flat chopping board, then hold the top of the cake with the palm of my hand as I gently wiggle the leveller through. When I get near the other side of the cake, I’ll move my hand so it rests against the side of the cake that is furthest away from me, then wiggle the leveller carefully until it meets my hand. This way, the cake won’t break off as the leveller comes out the other side. Most levellers are just wire, so this won’t hurt at all, but if yours has a sharper blade, you might want to use a different method.
Stage 3: The white chocolate buttercream
This was a last-minute addition to my cake. There’s something about vanilla buttercream that just… doesn’t do it for me? It feels very sweet-for-the-sake-of-being-sweet, and I was worried about this cake being too sweet. (It makes perfect sense, then, that I chose one of the sweetest possible buttercream flavours on the planet. Good job, Gemma- actually though, when you eat this buttercream with the cake, it isn’t overwhelmingly sweet- but it really does fit with the Mini Egg vibe! Success!). Anyway, like the cake, you can use whatever flavour buttercream you want, including less sweet alternatives- it just needs to be a pale one so that you can colour it later.
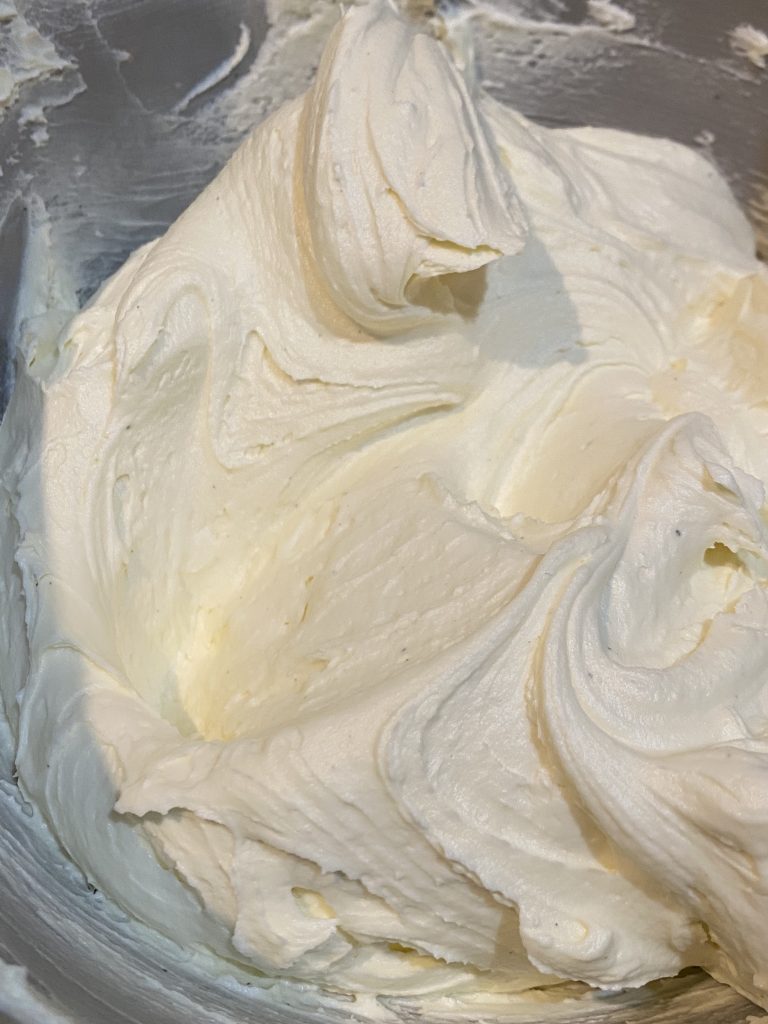
I’ve made white chocolate buttercream a couple of times before, and I could never get it to work. It always firmed up super quickly into a dense, almost fudge-y texture. Not what I was looking for. Anyway, I did some research and apparently the way to combat that is to use a lower proportion of icing sugar than you normally would in a buttercream. This works because, as the chocolate sets, it firms the buttercream up, so you don’t need as much sugar to get a stiffer consistency. The added benefit of this is it helps tone down the sweetness (slightly, a little, hopefully?), which is definitely a good thing when it comes to white chocolate! I also found that adding a little bit of salt (something I very rarely do in my buttercreams) helped to counteract the sweetness a little too.
Some tips for the buttercream:
- Make sure your chocolate has cooled to room temperature after you have melted it. Adding warm chocolate to butter will just melt the butter!
- Similarly, make sure your butter is at room temperature before beating it. Not only will it beat up more smoothly, but if you add the melted chocolate to cold butter, the chocolate will set super quickly and you’ll be left with a very lumpy buttercream!
- Don’t be afraid to really whip the icing. The longer you whip it, the lighter, fluffier and paler it will be (which is ideal not only for a delicious texture, but also for ensuring you get accurate colours from your food colouring later on!).
Once you have your buttercream, you’ll need to split it up for colouring. I wanted to get all 4 of the Mini Egg colours into my cake somehow, so I used 3 of them to sandwich the layers together, and the final colour to decorate the outside of the cake. To do that, you’ll need to take out 3x100g portions of the icing, place them into separate bowls and colour each one either yellow, purple or white. (To get a super white buttercream, you can add a tiny bit of purple food colouring. This will neutralise the yellow tones in the buttercream, leaving you with a whiter icing). You then want to colour all of the remaining icing pink. With the icing done, you’re ready to assemble.

Stage 4: Assembly
To assemble the cake, place one of your 4 cake layers onto a serving plate (this cake will be pretty tall- make sure you don’t make the same mistake as me and build it on an equally tall cake stand, or you’ll never be able to fit it in the fridge for the chilling stages!) Spread all of the yellow icing on top, smoothing it into an even layer. Add another layer of cake, then repeat the process with the purple icing, then add another layer of cake, the white icing, then a final layer of cake. Use an offset spatula to smooth out any excess icing on the sides. Once the cake is layered, you can crumb coat it.
To crumb coat, cover the whole cake (top and sides) in a thin layer of pink icing. If your cake is feeling very unstable- don’t worry! It’s probably because of the high icing to cake ratio- just pop it in the fridge for about 15 minutes to firm up, then do your crumb coat. Once you’ve done the crumb coat, put it back into the fridge for another 15 minutes to set.
Once your crumb coat is set, you can cover the cake in a thicker, final layer of pink icing. Use an offset spatula to get the icing as smooth as you can (cleaning off the spatula using warm water, then drying it well before using it, can help you get a smoother finish). When you’re happy with the cake, take the chocolate nest out of the fridge, peel off the baking paper from the bottom and place the nest on top of the cake,. When I made this, I waited until after the icing had set to put the nest on top. The problem with that was that my cake was not perfectly level (I mean… I did not level them at all, so I don’t know what I expected), so the nest did not sit flush to the cake. If I were to do it again, I would definitely put the nest on top at this stage- it’ll also be more securely stuck down if you do this! Once the nest is on, put the cake back into the fridge for an extra 15 minutes.
With the icing done, it’s time to speckle the cake! To do this, you’ll need cocoa powder, vanilla extract and a pastry brush with firm bristles. Don’t bother using a super good quality vanilla extract- you’ll need a relatively large quantity of it (as vanilla goes), and you’ll barely taste it, so it would be a waste! Mix the cocoa powder and vanilla extract together in a small bowl (I used an egg cup), until completely combined. Dip the pastry brush into the mixture, then use your finger to pull back on the bristles, ‘splattering’ it onto the cake. You might want to practise against a plate before going straight onto the cake, just to get the hang of the technique. You’ll definitely want to move any important documents/items out of the way when you do this, and make sure your cake is on a wipe-clean surface, with a wipe-clean backdrop, because this can get messy. Make sure to wipe off any speckles that have landed on your serving plate, as well.
When you’re happy with your speckles, you can add the Mini Eggs! You can do this however you like, I added a row of eggs in a repeating pattern around the bottom edge and filled the nest on top of the cake with a pile of them. And there you have it: an Easter Nest Cake. As with all cakes, this is best eaten the day you made it, but it will last, at room temperature, for a few days if needed. Don’t keep it in the fridge though, because, as we have already discussed, the sugar shell of your Mini Eggs will absorb the moisture in the air, and discolour.
Let me know what you think of it!
Gemma
xxx
Easter Nest Cake
Equipment
- 2 6" round cake tins
- 1 pastry brush, with firm bristles
Ingredients
For the Rice Krispy nest:
- 30 g Rice Krispies (or other cereal, e.g. cornflakes or shredded wheat)
- 100 g milk chocolate, finely chopped (can be substituted with an equal amount of dark chocolate)
- 20 g unsalted butter, cubed
- 1 tbsp golden syrup
For the vanilla cake:
- 170 g unsalted butter, softened (I use Stork)
- 170 g caster sugar
- 3 eggs
- 170 g self-raising flour
- 1 tsp baking powder
- 1 pinch salt
- 1/8 tsp vanilla extract
- 1 tbsp milk
For the white chocolate buttercream:
- 140 g white chocolate, melted and cooled
- 190 g unsalted butter, softened
- 210 g icing sugar, sifted
- 1 pinch salt
- 2 tbsp milk
- gel food colouring (pink, purple and yellow)
To decorate:
- 1 tsp cocoa powder
- 2 tsp vanilla extract (see Note 1)
- 300 g Mini Eggs
Instructions
For the Rice Krispy Nest:
- With a pencil, draw a 5 1/2" diameter circle on a piece of baking paper. Flip the paper upside down and place onto a baking tray. Set aside.
- Place the chocolate, butter and golden syrup into a heatproof bowl. Melt gently (either in microwave or over a pan of barely simmering water), until smooth. Stir in the Rice Krispies until completely incorporated.
- Working quickly, tip the Rice Krispy mixture onto the lined baking tray, into the centre of the marked circle. Using the pencil as a guide, push the mixture into shape. Use a spoon to press the centre down and build up the sides to mimic a nest.
- Place the nest into the fridge to firm up while you make the rest of the cake.
For the cake:
- Preheat oven to 170°C (150°C fan). Grease and line 2 6" round cake tins
- Place the butter and sugar into the bowl of a stand mixer fitted with a paddle attachment. Beat on high until light and fluffy.
- With the mixer on a medium-low speed, add the eggs, one at a time, making sure to incorporate fully between each addition.
- Sift together the flour, salt and baking powder. Add to the butter mixture, and mix on medium-low speed until just incorporated.
- Add the vanilla extract and milk, and mix to combine.
- Divide the mixture between the two tins and bake in preheated oven for 25-30 minutes, until cakes spring back when touched.
- Leave cakes to cool in tins for 5-10 minutes, then remove carefully and transfer to a wire rack to cool completely. Once cool, use a serrated knife/cake leveller to level each cake, then split each in half horizontally, to leave you with 4 even layers.
For the white chocolate buttercream:
- Place the softened butter into the bowl of a stand mixer, fitted with the paddle attachment. Beat on high speed for about 3 minutes, until very pale and fluffy.
- Pour the cooled white chocolate into the whipped butter, then mix on medium speed for a further minute to combine fully.
- With the mixer on low speed, add the icing sugar, a spoonful at a time, until fully incorporated.
- Add the salt and milk, mix on medium speed to combine, then turn the speed up to high, and beat for a further 3-5 minutes, until fluffy and significantly paler. Turn the mixer down to its lowest setting, and mix for a further 30 seconds (this will help to reduce the air bubbles in the icing).
- Once the icing is ready, divide it into 4 for colouring. You will need 3x100g bowls of icing for filling, while the rest will be used for decorating. Colour one each of the smaller bowls yellow, purple and white (see Note 2). Colour the final, largest portion pink.
To assemble:
- Place one layer of cake onto a serving plate. Place all of the yellow buttercream on top and spread out into an even layer. Add another layer of cake, then repeat the process with the purple buttercream. Add another layer, top with the white buttercream, then add the final layer.
- Use an offset spatula to smooth out any icing that has squished out from the filling. Smooth a thin layer of pink icing all over the top and sides of the cake, to act as a crumb coat (see Note 3). Put the cake into the fridge for about 15 minutes, to allow the buttercream to firm up before proceeding.
- When the crumb coat has set, use the remaining pink icing to generously ice the top and sides of the cake, using an offset spatula to smooth it out as much as you can (see Note 4).
- At this point, you'll want to remove your chocolate nest from the fridge. Carefully peel the baking paper off the bottom, then set the nest on top of the cake, making sure to centre it. Once you have added the nest, put the whole cake back into the fridge for a further 15 minutes, to firm up the final buttercream layer.
- When the buttercream has chilled for 15 minutes, mix together the cocoa powder and vanilla extract in a small bowl. Remove the cake from the fridge, then dip the pastry brush into the cocoa mixture. Use your finger to pull back the bristles and flick the mixture towards the cake to make little chocolate speckles, reminiscent of a Mini Egg.
- The cocoa mixture will set relatively quickly, so you can move onto adding the Mini Eggs. Place a row of the eggs all around the base of the cake, then pile the remaining eggs into the chocolate nest on top of the cake.
- The cake can be served immediately, or left at room temperature until you are ready to eat it. As always, cake is best eaten on the day it is made, but it will last for about 2-3 days if necessary.
Notes
- You don’t need to use a particularly good quality vanilla extract for this stage- it’s just to dissolve the cocoa powder and counteract the bitter taste.
- To colour icing that has a slight yellow tinge white, add a very (very) small amount of purple gel food colouring. The purple will neutralise the yellow tone, leaving you with a much whiter icing.
- Because of the high icing-to-cake layer ratio in this cake, your cake may be a little unsteady when you come to crumb coat it. If this is causing you problems, smooth out any residual filling icing on the sides as best you can, then pop the filled cake into the fridge for about 15 minutes before crumb-coating. This will firm up the filling icing, making your cake a bit sturdier and easier to deal with.
- If you’re having trouble getting a smooth edge on your cake, try using warm water to rinse off your spatula. The clean, slightly warm spatula will make it much easier to smooth out the icing, and you can repeat this as many times as you need to when icing.