Welcome to the final day of Wedding Cake Weekend!
I recently made a wedding cake for a family friend and, this weekend, I’ve been sharing the recipes & all of the fun, summer-y details! This was only my second time making a wedding cake (check out my Wedding Cake Week series for the first time, where I made the cake for my brother’s big day!), so I am by no means a professional, but I’m so happy with how these cakes turned out and I’m so excited to be sharing them with you now!
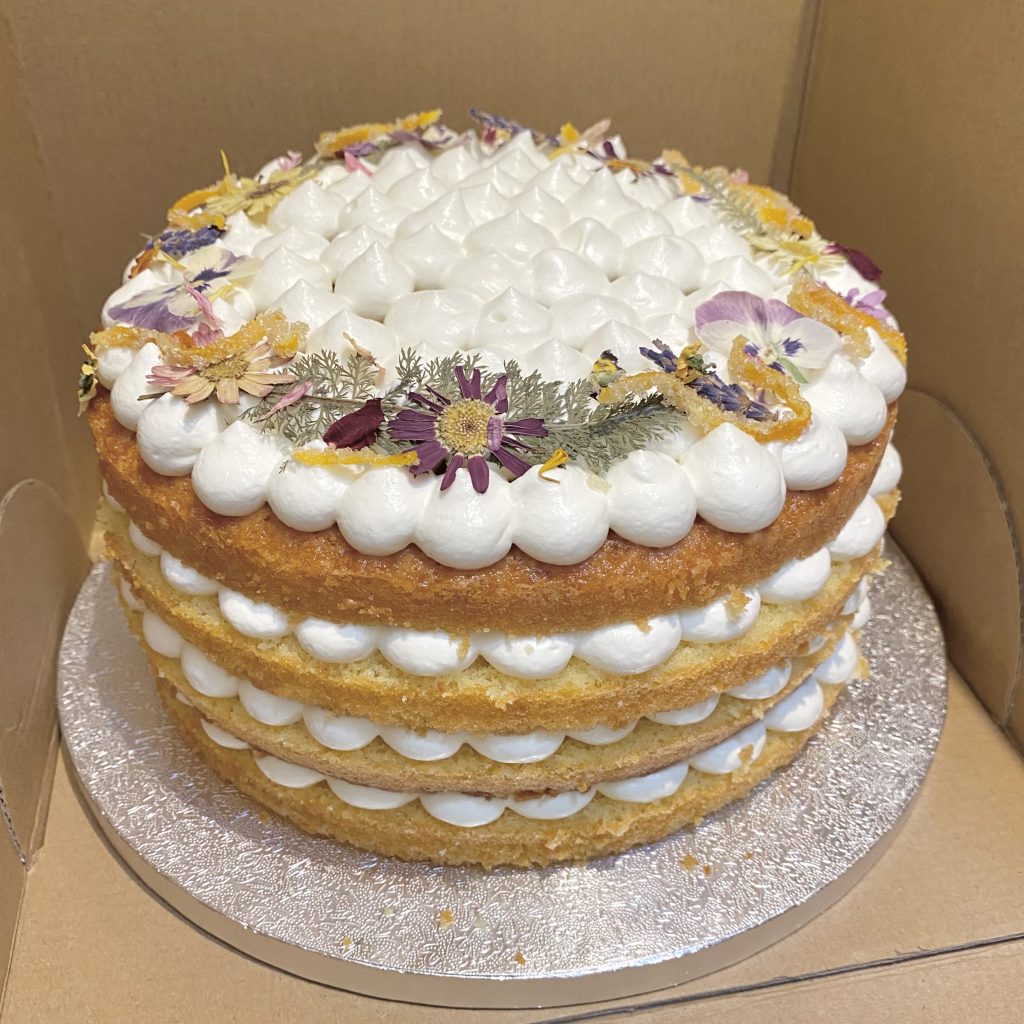
Yesterday, I shared the recipe for the main cake: an 8-inch, circular, 4-layer, naked cake, made up of an orange & olive oil sponge, filled with a honey-yoghurt icing and decorated with edible pressed flowers & homemade candied orange peels.
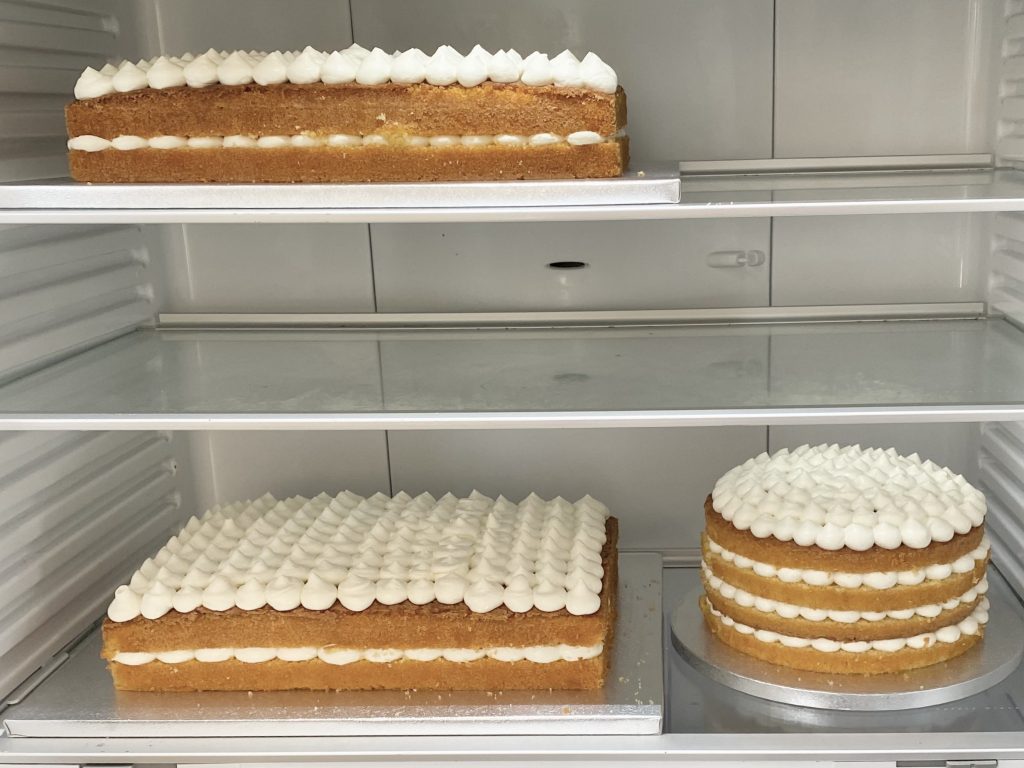
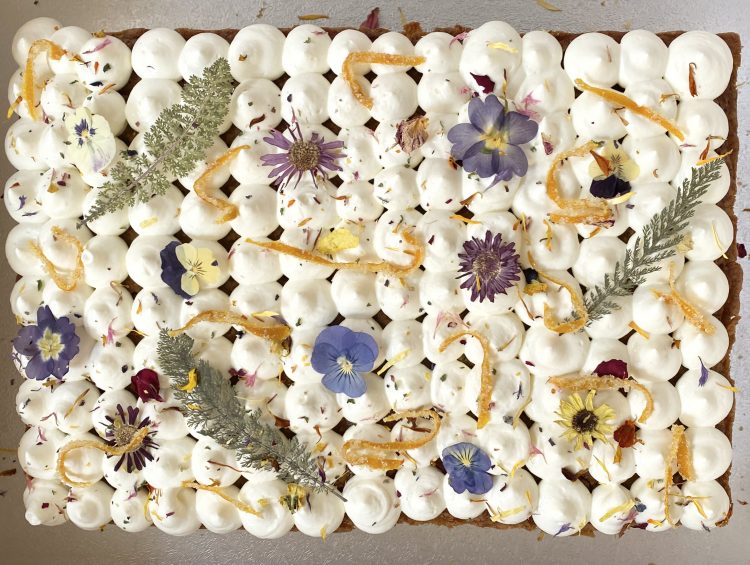
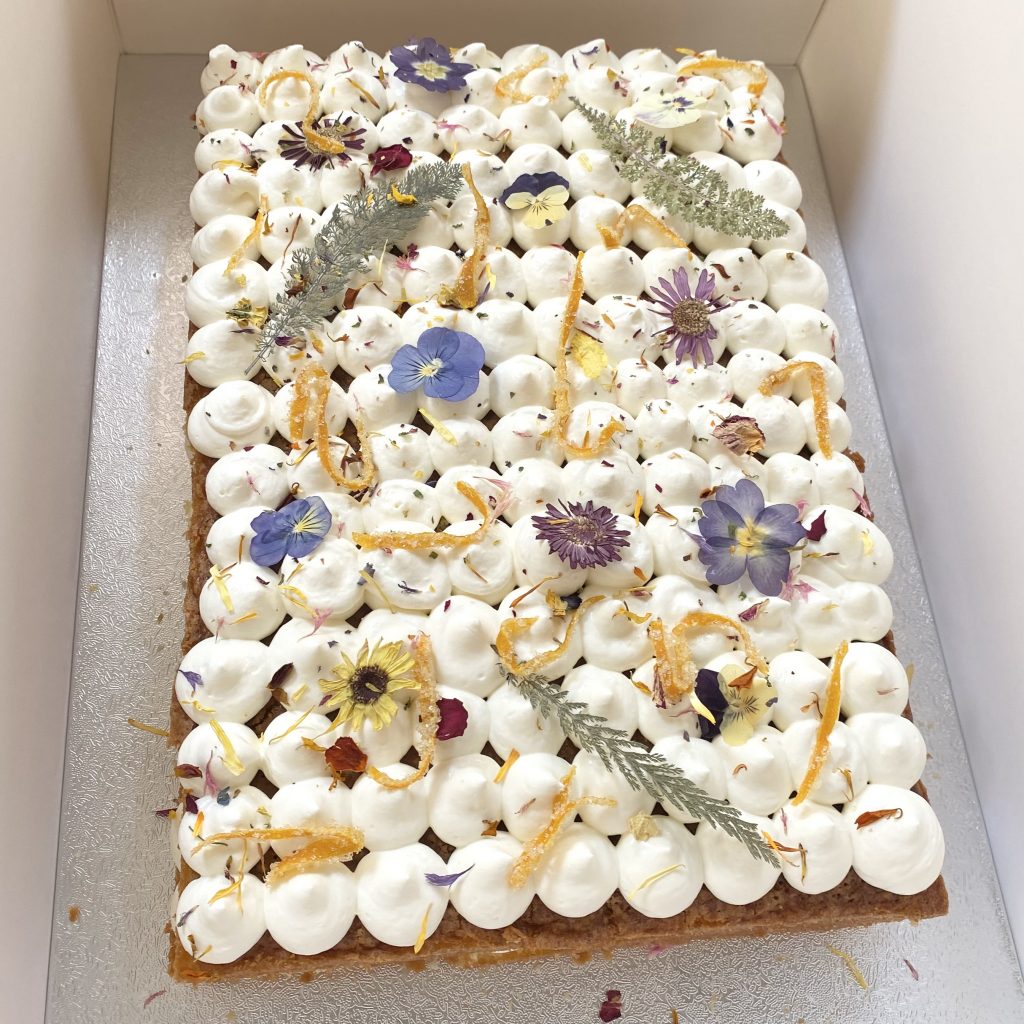
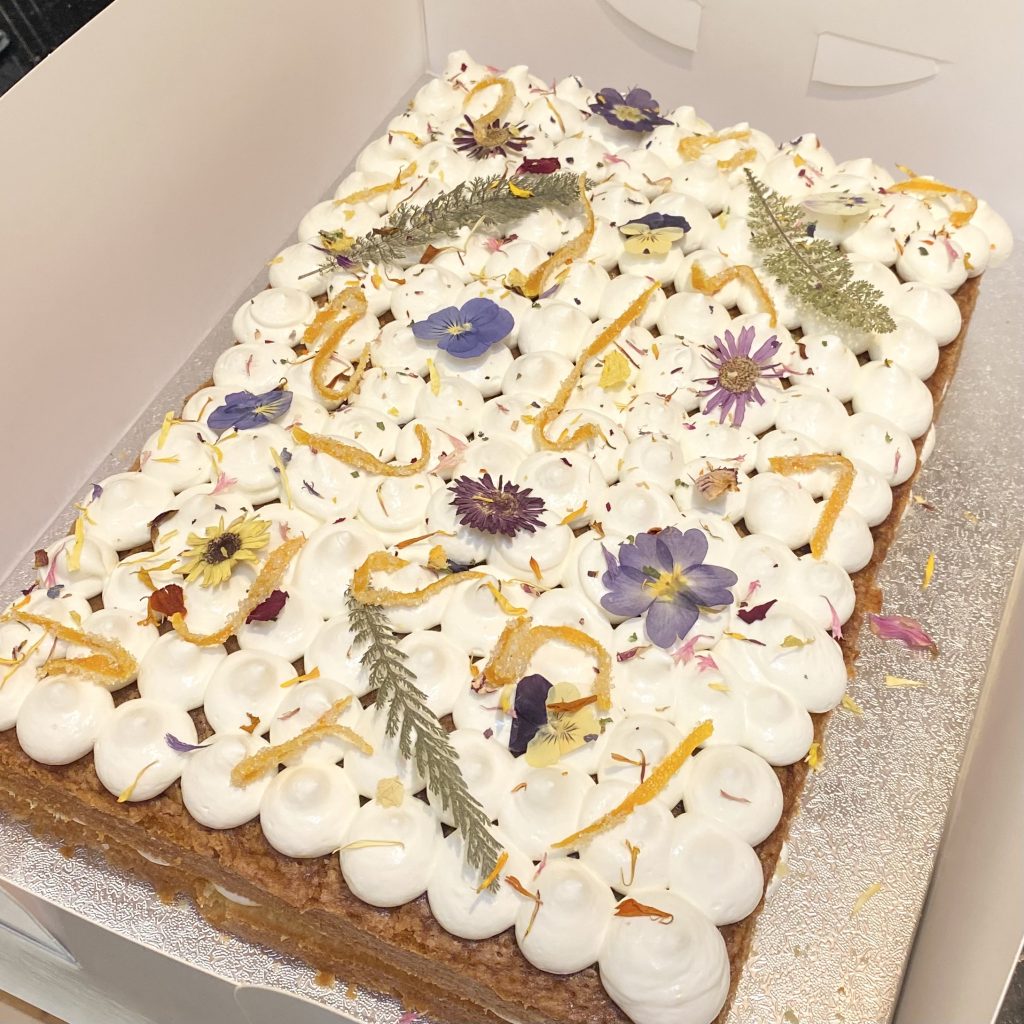
Along with the main cake, I made two rectangular traybake versions of the same cake (same sponge, same icing, same decoration), to ensure that there was plenty of cake to go around! In today’s post, I’m sharing that scaled-up, traybake version of the original recipe, plus some tips/tricks for working with larger cakes (which these traybakes, coming in at 9 x 13 inches inch, definitely are!).
Let’s get into it!
Table of Contents
- The Tin
- Baking the Traybakes
- Assembling the Traybakes
- Decorating the Traybakes
- Tips for Working with Large Cakes
- Recipe
The Tin
For each of the two traybakes, I used this tin from Silverwood: it’s a 9 x 13 x 2 inch, rectangular tin with straight sides and a loose base. This is such a good tin: you get super neat, perfectly straight sides on your finished cake, it’s really easy to get the cake out of it once it’s baked (thanks to the loose base) and the cake cooks really evenly. It is on the pricier side, but, like all Silverwood tins, I think it’s a really good investment: particularly if you’re making a naked cake like this, where it’s really important that the cake itself is super neat and tidy!
The quantities/temperatures in this recipe are specifically formulated for a baking tin of this size. If you want to use a different size/shape tin, you will need to adjust the amounts/temperatures accordingly.
Just like with the circular cake, it’s really important to prepare the tin properly for this recipe, so that the cake doesn’t stick to the tin. This includes:
- Brushing the whole tin with a layer of my DIY Cake Release.
- Lining the bottom of the tin with a rectangle of baking paper.
- Brushing a thin layer of DIY Cake Release on top of the baking paper layer.
- Once the cake comes out of the oven, gently pushing the edges of the cake inwards, towards the centre, to loosen them from the sides of the tin.
I know it sounds a bit overkill, but this cake can be a bit of a menace when it comes to sticking to the tin, so it’s better to be safe than sorry!
Baking the Traybakes
The only differences between the traybake sponges and the circular sponges are a) the tins, b) the ingredient quantities and c) the baking times/temperatures. Otherwise, the whole process of preparing the tins, making the cake batter and checking for the doneness of the cake are exactly the same. Because of this, I won’t be doing a deep-dive into the step-by-step process here. If you want to check out my previous two posts on this particular cake batter for more detailed instructions, you can find them here:
- Mini Orange & Olive Oil Layer Cakes with Greek Yoghurt and Honey Icing
- Orange & Olive Oil Layer Cake with Honey-Yoghurt Icing (Wedding Cake Weekend #2)
The traybakes are larger than the original, circular cake. This means that:
- The quantity of cake batter required is larger.
- The baking temperature should be lower.
- The baking time will be longer.
This is standard practice for larger cakes: obviously, they require more cake batter, but also, in order to ensure they are fully cooked through (and don’t burn on the top!), they need to be baked at a lower temperature for a longer time. Therefore, these traybakes are baked at 160°C (conventional oven, not fan) for 55-60 minutes (compared to the smaller, 8-inch, circular layer cake, which is baked at 165°C for 35-40 minutes).
Assembling the Traybakes
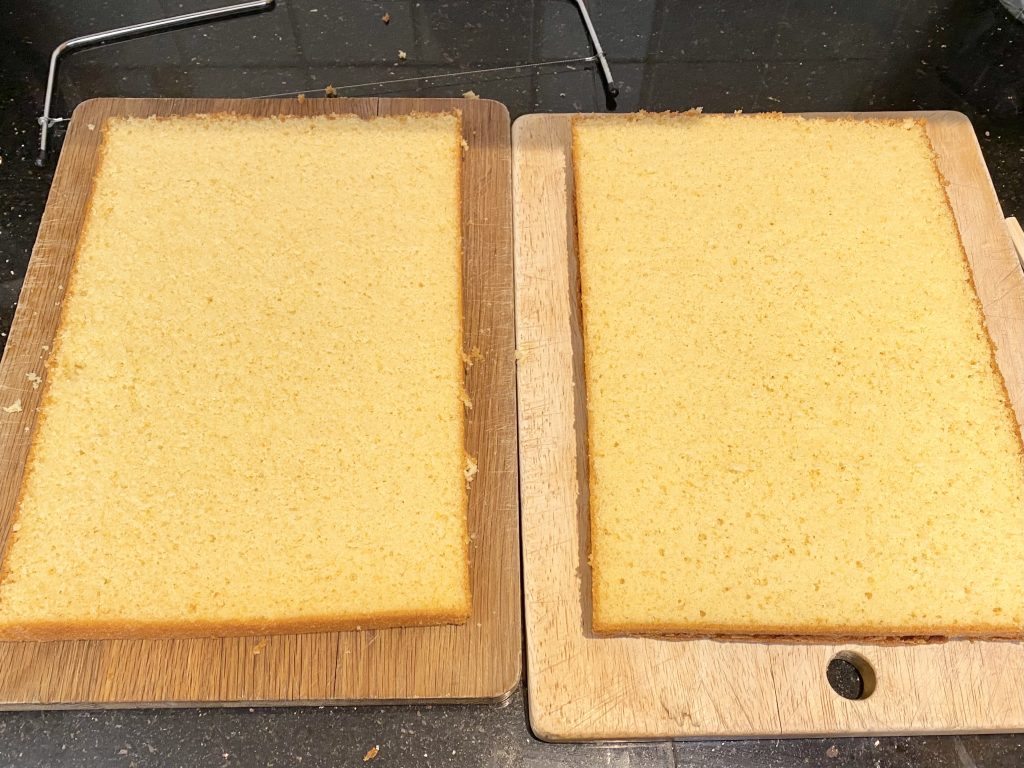
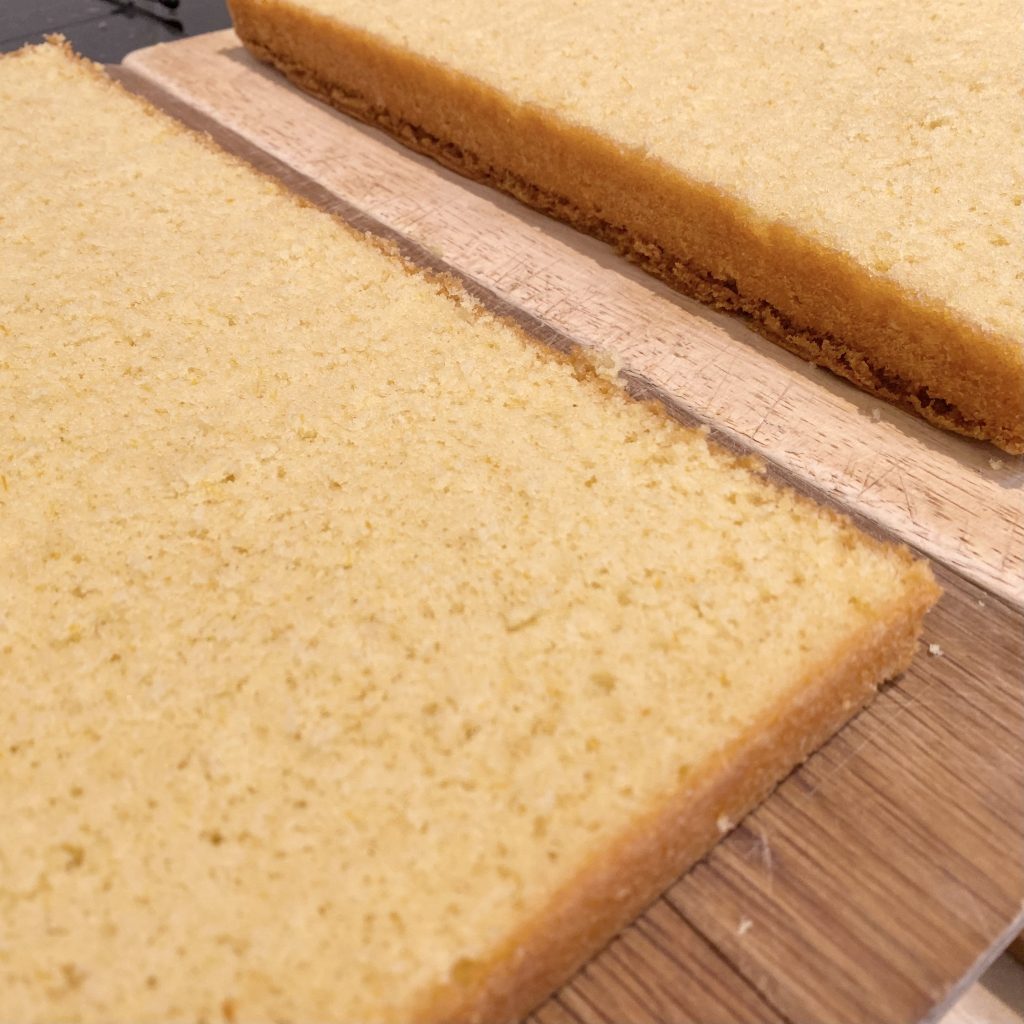
Unlike the main cake, which is split into 4, thin layers, I split each of these traybakes into two layers, so I had two separate, 2-layer cakes. You could absolutely split each traybake into 4 layers by splitting each half into half again horizontally, but it can be quite tricky to work with larger cakes than this, so you would need to be very gentle and careful to ensure that you do not break any of the layers. Also, be aware that you will need twice as much icing (because you’ll be filling 2 extra layers!), so plan accordingly. Because my traybakes were for a (very important!) event, I decided that it was easier to go for two thicker layers: you still get plenty of the delicious icing, but it significantly lowers the risk factor involved!
As with the circular cake, I found it easiest to use a cake leveller to split each cake in half (I use this one). Because these cakes have such a large surface area and have such clean, sharp edges, using a cake leveller makes it much easier to cut through the sponges in a perfectly neat, straight line. Having said that, if you’re confident in your ability to cut in straight lines (I am not), you could absolutely use a large, serrated knife instead!
I used the exact same method as the circular cake to fill the traybakes: just piping dollops of the icing all over the surface of the cake. Because these are rectangular cakes, I piped the dollops in rows (as opposed to the concentric circles of the main cake!).
Decorating the Traybakes
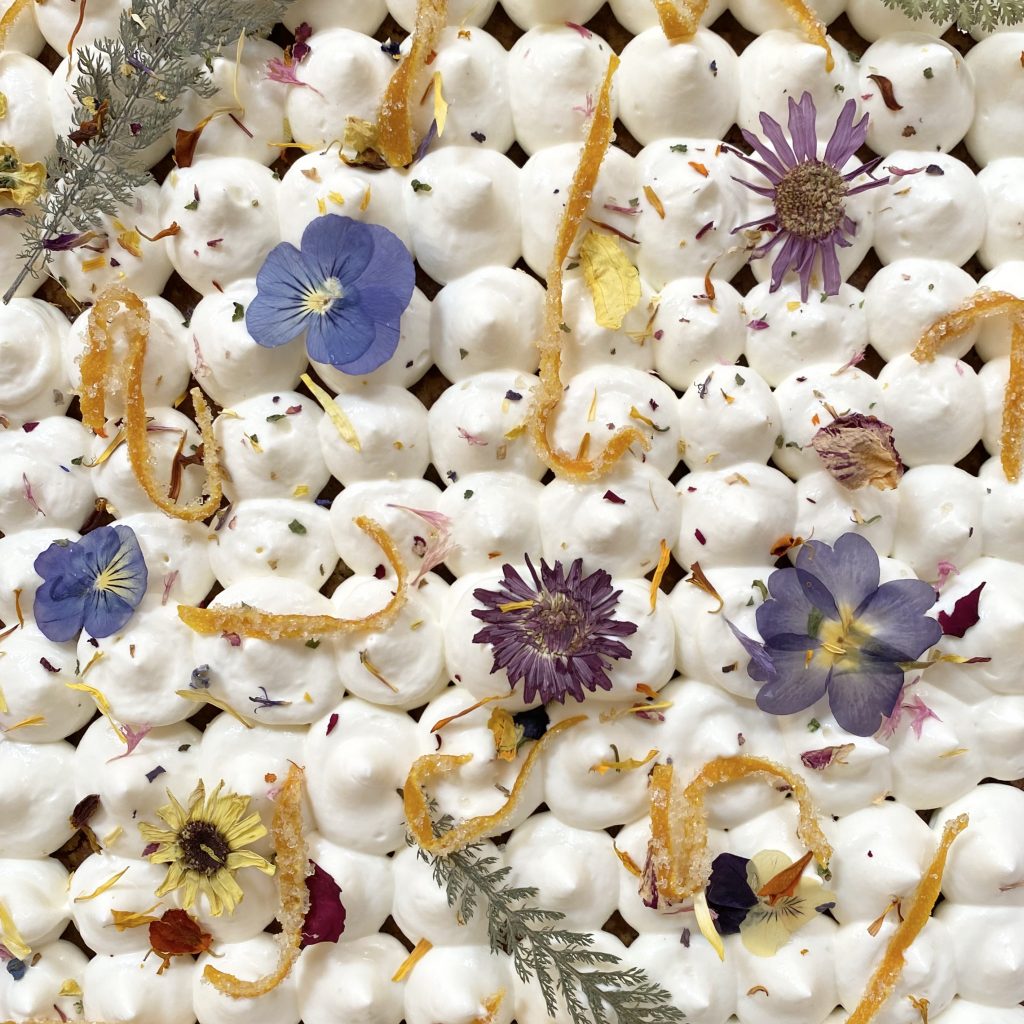
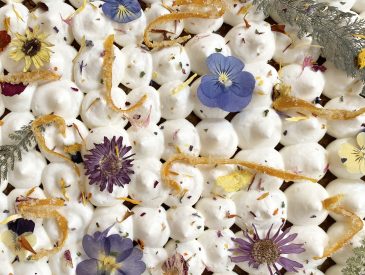
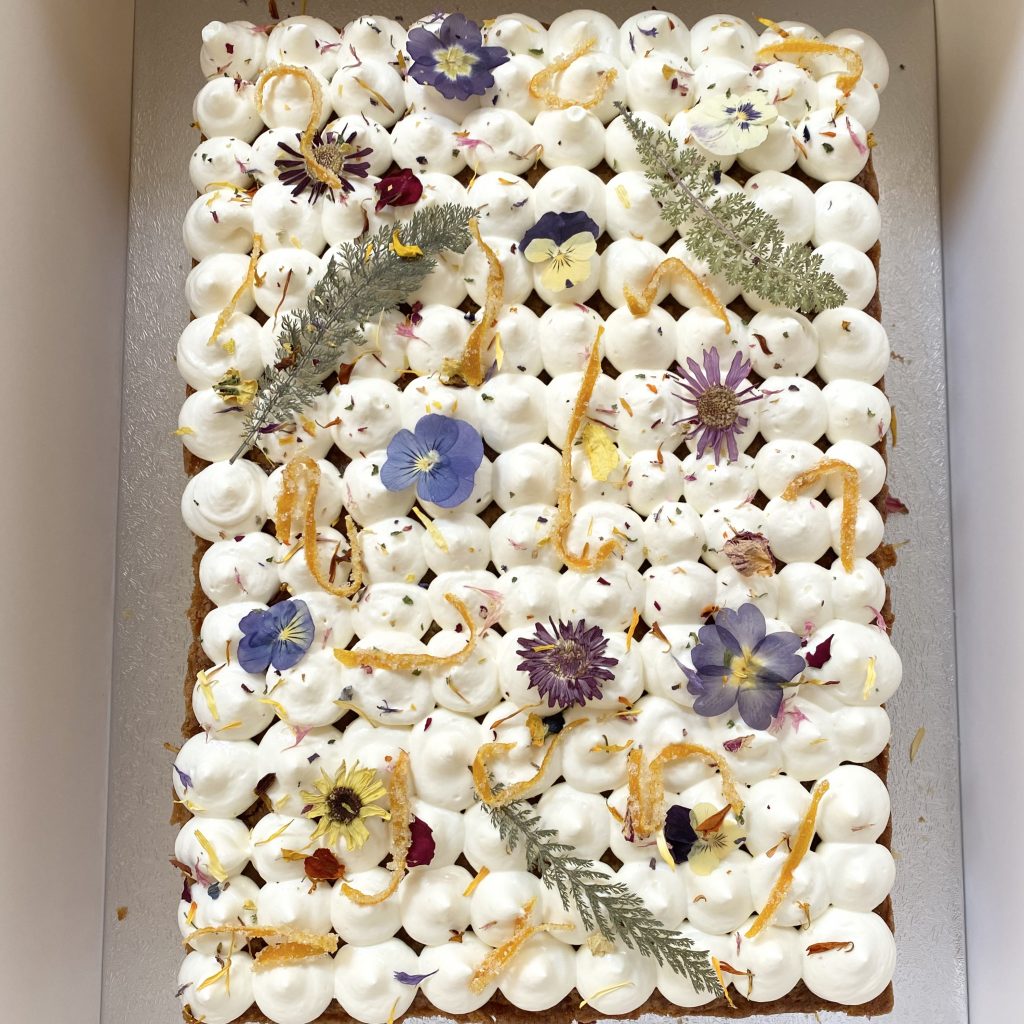
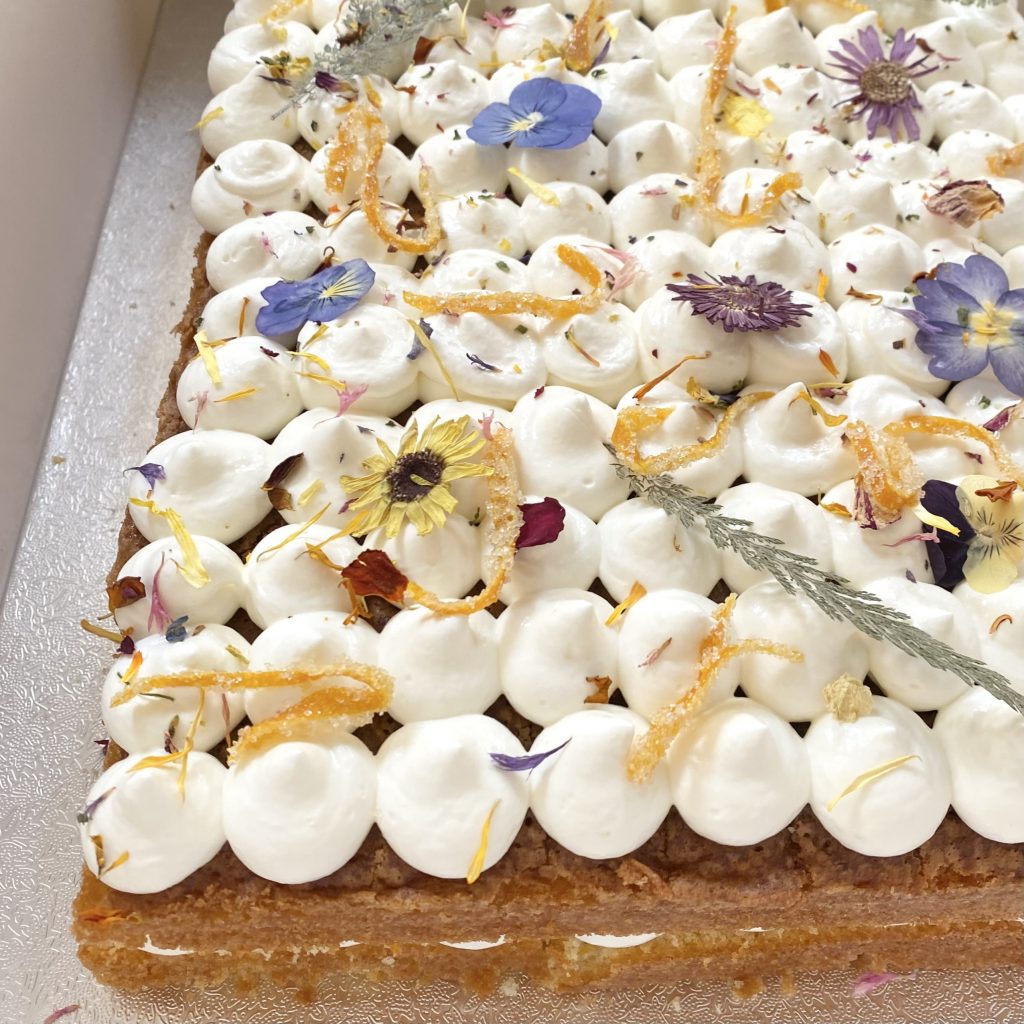
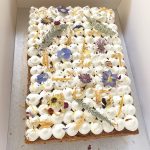
While, with the main cake, I added the flower/candied orange peels in a ring around the circumference of the cake, with the traybakes, I opted to just scatter the decorations all over the surface. I actually love how this approach turned out: I think these traybakes ended up looking so pretty, summer-y and fun!
Just like with the main cake, I started with the bigger, more dramatic edible flowers, then worked my way down to the smaller flowers. Once all of the individual flowers were placed, I added the candied orange peels. Finally, I sprinkled over some mixed dried petals, to give the whole thing a colourful, celebratory feel.
Tips for Working with Large Cakes
As cakes go, a 9 x 13 inch one is pretty large and, as a result, can be a little unruly to work with!
Below are a few tips for working with large cakes, to make the process as easy as possible for you:
- Use a cake leveller.
As I mentioned, you can absolutely use a large, serrated knife to split a large cake in half horizontally, as you need to do for this recipe, but the large area does mean that there’s more room for things to go a bit askew! I find it easier to use a cake leveller for this, because you can just slowly walk it through the sponge and let it do all the hard work for you. I use this one.
- Use a cake lifter.
With such a large surface area, there’s a greater potential for cracking/breakages whenever you move the cake around, particularly if you’ve sliced it in half and are working with thinner, more fragile layers. While you’re unlikely to find a cake lifter that can hold the full surface area of this cake, it will still do a better job than your hands at supporting more of the cake at any given time, so it’s worth using one if you have it!
- When holding the cake, let it rest on your forearms.
I know that hands are a cook’s best tools and all that, but I think forearms are underrated. Anything you can do to increase the amount of cake you’re supporting will help prevent breakages, so letting the cake rest on your forearms if you need to transfer it from Point A to Point B is a helpful workaround, particularly if you don’t have a cake lifter.
- Make sure you have a serving plate/board large enough!
This one seems pretty obvious, but the bigger the cake, the bigger the serving plate you’ll need for it! If you can’t find anything big enough, you could always use a chopping board or baking tray (though, if you’re making the cake for an event, I would recommend purchasing a sturdy, professional cake board, like this one!).
Recipe
Orange & Olive Oil Traybake with Honey-Yoghurt Icing
Equipment
- 9 x 13 x 2 inch traybake tin (see Note 1).
- 1 piping bag, fitted with a large, round nozzle
- cake leveller (or a large, serrated knife).
Ingredients
For the tin:
- 2 batches DIY Cake Release (see Note 2).
For the cake:
- 450 g golden caster sugar
- 6 oranges (zest of 6 + 180ml juice (approx. 3-4 oranges).
- 6 eggs
- 180 ml extra virgin olive oil
- 380 g plain flour
- 1 tbsp baking powder
- 1 pinch fine sea salt
For the icing:
- 765 g Greek yoghurt (at least 10% fat)(see Note 3).
- 385 ml double cream
- 110 g runny honey (see Note 4).
To decorate:
- Edible pressed flowers (see Note 5).
- Candied orange peels (see Note 6).
Instructions
Prepare the cake tin:
- Brush the cake tin all over with a layer of DIY Cake Release. Line the base of the tin (not the sides) with baking paper, then brush the surface of the paper with a little more Cake Release. Set aside.
Make the orange & olive oil cake:
- Preheat the oven to 160°C (conventional oven, not fan).
- Place the caster sugar into the bowl of an electric stand mixer, fitted with the whisk attachment. Zest all 6 oranges directly into the bowl with the sugar, then use the back of spoon to press the zest into the sugar until evenly distributed.
- Add the eggs to the sugar, then whisk on high speed until the mixture has become pale and doubled in size. It should be thick and creamy, like the consistency of softly whipped cream.
- While the egg mixture is whisking, combine the flour, baking powder and sea salt in a mixing bowl. Set aside.
- With the mixer running, pour the olive oil into the egg mixture in a slow, steady stream, until it is all incorporated.
- Repeat this process with 180ml of freshly-squeezed orange juice, pouring it in in a slow, steady stream with the mixer running, until it is all incorporated.
- Remove the bowl from the stand mixer and sift 1/4 of the dry ingredient mixture directly over the surface of the batter. Use a handheld balloon whisk to fold the dry ingredients in gently, but thoroughly.
- Repeat this process 3 more times, adding 1/4 of the dry ingredients each time, until they are completely incorporated. Switch to a spatula for one final, brief stir to make sure no flour remains at the bottom of the bowl.
- Pour the batter into the prepared tin, then bake in the preheated oven for 55-60 minutes, until the edges of the cake are starting to pull away from the sides of the tin and a skewer inserted into the centre of the cake comes out clean.
- As soon as the cake comes out of the oven, use your fingers, or the flat edge of a palette knife, to very gently push the edges of the cakes inwards, towards the centre. This helps the cake to release from the sides of the tin, making it easier to get it out of the tin once they are cool and ensuring that the cake has neat edges later.
- Allow the cake to cool most of the way in the tin, then turn out onto a wire rack, carefully remove the baking paper from the bottom and allow to cool completely before assembling.
Make the icing:
- When the cake are cool, make the icing. Place the yoghurt, cream and honey into the bowl of a stand mixer. Whisk on high speed until the mixture just holds stiff peaks. Don't over-whip. Transfer to a piping bag, fitted with a large, round nozzle.
Assemble the cake:
- Once the cake is cold and the icing is made, it's time to assemble. Start by dividing the cake into two layers horizontally. I use a cake leveller for this, but you can use a large, serrated knife instead.
- Add a generous smear of icing to the centre of your serving plate/board, then stick the first layer of cake on top, making sure it is centred and level.
- Pipe rows of icing dollops all over the surface of the first cake layer, making sure the dollops around the perimeter of the cake are neat, as they will be on show.
- Carefully top with the second layer of cake, then repeat the icing process again. Make sure that all of the piping on this layer is neat, because this will be the top of the cake.
- Place the cake into the fridge to chill for 15-20 minutes, then arrange the edible flowers and orange peels all over the surface.
- The cake must be stored in the fridge until you are ready to serve it. As long as the cream/yoghurt were well within their use-by date, it will last for 2-3 days.
Notes
- I use this tin from Silverwood.
- My recipe for DIY Cake Release is absolutely essential for this recipe, because the cake batter is very prone to sticking to the tins.
- Make sure to use a Greek yoghurt that has a fat content of 10%: this will make for a perfectly thick, creamy and stable icing.
- I used a selection of pressed, edible flowers from Nurtured in Norfolk.
- You can find my recipe for Homemade Candied Orange Peels here.