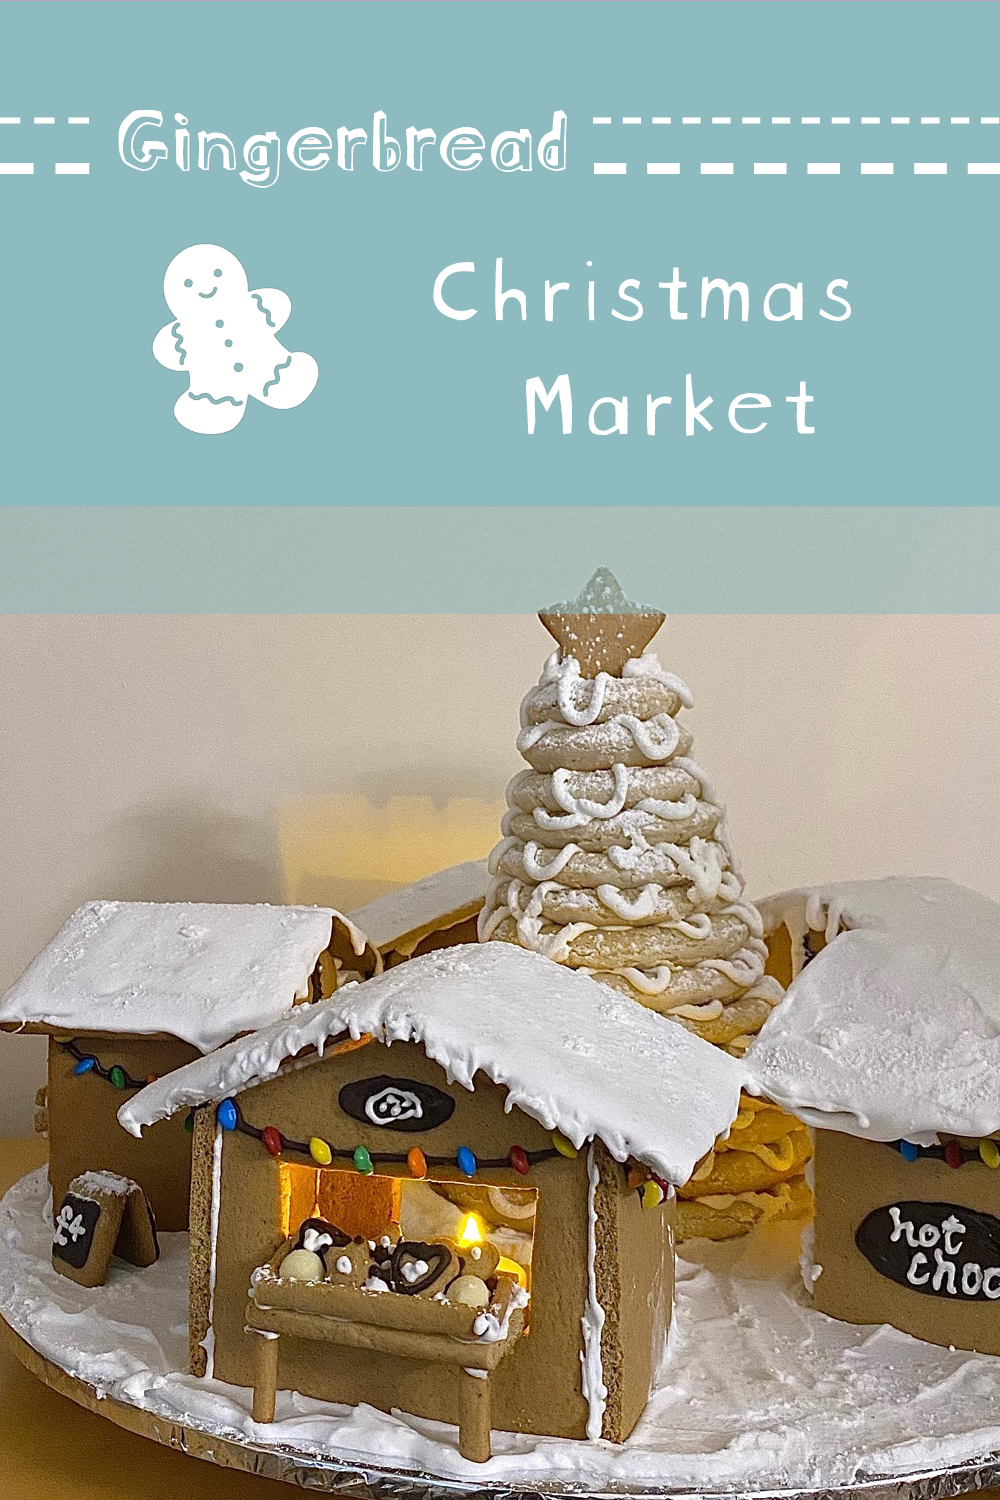
Today, I am bringing you a walkthrough of my 2022 gingerbread undertaking: the Gingerbread Christmas Market! This post is a little later than intended- sorry! It was a big project, and one that required a lot of careful planning. There was modelling, there was maths, and there was icing everywhere. This post is not a recipe, but I will be walking you through my process, along with the numerous difficulties I encountered along the way- I’m beginning to feel there is nothing more humbling than attempting to make a gingerbread sculpture! Well, let’s get into it…
Phase 1: Conception
I am no architect. In general, I have very little practical sense, maths is not my strong suit and I often wonder if GCSE Physics was really just a fever dream. Nevertheless, I dreamt up a gingerbread project that required mathematical, architectural and functional planning, so plan I had to. Of course, I turned to The Sims. Using my hard-earned ninja building skills, acquired from hours of designing mansions for my filthy rich super-Sims, I made myself some concept art:
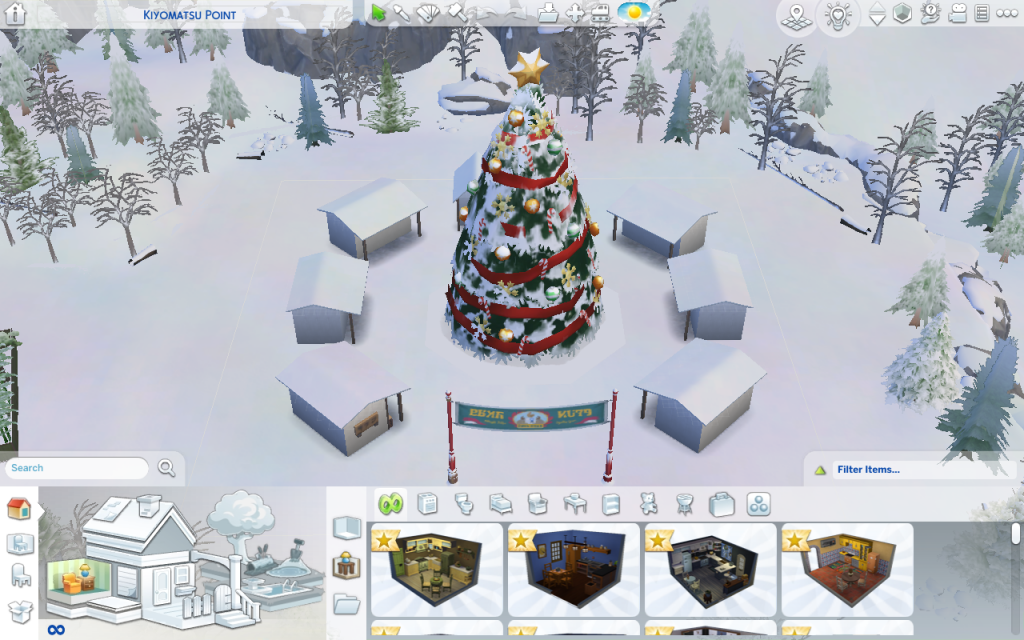
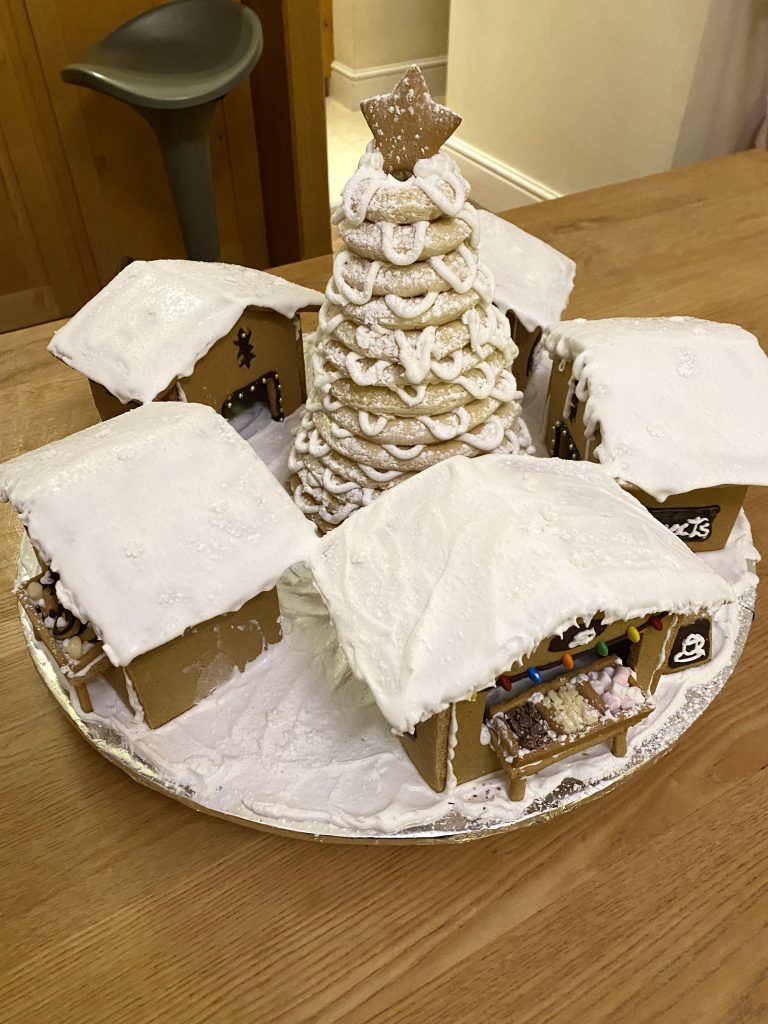
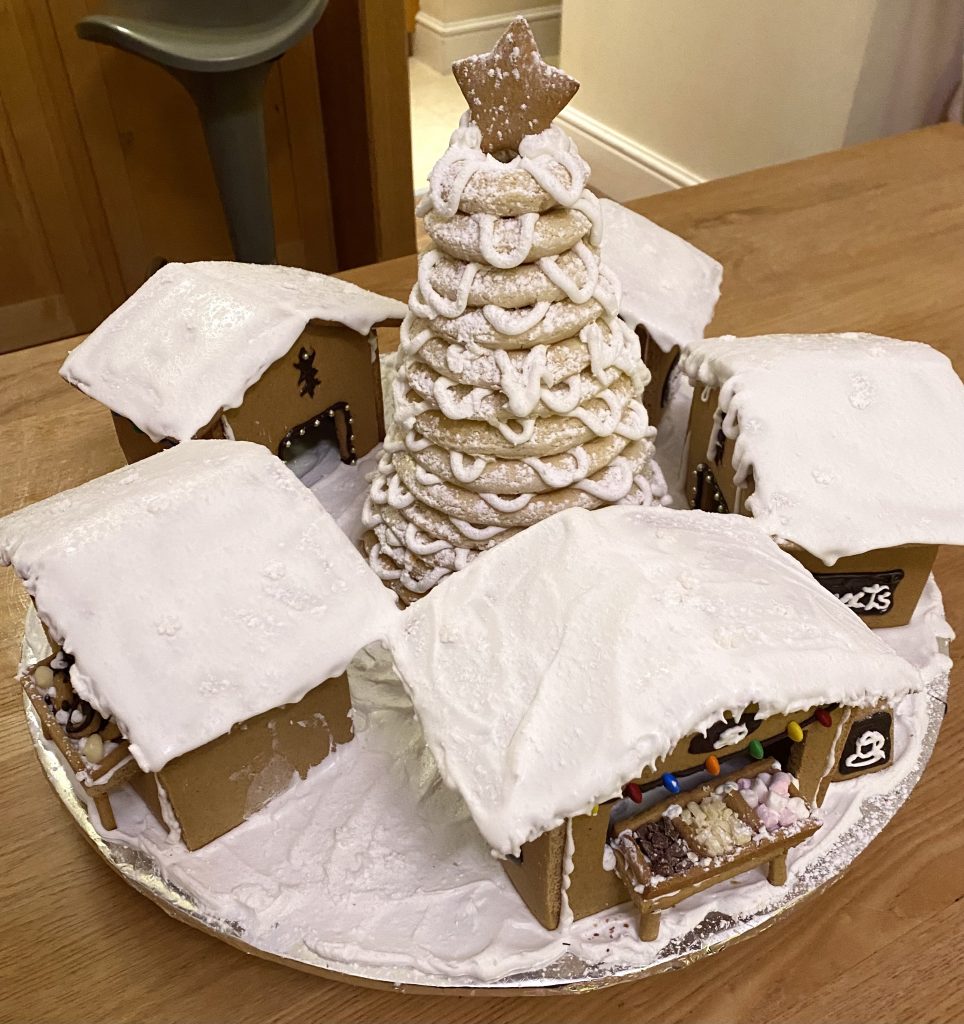
To be frank, I feel the Sims render was not overly necessary. The basic concept was this: big tree in middle, small stalls around tree. Pretty simple.
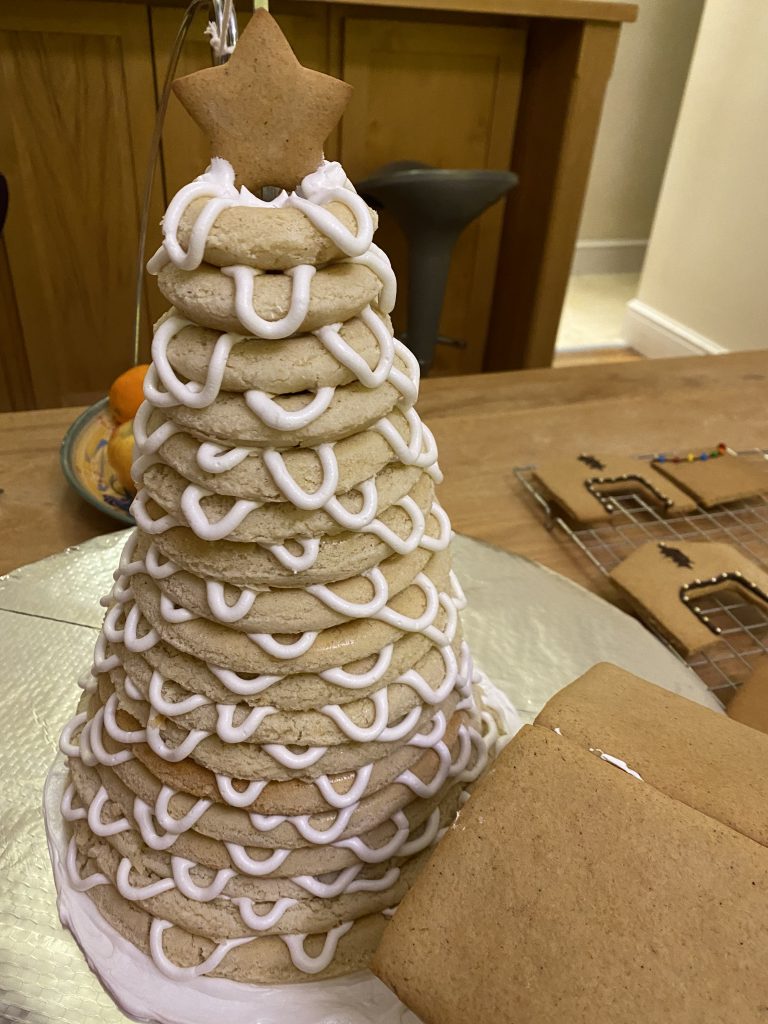
While I was conceptualising my magnum opus, I came across a Scandinavian celebration cake: the kransekake. I believe this translates to ‘wreath cake’, but, to me, these almond-y confections resemble a big Christmas tree. It was fate! I was sold. The central tree of my market would be a kransekake and the huts would be made of gingerbread. The conceptualisation was complete.
Phase 2: Planning
After much scouring and much being appalled at the extortionate cost of some of the tins, I finally managed to track down a kransekake tin set at a (relatively) reasonable price. It was a second hand version of this one, from Lakeland (which has been discontinued – sad face).
Once I had my tins and I could visualise how big the central kransekake would be, it was time to model the huts themselves, which I would be making out of gingerbread. I made a prototype from card, which I then used to cut out templates for each of the individual pieces. I decided to make 5 stalls, with each hut consisting of one front piece, one back piece, two side pieces, two roof pieces, 1 shelf piece, 2 long divider pieces and (at least) 4 short divider pieces:
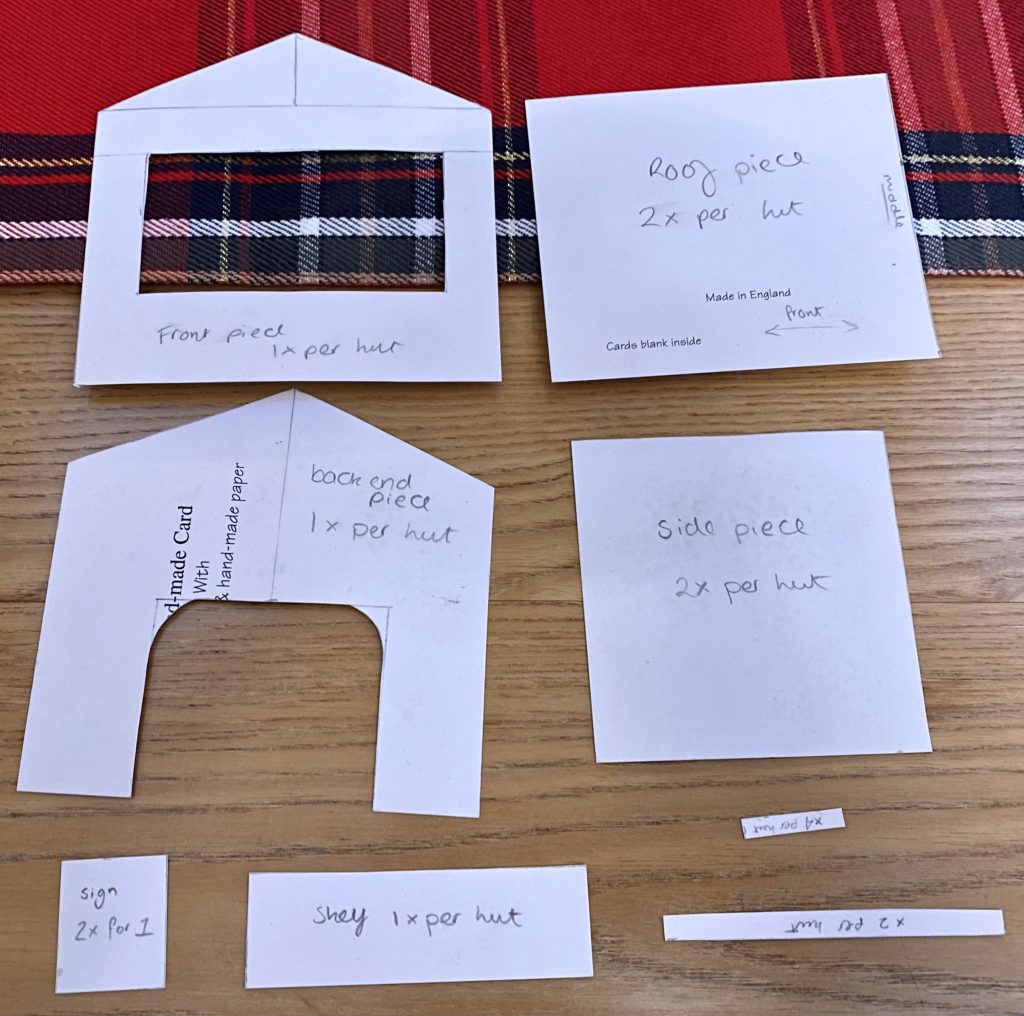
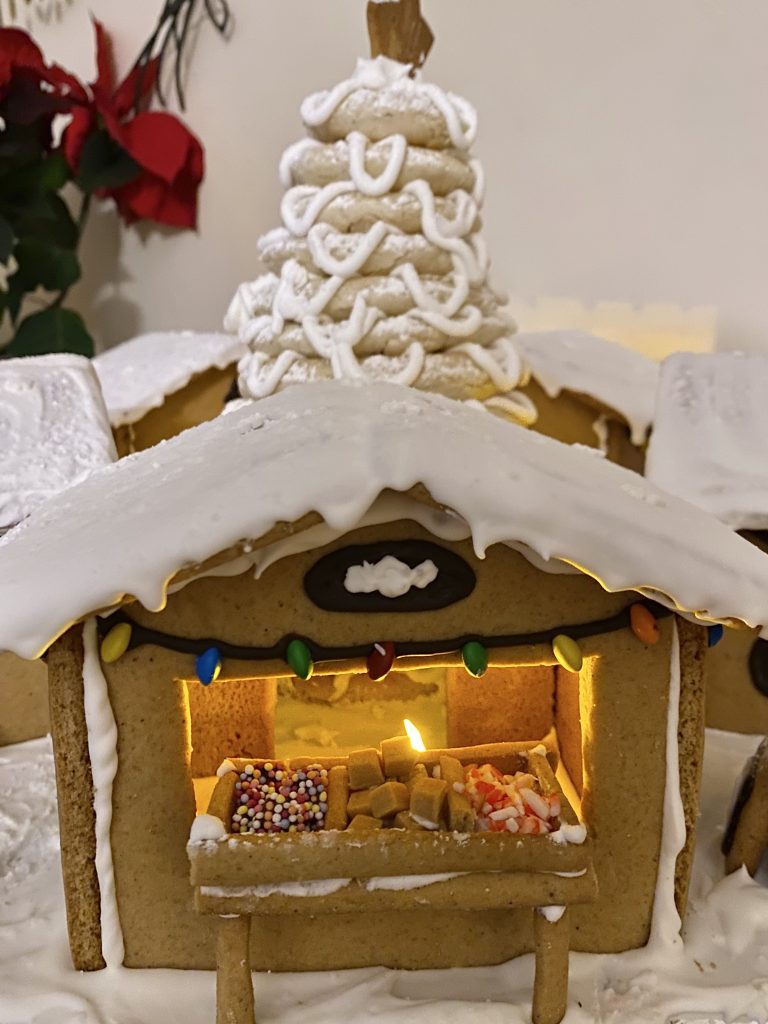
I wanted to be able to light my huts up from the inside, using electric tea-lights, so I made sure to leave a gap on the back pieces large enough for the tea-lights. The fronts had a rectangular hole to mimic the store front. I also made a small, rectangular template to make a few chalkboard stand-up signs. I used small heart and star-shaped cutters for some merchandise and a larger star cutter to make the topper for my kransekake tree.
I then had to decide what to build my gingerbread market on, since it would be too large for a standard cake board. In the end, I found a circular piece of recycled plywood, which I wrapped tightly in foil (secured with masking tape). The plywood was roughly 50cm diameter (though, had everything gone to plan, a slightly larger board might have been preferable).
All that was left to do was to decide what each of my 5 stalls would sell and calculate the amount of gingerbread I would need to make. One of these jobs was much more enjoyable than the other. The calculation part (obviously) required a lot of maths, which was an unpleasant, yet wholly necessary, task. I worked out that I would need a double batch of my gingerbread recipe. This ended up being the perfect amount (yay for successful maths-ing!), after I broke 2 of the walls (boo…) and had enough dough to rebuild them. Phew. For the stalls, I simply selected merchandise that I loved and that I felt were easy to recreate in miniature form. I settled on: nuts, sweets, hot chocolate and cookies, and I dedicated the final store to my brother and his girlfriend, who came to spend Christmas with us (read: I was undecided about the merchandise and hoped to gain inspiration later on, while decorating).
And, with that, my gingerbread Christmas market had been conceptualised, planned and prepared. It was time to get baking!
Phase 3: Baking
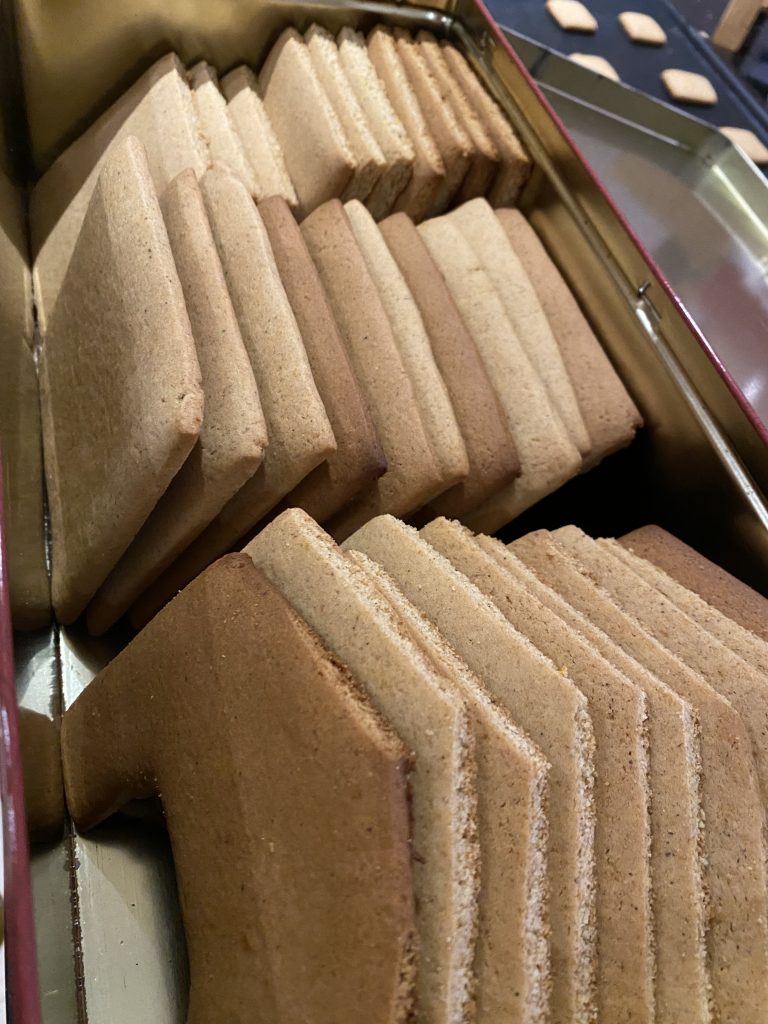
I began with the gingerbread. Following my plan, I made a double batch of my usual recipe and, once it had chilled in the fridge, I cut out the shapes I needed using my templates. I tried to bake similar sized pieces together, so that they would cook evenly. Immediately after the main pieces came out of the oven, I placed the corresponding template on top of each piece and trimmed the edges with a small, serated knife. This would ensure that the pieces fit together properly later, when I was building. There is a very small time frame in which the gingerbread is soft enough to do this in (literally about 1-2 minutes). My advice is to start with the edges that truly require trimming (all the outer edges of the walls of the house, and the short sides of the shelves). The roofs can stand going untrimmed, but trimming one of the long sides (for the middle of the roof, where the two pieces join), would be helpful if you have time. It was at this stage I met my first hurdle: the combination of burnt fingertips from touching super-hot, straight-from-the-oven gingerbread and the rapid cooling of said gingerbread led to a couple of breakages. Luckily, as I said, I had just enough gingerbread to remake those unfortunate pieces!
Each stall required 13 separate pieces, as shown here:

Again, that’s one front, one back, two sides, two roofs, one shelf, two long dividers and four short dividers (though I ended up using a few more of the short dividers on each hut). I also cut out a large star, 6 blackboard signs, 5 mini stars and 5 mini hearts.
Once I had all my gingerbread pieces, I was thoroughly tired out- it was quite a process! I packed all my walls and pieces into tins, and called it a night.
The next day, I baked my kransekake. I used this recipe. However, I did run into a few issues with it. Despite giving my larger layers an extra minute of baking time, and the fact they were indeed golden on top, as Paul requested, they were underbaked (to the point where they collapsed on assembly…RIP bottom 3 layers…). I wonder, perhaps, if a lower temperature and longer bake would have been more suitable? I hope to try another recipe at some point, to compare.
With that, the baking phase was done! It was time for the next stage: decorating.
Phase 4: Decorating
Finally, it was time for the fun part! Decorating! I compiled my various sprinkles, sweets and snacks, ready to use:
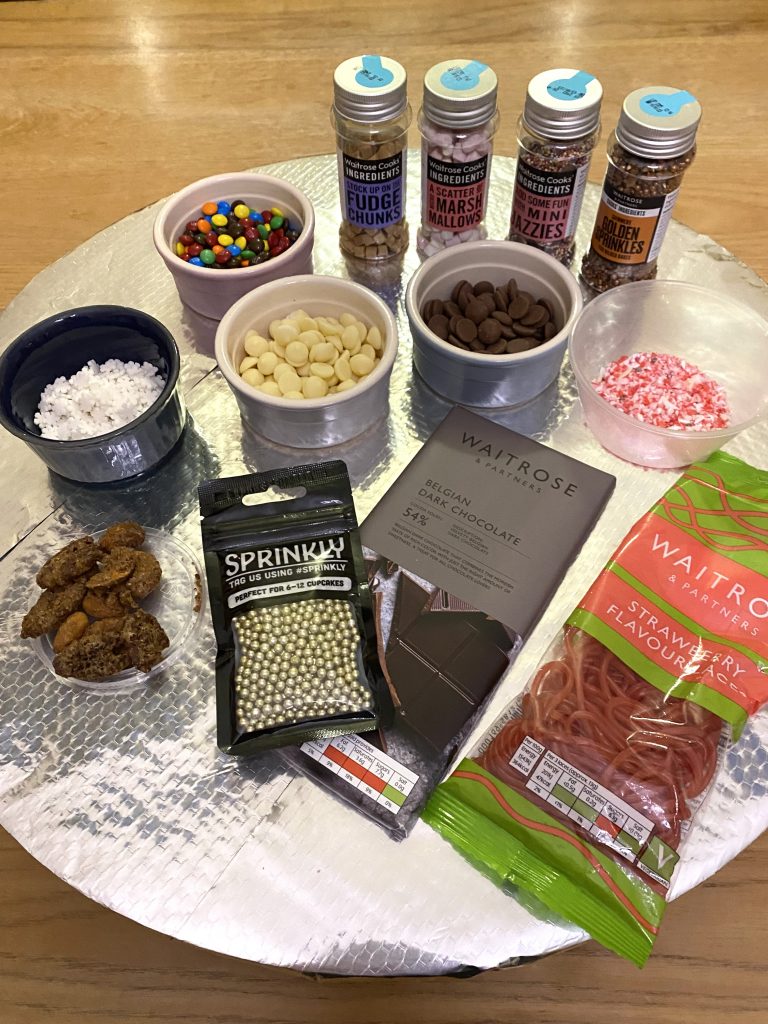
To start with, I used the mini m&m’s (which are almost impossible to get in the UK- you could easily substitute them with mini Smarties if needed), the gold edible balls and the dark chocolate. (Side note: this post is absolutely not sponsored by Waitrose, despite what this layout might suggest).
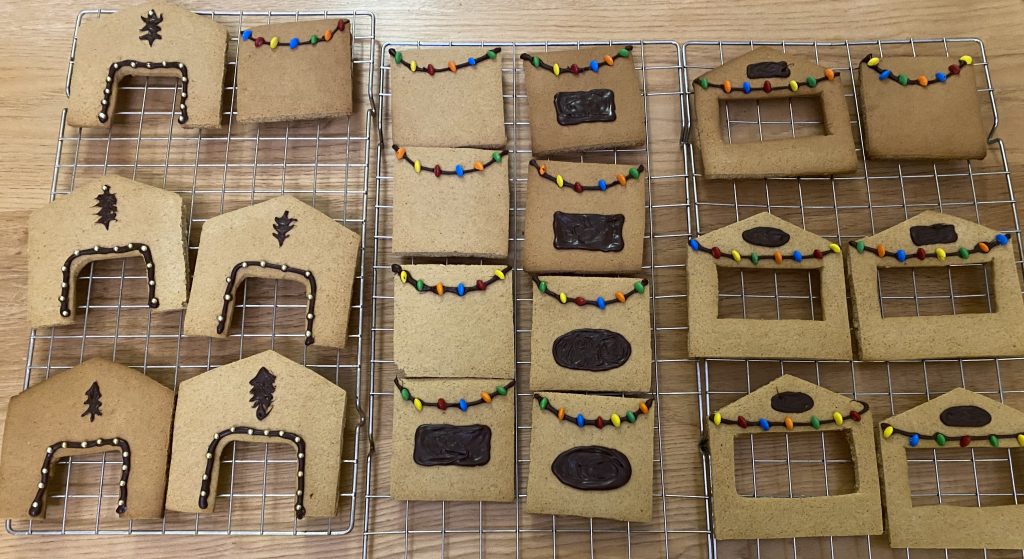
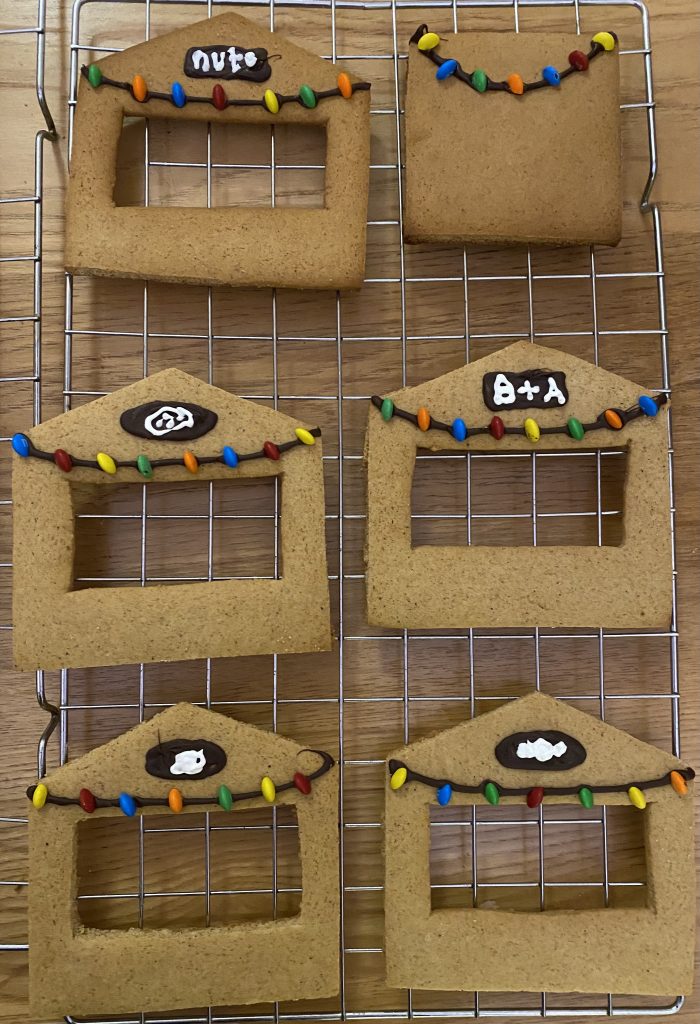
I began by cutting the mini m&m’s in half. I say I, I did one and promptly let my dad take over. Yay for sous-chefs! (But seriously, thank you, Dad). You want to cut them through the side with the ‘m’ on it, so you have little almond shapes. These will form the coloured lights that are strung around the stalls.
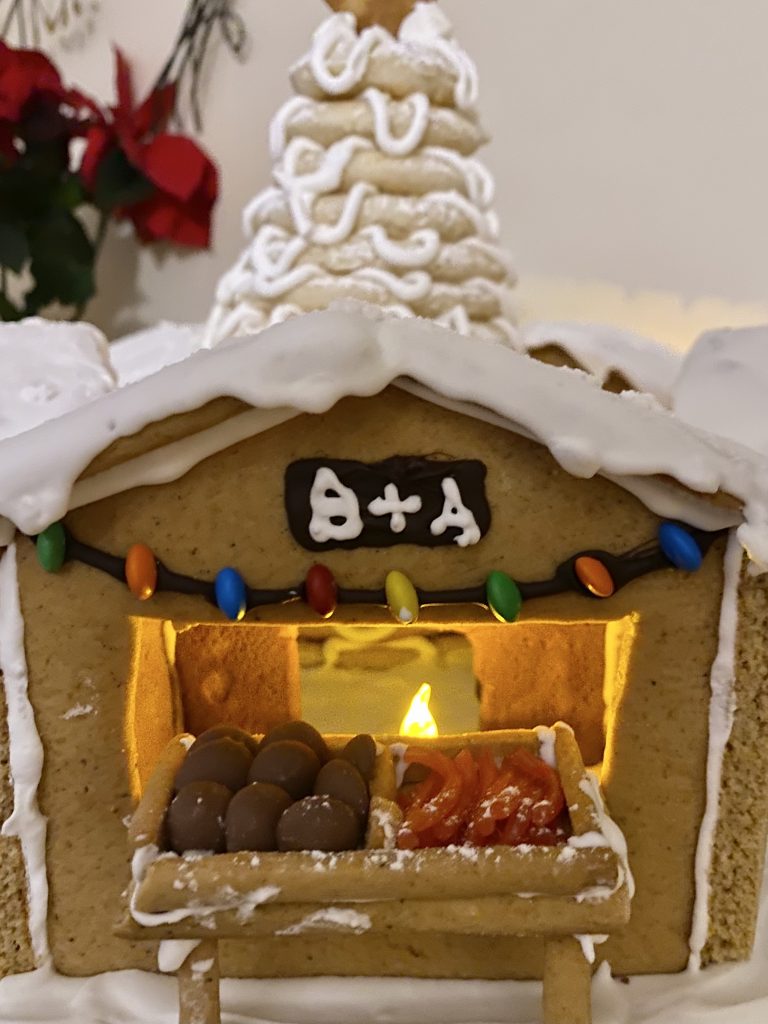
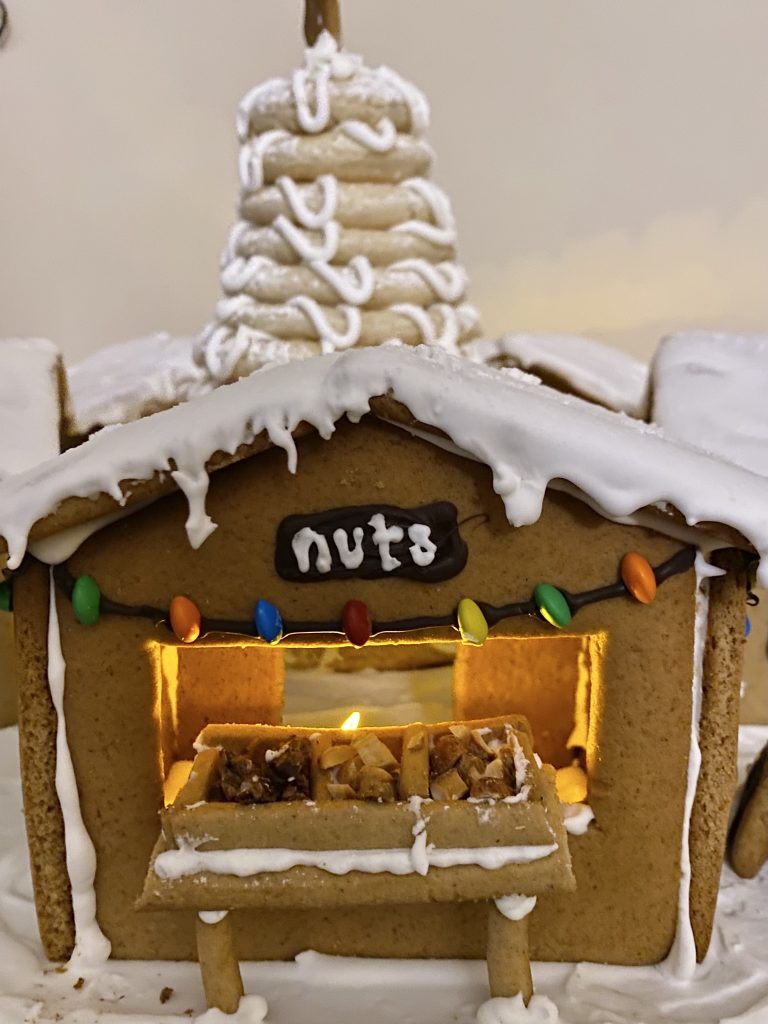
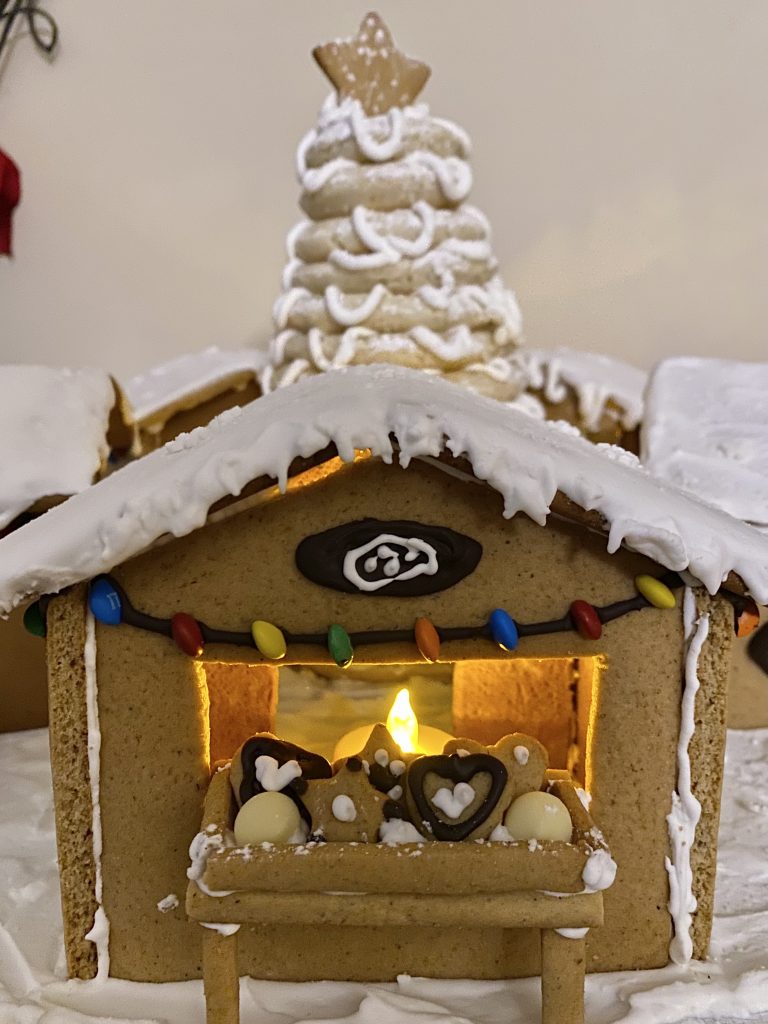
Once I had my m&m lights at the ready, I tempered some dark chocolate (you can read more about my tempering process on this post) and put it into a piping bag with a small round tip. Using the chocolate, I piped a a slight arc across the top of the front and side pieces, to form a string for the lights. While the chocolate was still wet, I (and my dad- mainly my dad) stuck the half m&m’s onto the chocolate ‘strings’. I also piped small rectangles and ovals above the strings on the front and slightly larger versions on 5 of the 10 sides, to form the signs. On the backs, I piped around the opening for the candles and placed gold balls onto the chocolate to resemble little lights. I also attempted to pipe a little chocolate Christmas tree above the arch on each back.
As you can see, some of my attempts were more successful than others! Let’s focus on the one, perfect tree I managed to do!
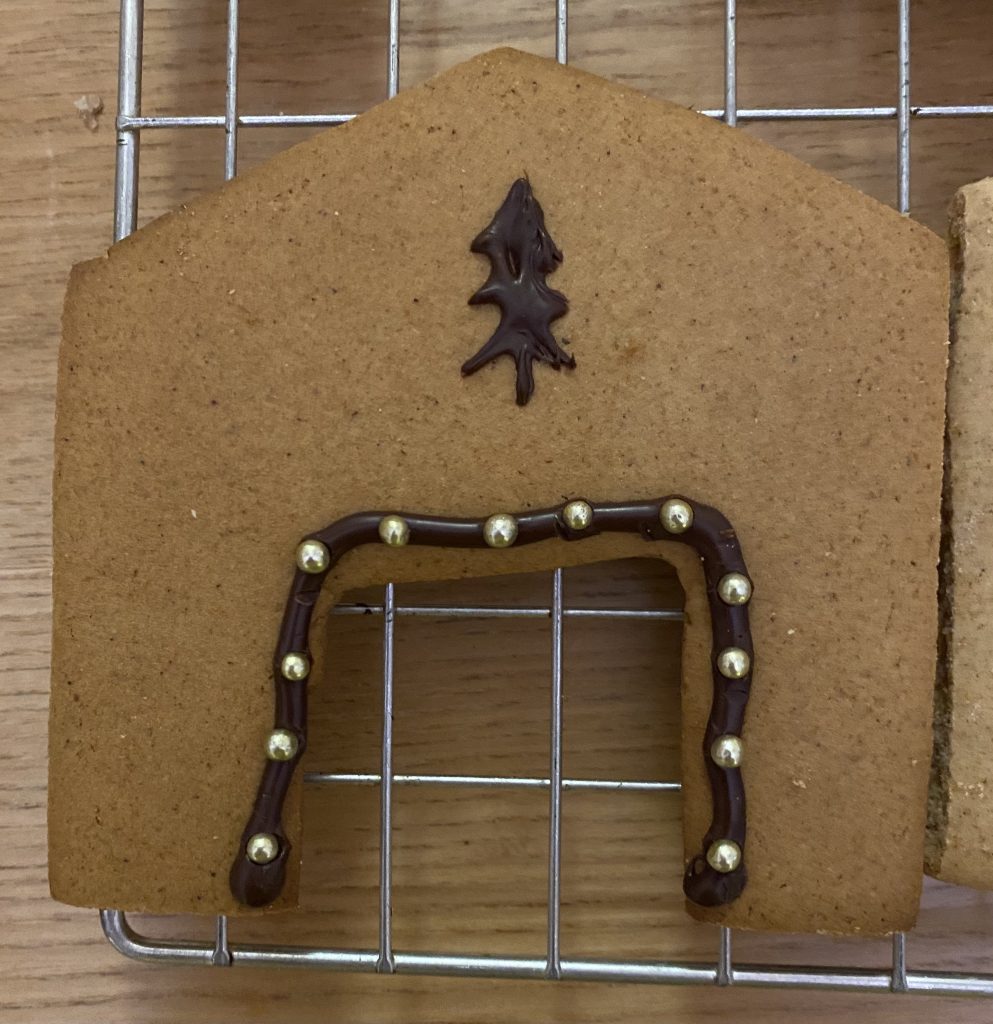
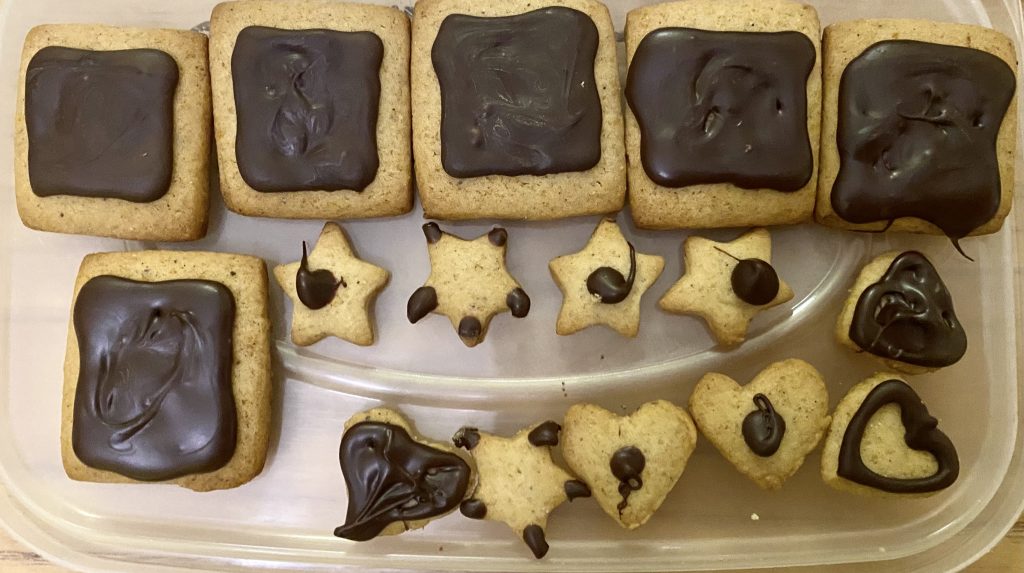
Isn’t she pretty? I was very proud. I also piped rectangles of chocolate onto my blackboard signs, and ‘decorated’ (I use the term very loosely) some of the mini cookies.
While the chocolate was setting, I whipped up some royal icing. I ended up using 4 egg whites’ worth, but I made it in two separate batches, so that it wouldn’t dry up during the process. I put a small amount of the icing into a piping bag with a very small, round nozzle and used it to pipe the finishing touches on the signs. I wrote out the full name of the shops on the sides:
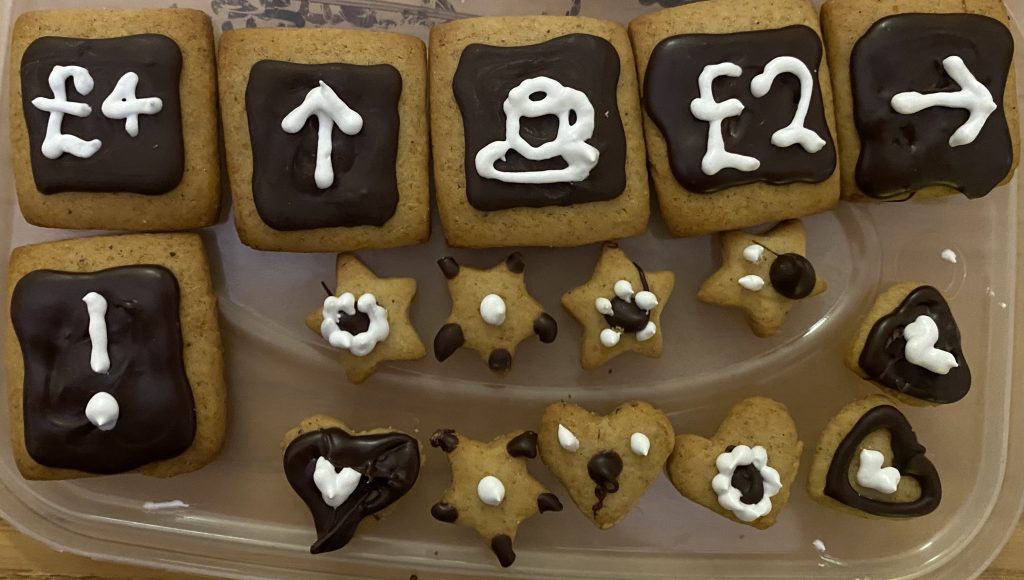
And then drew a little symbol for each shop on the smaller signs on the front:
Finally, I added some finishing touches to the blackboard signs/mini cookies:
And, with that, the initial decorations were complete!
Phase 5: Assembly
I feel like the assembly is the part of gingerbread-house making that feels the most daunting. What if you break your decorations? What if the whole thing collapses? Needless to say, I was very nervous. Anyway, I began by assembling my kransekake in the middle of the board (which I placed on a Lazy Susan, for ease). I spread a thin layer of icing down, then began to build the kransekake, drizzling each layer with icing in the traditional way, as Paul instructs. I think I should, perhaps, have used the finer nozzle for this, but we live and learn.

This is a delightful photo of the kransekake in process, before the bottom 3 layers (which you can see here) decided they had had enough of life at the bottom of the tower and promptly gave way, toppling the kransekake. I ended up lifting the top 15 layers up, removing the bottom 3, and putting the smaller kransekake back onto the board. It has since held up perfectly and actually fits better on the board with the houses! All’s well that ends well, I suppose. I placed the larger star gingerbread on top of the kransekake, for the finishing touch. Below is the kransekake, before the Big Squash.
Once the kransekake had been assembled, rescued and then reassembled, I began to build the stalls. Working on 1/5th of the board at a time, I spread a thin layer of icing down and built a stall directly onto the board. I began by placing the front wall, facing out, where I wanted it, then used the same piping bag I used to ice the kransekake to stick the walls together. I used the piping bag with the thinner nozzle, the one I used for writing on the signs, to stick the shelves together. I did have to break off parts of my dividers to get a good fit, but this was actually quite easy! Unfortunately, I have no photos from this stage because I was absolutely COVERED in royal icing. It was all very sticky.
My shelves were a bit top heavy, so I ended up using 2 extra small dividers per stall as supports, placing them upright on the board and using icing to stick them to the bottom of the shelves. They worked perfectly!
I repeated this process for every stall, spacing them evenly around the board. Once they were all constructed, I placed my blackboard signs randomly around the board, propping 2 up against each other and securing them with a little royal icing. After giving everything a little time to set up, I could move on to adding the finishing touches.
Phase 6: Finishing touches
The first thing that I had to do was to cover the roofs of the huts with snow. For this, I thinned my remaining royal icing slightly with water, so that it would cover the huts more easily and drip off the edge a little, mimicking icicles. I hope you can see that in the pictures!
I then used a little more royal icing to stick down the ‘merchandise’ in each tray. For the hot chocolate stand, I divided the shelf into 3 sections and filled one with chopped milk chocolate, one with chopped white chocolate and one with micro marshmallows (seriously, micro, not mini- they’re even smaller!).
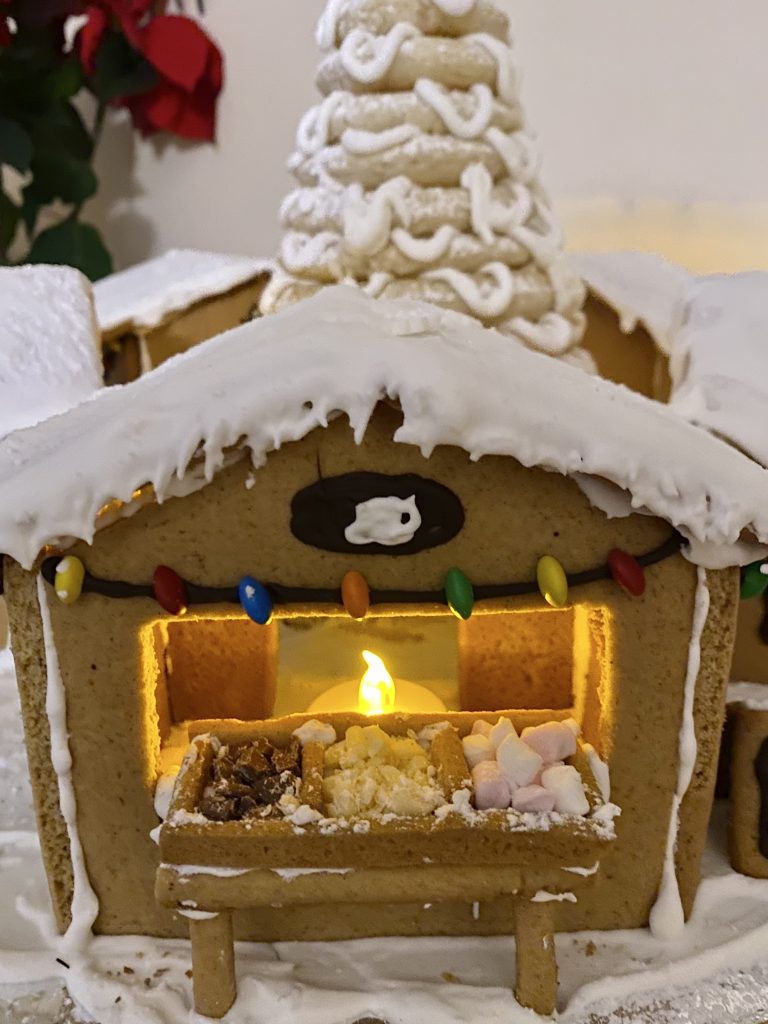
For the sweet stall, I again divided the shelf into 3 and filled the individual sections with mini jazzies, mini fudge chunks and crushed candy canes.
For Ben and Amy’s stall, I divided the shelf into 2 and filled it with chocolate chips and small lengths of strawberry laces (I was, as I had hoped, eventually inspired by Amy’s love for chocolate and my own leftover toppings).
For the nut stall, I divided the tray into 3 and chopped up one each of my Copycat Christmas Market Nuts: a pecan, an almond and a cashew, to put in each section.
Finally, for the cookie stall, I left the tray undivided and filled it with 5 of my mini gingerbread cookies (plus a couple of white chocolate chips for good measure).
Then, all that was left to do was to scatter a few snowflake sprinkles around the place and dust the whole thing with icing sugar snow!
Overall, this project was a MASSIVE undertaking, but I’m really proud of how well it turned out. Of course, there a bits that are messy, there are parts that I could have done better and I’m not sure the clothes that I was wearing will ever truly be clean again. BUT, it is a little bit of festive fun that I took from concept to completion and I think, all in all, it looks pretty good! I hope you like it, and I’d love to hear about any gingerbread projects you undertook this year!
Gemma
xxx