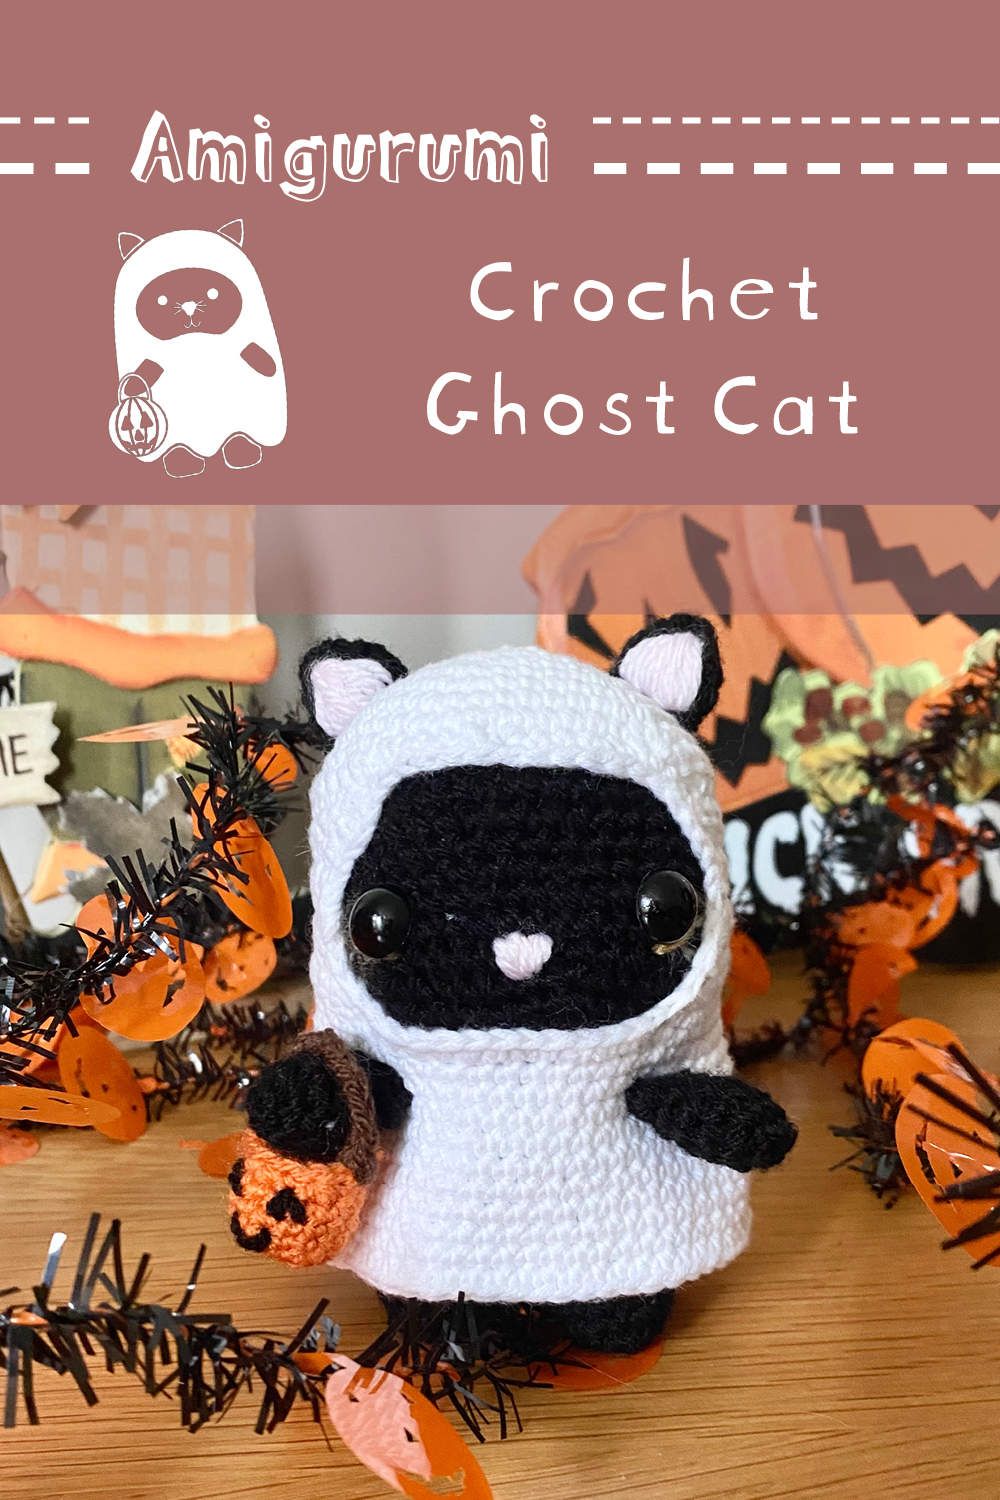
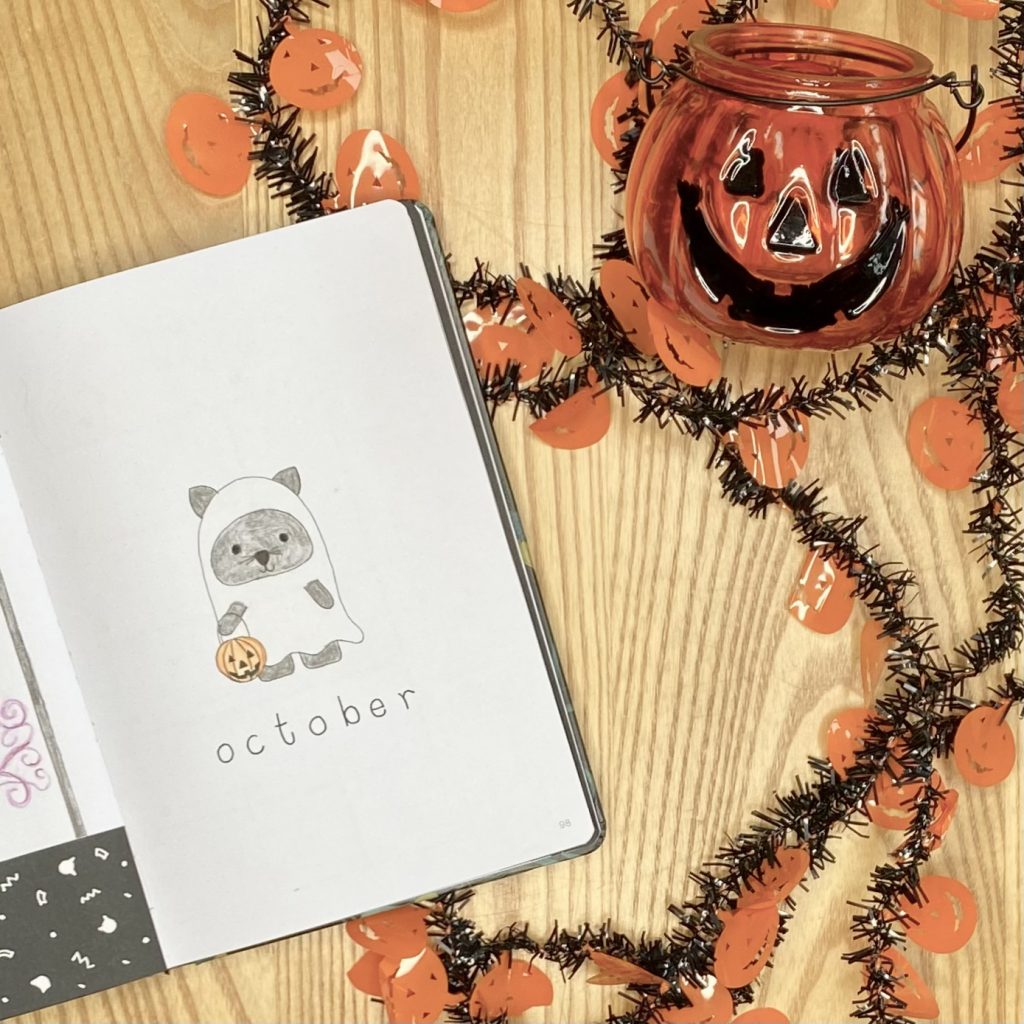
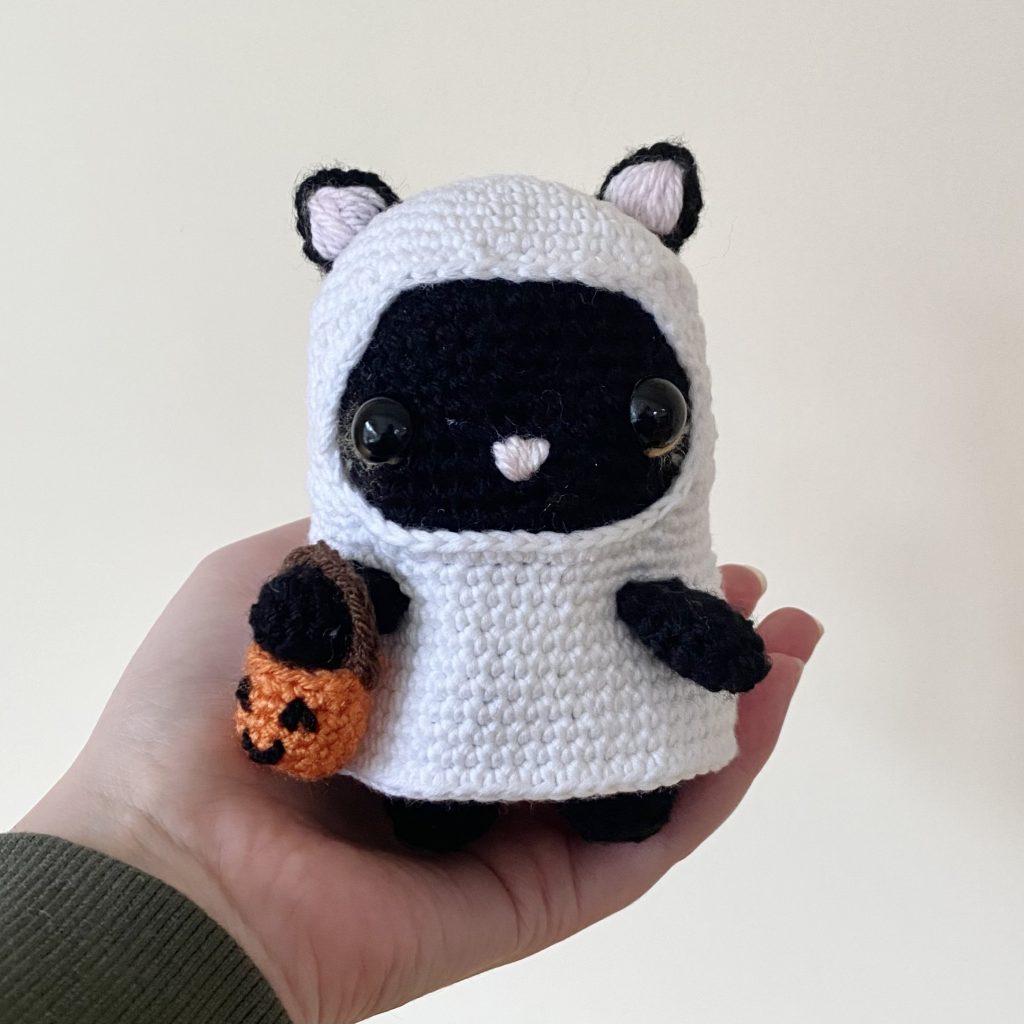
In my last post, I shared my October 2023 bullet journal setup, which has a trick-or-treating cat theme.
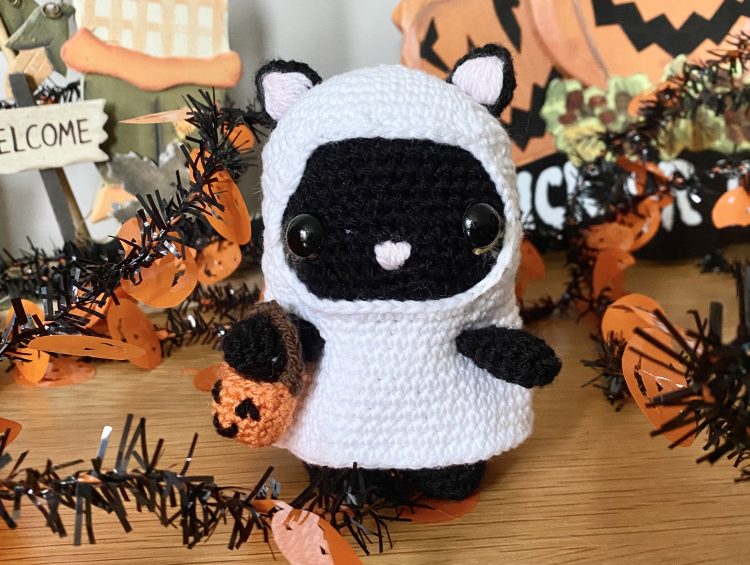
As I mentioned in that post, the whole setup was inspired by this Halloween Ghost Cat Amigurumi crochet pattern, by Imelda Liputri (@medaami). I think it is truly one of the most adorable things I have EVER seen and it definitely made for a super cute, super spooky setup. I did say that I might give the crochet pattern a try at some point during October and… I did! I made my very own Halloween Ghost Cat Amigurumi, and I thought I would share my experience working with this pattern and making my cat with you today.
A little disclaimer to begin: obviously, this post does NOT include the pattern for the cat. If you want to make your own cat, you will need to buy the original pattern yourself. You can purchase the pattern from Ravelry (which is what I did!) or from Etsy. I purchased this pattern independently for my own, personal use and this post is just me sharing my experience of it and attempting to shine a light on this super-talented creator!
With that out of the way, let’s get into my cat-making adventure!
Table of Contents
Materials
Yarn
I just used odds and ends from my stash for this project- you don’t need very much. For the majority of the yarn, I used Stylecraft Special DK. To the best of my knowledge, I used the following shades:
- Black (1002), for the body and the embroidery on the pumpkin.
- Powder Pink (1843), for the nose and ear details.
- Warm Grey (1805), for the whiskers
- Camel (1420), for the eye details.
- Spice (1711), for the pumpkin bag.
- Walnut (1054), for the handle of the pumpkin bag.
I didn’t have any white acrylic yarn on hand, so I used some cotton yarn instead. I have absolutely no idea what brand it is, but it is a DK weight yarn, just like the Stylecraft.
Additional Equipment
- 3.5mm crochet hook
- Locking stitch marker (I use these ones).
- Tapestry needle
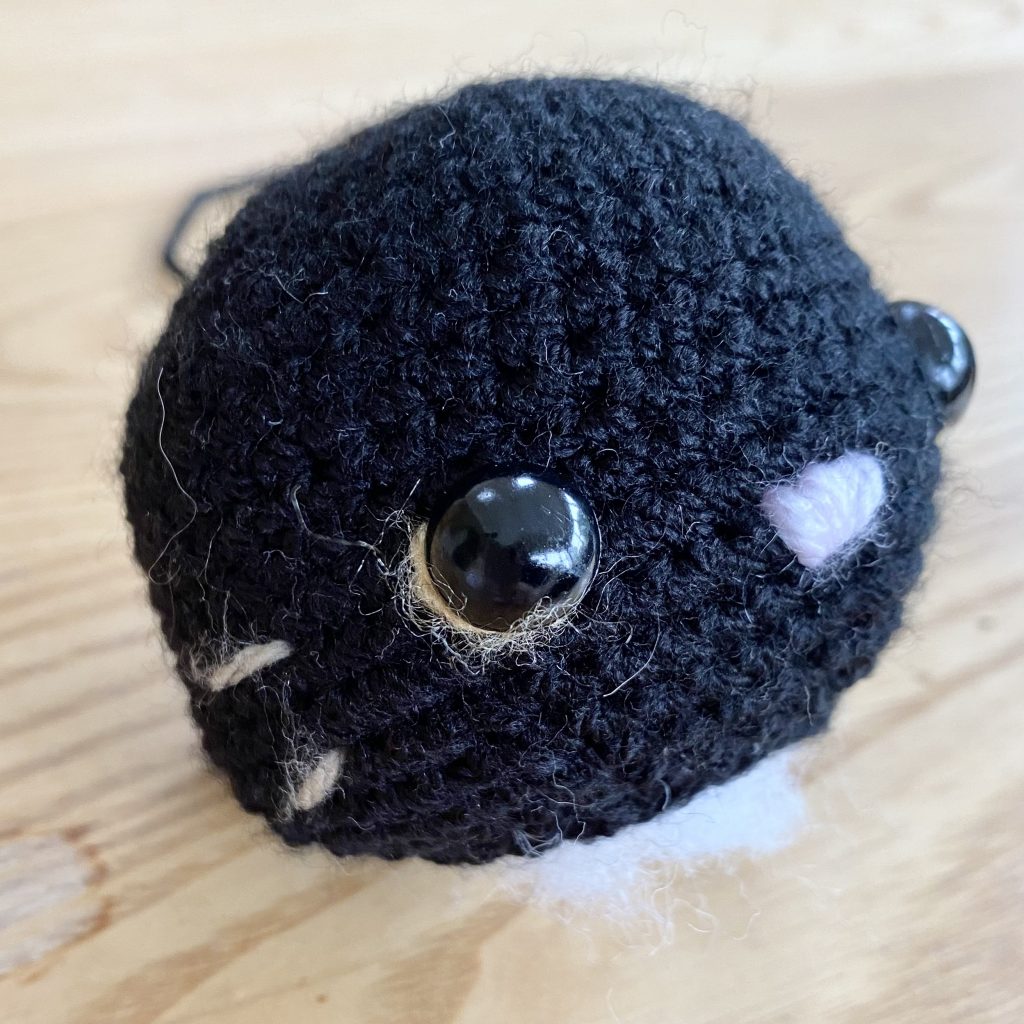
- 2x12mm safety eyes (a little bigger than the ones listed in the pattern, but it’s what I had- I figure bigger eyes can only make amigurumi cuter anyway, right?)
- Scissors
- Stuffing
The Process

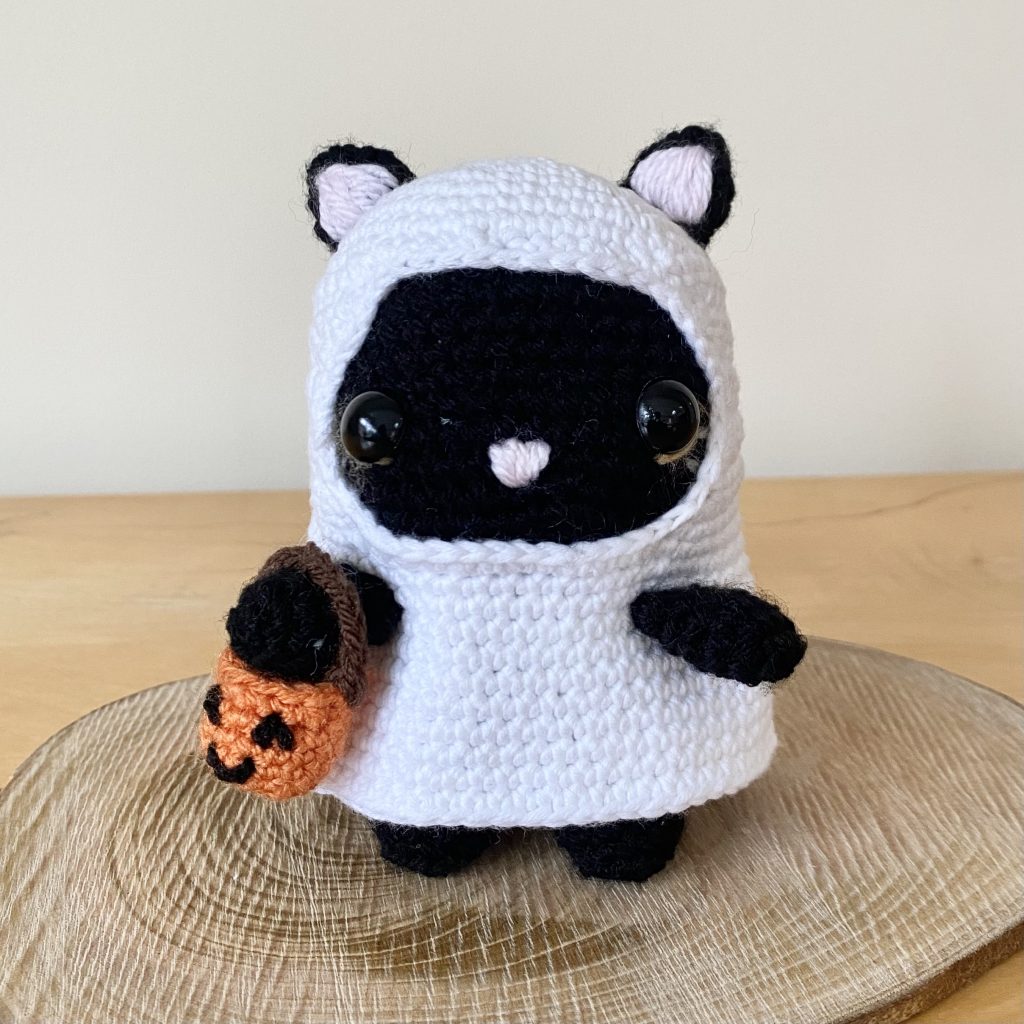
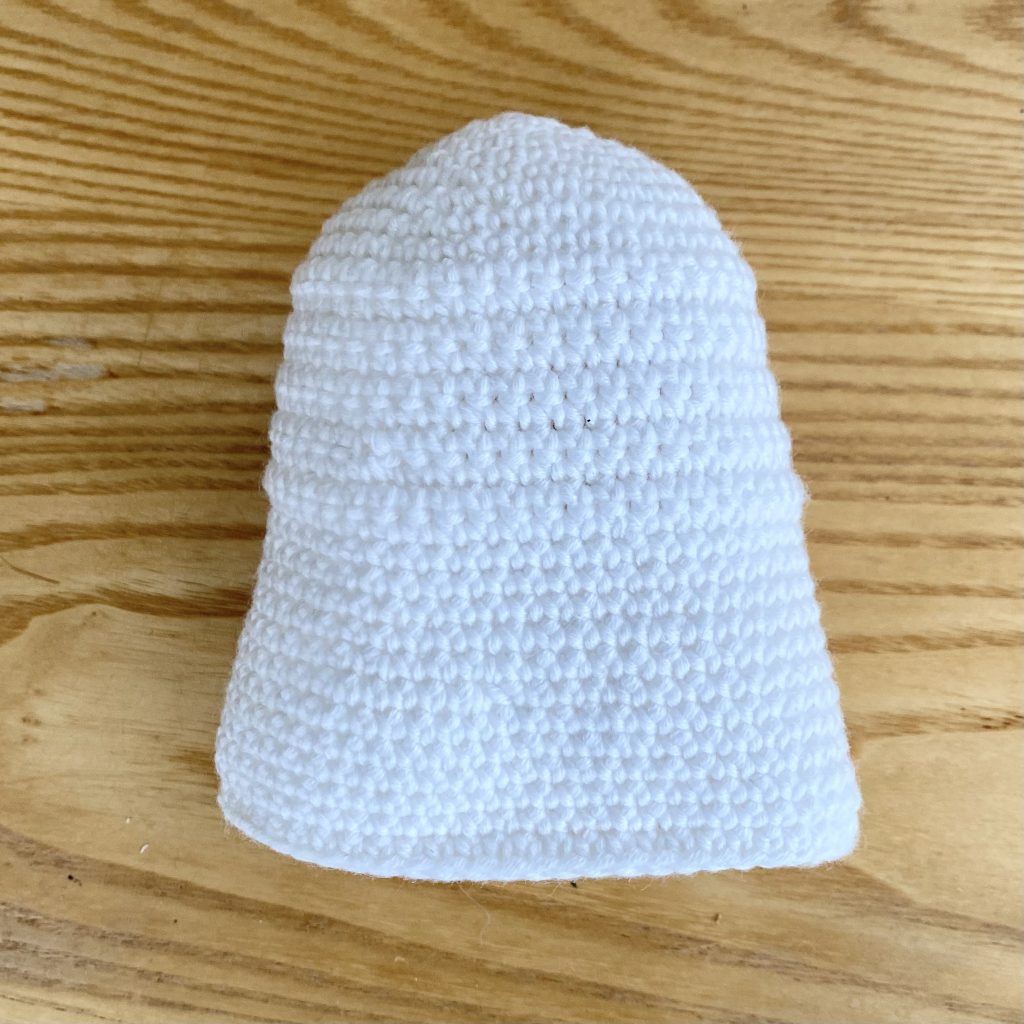
For this pattern, like most amigurumi patterns, you make most of the elements separately and sew them all together at the end. It doesn’t really matter what order you make them in, but I did find it helpful to make the head (top left) before I made the sheet (top centre) that goes over the top, so I could ensure it fit (which it did, pretty perfectly, which I was very impressed by- the pattern was so precise!). Along with those two pieces, you have 2x ears, 2x arms, 1x tail, 1x pumpkin basket and 1x body (which includes the two legs- more on this later). For the most part, I just followed the pattern for each body part, but I did make a couple of adaptations, here and there. I’ll talk through those adaptations in a second.
The original pattern suggests using a dark grey yarn for the body of the cat. This works really well, because you can then embroider the facial details on with a black yarn- the whole thing still ends up looking like a black cat, but you get a bit more dimension. I think it looks great! I, unfortunately, did not have a dark grey yarn on hand, so I opted to use black for the whole thing. I do feel I lost a little dimension by doing this, even though I managed to keep the nose/whisker details by replacing the black embroidery with pink/grey embroidery, respectively.
Head
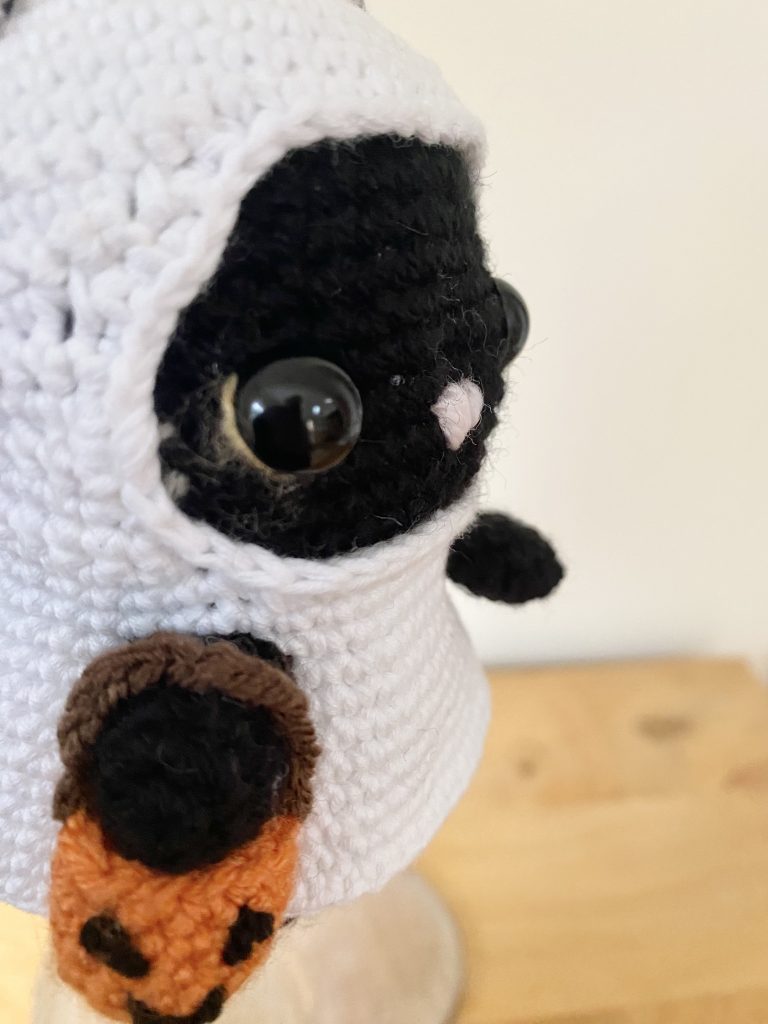
For the construction of the head, I followed the pattern exactly. The pattern makes for a really cute head (that sounds weird, I know, but it’s true!)- the cat has little chubby cheeks that are super easy to make but have a real impact on the finished cat- you might not be able to see it so clearly on my cat, because of the colour, but it’s definitely there!
The only thing I did differently for the head was that I embroidered the face (i.e. the pink nose and the grey whiskers) when I added the safety eyes- just before you finish off the head. I did this just to make the process a little easier for myself- embroidering onto a toy that has already been stuffed is a little trickier than embroidering onto an unstuffed piece of crochet because it’s a little harder to secure the ends. Having said that, the placement of the embroidery is easier to visualise when the head is stuffed, so do whatever you find easiest! I didn’t add a mouth, like the cat in the pattern has, because I thought a pink/grey mouth would look a little… strange? I also didn’t add the optional ‘eyeliner’ because, unless my cat wanted to go full 80s blue with its eye makeup, the little wings wouldn’t have shown up against the black body…
A couple of notes here:
- My whiskers looked super cute at this stage, but, when I put the sheet over the head, it completely covered them! Having looked at the original pattern’s photos, I think this was the case for that cat too- which seems a little pointless to me- I wanted to see the whiskers! I went back later and extended them out a little- they’re still a little obscured, but they are at least visible now. If you want your whiskers to be seen, I recommend taking them much closer to the eye- about a stitch away.
- I am OBSESSED with the technique this pattern used to enhance the safety eyes! It was so simple, but SO effective- genuinely, if you’re looking to up your toy eye game, I would recommend buying this pattern just for that! I’m not sure if it’s an original technique, but I’ve definitely never seen it before.
Body
For the body, I followed the pattern exactly as it was.
When I first started following amigurumi patterns, I would make one body piece and two leg pieces, all separately. Either I was using the wrong patterns, or the collective hatred of the amigurumi world for darning in ends and sewing things up has inspired a more seamless approach to bodies: an all-in-one method, where the legs are made separately, then worked together into a single body piece. This pattern uses that all-in-one technique! I’ve made a few patterns that utilise this kind of approach and I am completely, utterly IN LOVE. Not only does it mean that there’s less sewing up, but I think it gives a really professional, seamless look. The technique can feel a little awkward when you start out, but the pattern is so clear- just follow the instructions and you’ll get there!
Tail
When I first made the tail, my first thought was: “Tail, why are you so LONG?” Everything else about the pattern seemed so proportional and right, that this tail just felt a little weird. Admittedly, in the photo of all the body parts, it doesn’t even look that long, but it just seemed very long when I was making it, you know? Anyway, having assembled the whole cat, I have since discovered that the long tail is vital to this design. The legs are quite small, so the tail really helps balance the cat so that it can stand up by itself. I often find that my amigurumi makes don’t stand up so well on their own, so the fact that this cat does (and so well!) is a real win for me. Tail, I’m sorry- I misjudged you!
Sheet
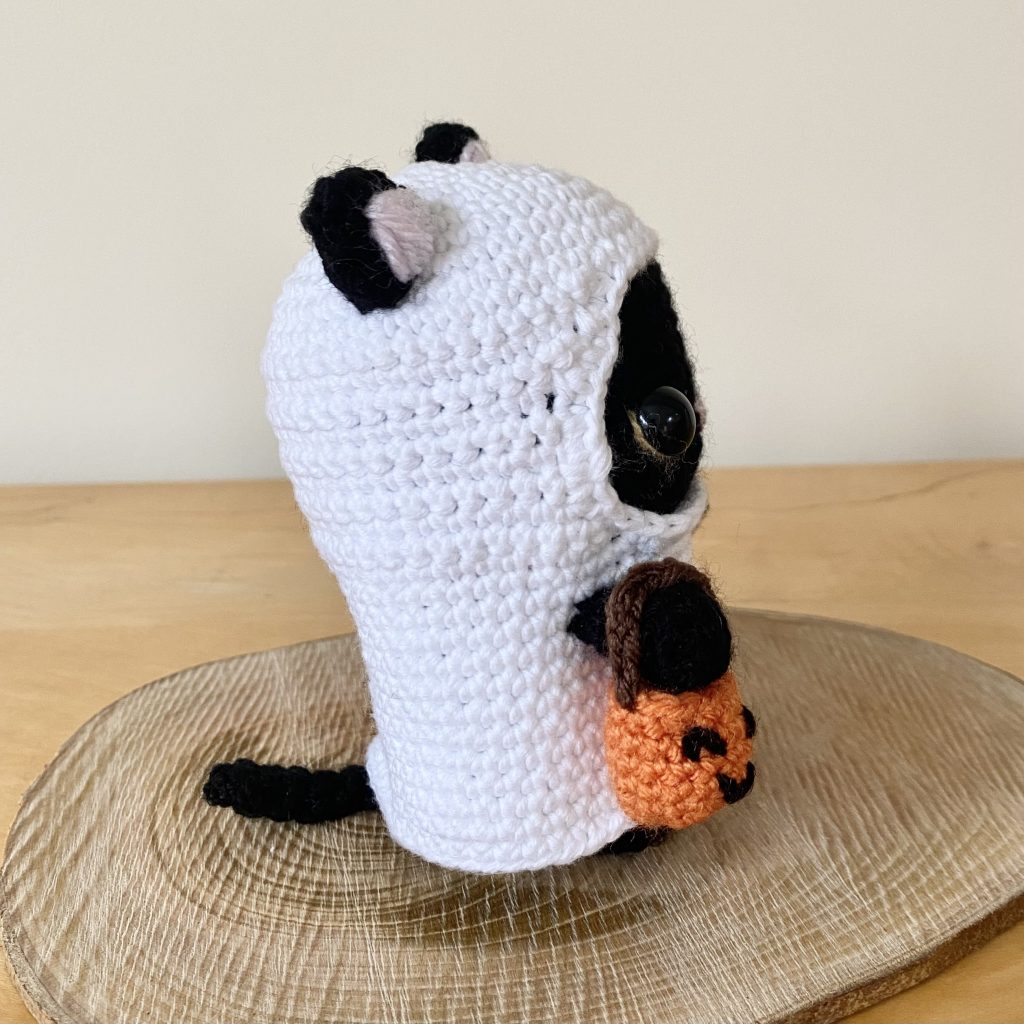
Ah, the sheet. Honestly, the sheet was one of the main selling points of this pattern to me- I use a lot of amigurumi patterns, but I was really intrigued by the construction of this sheet- specifically, the hole around the face. It was really interesting to see how this unusual shape was constructed and I was super impressed by how perfectly it fitted over the cat. The problem, however, is that, for someone like me who despises sewing in ends, the technique suggested in this pattern is absolutely hellish. Essentially, to get that hole in the front, you have to leave a gap in your rounds of crochet- the pattern achieves this by cutting the yarn at the end of every row and re-joining it at the beginning. All fun and games, but this goes on for a good number of rows- when every row has 2 ends to sew in, I’m sure you can see why I was so aghast.
I honestly could not bring myself to do that. Instead, I opted to form the rows by crocheting back-and-forth over the area. It takes a little bit of working out, but it is much easier (and much less soul-destroying) than sewing in all those ends- just remember that the shaping is always at the start/end of the row and work out the number of regular stitches from the pattern accordingly. However, you can see a difference in the texture of the stitches. If you look in the photo above, you can see that my crochet is a little more open where I have gone back and forth (around the centre portion) and is slightly more ridged than the crochet worked in rounds. Obviously, the pattern was designed to avoid this- but I just couldn’t face all the ends (I’ve seen a lot of other people who made this pattern who felt the same way!), so I decided that the slightly less neat sheet was the lesser of two evils.
While the sheet did fit very well over the cat’s head, it does have a tendency to slip about a little, making it look a little less like the perfect fit it is! In the end, I decided to use some more of the white yarn to add a few little stitches to keep it in place. I didn’t want to stitch all around the face hole because I thought that might look a bit funny, so I opted to make 8 little stitches, evenly space around the perimeter of the face hole, making sure to make each stitch as invisible as possible. Honestly, I think this made a huge difference- my little cat always looks his best now and the whole thing is much more secure!
Ears
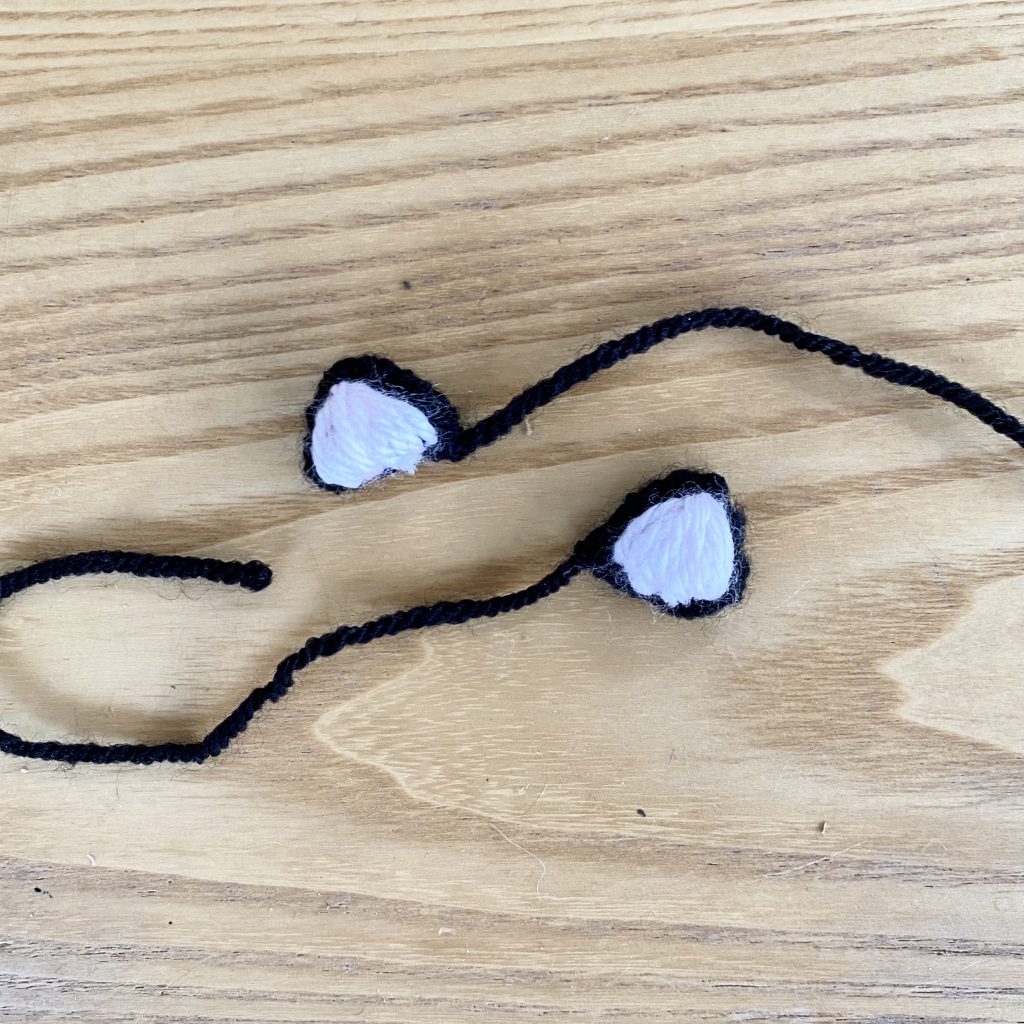
In the original pattern, you crochet the black ears, then you crochet two teeny-tiny triangles of pink, which you then stitch onto the black ears. I won’t lie, it seemed like a lot of effort- sewing in ends on tiny things is the WORST, especially when they really have to look nice and neat. Again, I let my laziness win. Instead of the extra crochet details, I opted to do a little bit of freehand embroidery to add the ear details. I cut a length of pink yarn, threaded it onto my needle and looped it through one side of the black ear piece, over and over, going through the same point near the top of the ear each time, to get a triangle. When I was done, because I was really embracing the whole lazy vibe at this point, I tied the two ends in a double knot and tucked it inside the ear, never to be seen again. Truth be told, I actually… love how this turned out? The embroidery gives the ears a slightly puffy look, which I think makes the cat even cuter!
The embroidery did make it slightly trickier to attach the ears to the cat- it is quite loopy, so it’s not the best for stitching into. However, I found that if I stitched very solidly along the back and sides of the ears, they were secure enough anyway. I also wrapped the black thread once around the base of the ear, at the front, before darning in the end, to add a line of black in-between the pink of the ear and the white of the sheet, which made a HUGE difference in how put-together my little cat looked. Such a simple trick, but so effective.
Arms
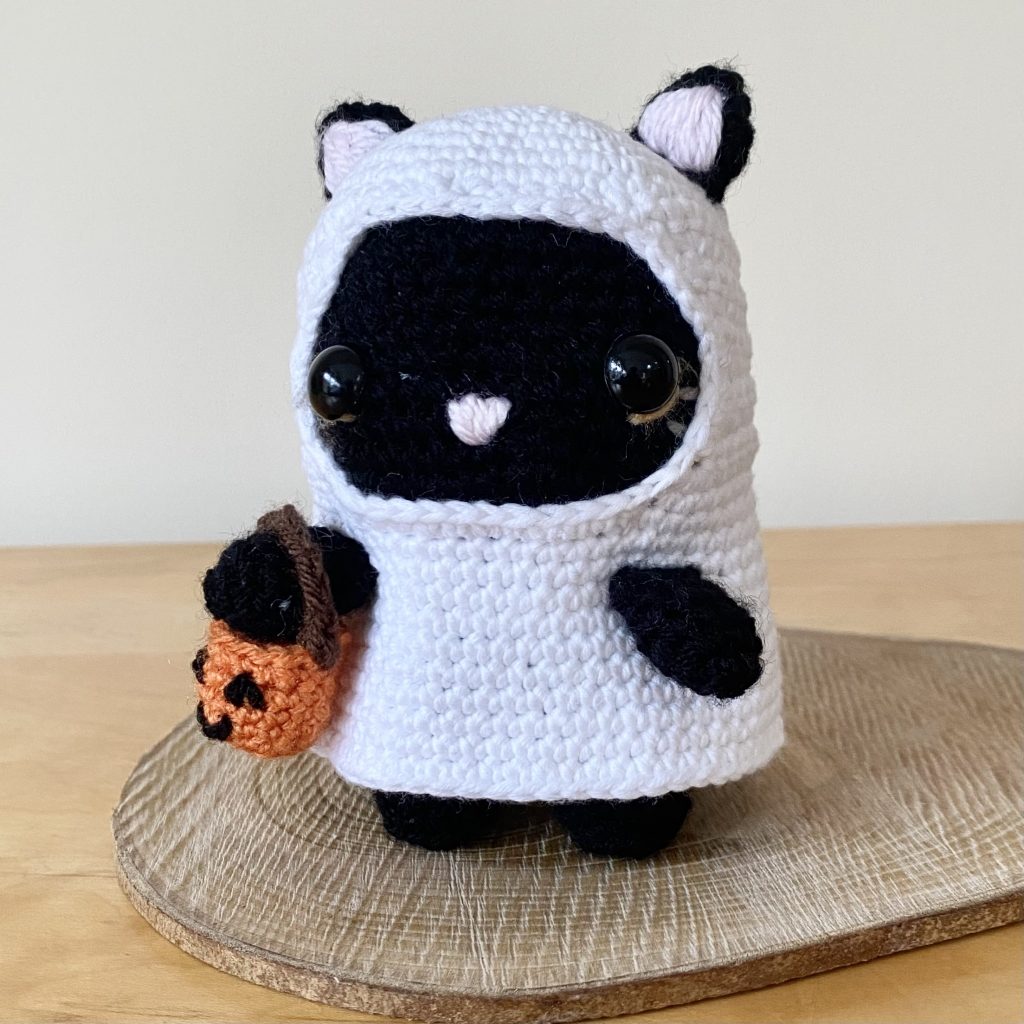
I am undecided about the arms on this cat. I think they are very proportional to the cat body, which is great, but I would almost like them to be just a little bit longer (maybe a single row?). I think that would make it easier to position the pumpkin bag on the right-hand one, because I just feel that the bag doesn’t quite have enough room to sit right?
The pattern suggests stuffing the arms lightly, before sewing them to the body. I was a little worried about attaching the arms to the body (you have to attach them through the sheet and onto the body), so I opted to stuff only the paws, then stitch across the opening of the arms so that I had a flat edge to attach to the body. After that, the process really wasn’t as bad as I thought! I sewed the arm fully onto the sheet, then attached it to the body underneath with a stitch on each end- that way, it was secure and gave the cat some dimension, but the sheet wasn’t so cinched in that it looked weird. I do wonder if stuffing the whole arm and leaving the opening as it was would have given the ams a bit more structure and length though, so maybe that was on me!
Pumpkin Bag
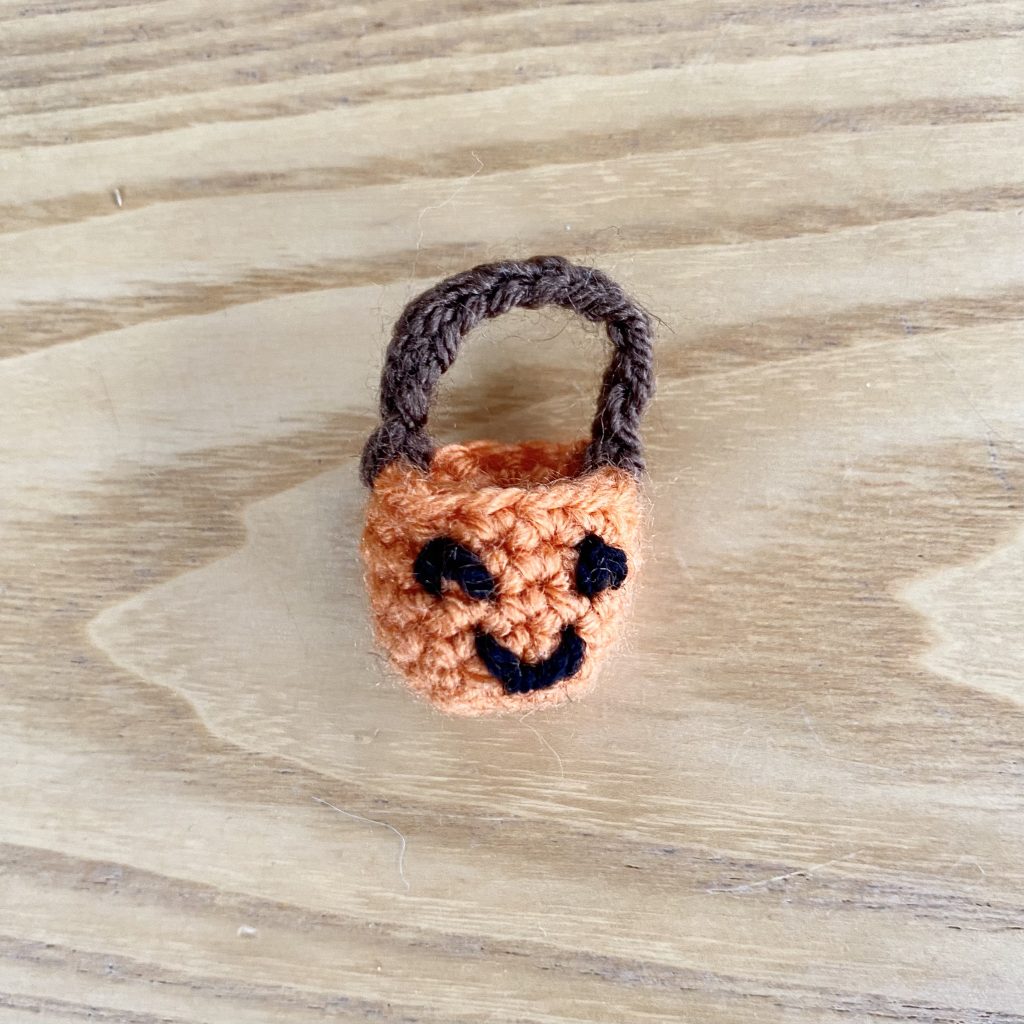
I feel like the pumpkin bag is the thing that really makes this cat. It’s just so cute! I opted to embroider the face on, using black yarn, as opposed to the felt used in the original pattern (again, it just seemed like sooooo much work to find the felt, cut the felt, stick it on etc.). I embroidered two little upside down V’s for the eyes, then made a loose straight stitch for the mouth, which I curved into a smile by securing it at the bottom with a tiny stitch.
For the handle, the pattern suggests making a chain, sewing in the ends and glueing it to the pumpkin part. I just crocheted the chain directly onto the pumpkin and sewed in the ends afterwards- it was very quick, neat and effective.
I didn’t fill mine with scrap yarn to look like sweets, as the pattern suggests, because I figured they’d just fall out. Sorry, cat.
One final note on the pumpkin basket: the pattern suggests that you just hook the pumpkin bucket over the arm, which I felt was just an accident waiting to happen, so I decided to secure it with a single stitch, in the centre. That way, it can still be manoeuvred a little bit, but it’s not about to go missing (or be eaten by a misguided dog) anytime soon!
Final Thoughts
I’m pretty used to the techniques used in most amigurumi patterns, so I was pretty confident going into this one, which is listed as an intermediate-level pattern. Honestly, I think this rating is spot on- I didn’t struggle with it by any means, but I feel if I had less experience with amigurumi, it definitely would have been challenging in places- specifically the body piece and the sheet. Having said that, I feel like it looks a lot more challenging than it actually is (which can only be a good thing because I apparently live to impress).
I made a few little changes throughout, here and there, just to suit the pattern/finished cat to my individual needs, but the pattern itself is incredibly clear and thorough, so none of my changes were really necessary.
I still would have loved to have made this cat in a dark grey yarn, so I could really get the detail/dimension of the original pattern, but I’m still really happy with my black cat. It’s so cute and it really didn’t take me too long to make at all!
I hope you’ve enjoyed this post! Let me know if you’re crocheting anything spooky this October!
Gemma
xxx