🎄☃️✨ Welcome to Day 18 of Blogmas At Home! It’s 7 days until Christmas and Chuck Berry is reelin’ like a merry-go-round. ✨☃️🎄
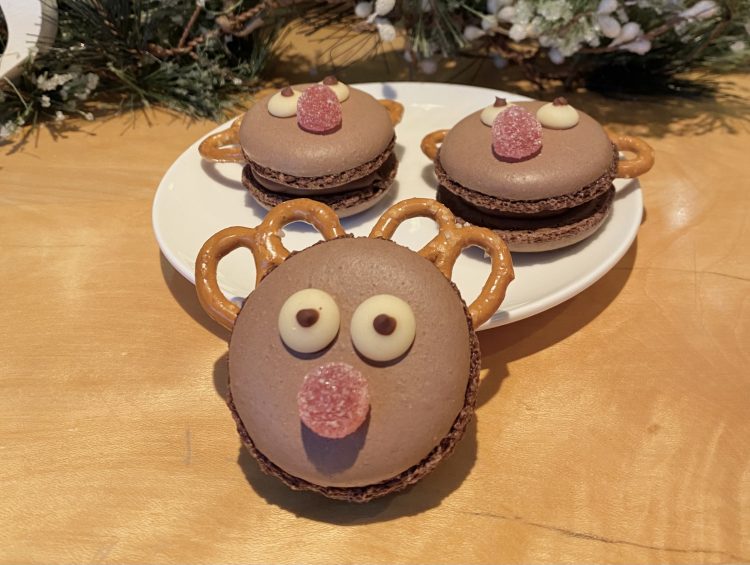
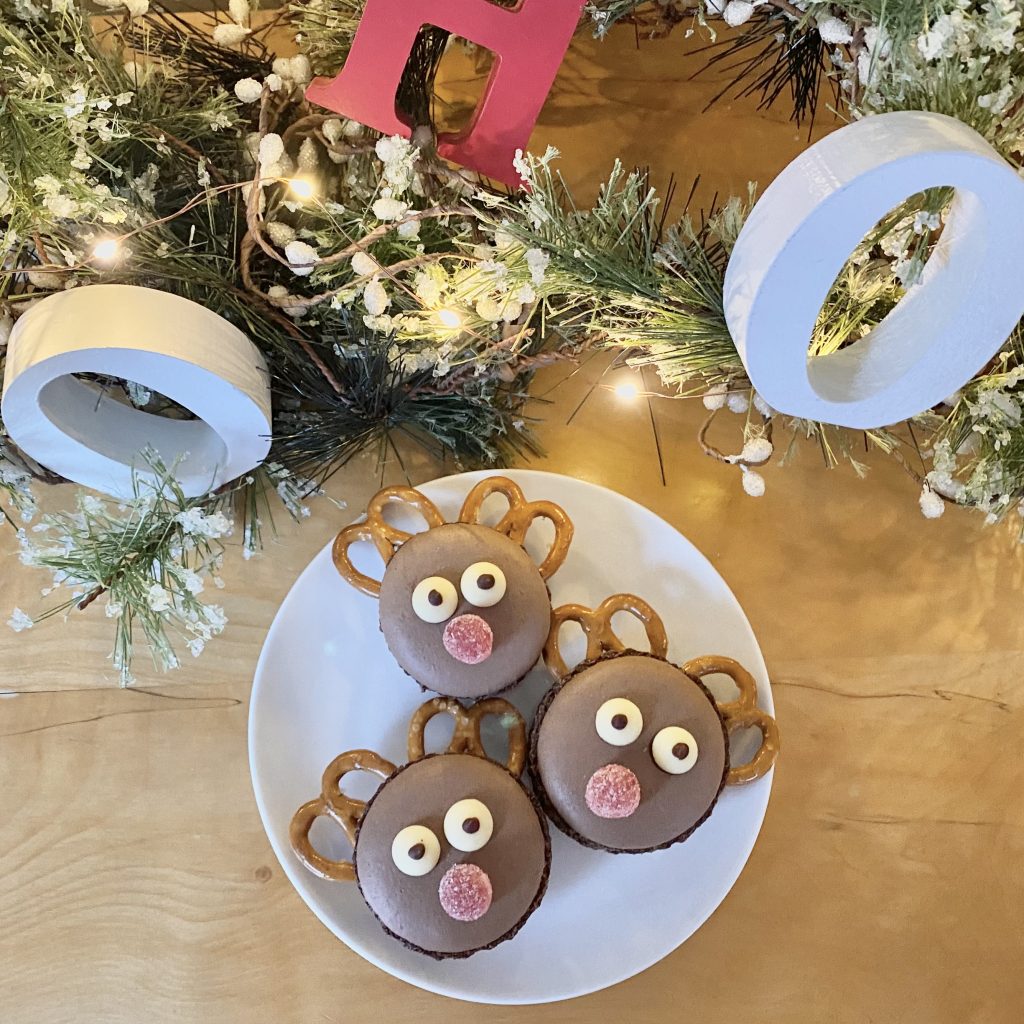
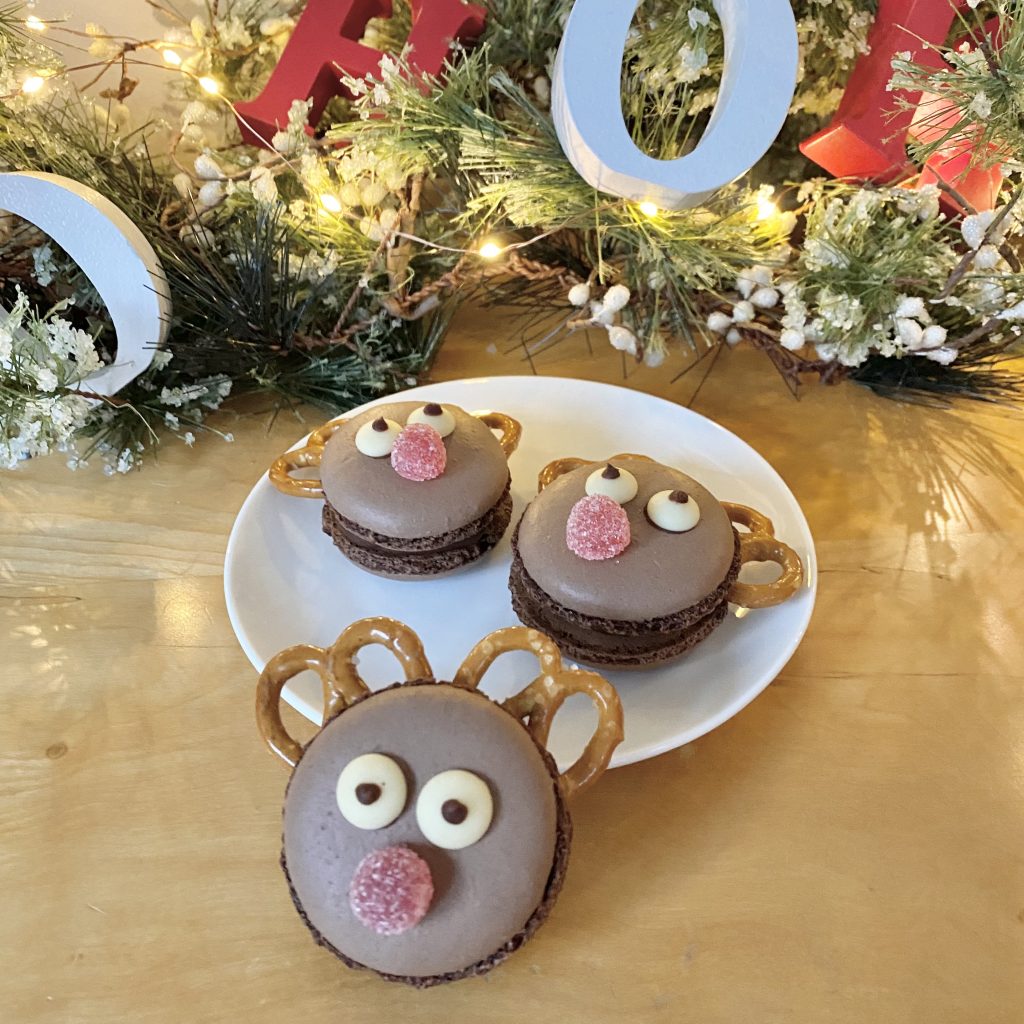
A few days ago, I shared my recipe for Christmas Pudding Macarons: chocolate macarons, filled with dark chocolate ganache and decorated to look like mini Christmas puddings. But! What you don’t know is that, when I made those macarons, I also made another (equally festive) version. Let me introduce you, then, to my Reindeer Macarons.
Fear not, just like the Christmas Pudding Macarons, which contained no actual Christmas pudding, these Reindeer Macarons contain no actual reindeer. They are, however, decorated to look like cute little Rudolph faces. They’re fun, they’re festive and they’re oh-so tasty.
To keep things simple, I’m not going to do a full post here about how to make the macaron shells and ganache filling. The full recipe is down below, but you can find the more in-depth walkthrough, with photos and all of my tips and tricks for perfect macaron-making, on the Christmas Pudding Macaron post. For today, let’s just focus on how to make those cute little reindeer faces!
Table of Contents
- Ingredients
- To Decorate the Macaron Shells:
- To Assemble the Reindeer Macarons
- To Store the Reindeer Macarons
- Recipe
Ingredients
First of all, you will need:
- Baked and cooled (but unfilled) chocolate macaron shells. You can find my tutorial for these here.
- Chilled dark chocolate ganache, for filling. You can find my tutorial for this here too!
To decorate the macarons, you will need:
- Melted dark chocolate
You only need a tiny bit- just to stick the sweets onto the macaron shells and make the pupils. For ease, I recommend putting this into a piping bag, fitted with a fine, round tip (though you could just use a cocktail stick to ‘dot’ it on, if you prefer).
If you can’t be bothered with the chocolate, you could always just use a small amount of the ganache filling. The decorations won’t be stuck on quite so securely, but they will still look good.If you do this, I would recommend remelting a small amount of ganache and using the cocktail stick ‘dotting’ method- the chilled ganache will be too stiff to go through the fine piping nozzle, but the warmed stuff will be too oozy!
- Red Jelly Tots
Any small/medium red sweet like this will work- I like Jelly Tots because they kind of make it look like the noses are lit up, but red Smarties or M&M’s would also look great.
- White chocolate chips
These are for the reindeers’ eyes. Try to get the flatter chips if you can- the ones with the little point at the top will still work, but they might be a bit more… stare-y? You could also buy pre-made eye sprinkles, if you want to make your life a bit easier.
- Salted pretzels
Please, please, for the love of all things Christmas, make sure you get plain, salted pretzels (not sour cream and chive). The saltiness really compliments the chocolate-y macaron. While the pretzels are a different shape to an antler, they still somehow give that antler-y vibe!
To Decorate the Macaron Shells:
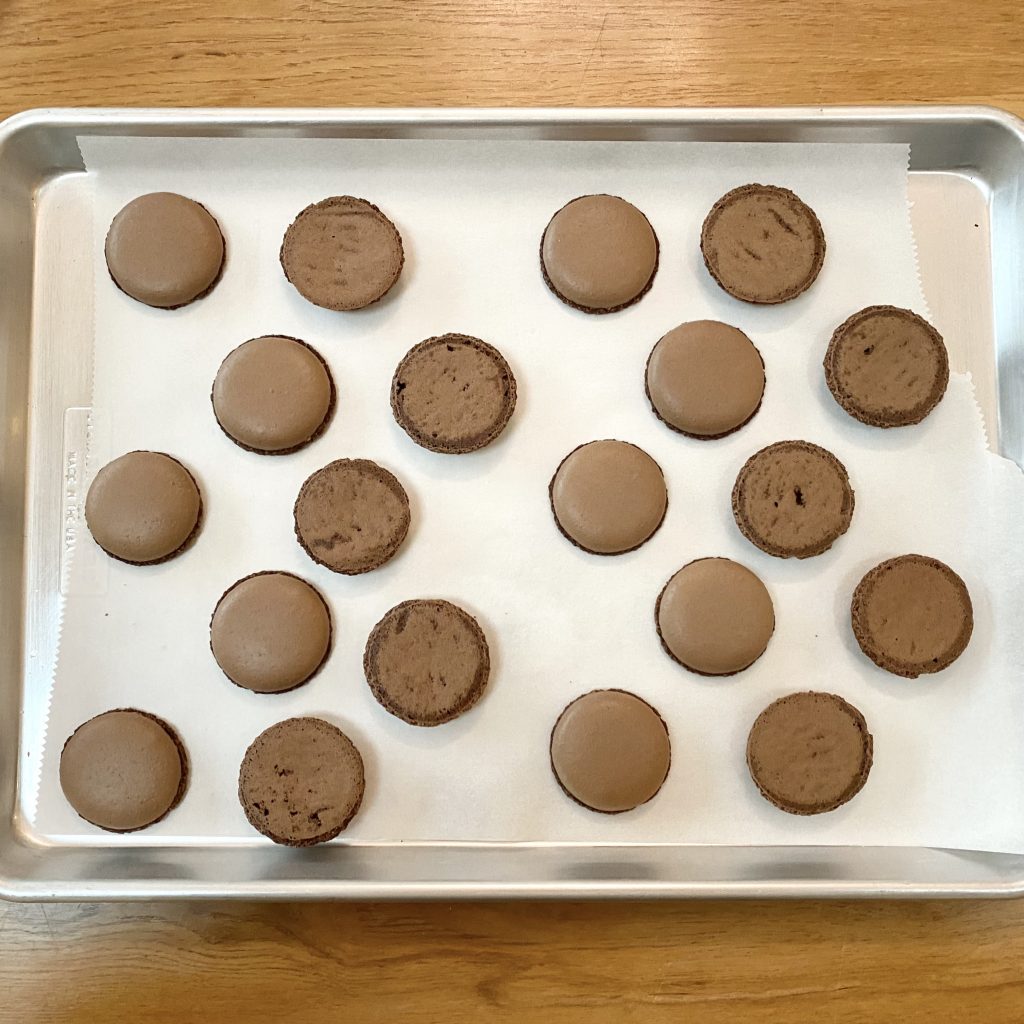
To start off, you want to pair up your macarons. I like to do this before I start decorating, so I know which shells to decorate and don’t get caught out at the end with a tiny shell and a huge shell having to be sandwiched together somehow! Aim to match the shells as closely as possible, both in terms of size and shape.
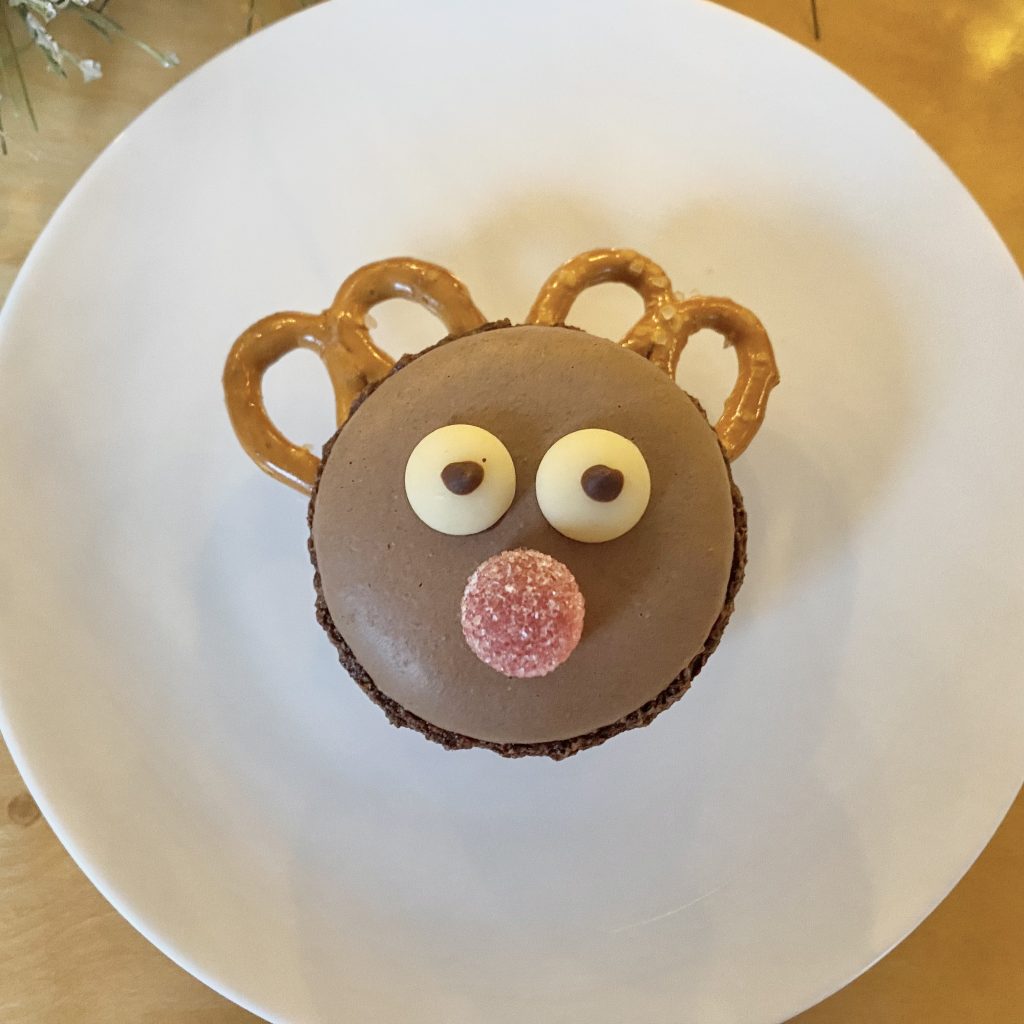
Once you have your macarons paired up, you’ll need to decorate half of them (one from each pair). To do this, use the dark chocolate to ‘glue’ the sweets onto the domed surface of each shell. For each shell, you will need one Jelly Tot nose and two white chocolate chip eyes. Once the features have been attached, add the pupils to the eyes by adding a small dot of chocolate to the centre of each chocolate chip.
Set the decorated shells aside at room temperature for the chocolate to harden- this will secure the sweets and make the shells easier to handle.
To Assemble the Reindeer Macarons
Once the chocolate has hardened, you can assemble the macarons. I like to pipe the ganache filling, for more precision, but you can also spoon/spread it onto the shells, if you prefer.
Pipe a dollop of ganache onto the underside of an undecorated macaron. Press two pretzels into the ganache, so that they both poke out the top a little, to act as the antlers. Pipe another, larger dollop of ganache on top, then press the decorated shell on top. The antlers should now be sandwiched in between the shells and two layers of ganache- this will help to keep them secure. Repeat this process for the remaining macarons and you’re done!
To Store the Reindeer Macarons
Filled macarons are best kept in an airtight container and stored in the fridge, where they will keep for about 5 days, but they can be stored at room temperature for 2-3 days, if needed.
Unfilled macaron shells can be kept in an airtight container for 5 days, but will start becoming more brittle and less chewy if left for too long.
…And that’s how to make these super cute Reindeer Macarons. As I mentioned, you can find a more detailed walkthrough for making the macaron shells and the ganache on the Christmas Pudding Macaron post. Let me know if you try out this recipe- I’d love to hear about it!
Gemma
xxx
Recipe

Reindeer Macarons
Ingredients
For the dark chocolate ganache:
- 120 g dark chocolate
- 180 ml double cream
For the chocolate macarons:
- 85 g ground almonds
- 80 g icing sugar
- 23 g cocoa powder
- 72 g egg whites, split into 2x36g portions.
- 105 g caster sugar
- 30 ml water
To decorate:
- 20 g dark chocolate, melted (see Note 1).
- 15 red Jelly Tots (see Note 2).
- 30 white chocolate chips
- 30 salted pretzels
Instructions
Make the dark chocolate ganache:
- Finely chop the chocolate and put it into a small, heatproof bowl.
- Place the cream into a small saucepan over medium heat. Stirring frequently, allow it to come to just below a simmer (you will see small bubbles start to form around the edge of the pan), before pouring it over the chopped chocolate.
- Allow to stand for 1-2 minutes, then stir until the chocolate has completely melted and you have a smooth mixture. Cover the surface directly with clingfilm (to prevent the ganache from forming a skin), then allow to cool slightly before putting into the fridge to set overnight.
Make the chocolate macarons:
- Line 2 baking trays with baking paper. Fit a piping bag with a medium-sized round nozzle and set aside.
- Place the ground almonds, icing sugar and cocoa powder into a food processor. Pulse 10 times, then sift into a large bowl, discarding any large lumps. Repeat this process once more, so that you are left with a very fine powder.
- Add one of the 36g portions of egg white to the dry ingredients. Mix well to form a paste, then set aside.
- Place the remaining 36g of egg white into the clean, metal bowl of a stand mixer, fitted with the whisk attachment. Set aside while you make the sugar syrup.
- Place the caster sugar into a small saucepan with the 30ml of water. Place over a medium heat and bring to a boil. Do not stir- swirl gently if necessary. Allow the syrup to continue bubbling, monitoring the temperature with a digital sugar thermometer.
- When the syrup has reached 114°C, turn the stand mixer to high speed and begin to whip the egg whites to soft peaks. Keep the syrup over the heat.
- When the sugar syrup has reached 118°C and the egg whites have reached soft peaks, with the mixer still on high, pour the syrup down the side of the bowl in a slow, steady stream. Once all of the syrup has been added, turn the mixer up to full speed and beat for 5 minutes, or until stiff peaks are achieved and the metal bowl has come to room temperature.
- When the meringue is ready, add 1/3 of it to the cocoa and almond mixture. Mix vigorously to combine the two mixtures and loosen the thick paste.
- Add the rest of the meringue and fold it in, using a figure of eight motion, until the mixture is cohesive and comes off the spatula in ribbons- if you leave those ribbons for 30 seconds, they should level themselves out into the rest of the mixture.
- Transfer the macaron batter to the prepared piping bag. Holding the bag vertically to the baking tray, apply gentle pressure to pipe circular 'blobs' that are about 4cm in diameter.
- Once the macarons are piped, lift the whole tray and drop it down onto the work surface a few times to bring any air bubbles to the surface. Use a sharp knife/cocktail stick to burst any remaining bubbles, letting the mixture fall back on itself.
- Set the macarons aside at room temperature to form a skin- on a relatively dry day, this should take about 30-40 minutes, but can take less time on drier, warmer days and more time on cold, humid days. Check on the macarons every 10-15 minutes or so, if unsure. The macarons will be ready when you can gently touch their surfaces without any batter coming off on your finger.
- When the macarons are almost ready, preheat the oven to 165°C fan. Bake the macarons in the centre of the oven, one tray at a time, for 11 minutes. To check if they are done, place a finger on top of the shells and wiggle gently. When done, the tops of the macarons should not wobble. Remove from the oven and allow to cool completely on the tray.
To decorate:
- Once the macaron shells are cool, pair them up, so that each pair is evenly matched in terms of size and shape. You will be decorating half of the shells, one from each pair.
- Place the melted chocolate into a piping bag, fitted with a fine, round tip. Use the chocolate as 'glue' to stick one red Jelly Tot (as the reindeer's nose) and two white chocolate chips (as the eyes) onto the shells as pictured. Then, pipe two small dots of chocolate in the centre of each chocolate chip, for the pupils. Leave the shells to sit at room temperature until the chocolate has hardened.
To assemble:
- Once the chocolate on the shells has hardened, transfer the chilled ganache to a piping bag, fitted with a medium round nozzle. Add a dollop of ganache to the underside of one of undecorated macaron shells then press two pretzels into it, so that they poke up over the edge. This will help to keep the pretzel 'antlers' in place.
- Add another dollop of ganache in the centre, then sandwich the decorated shell on top. Repeat for the remaining macaron pairs.
- The macarons are best eaten immediately, but can be stored in an airtight container in the fridge for up to 5 days, or at room temperature for 2-3 days. You can also keep the unfilled macaron shells in an airtight container, at room temperature for about 5 days, before filling.
Notes
- If you don’t need the decoration on your macarons to be super secure (i.e. if you aren’t transporting them anywhere) you can just use some of the dark chocolate ganache to stick the eyes/nose on and add the pupils. I would recommend, remelting a small amount of the ganache and dipping a cocktail stick into it to ‘dot’ the ganache onto the macaron as glue/white chocolate chips for the pupils.
- I like the look of red Jelly Tots for the noses, because I think they make it look like the noses are lit up, but you could use any small red sweet- red Smarties or M&Ms would also work well.