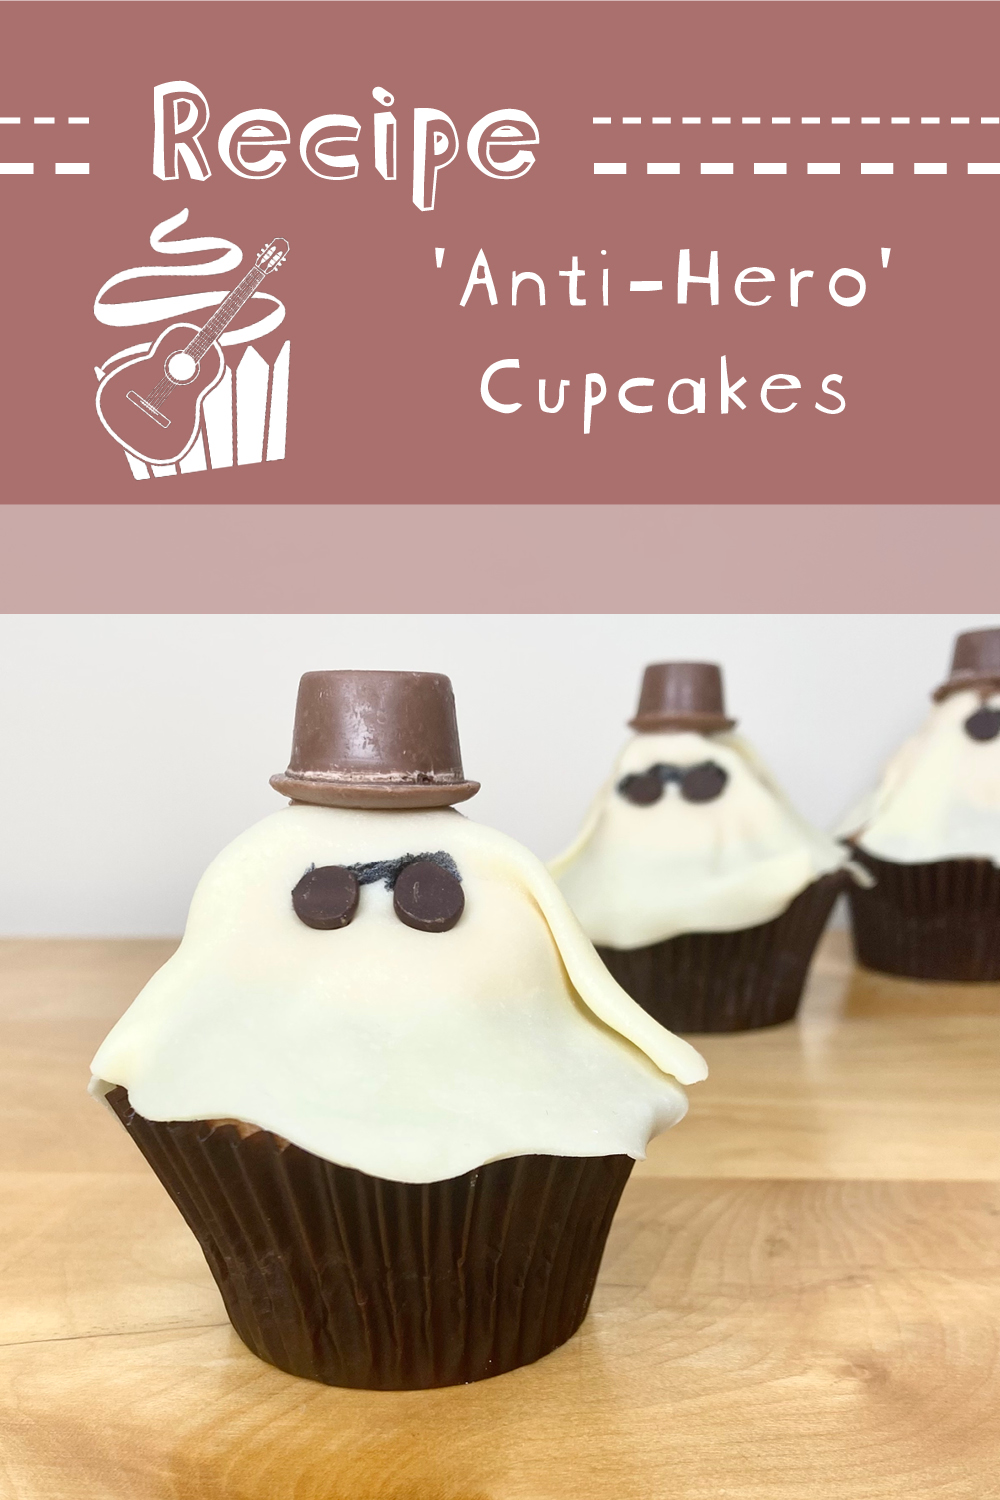
It’s me, hi (I’m the problem, it’s me). It’s tea time here at Gemma At Home, because today we’re continuing on with our Taylor Swift Cupcakes series, with a cupcake inspired by the lead single from Midnights, Anti-Hero. We’ve already tackled the first 2 tracks on the album: Lavender Haze and Maroon, but today is all about Track 3.
Table of Contents
- The Anti-Hero Cupcake: Explained
- Earl Grey-Infused Milk
- Making the Earl Grey Cupcakes
- Making the Earl Grey Buttercream
- Making the Chocolate Fedoras
- Decorating the Cupcakes
- Recipe
The Anti-Hero Cupcake: Explained
The Anti-Hero cupcake is made up of 3 main elements:
- Earl Grey cupcake
- Earl Grey buttercream
- Chocolate ghost decorations
I really embraced the ‘at tea-time, everybody agrees‘ lyric from the song’s chorus. This cake is tea. I went for Earl Grey, because I really love the flavour, but you could use a more classic breakfast tea, if you prefer. To get all that delicious tea flavour into both the cake and the buttercream, I used some homemade infused milk.
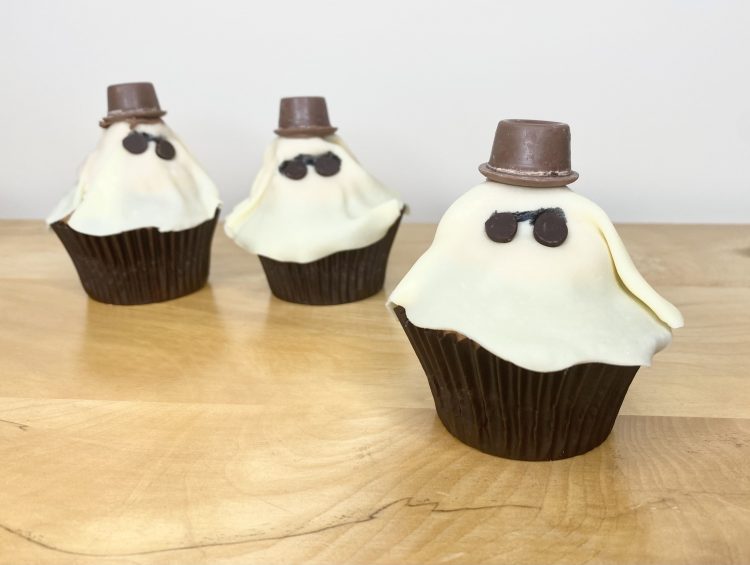
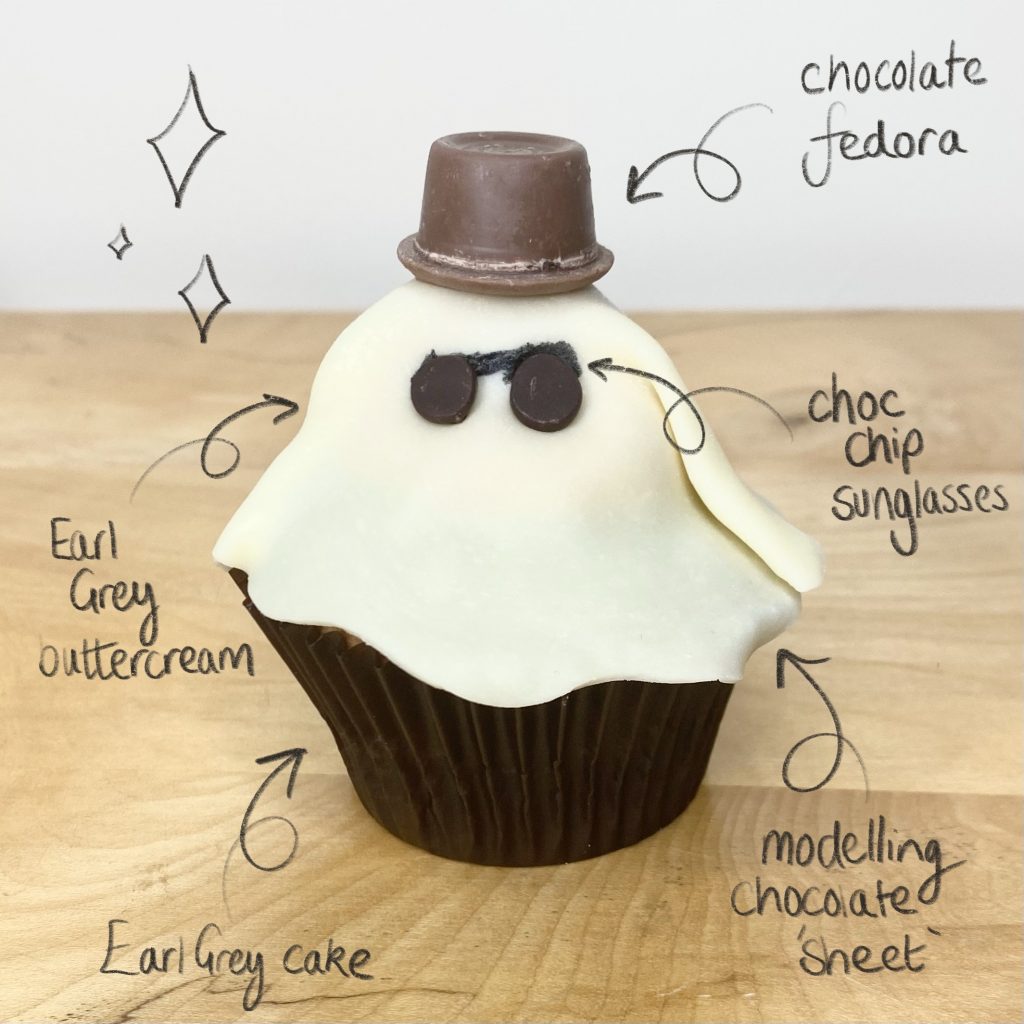
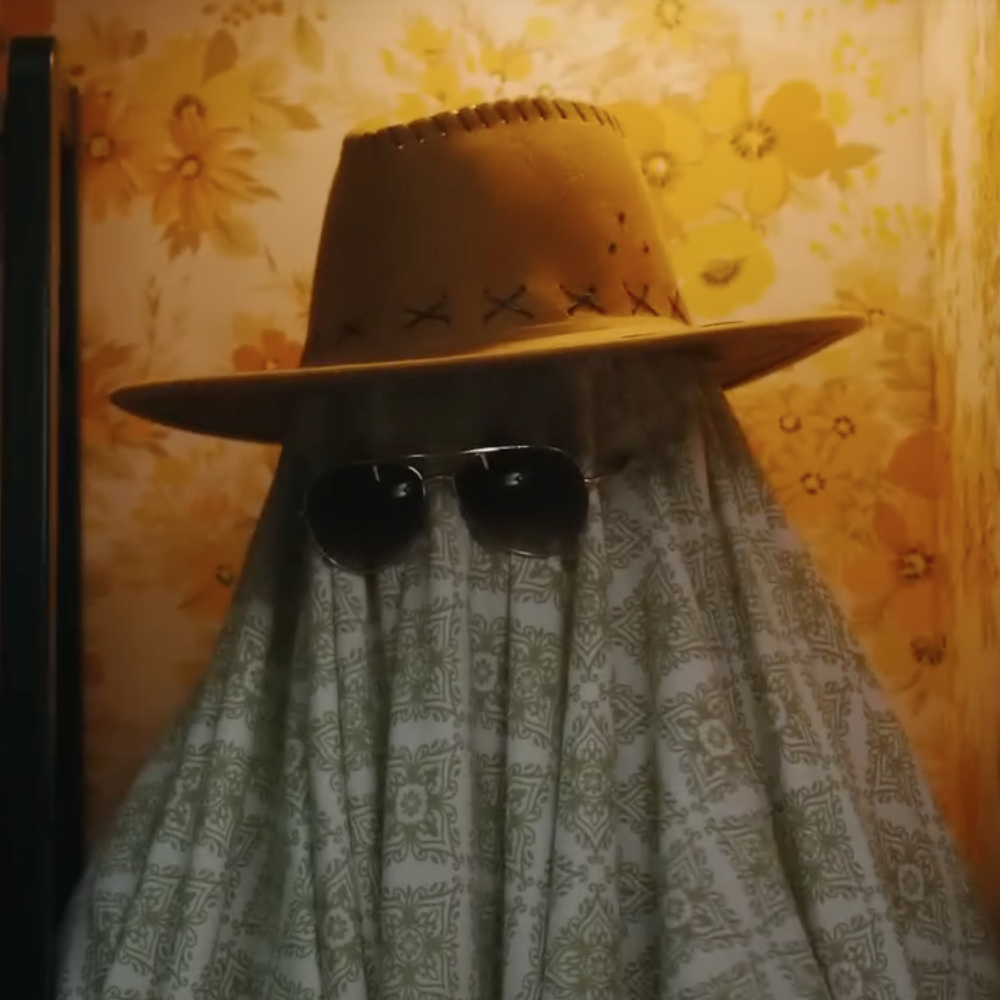
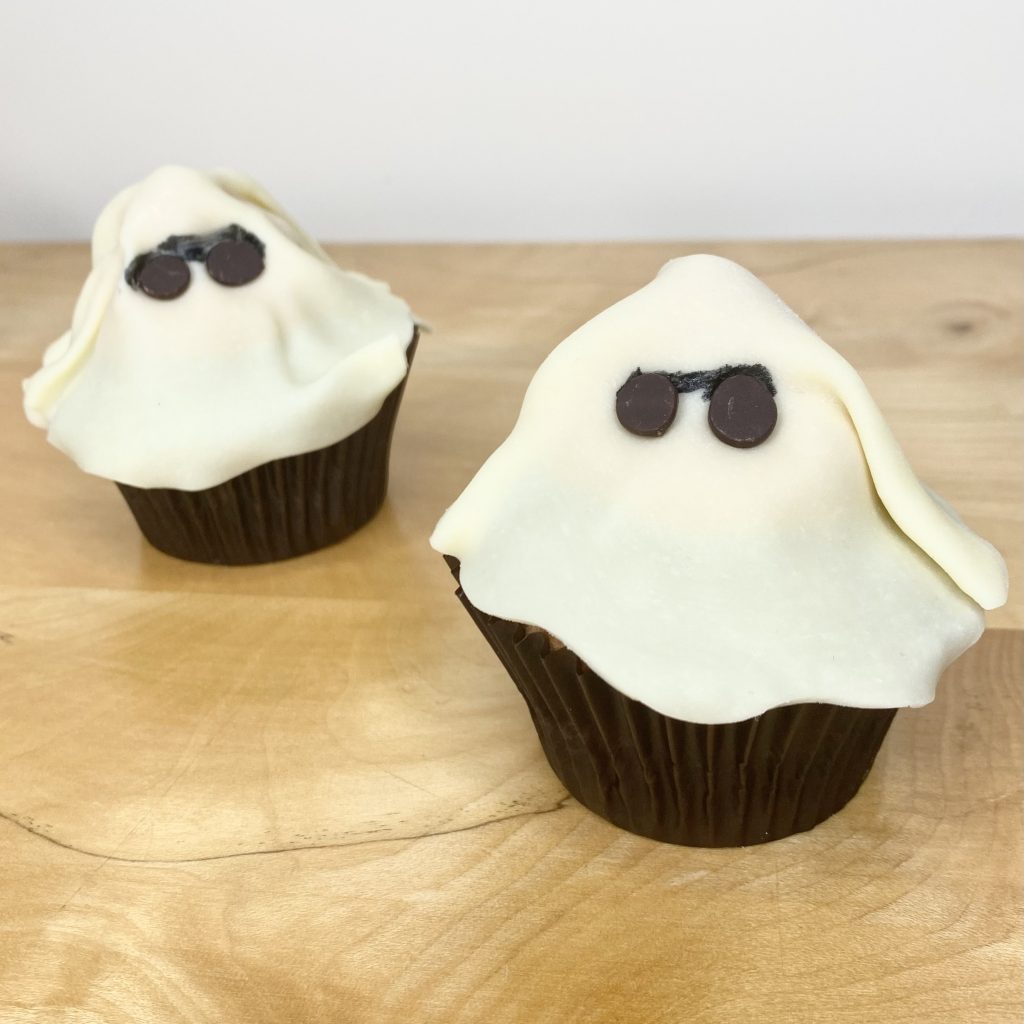
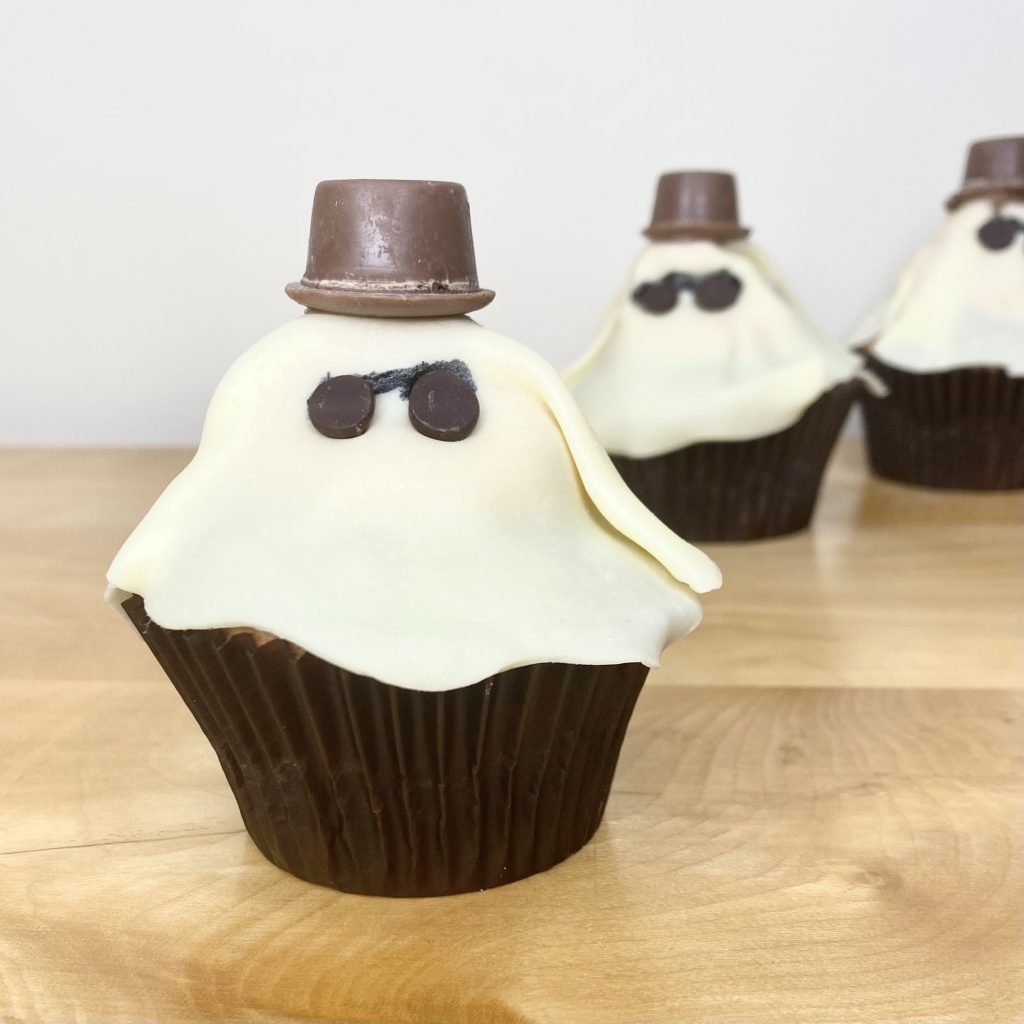
The chocolate decorations are what really elevate these cupcakes from tea to tea time. Anti-Hero is one of the 3 songs from Midnights that has a music video (along with Lavender Haze and Bejeweled), so I had plenty of extra inspiration for the decorating these cupcakes! In the video, there are a bunch of ‘ghosts’ (read: people wearing sheets, sunglasses and funky hats), which have become pretty iconic. I knew, almost immediately, that I wanted to decorate my cupcakes to look like the ghosts, because a) they’re so CUTE and b) they’re so iconically Anti-Hero. I singled my decorations down to a single ghost, my favourite ghost: Fedora Ghost:
To make Fedora Ghost, I use a combination of white modelling chocolate, dark chocolate chips, Rolos and giant chocolate buttons. Basically, chocolate 4 ways. What’s not to love? Ultimately, these Anti-Hero cupcakes end up as a delicious tea time treat, vaguely reminiscent of a classic Fondant Fancy, amped up with the flavours of tea and chocolate!
So, those are the basics of the Anti-Hero cupcake. Now, let’s get into some specifics.
Earl Grey-Infused Milk
To get the Earl Grey flavour into both the cupcake batter and the buttercream, we need to make some infused milk. Luckily, it’s super easy to do! All you have to do is put the milk and tea bags into a small saucepan, bring the whole thing to a simmer, then turn off the heat, cover it and allow the milk to infuse as it cools down to room temperature- about 30 minutes. Once it’s cool, you can remove the tea bags (make sure to squeeze them to get every last drop of flavour!) and discard them, leaving you with Earl Grey-infused milk. So easy, right?
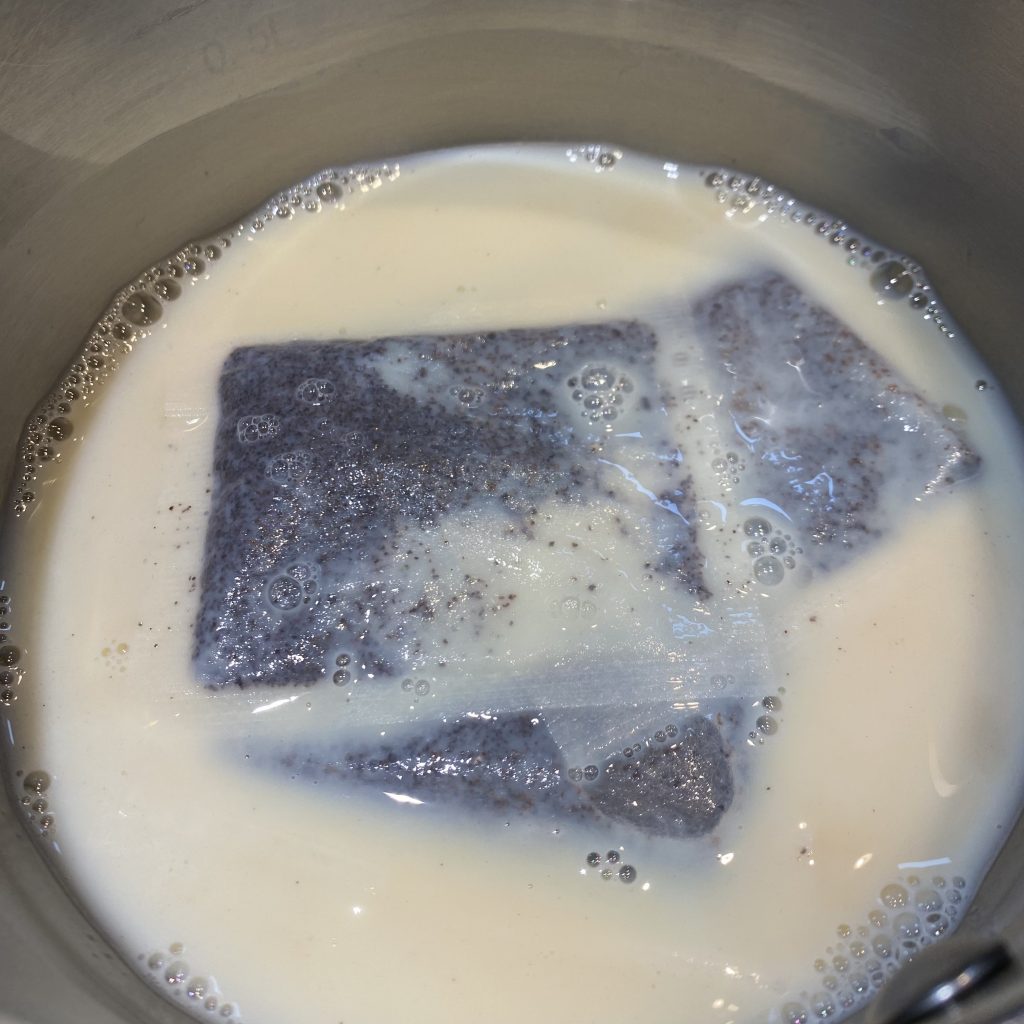
Earl Grey has quite a subtle flavour, so I’ve tried to really amp up the flavour in the batter/buttercream by using 4 tea bags for 100ml of milk. It might seem like a lot, but you need to get a really concentrated flavour in the milk, because adding too much liquid to either the batter OR the buttercream can cause them to split (more on that later). I found that this ratio of tea:milk makes for the perfect hit of Earl Grey in the finished cupcakes, without any of the bitterness that you can get from over-brewing the tea bags.
Making the Earl Grey Cupcakes
Once you’ve got your infused milk, you can move on to making the cupcake batter. For this, I used my All-In-One Method (I recently made a post where I described this process in depth- you can check it out here if you want to learn more). Essentially, you just put all the ingredients, making sure to sift the dry ingredients beforehand, into the bowl of a stand mixer, fitted with the whisk attachment, and whisk until it’s smooth, light and airy. SO easy! To flavour this batter, I used 3 tbsp of the Earl Grey-infused milk. I also added a few drops of vanilla extract, just to bring out the flavours in the tea even more.
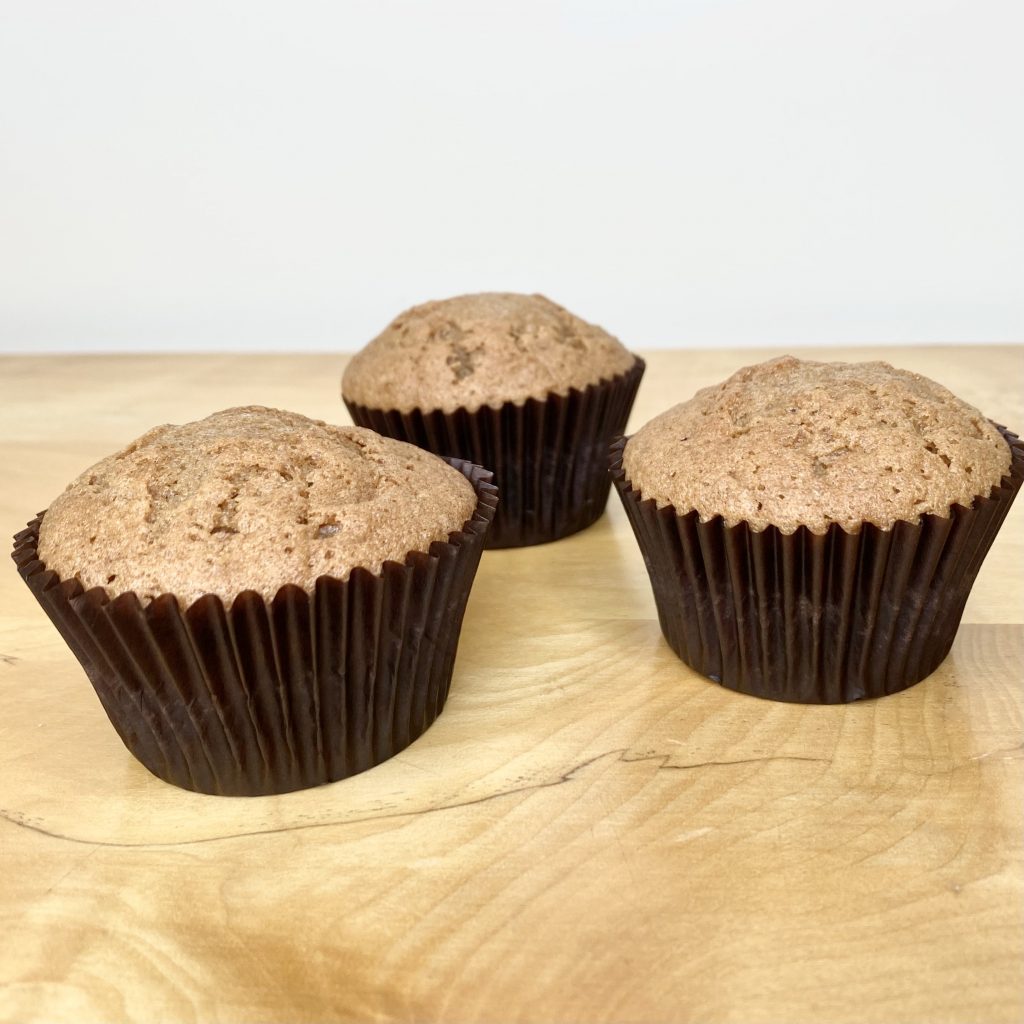
As always, I like to divide my cake batter into the cupcake cases using a standard-sized ice cream scoop- I find this is the perfect size and makes scooping the cupcakes so much quicker! For these cupcakes, I opted to use dark brown cupcake cases, to match the fedoras on my ghosts. I used these ones, but they’re slightly smaller than my normal cupcake cases and not overly thick, so I’m still on the lookout for the perfect dark brown cases!
Once your cupcakes are all scooped, you just need to bake them at 170°C for 25-30 minutes, until they have risen and the tops spring back when touched lightly. This is a slightly lower baking temperature than most cupcake recipes suggest! I found that, at higher temperatures, my cupcakes were coming out with super peaked tops, almost like volcanoes- a sure sign that the oven temperature is too high! Baking the cupcakes at a lower temperature ensures they rise into perfect, even domes, making them a) prettier and b) easier to pipe onto!
I like to transfer the baked cupcakes to a wire rack as soon as they come out of the oven. The reason for this is that, if left in the baking tin as they cool, the bottom of the cupcake cases can become greasy. By taking them out of the tin immediately, you can prevent this. Do be careful though, because the cakes (and the tin!) will be very hot. Once you’ve transferred them, make sure to let the cakes cool completely before you decorate them, or the buttercream will melt.
Making the Earl Grey Buttercream

For these cupcakes, I opted to make a typical American buttercream, flavoured with the same Earl Grey-infused milk as the cake batter. American buttercream is one of the easiest icings to make, but I do have a few tips and tricks to make the process even more straightforward and produce an even more delicious buttercream.
Quick note here: when I was making my buttercream for these cakes, disaster struck! My icing… split! Only slightly and, strangely enough, it split after I’d piped it onto my cakes, by which point I was tired and decided to just go with it, knowing it would be covered up later anyway. Ah well, these things happen! It was a combination of me baking these cupcakes in a warm, humid kitchen & getting cocky and adding too much infused milk. I’ve tinkered with the recipe a little to make sure this won’t happen to you if you use this recipe, so don’t worry!
This buttercream recipe only uses 4 ingredients. To make it, you will need:
- Softened unsalted butter
When you’re making buttercream, the butter absolutely has to be softened (i.e. at room temperature). You should be able to press your finger into the butter and make an indent in it easily, but it shouldn’t be melty or liquid. Soft butter will ensure that your ingredients can incorporate fully into a smooth, creamy buttercream.
- Icing sugar
I know that sometimes sifting can feel like a super mundane job. Unfortunately, when you’re making buttercream, it’s wholly necessary. Not sifting your icing sugar can leave you with a lumpy buttercream, which is just… not the vibe. Take it from me: sift your icing sugar!
- Earl Grey-infused milk
The amount of infused milk this recipe makes is enough for both the batter and the icing. Adding the infused milk to the buttercream will get loads of delicious tea flavour into the icing, without compromising the smooth texture. Just make sure not to add too much, or else your buttercream may split (again, speaking from experience…).
- Salt
Listen, I’ve never fully got on board the whole ‘salt in baked goods’ train. I just… don’t think it makes much of a difference? However, there are some baked goods for which I will wholeheartedly embrace the addition of salt- salted caramel being the obvious choice (side note: I recently posted a recipe for salted caramel ice cream, so definitely check that out if salted caramel is your thing!). This icing, randomly, weirdly, unexpectedly, needs salt. I’m not talking loads of salt- just a little pinch. At last, I have found an instance where I can understand the famous bakers’ and chefs’ claims that ‘salt brings out the flavour of the other ingredients’, because, in this recipe, it really does. Go figure.
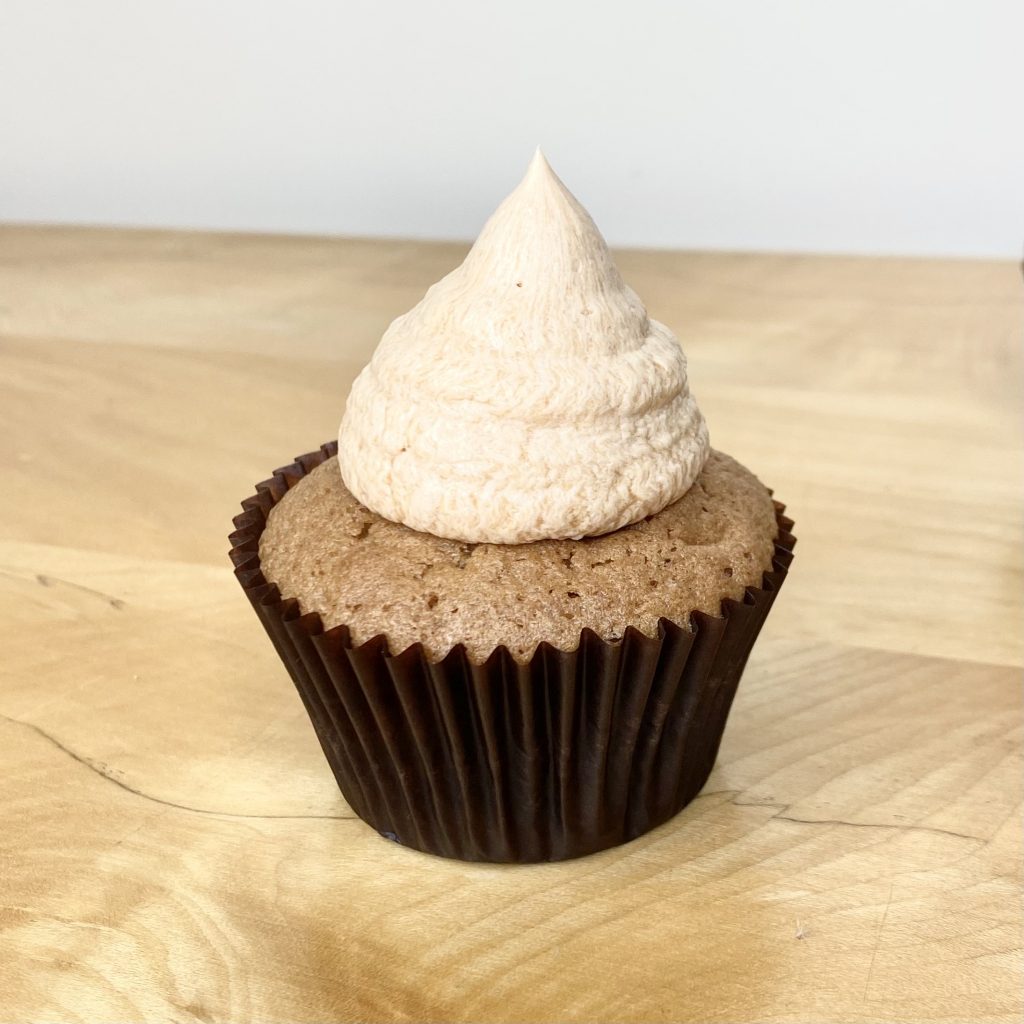
The best American buttercream is whipped a lot. The more you whip it, the fluffier it gets. The fluffier it gets, the less cloyingly sweet and stodgy it is. Therefore, be patient and whip the icing- you will be so glad you did! I like to start by whipping the butter, on its own, for about 2 minutes, until it’s super pale and fluffy. Then, I add half of the icing sugar, incorporate it by hand (to prevent an icing sugar cloud) and then whip it for another minute. I add the infused milk and whip again for a further minute. Finally, I add the remaining icing sugar, incorporate it by hand, then whip the whole thing for a final minute. You can do this with an electric hand whisk or a stand mixer (fitted with the paddle attachment), but I don’t recommend doing it by hand. It’s possible, yes, but only at great cost to your arm muscles. Save your arms and go electric- you’ll thank me later.
Making the Chocolate Fedoras
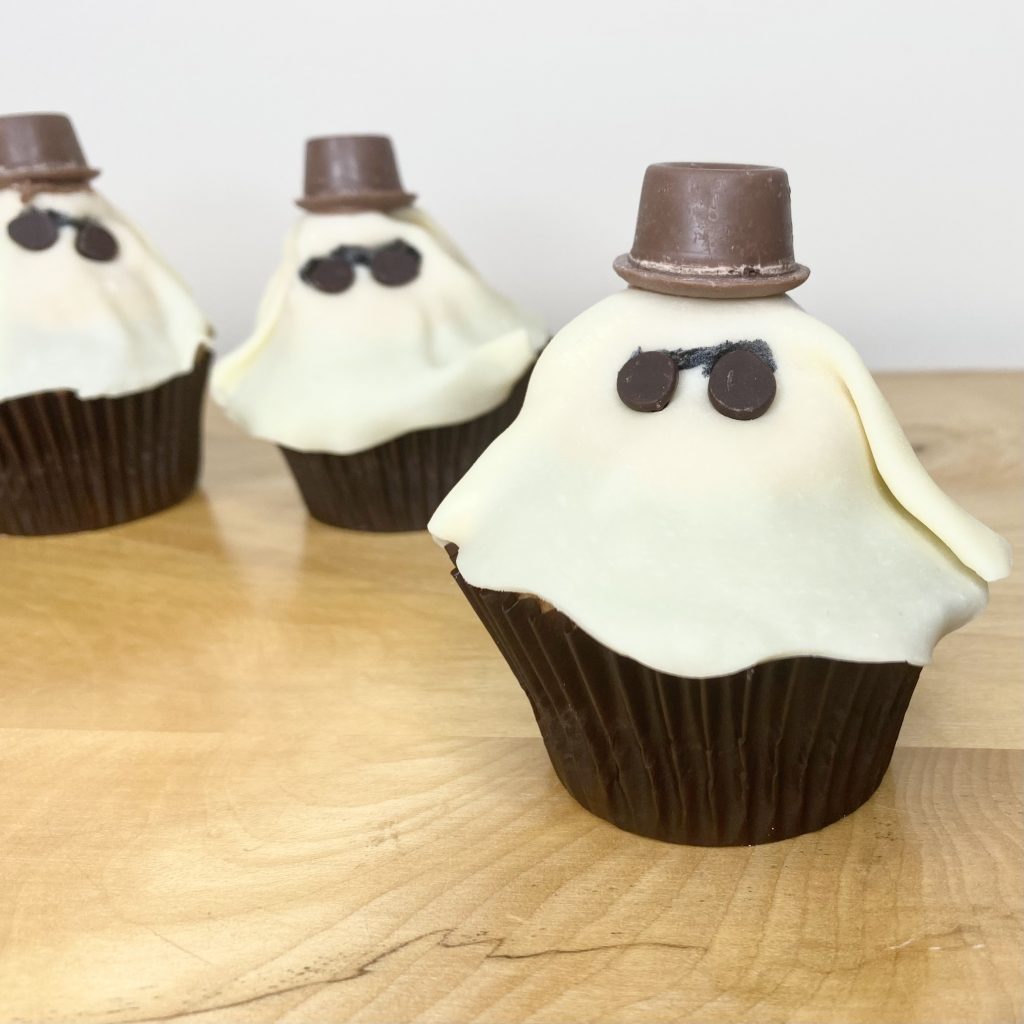
I said we were creating Fedora Ghost, so, obviously, we have to make some fedoras. Luckily, they’re super easy to make! You only need two ingredients, Rolos and giant chocolate buttons (I used Cadbury), as well as a small frying pan. That’s it!
Side note here: is there some Rolo-related stockist drama I don’t know about? I’ve been having real trouble finding them lately, particularly in the bigger supermarkets. The ones I used here were purchased from a corner shop, so, if you’re struggling to find Rolos too, maybe try your nearest one of those!
Anyway, if you have managed to obtain the Rolos, you can get started on making the fedoras. You’ll need 1x Rolo and 1x giant chocolate button per fedora, so 12 of each if you’re making a single batch of this recipe (the standard-sized Rolo tubes that I purchased each had 12 Rolos in, so 1 tube should be perfect. Having said that, sometimes the caramel can ooze out of Rolos, making them a little messy, so if you want perfect fedoras, it might be worth buying an extra pack to give yourself more options- you can always eat the leftovers!).
Begin by warming the frying pan over medium heat. When it’s hot, turn off the heat and use the residual heat of the pan to melt the base of a Rolo. You don’t need to melt it a lot, just enough that you can stick the Rolo to the chocolate button. To get a similar shape to the hat in the music video, I opted to stick the Rolo to the flat side of the chocolate button (so that the domed side was facing down). Repeat this process for each hat, making one for each cupcake, then set your fedoras aside for the chocolate to harden while you get on with the other decorations.
Decorating the Cupcakes
First up, you’ll need to pipe the buttercream onto the cupcakes. For this, you’ll need a piping bag fitted with a large, round piping tip (I used a #1A tip). Put the buttercream into the bag, then hold the bag vertically, so that the tip is centred above the surface of the cupcake. Apply a gentle pressure, lifting the bag as you go, to create a tall ‘dollop’ of icing in the centre of the cake- the aim is to bring the icing upwards, not outwards (i.e. the surface of the cake won’t be covered, just the very centre), like in the photo below:
Once you have iced your cupcakes, you need to chill them in the fridge for at least 15 minutes. This will firm up the buttercream, making the next stage much easier.
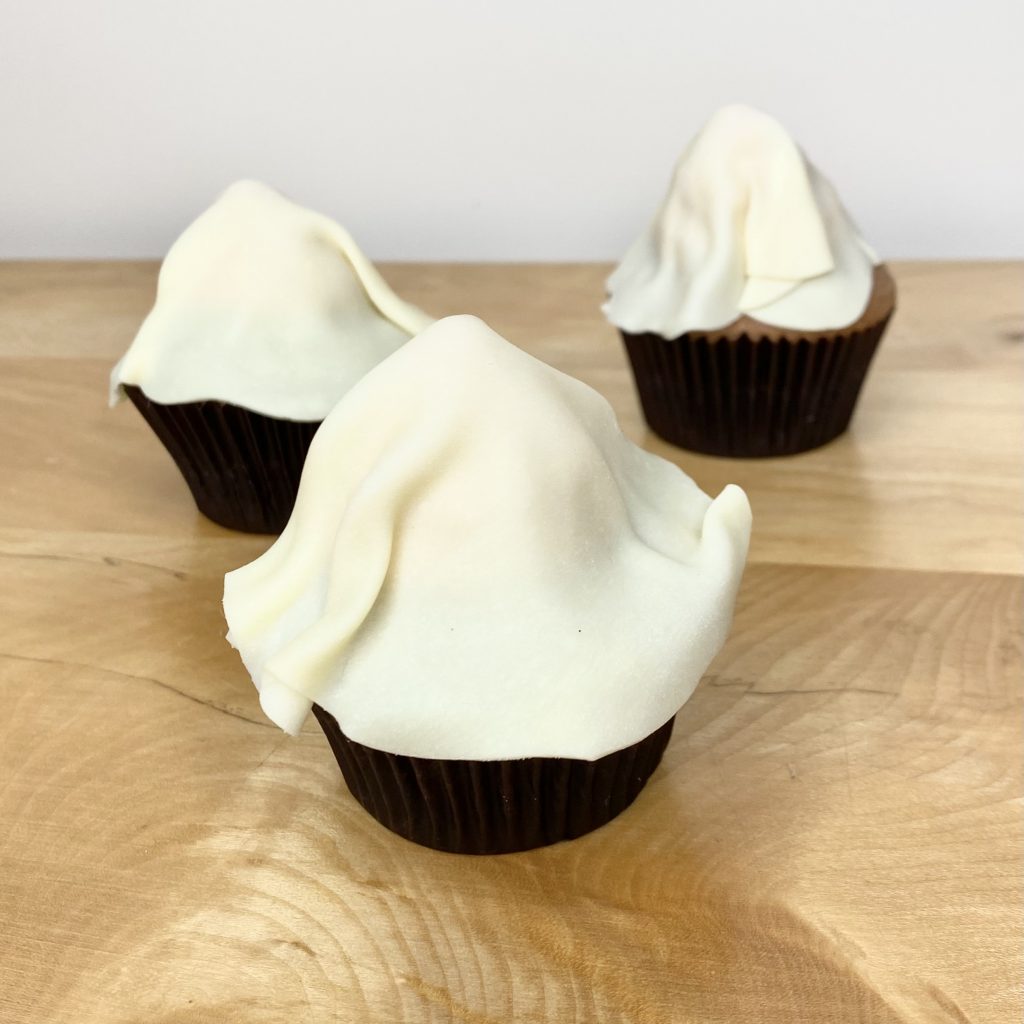
One quick note here: modelling chocolate, much like fondant, is hygroscopic, meaning it will absorb moisture from its surroundings. I recommend decorating these cupcakes the same day that you plan to serve them, otherwise you run the risk of your modelling chocolate ‘sweating’. This doesn’t affect the overall flavour, but will affect the texture/appearance of your cupcakes.
When you’re ready to decorate your cupcakes and the buttercream has chilled, you can start creating the modelling chocolate ‘sheets’ for your ghosts. Do this just before you want to put them on the cakes, or the modelling chocolate might dry out before you have a chance to drape it over the icing. Knead the modelling chocolate into a smooth ball, then break off a piece- about 15g. Shape it into a ball and dust your work surface with icing sugar, then use a small rolling pin (dusted with more icing sugar!) to roll it out very thinly, trying to maintain a roughly circular shape, until it’s about 12cm in diameter. If the edges are looking a bit ragged, use a small, sharp knife to cut a neater, wavy edge all around, keeping that rough, circular shape. After that, you can carefully lift up the chocolate sheet and drape it over your cupcake. Use your hands to press the chocolate around the buttercream below, allowing it to fold organically. Repeat this process for each cupcake.
Once you have all of your cupcakes covered in their modelling chocolate ‘sheets’, you can add the eyes. For this, I used 2x dark chocolate chips per cake (one for each eye). You want to press the chips into the modelling chocolate, so that they sit about half of the way down the buttercream dollop. Push them in pointy side first- not only will this look neater, but the point of the tip will pierce the modelling chocolate and help to secure the chips.
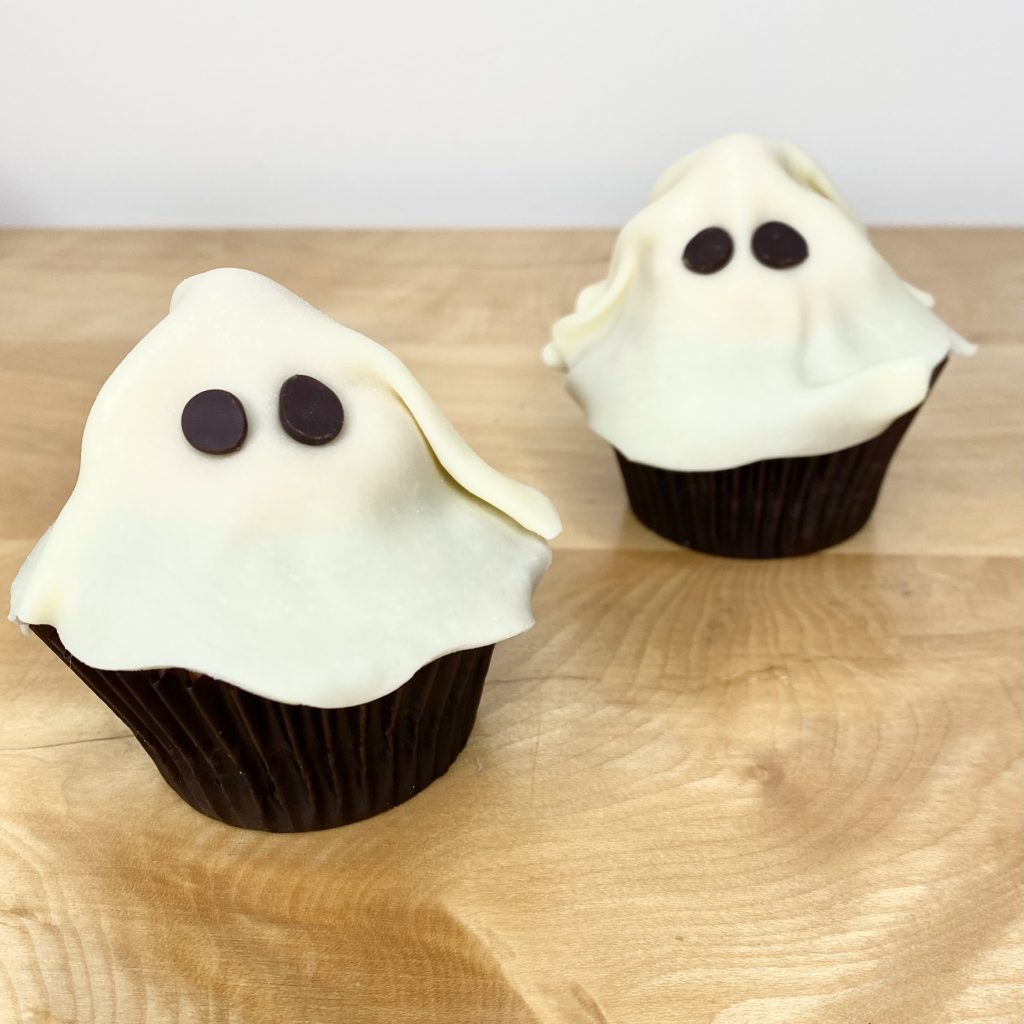
Side note: if these weren’t Taylor Swift-inspired cupcakes, I would have been tempted to leave them at this stage: they’re SO CUTE! I think these cupcakes would be perfect, left at this stage, for a fun Halloween treat.
Nevertheless, these are Taylor Swift cupcakes, so we have to turn these spooky eyes into super cool sunglasses. I used this black edible marker to draw in a bar between the two chips, but I wasn’t crazy about the result. It was quite finicky to do and doesn’t look super neat. If I were to make these again, I would probably melt a tiny bit of dark chocolate and use a cocktail stick/skewer (maybe even a piping bag with a very fine tip?) dipped into it to etch the little line across. I think that would be neater and ultimately easier, even if it requires a couple of extra steps.
The final step was to attach the chocolate fedoras that I made earlier. Modelling chocolate isn’t overly sticky, so you can’t just stick the fedora on top or it would fall off! Instead, I used the same frying pan-method that I used to make the fedoras. After I heated up the pan, I used it to melt the base of each hat (i.e. the domed part of the giant chocolate button), very slightly, then used that melted layer to stick the hat to the top of the modelling chocolate ‘sheet’. It worked really well, but do be careful not to melt the button too much, or it might ooze out as you press the hat down, making your cupcakes a little untidy!
With that, the Anti-Hero cupcakes are finished! I have to be honest, these cupcakes kind of give me more… Mafia vibes (??) than Anti-Hero, BUT they are still super cute. Also, the tea flavour is very much Anti-Hero and not at all Mafia, so I’m still counting this one as a win. I hope you’ve enjoyed my tutorial for these Anti-Hero cupcakes- let me know if you try them out!
Gemma
xxx
Recipe
Anti-Hero Cupcakes
Equipment
- 1 piping bag
- 1 large round piping nozzle (I used a #1A tip).
- small rolling pin
Ingredients
For the infused milk:
- 100 ml milk
- 4 Earl Grey tea bags (see Note 1).
For the Earl Grey cupcakes:
- 150 g caster sugar
- 150 g Stork (see Note 2).
- 3 eggs
- 150 g self-raising flour
- 1 tsp baking powder
- 1 pinch salt
- 3 tbsp infused milk
- 3 drops vanilla extract
For the Earl Grey buttercream:
- 100 g unsalted butter, softened
- 220 g icing sugar, sifted
- 2.5 tbsp infused milk
- 1 pinch salt
To decorate:
- 12 giant chocolate buttons (I used Cadbury)
- 12 Rolos
- 24 (about 7-8g) dark chocolate chips
- Black edible ink marker (see Note 3).
- 180 g white modelling chocolate (see Note 4).
- Icing sugar, for dusting.
Instructions
Make the infused milk:
- Put the milk and tea bags into a small saucepan. Place over medium heat and bring to a simmer. Remove from the heat and cover, then leave to cool down to room temperature- about 30 minutes. When the milk has cooled, remove the tea bags, squeezing out any excess milk for extra flavour, and discard.
Make the Earl Grey cupcakes:
- Preheat the oven to 170°C. Line a 12-hole cupcake tray with dark brown cupcake cases and set aside.
- Place all of the cupcake ingredients into the bowl of a stand mixer, fitted with the whisk attachment. Mix on low speed until most of the flour is incorporated, then gradually increase the speed to high. Beat until light and fluffy- about 30 seconds.
- Use a spatula to scrape down the sides of the bowl and ensure everything is fully combined. Use a regular-sized ice cream scoop to divide the batter between the 12 cupcake cases, then bake in the oven for 25-30 minutes, or until the cupcakes spring back when touched gently.
- When the cupcakes are baked, remove them from the oven and transfer immediately to a wire rack, to prevent the bottom of the cases from becoming greasy. Allow to cool completely before decorating.
Make the Earl Grey buttercream:
- Place the softened butter into a medium-sized bowl. Using an electric whisk, whip on high speed until the butter is pale and fluffy.
- Add half of the icing sugar to the whipped butter. Use a spatula to incorporate the sugar (this will prevent an icing sugar cloud), then beat with the electric whisk, on high speed, for a further minute.
- Add the infused milk, then beat for another minute. Add the remaining icing sugar, stir in with a spatula, then beat the whole thing for a final minute. Transfer the icing to a piping bag, fitted with a large, round tip, ready to decorate the cupcakes.
To decorate:
- Pipe the buttercream onto each cupcake- you are aiming for a tall-ish cone in the centre of the cupcake. To achieve this, hold the piping bag vertically in the centre of the cake, then apply gentle pressure, lifting as you go to add height. Place the iced cakes into the fridge for about 15 minutes, to allow the buttercream to firm up, while you make the other decorations.
- To make the chocolate fedoras, warm a small frying pan over medium-high heat. Once the pan is hot, turn off the heat. Use the heat from the pan to melt the base of a Rolo (be careful of your fingers near the hot pan!). When the base has melted a little, stick the Rolo to the flat side of a giant chocolate button, making sure it is centred. Repeat 11 more times, for a total of 12 chocolate fedoras, then set all the chocolates aside to harden.
- When the buttercream on the cakes is firm, you can start making the 'sheets' for the ghosts. Knead your modelling chocolate to bring it back to a smooth, pliant dough, then break off a small piece (about 15g). Dust your work surface and rolling pin with icing sugar, then roll out the ball, keeping the chocolate in a roughly circular shape, very thinly (about 12cm diameter). Use a small, sharp knife to cut off any messy edges with a wavy line, then carefully lift up the chocolate and drape it over the chilled cupcake. Press it against the central buttercream dollop and arrange the folds evenly.
- Before the modelling chocolate firms up, press two dark chocolate chips into the chocolate, to act as eyes. Using the black edible marker, draw a bar connecting the two chips to create the sunglasses (see Note 3).
- Heat the same, small frying pan you used to make the fedoras back up over a medium heat. Once the pan is hot, turn off the heat and use the warmth of the pan to melt the bottom of each fedora slightly (this will allow them to stick to the top of the modelling chocolate). Press one fedora on top of each ghost cupcake. Be careful not to over-melt the chocolate, or it will ooze out when you push it down onto the cupcake.
- I recommend adding the chocolate decorations (from the modelling chocolate 'sheets' onwards) on the day you plan to serve the cakes, to prevent any 'sweating'. The iced cupcakes will keep for 2-3 days in an airtight container (or the fridge), while the fully decorated cupcakes are best eaten on the same day.
Notes
- I like to use decaf tea when I’m baking with it, so that I can have a cake at any time of the day without worrying, but feel free to use caffeinated tea, if you prefer.
- As always, I like to use Stork in place of butter for my cakes- I think it makes for a fluffier, moister cake. If you don’t want to use Stork, just substitute it with an equal quantity of softened, unsalted butter.
- I used an edible ink marker to join the two chocolate chip ‘eyes’ into sunglasses, but it was a little bit finicky and I wasn’t super happy with the result. If you want to use an edible marker, I recommend you press the chips in, then remove them and draw the bar between them, before pressing the chips back in, to make the process easier. Otherwise, you could use some melted dark chocolate, either by placing it into a piping bag fitted with a very fine tip OR by dipping a cocktail stick into it and etching a small line that way.
- As always, you can use any edible modelling paste for this. I’ve opted to use white modelling chocolate, because I like the taste and the colour, but you could also use fondant or marzipan, if you prefer. All of these modelling pastes will ‘sweat’ if left on the cakes for too long though, so I would still only add them to the cupcakes on the day you plan to serve them, no matter which paste you choose to use.