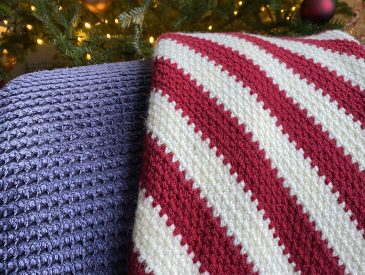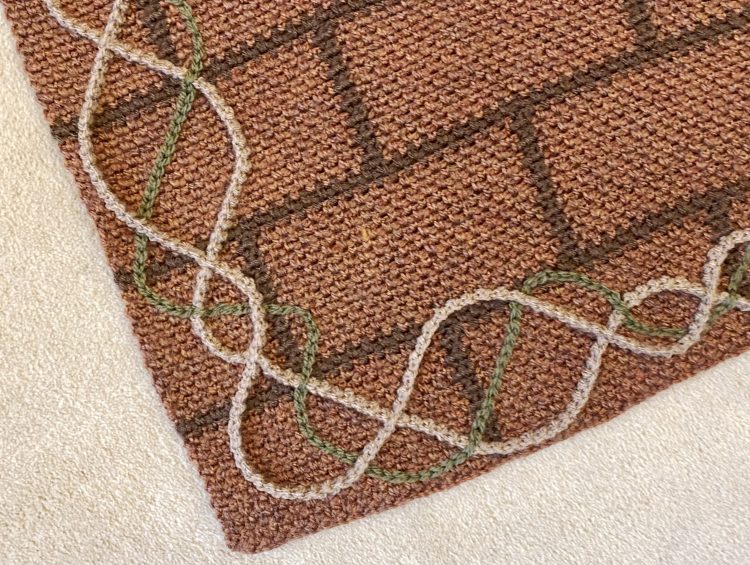
2 weeks ago, I unveiled my new, original crochet pattern: the Bridgerton House Baby Blanket. Last week, I released a full tutorial for making the brick-pattern blanket that forms the base of the project. This week, we’re tackling the next stage: using the surface crochet technique to add the vines/climbing branches around the perimeter of the blanket.
Let’s get into it, shall we?
Table of Contents
- Surface Crochet: Explained
- How to Surface Crochet
- Seamlessly Joining a Surface Crochet Loop
- Crocheting into Surface Crochet
- Interweaving Surface Crochet Paths
- Mapping Out the Curved Path
- Pattern
- Final Thoughts
Surface Crochet: Explained
Surface crochet is a crochet technique that can be used to create decorative lines of stitching on top of a piece of crocheted/knitted fabric. It produces a very similar effect to chain stitch in embroidery. Essentially, surface crochet is just a series of slip stitches that are worked onto the surface (hence the name) of an existing fabric. Once you get the hang of it, it’s super easy to do!
Surface Crochet vs Chain Stitch
As I mentioned, surface crochet produces a very similar effect to the embroidery technique known as ‘chain stitch’. If you’re a seasoned embroiderer, or find the surface crochet technique difficult to master, you can absolutely make this blanket using chain stitch, with a sewing needle instead of a crochet hook. However, I prefer using the surface crochet technique for a couple of reasons:
- Unlike with embroidery, when you surface crochet, you work directly from the ball of yarn (i.e. you don’t have to keep cutting new pieces of yarn to work with). I would do anything to minimise the amount of ends I have to sew in, so this is a real plus for me! Additionally, because the colour is visible on the back of the blanket, fewer ends to sew in also makes for a neater finish, so it’s a win-win!
- Although the basic shape of the stitches is the same, there is a slight difference in appearance between chain stitch and surface crochet. Embroidered chain stitches can look a little lacy and ‘gappy’, whereas surface crochet stitches are naturally a little less open, which makes for a bolder, cleaner line of stitching.
- It’s easier to keep an even, controlled tension with surface crochet. To adjust the tension when surface crocheting, you can simply adjust the hook size (where a bigger hook gives you a looser tension). When using a sewing needle, you have to be more mindful of your tension for each stitch. This is particularly important for this blanket, because the surface crochet stitches have to be quite loose, so that a) they don’t distort the blanket and b) they can be crocheted into.
How to Surface Crochet
When surface crocheting, the yarn should always be held at the back of the fabric, while the hook is held at the front.
Always use a larger hook when surface crocheting, to help keep the tension loose and prevent the fabric from warping. For this project, I’ve used a 5.5mm hook (with DK weight yarn, which I would normally use a 4mm hook for).
Throughout the process, hold the hook in your dominant hand and tension the yarn using your non-dominant hand, just like you would for regular crochet.
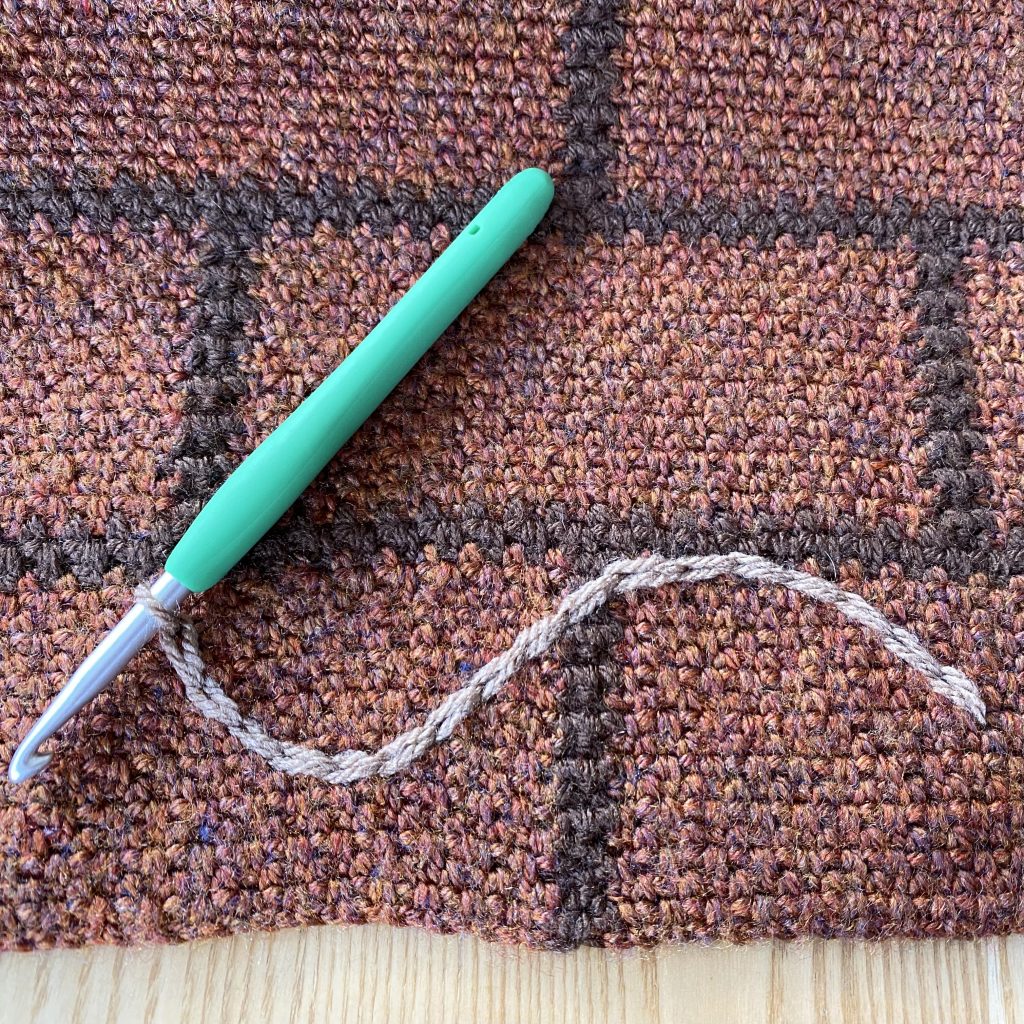
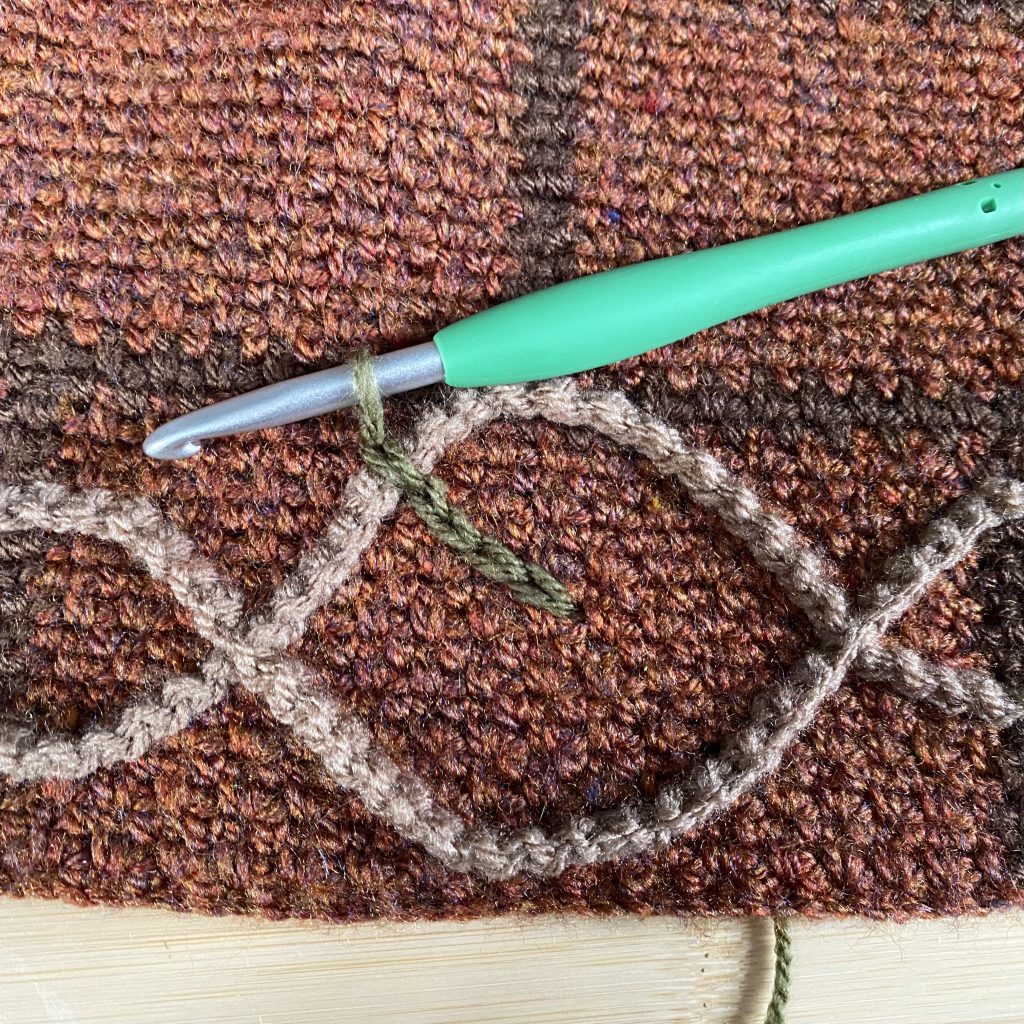
Start by inserting your hook into the fabric, from front to back, like so.
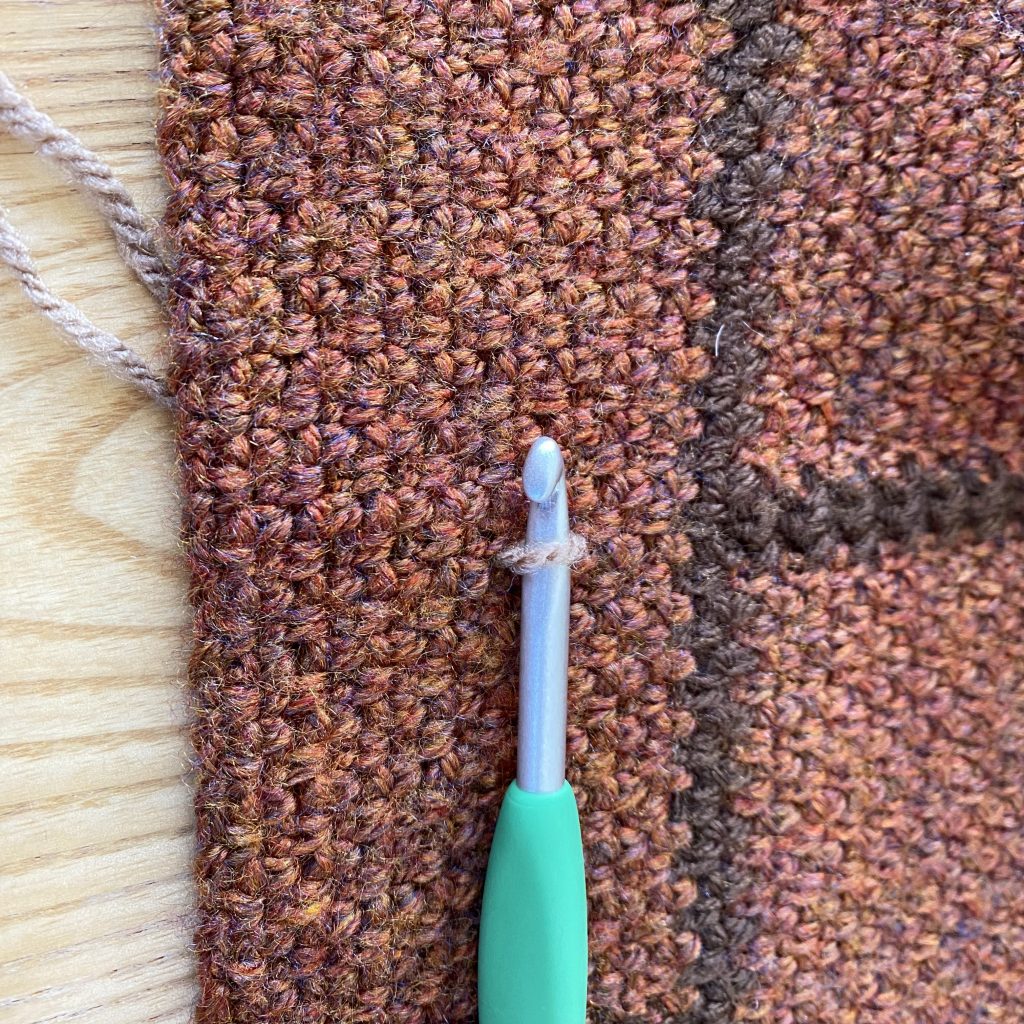
Pull up a loop of yarn from the back of the fabric.
Insert the hook into the fabric again, from front to back, a short distance from the entry point. This distance will be the length of your stitch- for this project, my stitches were about 0.5-0.75mm long, but you want to try and mimic the length of the chain that you would make with the same hook size/yarn weight.
Draw up another loop of yarn from the back of the fabric, then pull it through. You should now have two loops on your hook.
Pull the top loop through the bottom loop to make a slip stitch. Don’t pull this too tight- keep your tension nice and loose throughout the process, to prevent the fabric from warping.
This is your first surface crochet! As you can see, the ‘v’ of the slip stitch sits on top of the fabric, while, on the back of the fabric, you’ll see something more akin to a running stitch.
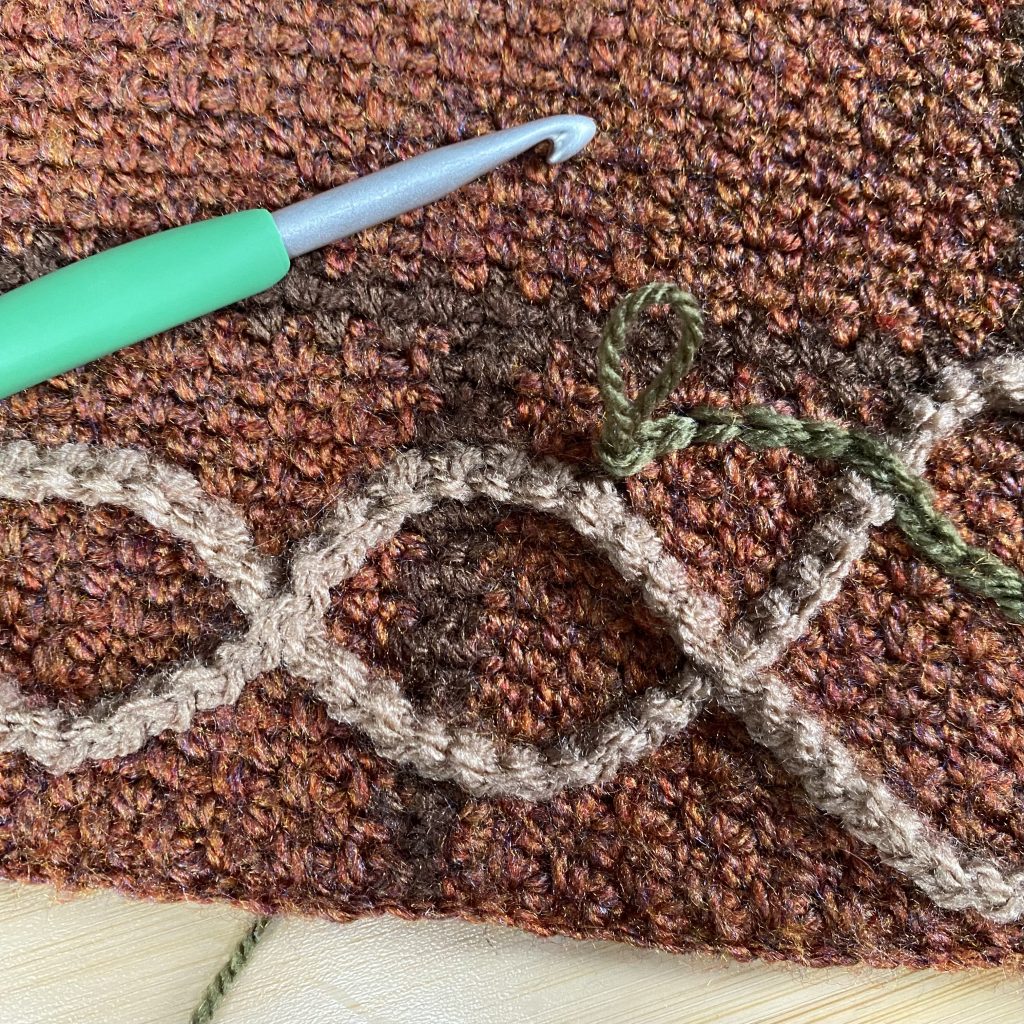
Keep making surface crochet stitches, following your desired shape, until you have finished your design.
To fasten off the surface crochet, cut the yarn at the back and pull the loop on the needle through from the front. At this point, you can either join your surface crochet line into a continuous loop (see the instructions in the next sections), or sew in the end.
If you plan to sew in the end at this stage, thread it onto a sewing needle. Insert the threaded needle into the fabric, from front to back, over the top of your last surface crochet stitch to secure it, before sewing in the end on the back.

At first, this technique will feel very counterintuitive, but, once you get into the swing of things, you’ll fly through it! I find it helpful to treat it as if I’m ‘doodling’ on the fabric and ‘drawing’ lines of stitches. Remember that you can always rip out some of the stitching and start again if you’re not happy with the shape of the line/stitch length.
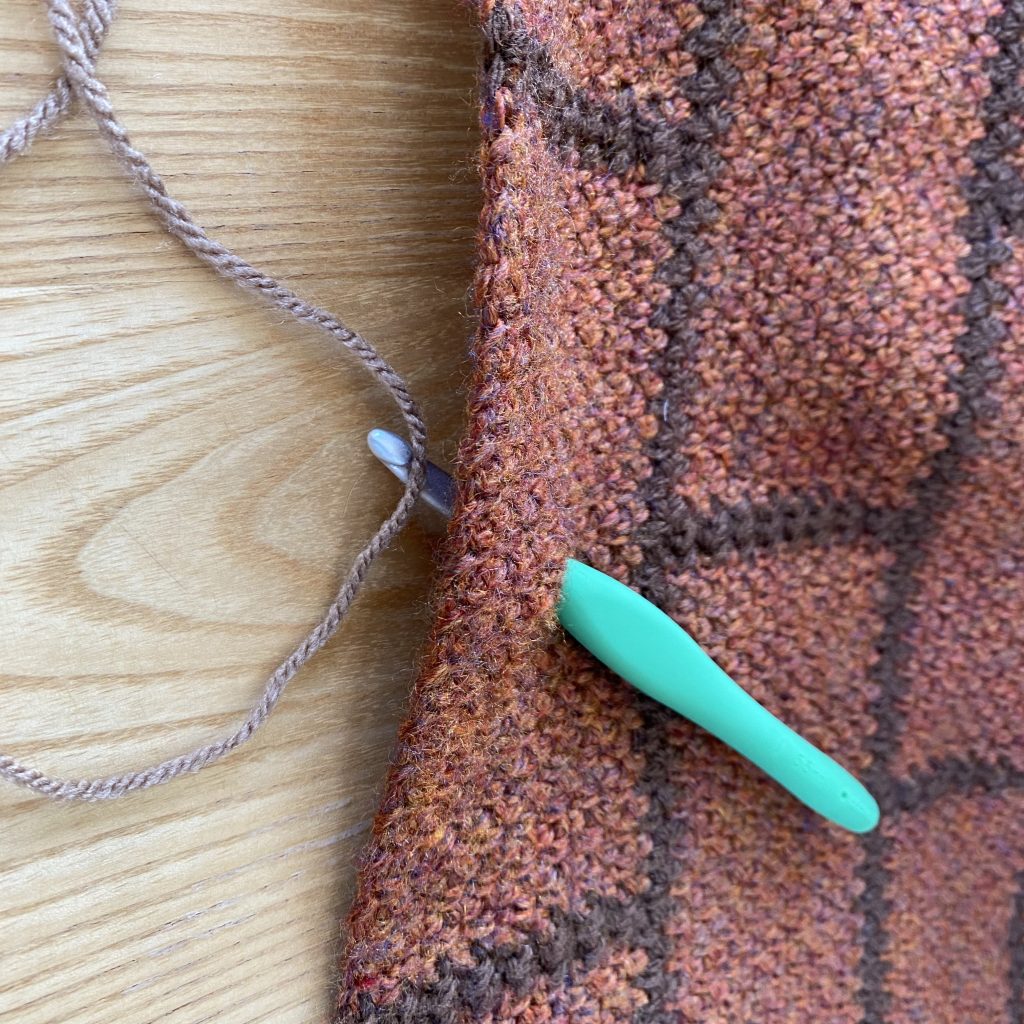
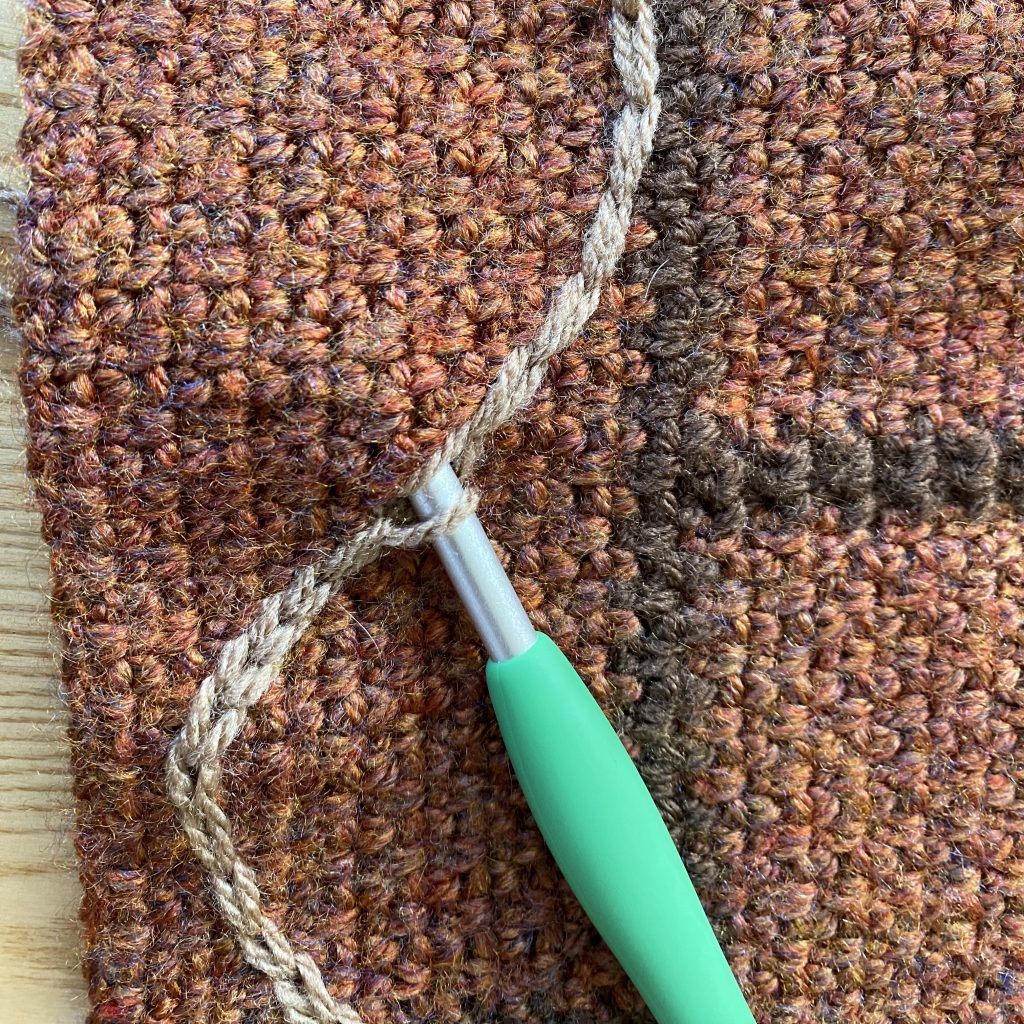
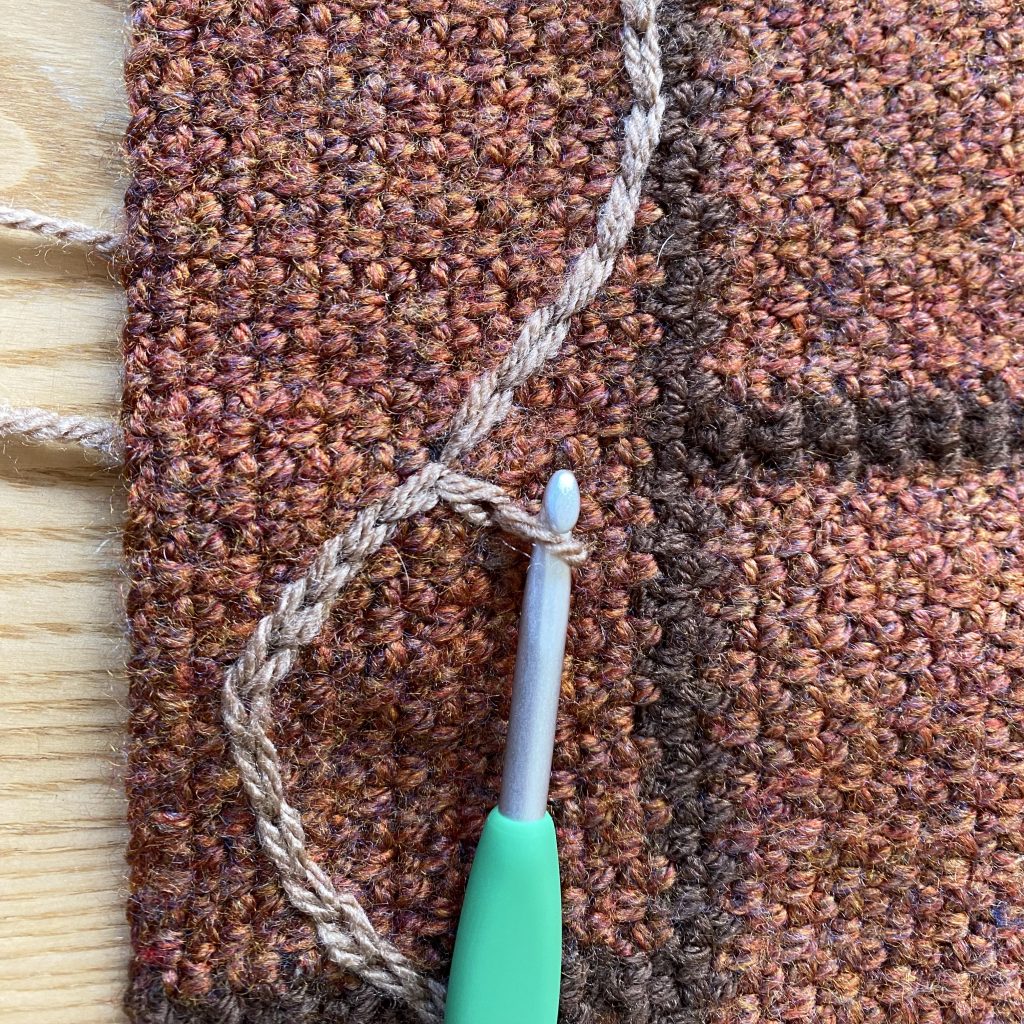
Seamlessly Joining a Surface Crochet Loop
For this pattern, we’ll be making multiple continuous chains of surface crochet around the perimeter of the blanket. To make a seamless join between the start and end of the surface crochet line, follow these steps:
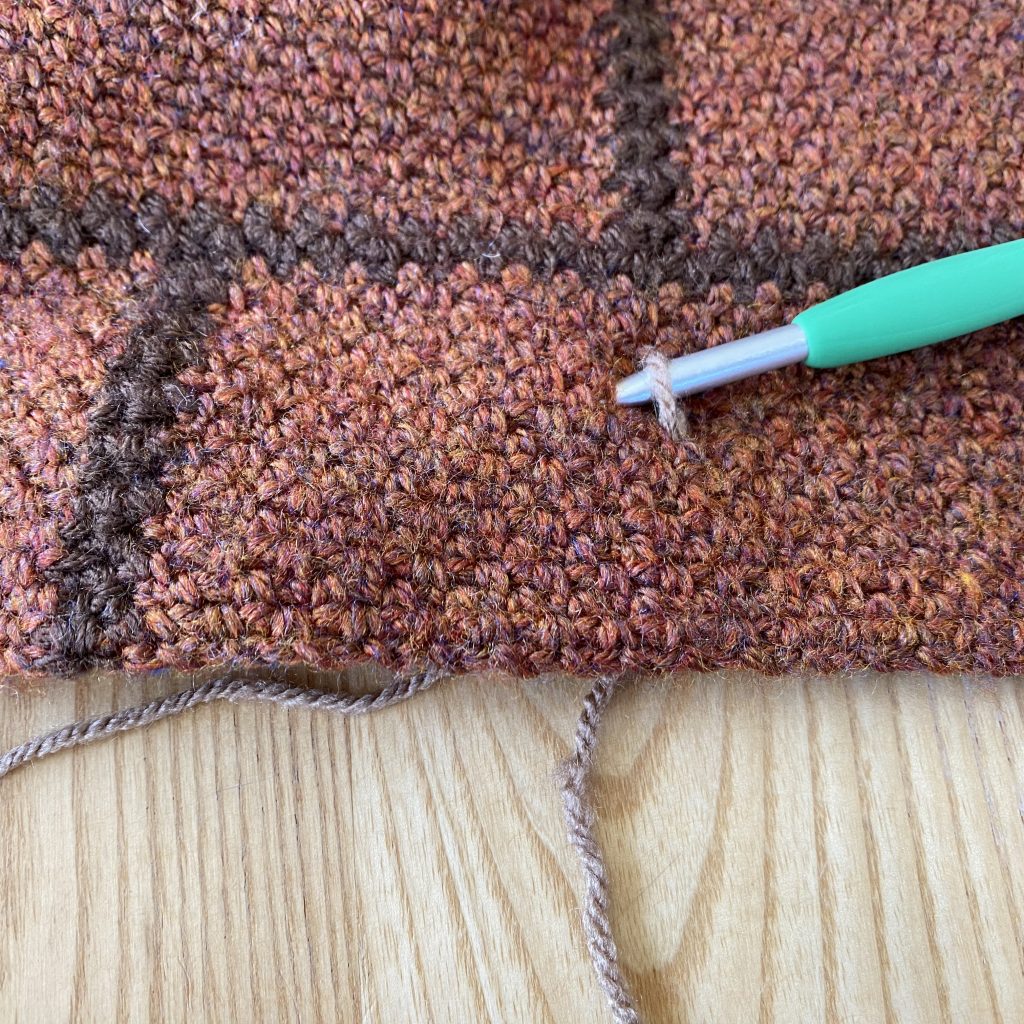
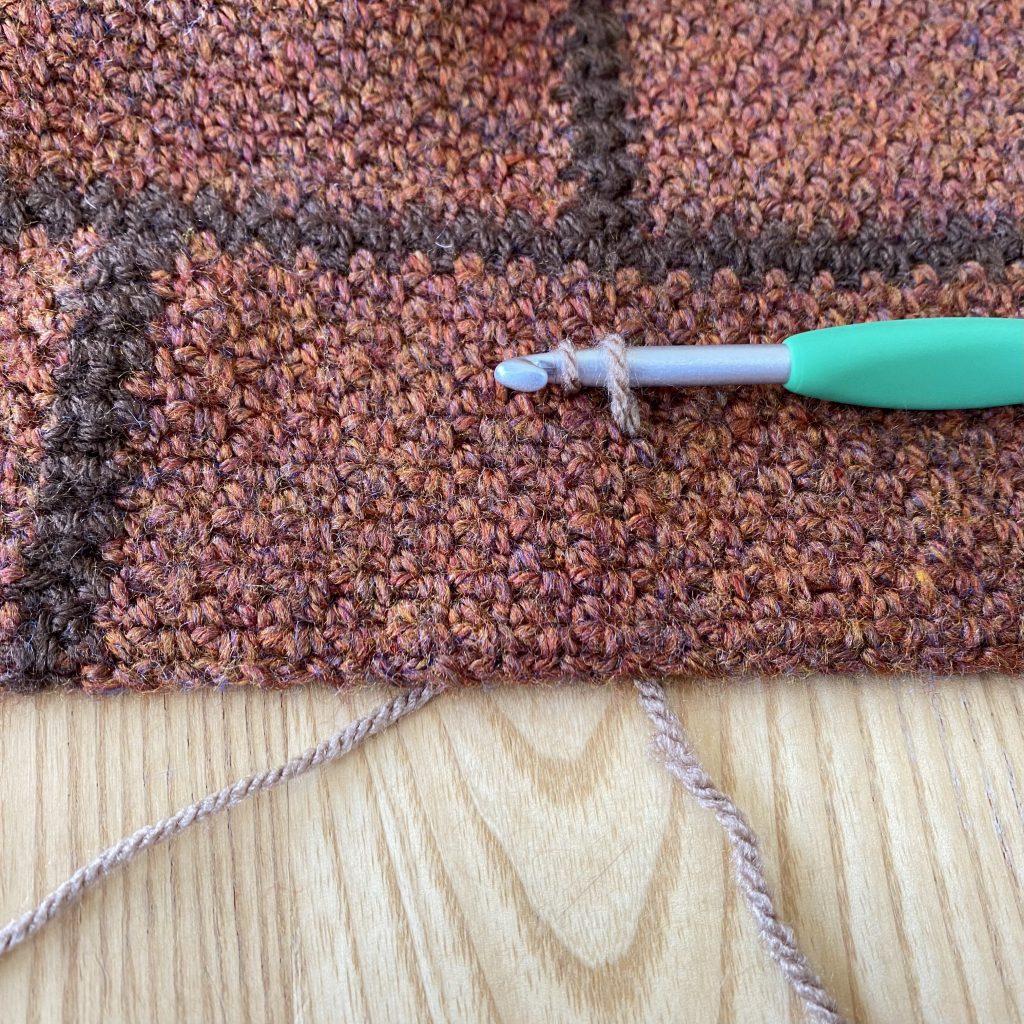
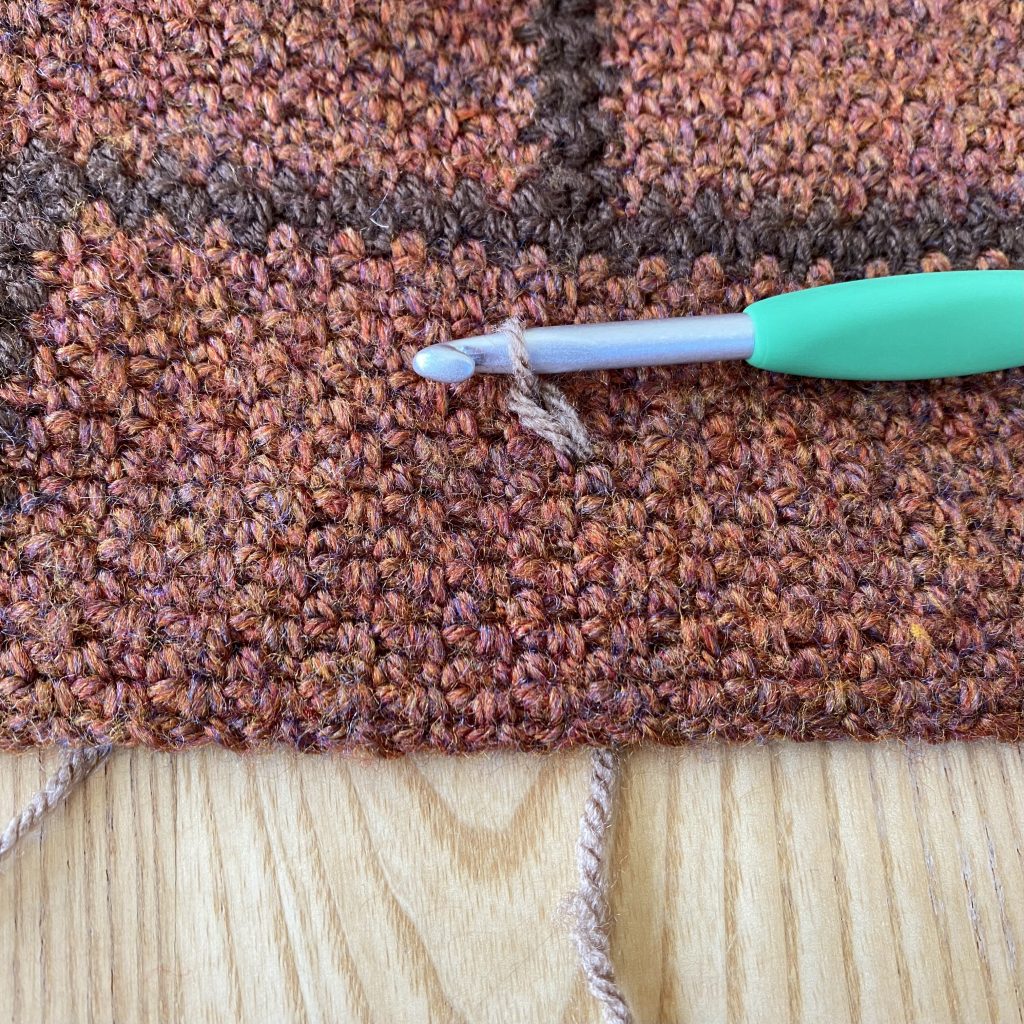
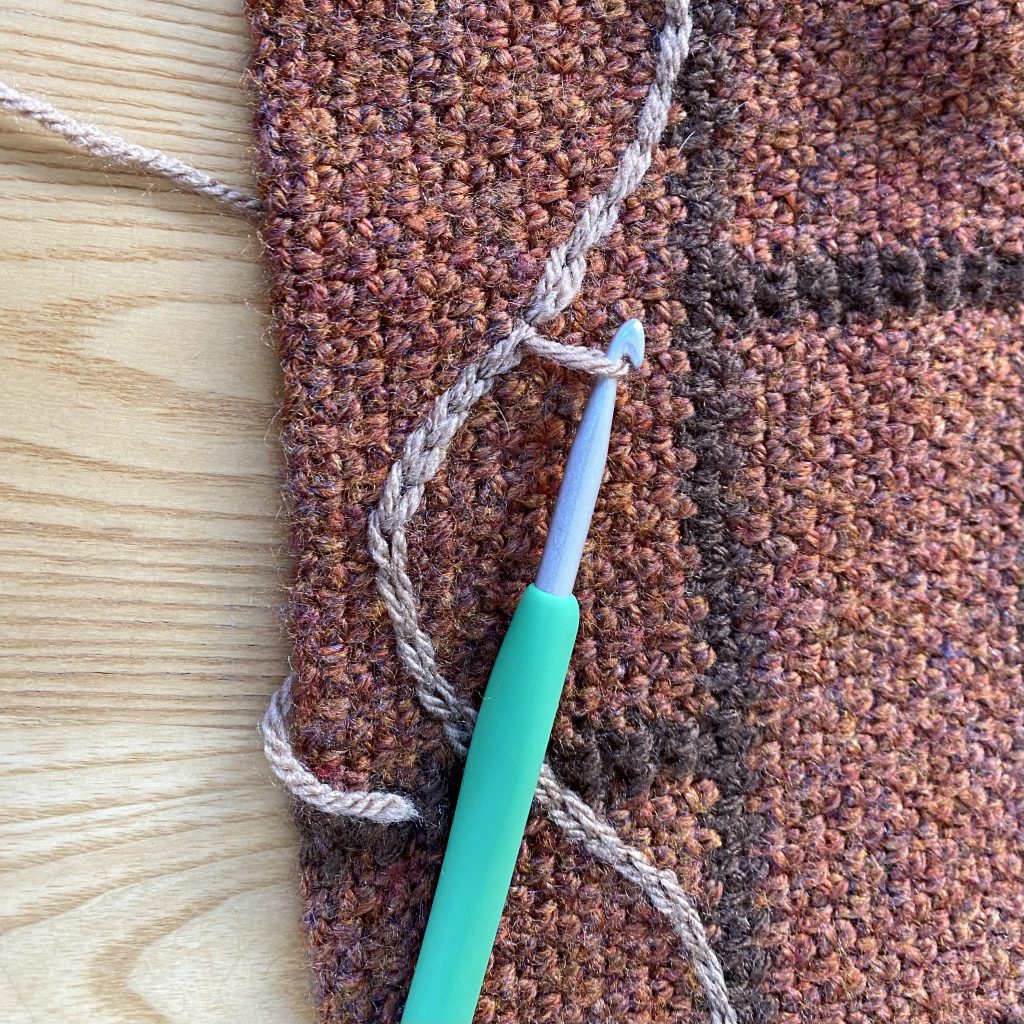
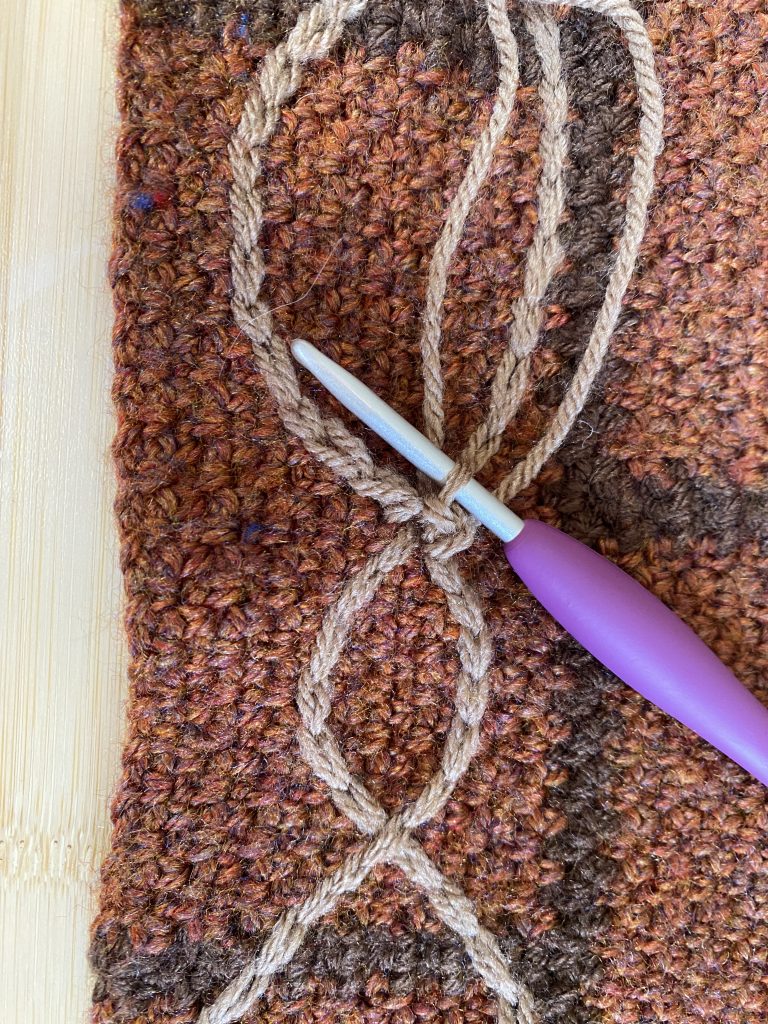
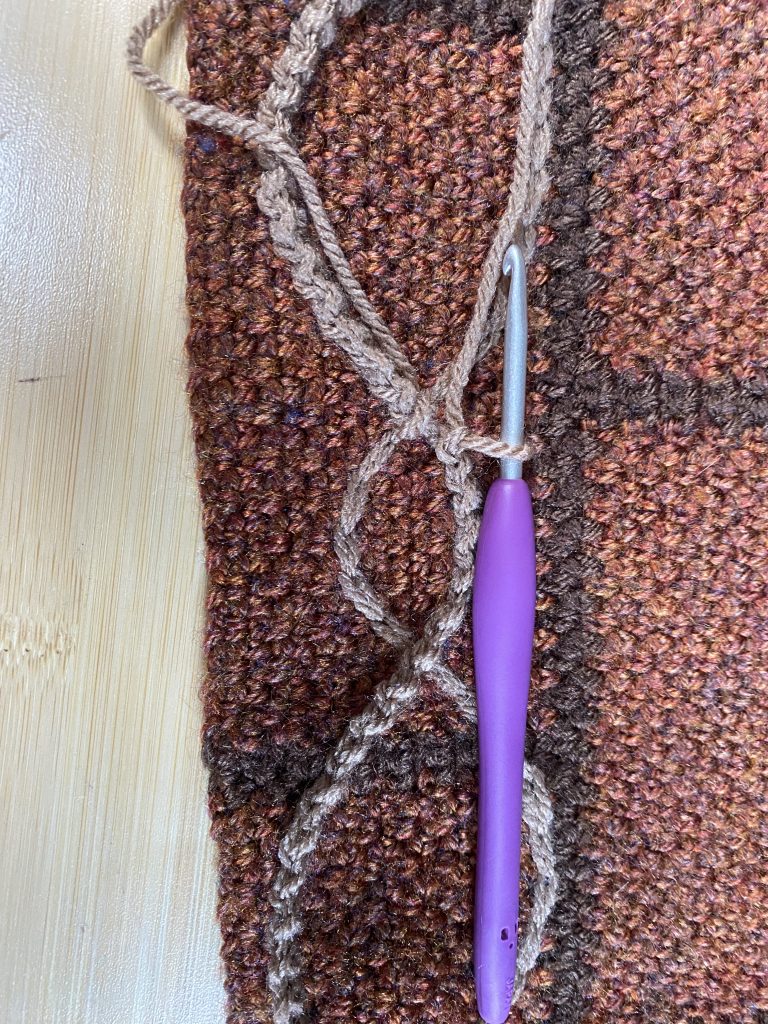
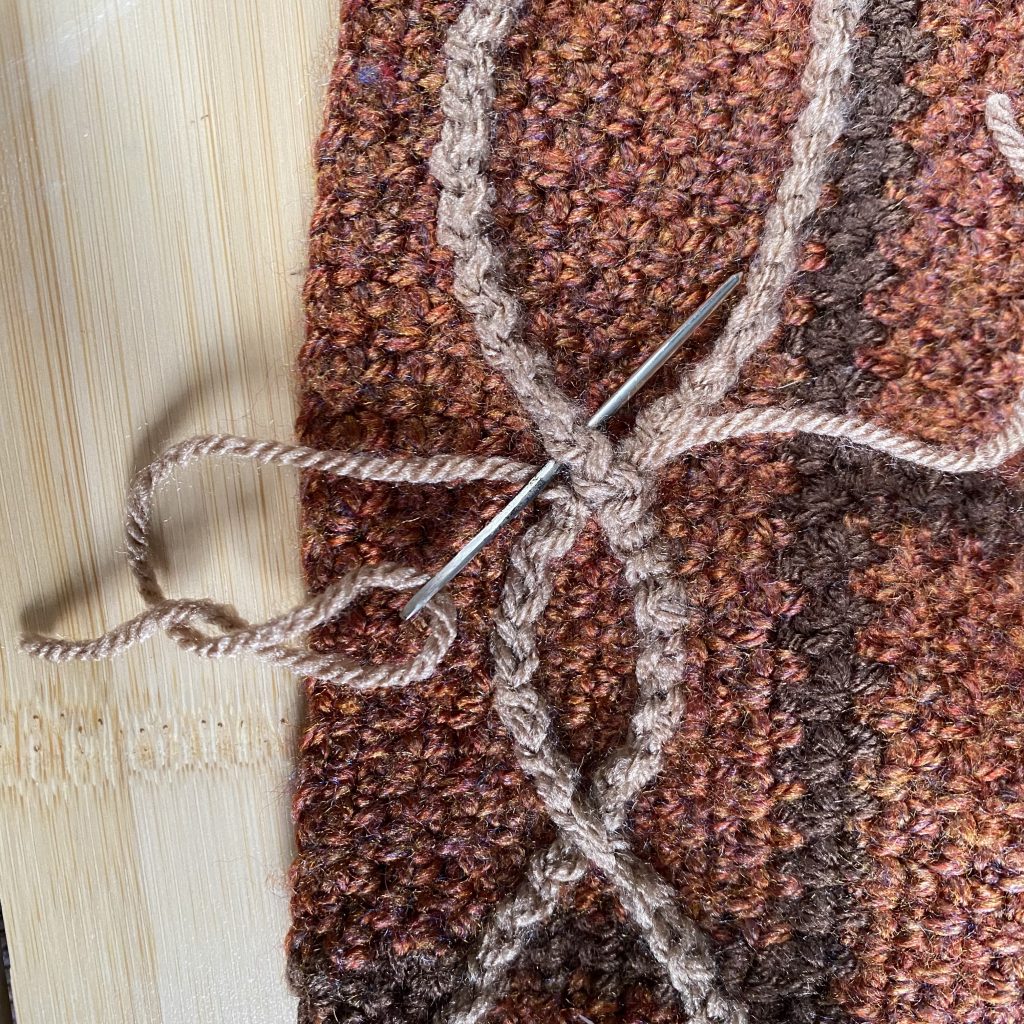
Finish your surface crochet line when you’re about one stitch’s distance away from the start of your line. Fasten off the surface crochet, leaving a long end.
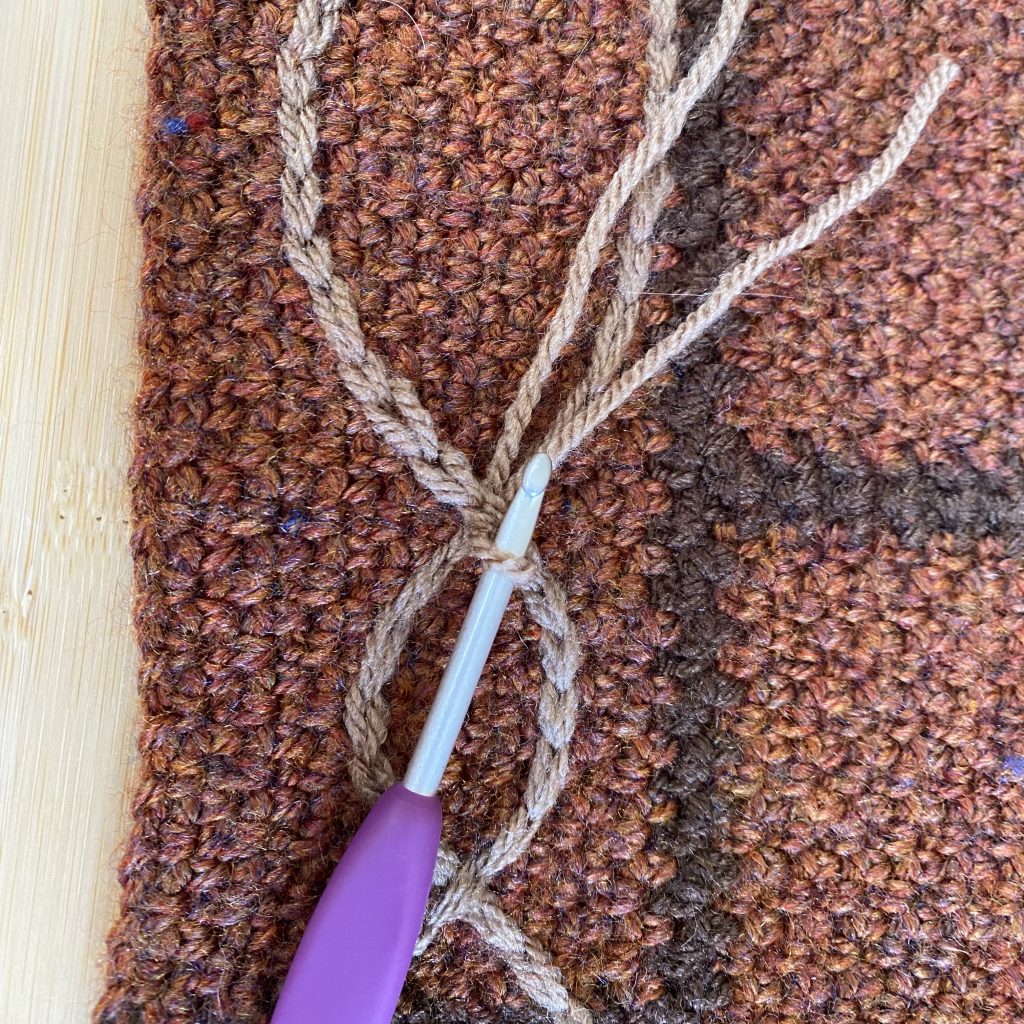
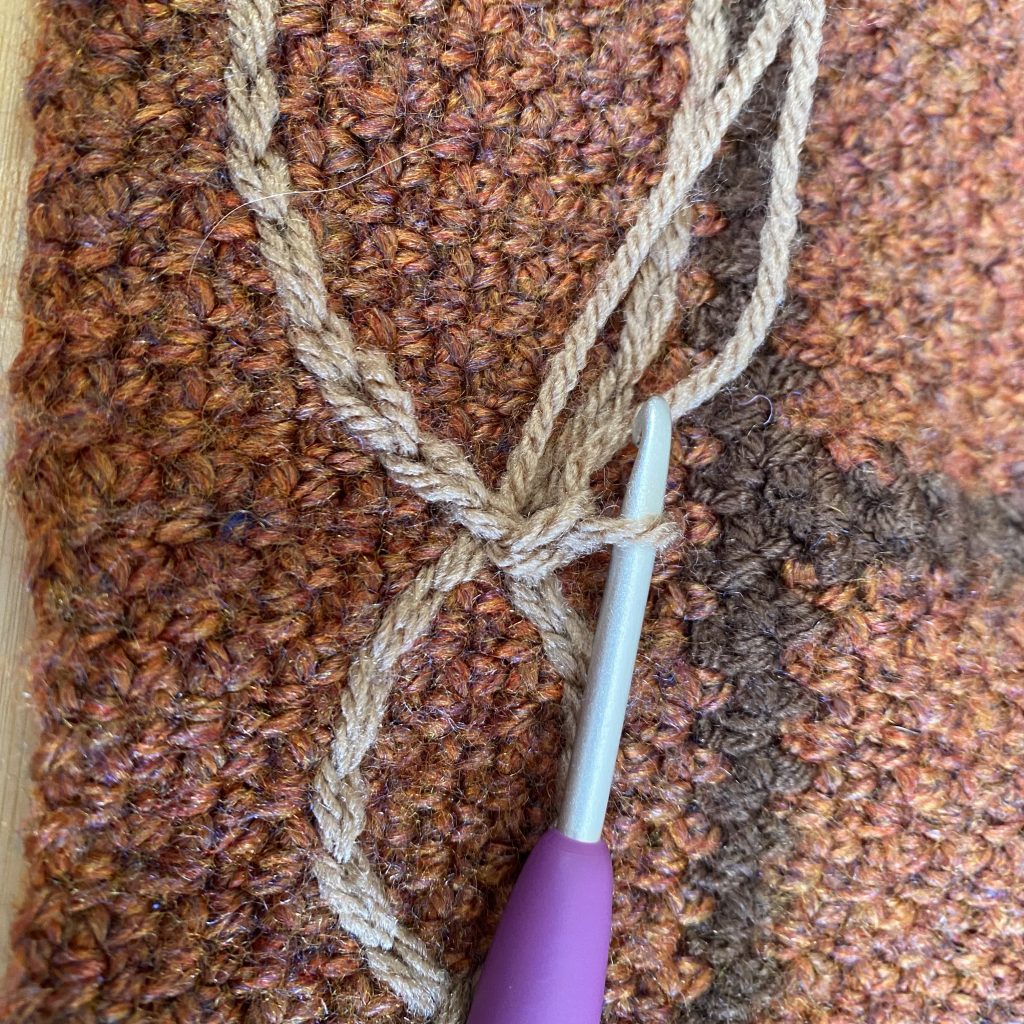
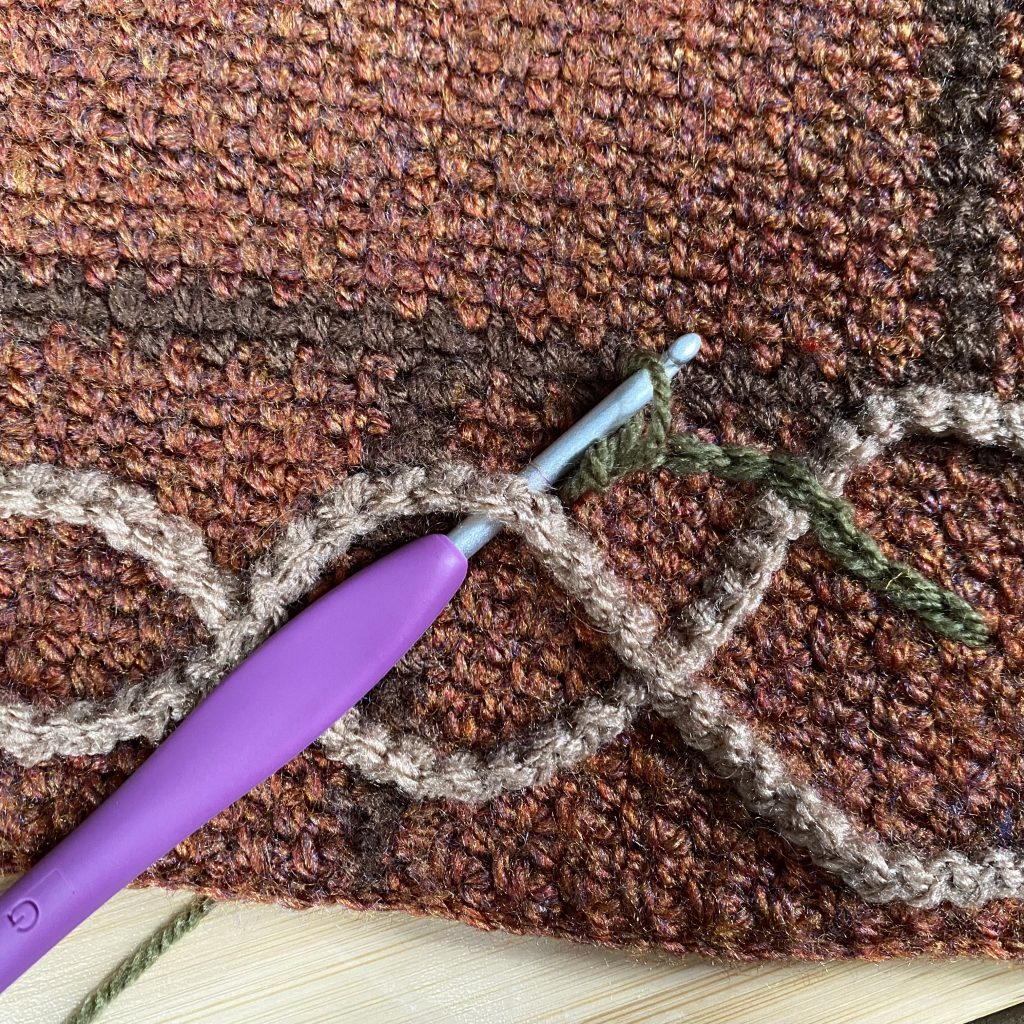
Take a blunt darning needle and insert it under both legs of the first surface crochet stitch, like so. Pull the yarn end through, so that it runs underneath both legs of that first stitch.
Insert your needle into the fabric, down through the centre of the last surface crochet stitch (i.e. between the the two legs).
Pull the yarn end through to the back of the fabric. You’ve now made a ‘faux’ surface crochet stitch, which joins your first and last stitches and gives your surface crochet line a continuous appearance. Darn in the end on the back of the fabric, and you’re done!
Crocheting into Surface Crochet
For part of this pattern, you will need to crochet into one of your surface crochet paths. This helps to add thickness and texture to the surface crochet vines, an effect that I’ve used in my pattern to differentiate between the thicker wisteria branches and the more delicate rose vines. Crocheting into surface crochet might sound a bit complicated, but it’s really not!
When crocheting into surface crochet, switch back to your regular hook size for your yarn weight (for this project, I’m using a 4mm hook). From now on, we’ll always be working from the front of the fabric, so you can hold the hook and the yarn on the same side of the fabric.
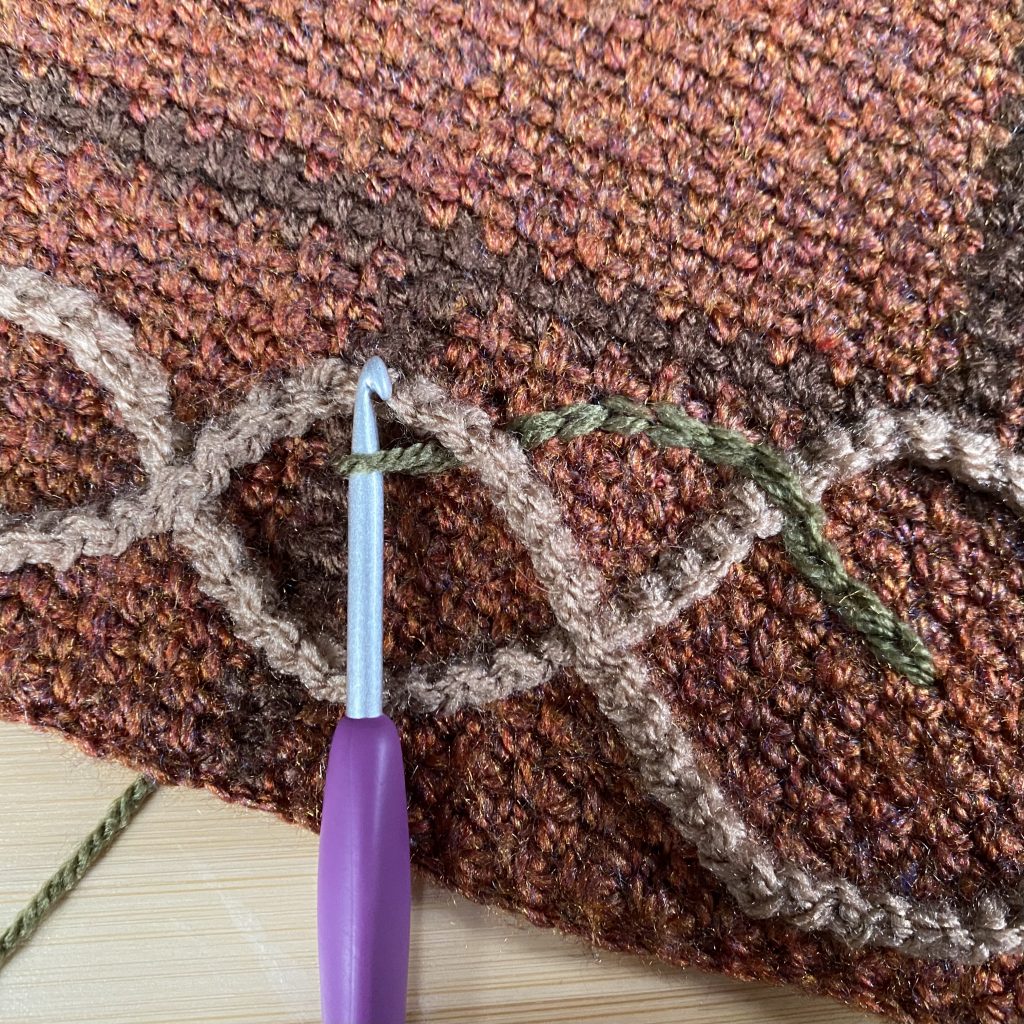
Insert your hook underneath both legs of one of the surface crochet stitches, like so.
Pull through a loop of yarn.
Make a chain, by pulling another loop of yarn through the loop on your hook.
Now you’ve attached the yarn, you can work into the surface crochet. Any time you work into a new surface crochet stitch, make sure to insert your hook under both legs of the stitch. Continue stitching with the working yarn as you work your way around, following the pattern. For this project, the pattern is a simple repeat: (Ch 1, ss) into every stitch.
Once you have worked around the entire line of surface crochet, you can cut and fasten off the yarn.
You can then follow the above instructions on ‘Seamlessly Joining a Surface Crochet Loop’ to join this round of crochet into a continuous loop as well. Instead of working into the surface crochet stitches though, just insert the needle under the round of stitches you have just worked.
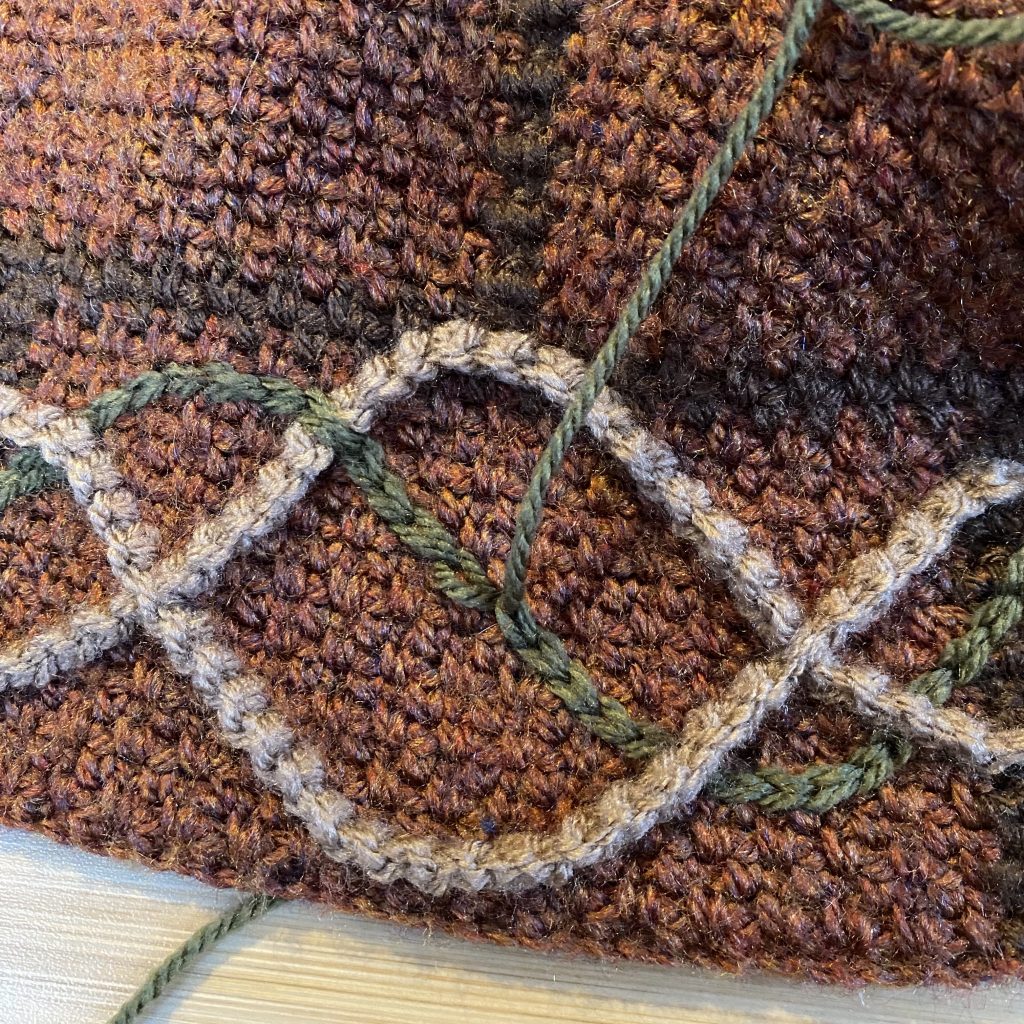
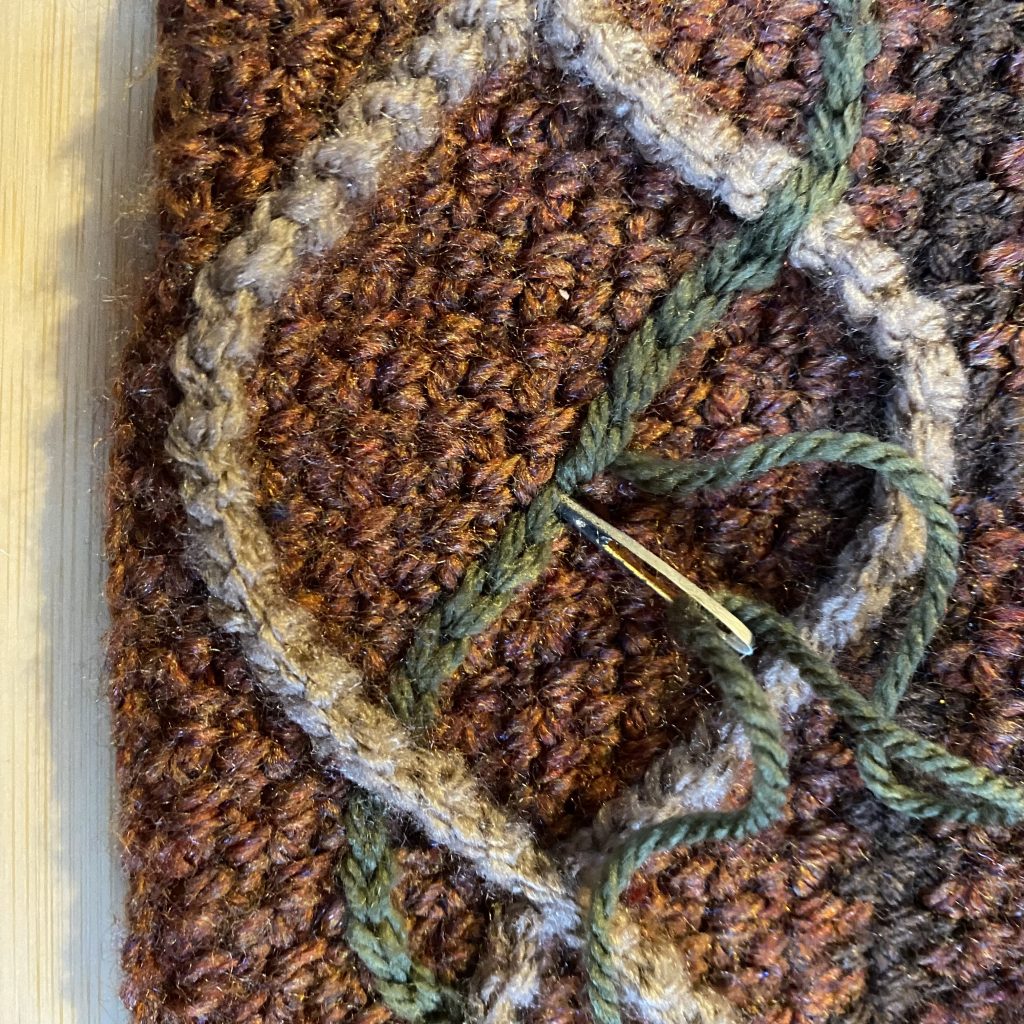
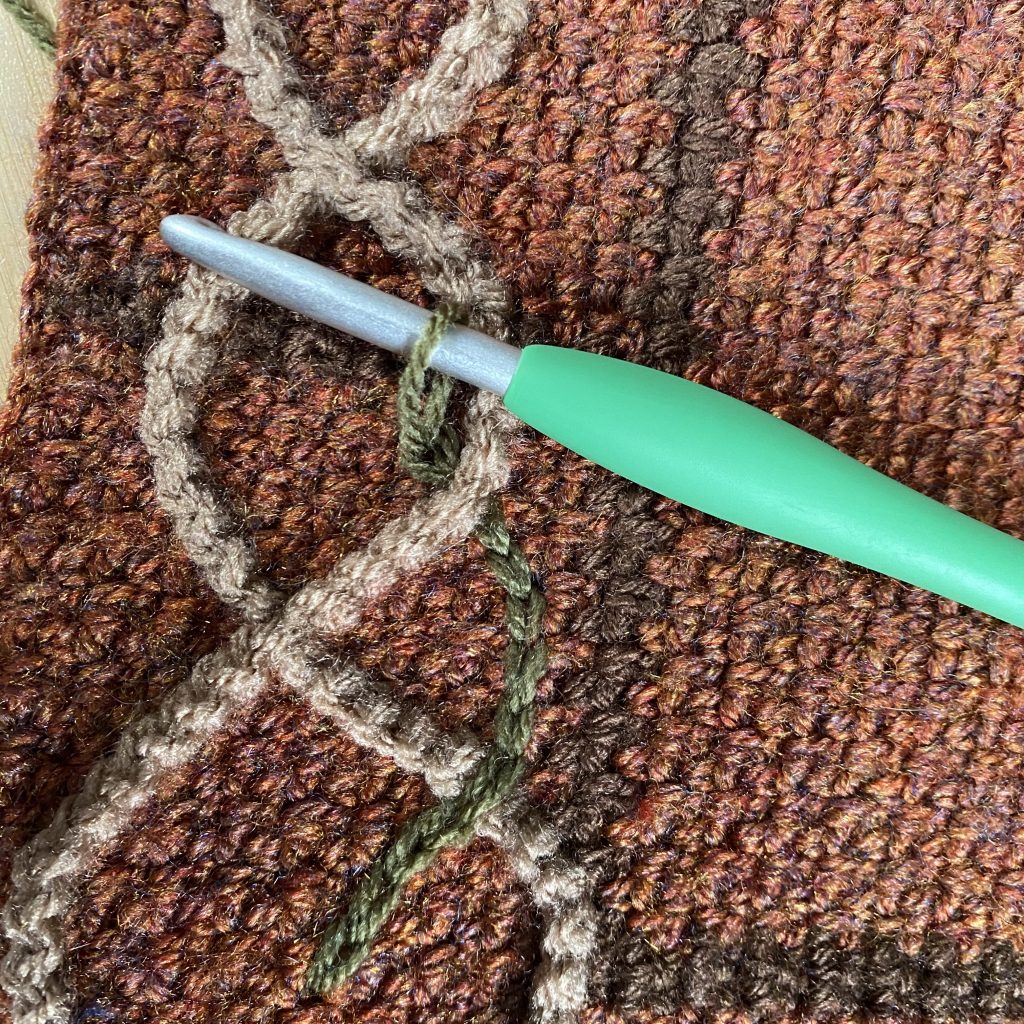
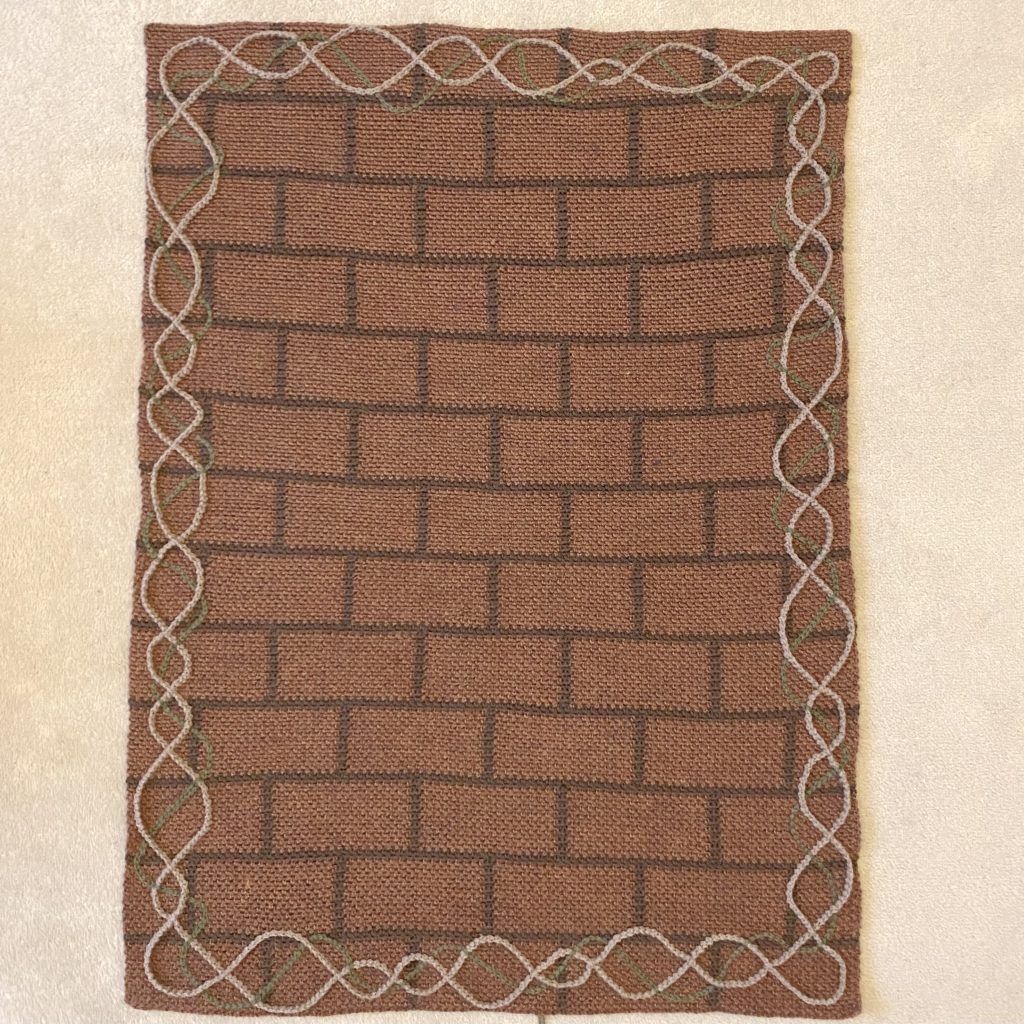
Interweaving Surface Crochet Paths
For this project, you’ll also need to know how to interlace your surface crochet paths. In total, we’ll be making 3 rounds of surface crochet: 2 brown, ‘wisteria’ rounds and 1 green, ‘rose’ round.
For the wisteria rounds, because we’ll be crocheting into the surface crochet, this isn’t important. You can just work the second round of crochet over the top of the first round any time the two rounds intersect. For the rose round, you’ll need to do a few extra steps, so that you can give the vine the appearance of ‘weaving’ in and out of the wisteria branches!
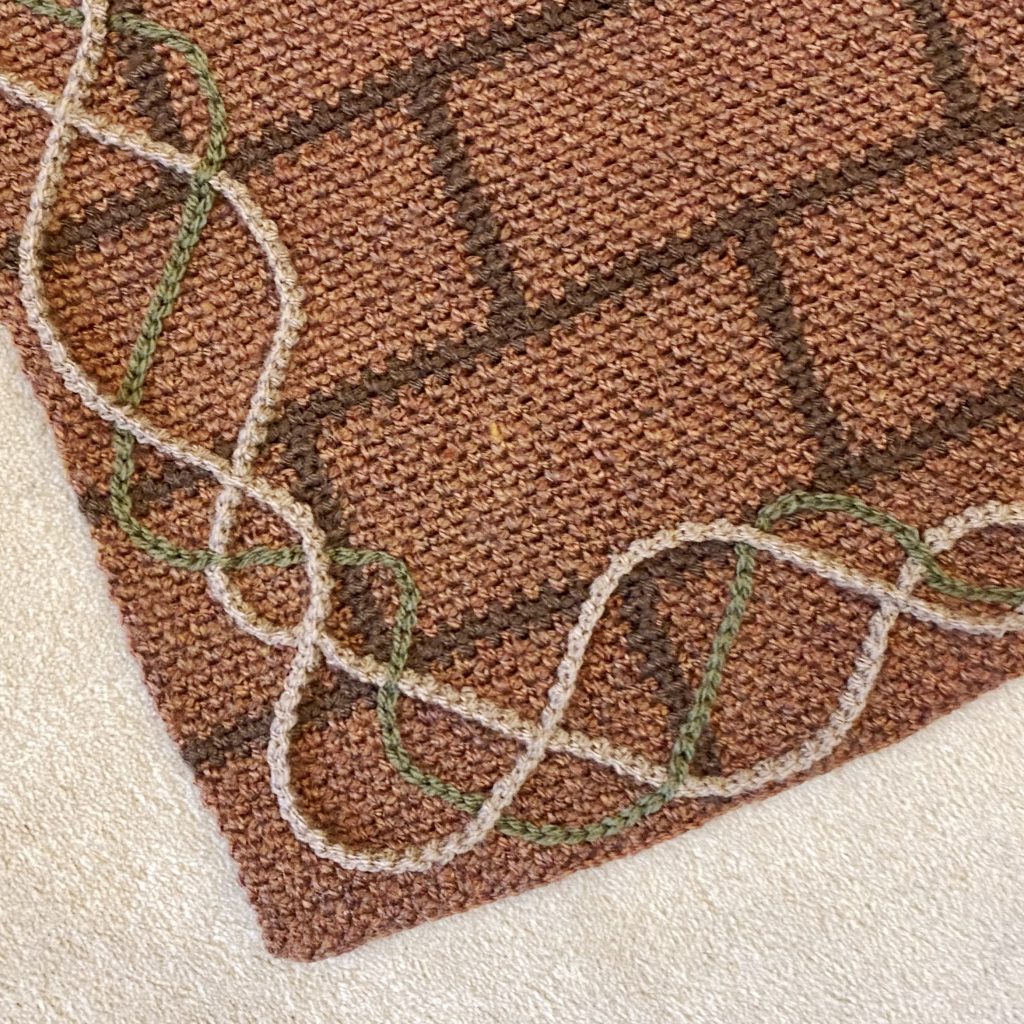
To get this woven effect, I like to alternate between the vine going over and under the vine below.
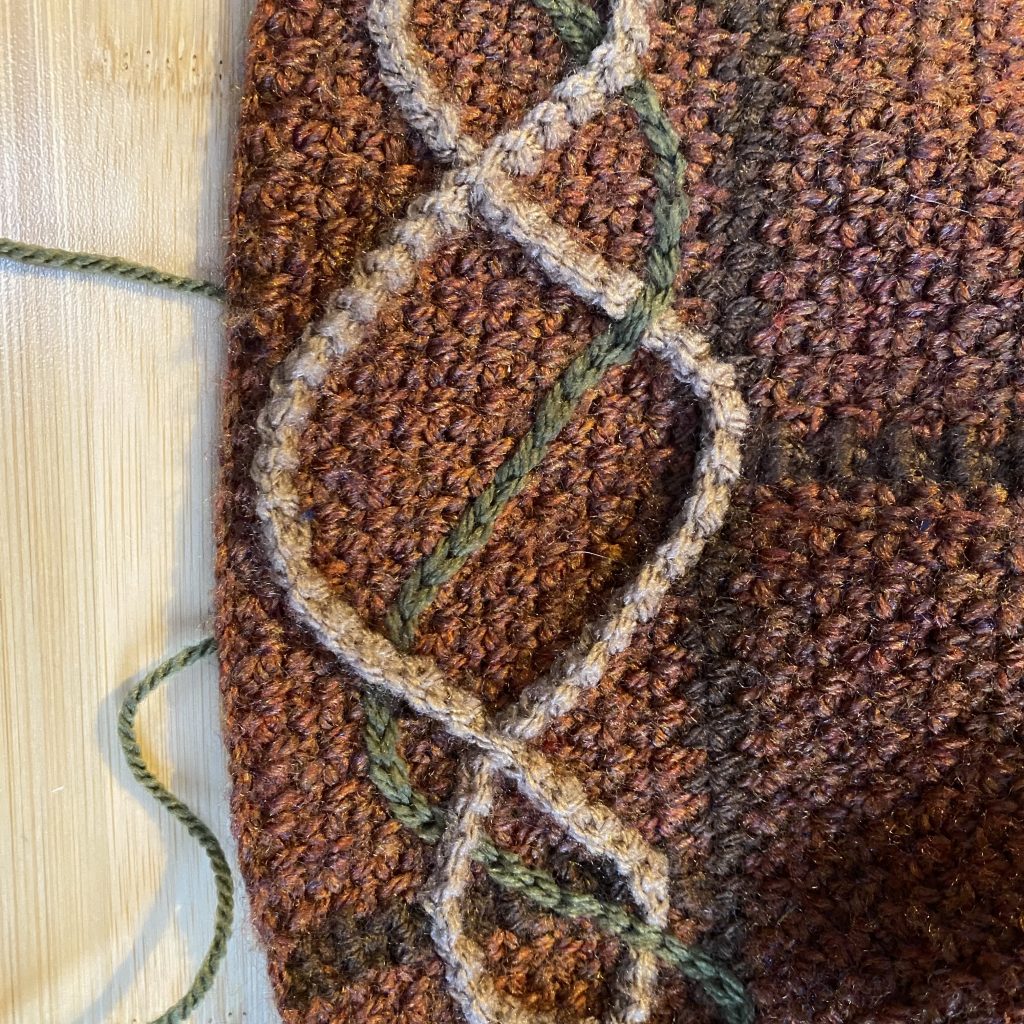
Weaving the Vine Over
To make the vine go over the vine below, just work the surface crochet over the round below. Start by making one stitch that ends just before the vine below.
Make the next stitch by inserting the hook into the fabric on the other side of the vine.
The new stitch will sit over the top of the vine.
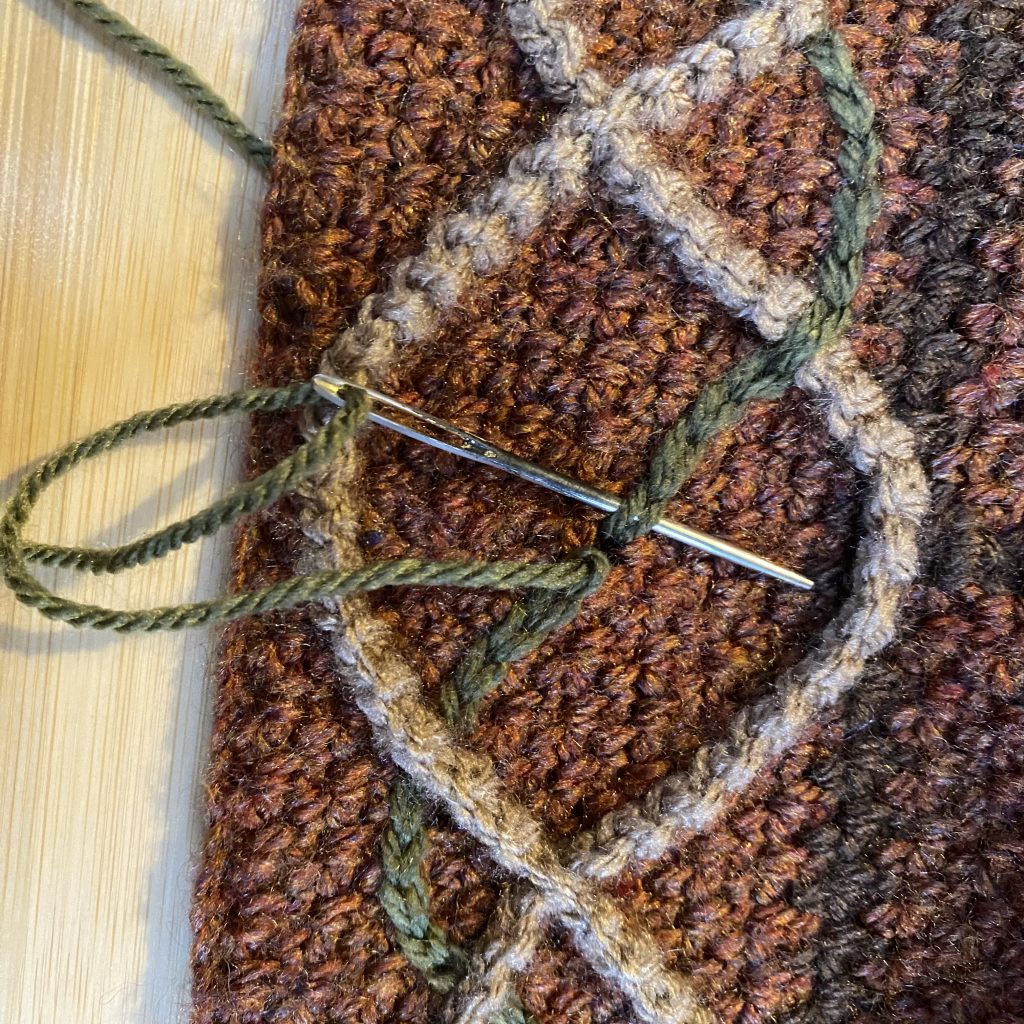
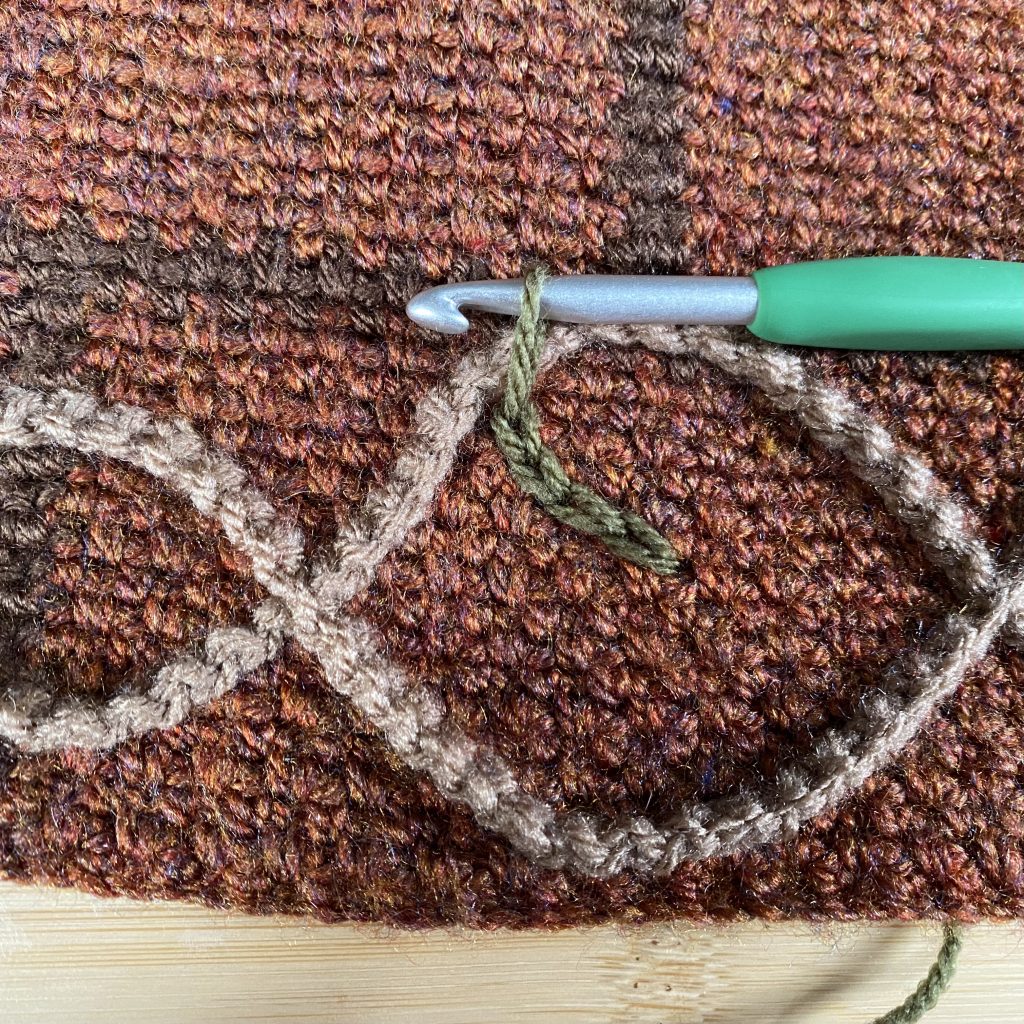
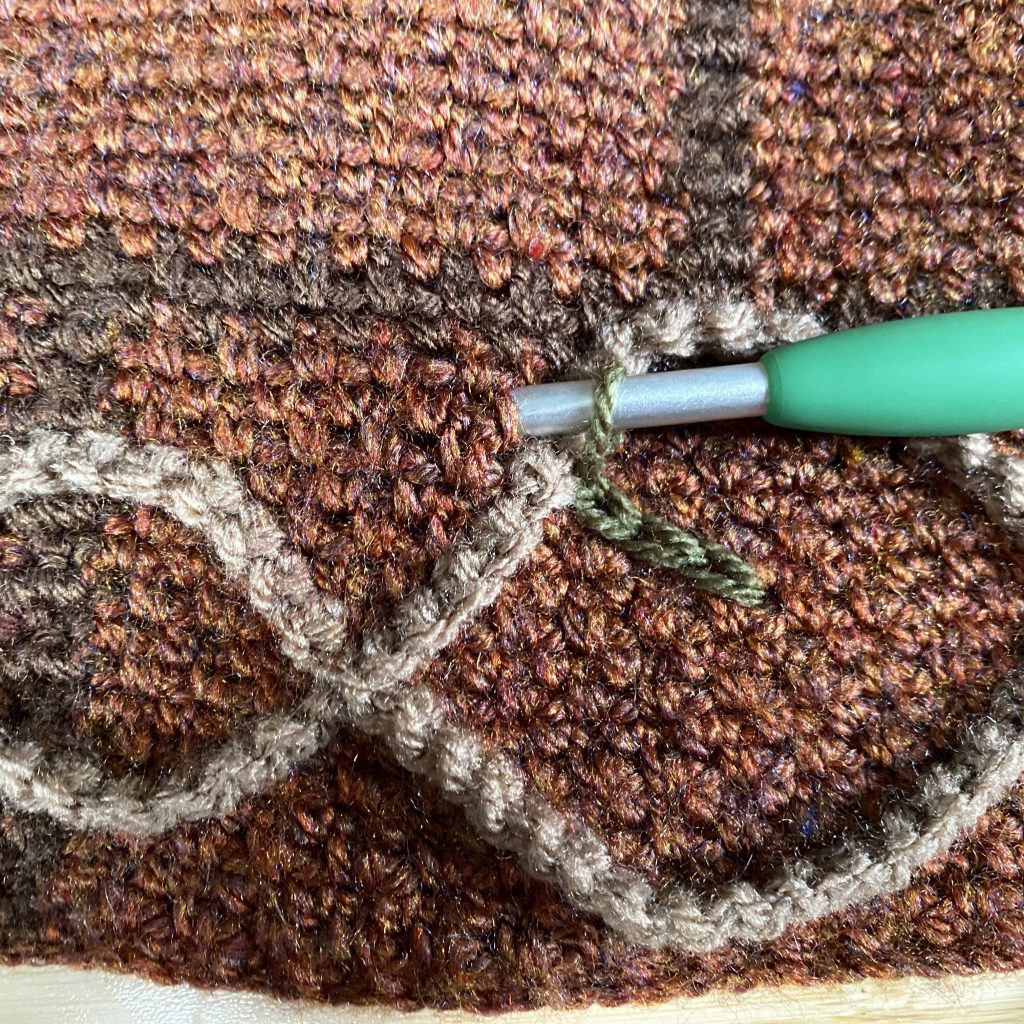
Weaving the Vine Under
To make the vine go underneath the wisteria branch, you’ll need to remove the hook. Once you’ve made the last stitch before the vine below, pull the loop to enlarge it a little (so that it doesn’t unravel!), then remove your hook.
Insert your hook underneath the vine below, from left to right (i.e. so that the hook is pointing towards the open loop). I like to switch to a finer hook for this step, just to make it easier to get the hook through the stitching, but this is optional.
Pick up the loop you left open and pull it through to the other side of the vine.
Switch back to your larger hook and continue surface crocheting as usual until you get to the next intersection, where you will be working over the vine.
Again, this is a technique that sounds much more complicated than it is- once you get into the swing of it, you’ll be flying around. The switching of hooks makes it a little bit finicky, but you only need to do that every second intersection.
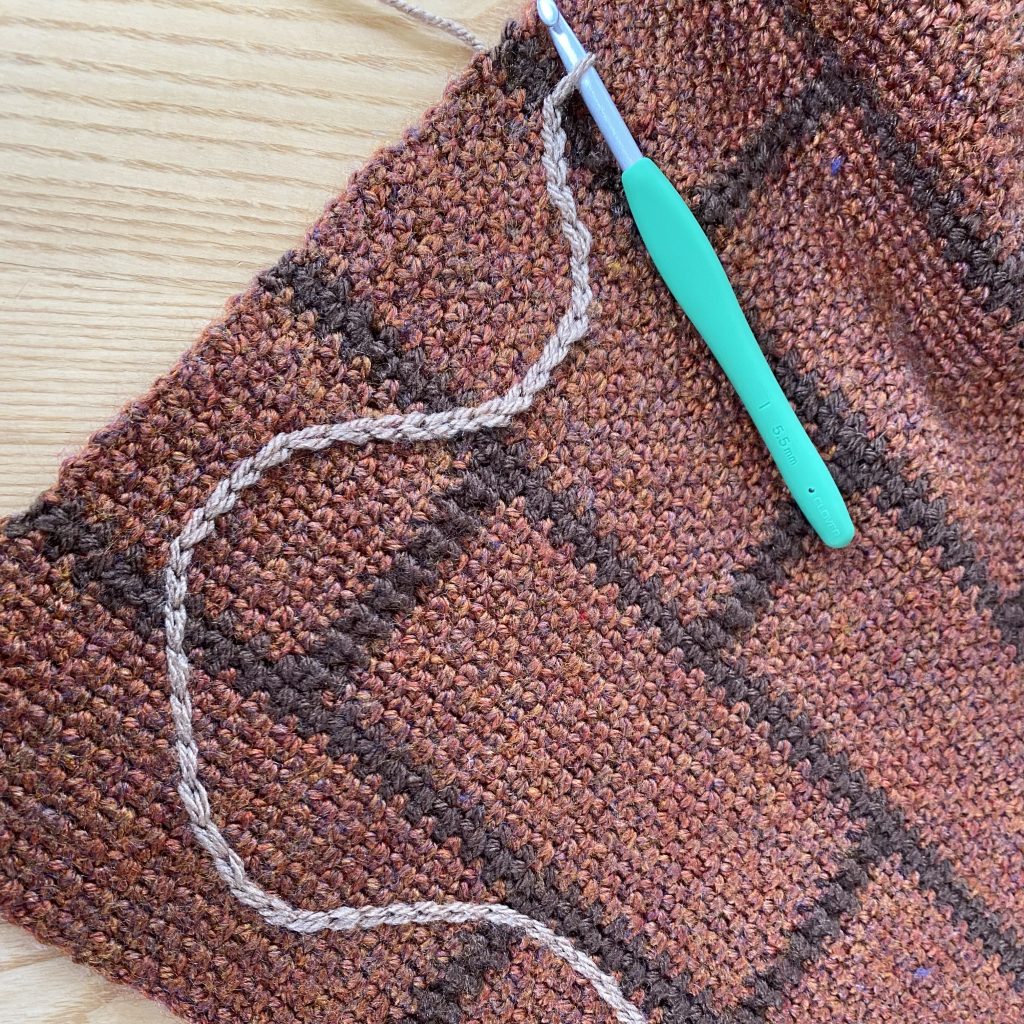
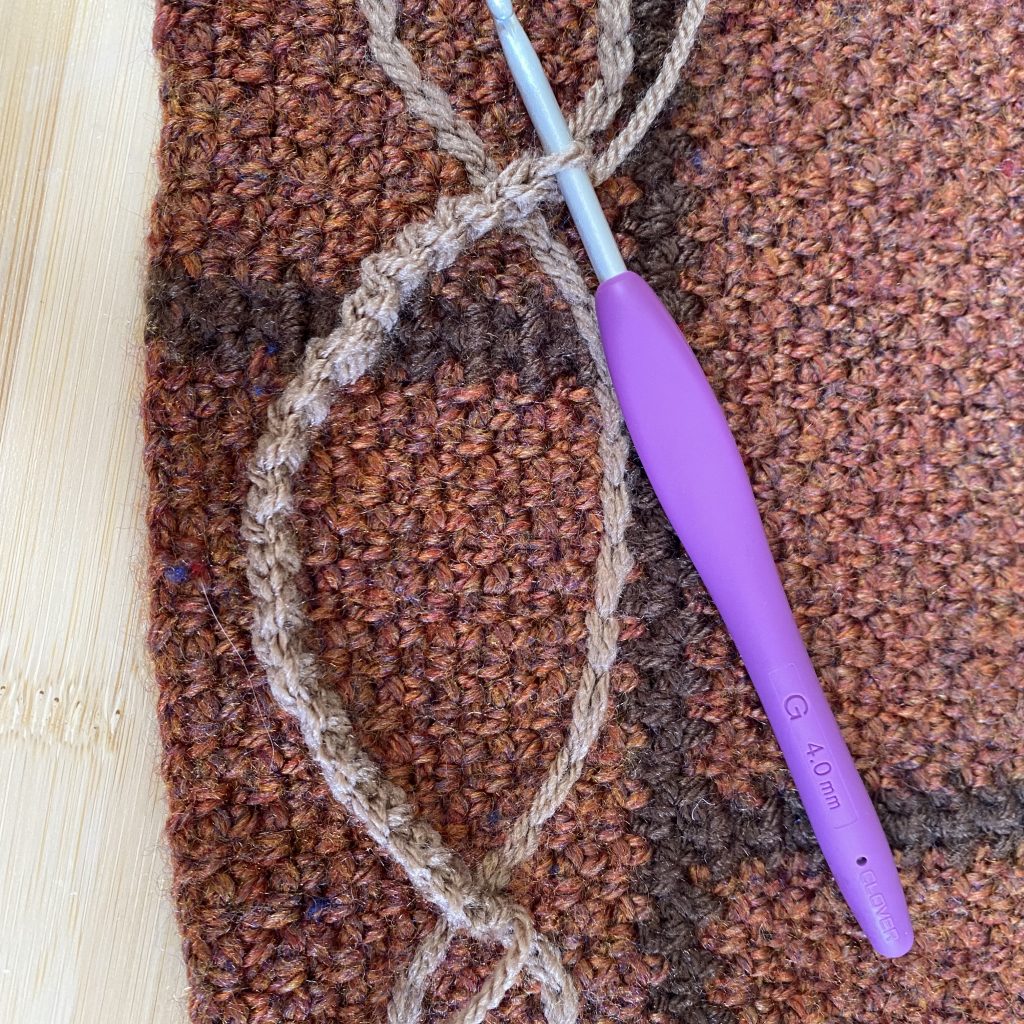
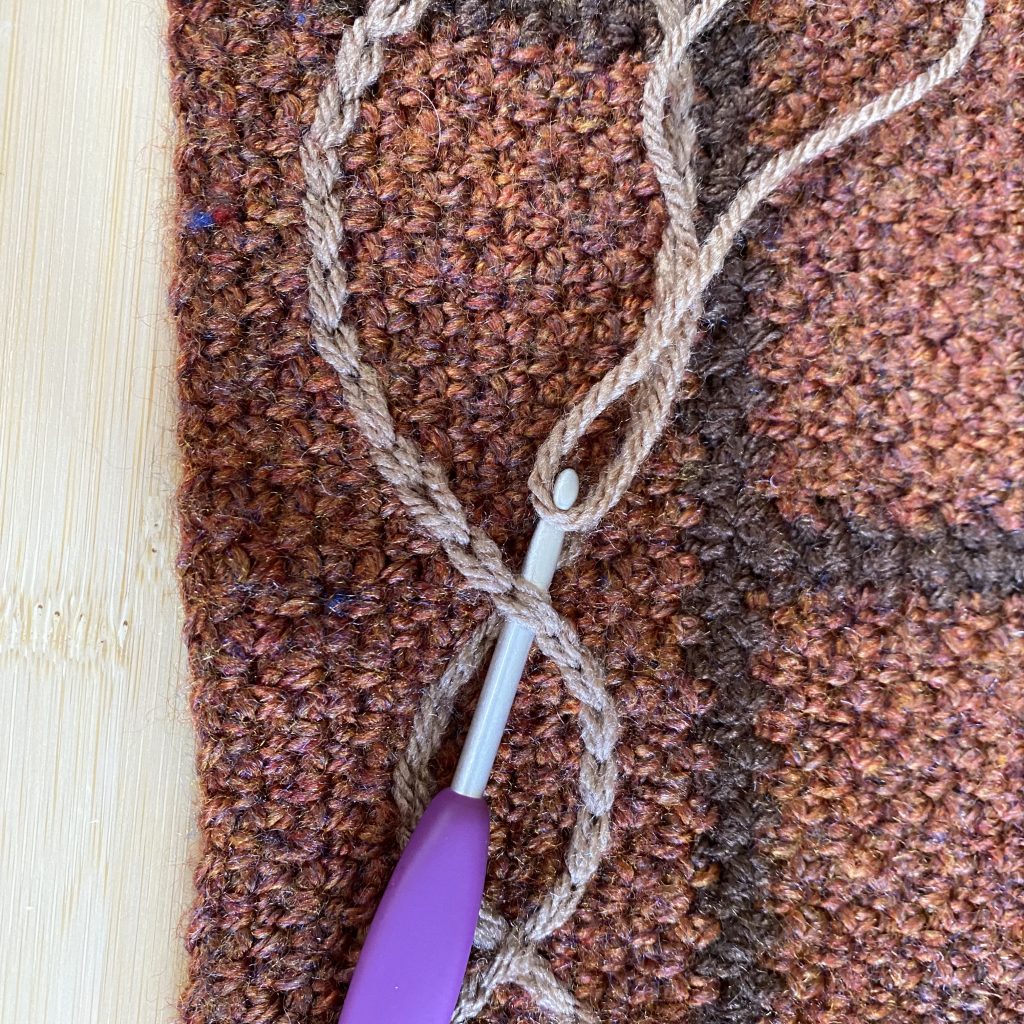
Mapping Out the Curved Path
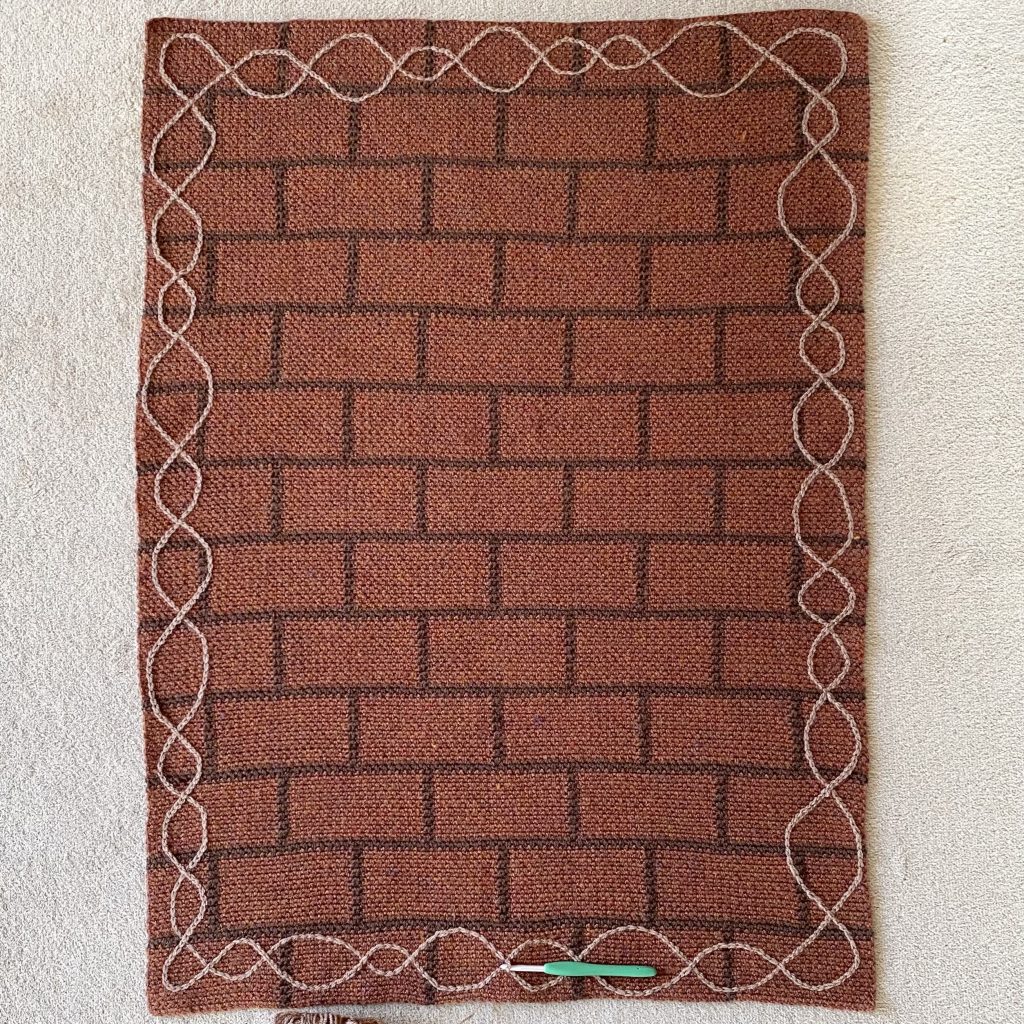
Unfortunately, with surface crochet, you can’t really give specific instructions as to where to insert your hook to make the perfect path. Ideally, for these vines, you just want to create organic, wavy lines that go all the way around the perimeter of the blanket.
When I made my blanket, I used the mortar lines as a general guide- I tried to keep my lines largely within the outer bricks to keep the border even (though I did occasionally go a little way past them, just to make it look natural). Try your best to make your curves as gradual as possible- you don’t want any sharp points or corners! Otherwise, I found it easiest to just be guided by the fabric and where you can insert your hook. The first round will be the trickiest, because for the second, you can just be guided by the first to create a rough mirror image.
Ultimately (and unfortunately), this stage of the blanket involves lots of unavoidable, mini decisions. If you’re worried about this, you can always make yourself a guide by using lengths of yarn to map out your surface crochet path beforehand. If you lay the yarn on top of the blanket, you’ll be able to get an idea of what your vines will look like and adjust the waves/position to your liking. You can then use lockable stitch markers/safety pins to mark the peaks and troughs of each wave, to guide you as you crochet.
Pattern
Because of the complexity and discretionary nature of surface crochet, this written pattern is not extensive or overly specific. It should be referred to in conjunction with all of the above information- together all of these elements form a complete tutorial for the surface crochet vines on the Bridgerton House Baby Blanket.
Materials & Tools
- Stylecraft Special DK in the shades Mocha (for the wisteria branches) and Khaki (for the rose vines). For a breakdown of approximate yarn quantities needed for this project as a whole, please see the ‘Master Material List’ on the original Bridgerton House Baby Blanket post.
- 5.5mm hook (for the surface crochet).
- 4mm hook (for working into the surface crochet).
- Darning needle.
- Scissors.
Surface Crochet Vines: Written Pattern
Round 1 (surface crochet): Using a 5.5mm hook, join Mocha yarn for surface crochet. Working in surface crochet, make a continuous wavy line around the perimeter of the blanket (see Pattern Note below).
Round 2 (surface crochet): Continue with Mocha yarn and a 5.5mm hook and work another continuous wavy line of surface crochet, creating a rough mirror image of the first line.
Round 3: Using Mocha yarn and a 4mm hook, work into the surface crochet from round 1. (Ch 1, ss) into each stitch around. When you come to the end of the round, cut the yarn and follow the above instructions on ‘Seamlessly Joining a Surface Crochet Loop’, working under Round 3, instead of the surface crochet, to join the round.
Round 4: Using Mocha yarn and a 4mm hook, work into the surface crochet from round 1. (Ch 1, ss) into each stitch around. Whenever you come to an intersection point between the two vines, continue working in pattern over the top of the round below. When you come to the end of the round, cut the yarn and follow the above instructions on ‘Seamlessly Joining a Surface Crochet Loop’, working under Round 4, instead of the surface crochet, to join the round.
Round 5 (surface crochet): Using a 5.5mm hook, join Khaki yarn for surface crochet. Work in surface crochet, making a continuous wavy line around the perimeter of the blanket, weaving the khaki vine over and under the wisteria branches (see instructions above). When you come to the end of the round, cut the yarn and follow the above instructions on ‘Seamlessly Joining a Surface Crochet Loop’.
Pattern Note
For rounds 1-2, you can either complete each round individually, joining a new thread of Mocha yarn and fastening it off after each round (using the above instructions on ‘Seamlessly Joining a Surface Crochet Loop’) OR you can work continuously. If you want to do this, please refer to the following instructions:
- When attaching the Mocha yarn for Round 1, join the yarn at an intersection point (about halfway between what will become a wave peak and trough). If you haven’t mapped out your path and are just freehanding it, I recommend joining the yarn at a centre point of a brick.
- When you come to the end of Round 1, insert your hook for your final surface crochet stitch into the first surface crochet stitch (i.e. between the legs of that first stitch).
- To start Round 2, insert your hook a stitch’s distance away, perpendicular to the path of the round before (to make the intersection point)Work all the way around, then follow the instructions for ‘Seamlessly Joining a Surface Crochet Loop’ to fasten off the yarn.
Final Thoughts
Once you’ve completed all 5 rounds of crochet, you’ll be left with a fully vine-d blanket, ready for all of your appliqué florals and leaves! Like I said, if you’ve never done it before, the surface crochet technique will seem quite counterintuitive and weird, but, once you get used to it, it’s a really useful skill to have under your belt!
As I mentioned in the last post, I’m not super experienced at writing crochet patterns, so please do let me know if you run into any problems with this and I will do my best to help you out! I’ll see you next week for Part 4!
Gemma
xxx