Disclaimer: This is a kit review. I purchased the .pdf download kit (which comes with 2 balls of yarn) for this project independently and all views expressed are my own. Obviously, this post will not repeat any of the specific crochet instructions from the original pattern for copyright (and general morality) reasons. I have made this review solely for the purpose of documenting my own experience with the pattern and helping others to consider whether it is the right pattern for them. All prices mentioned are correct at time of writing (May 2023).
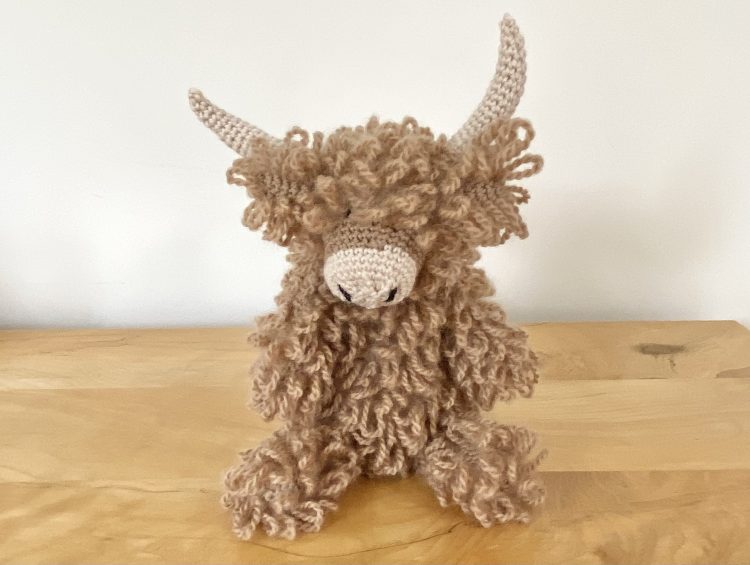
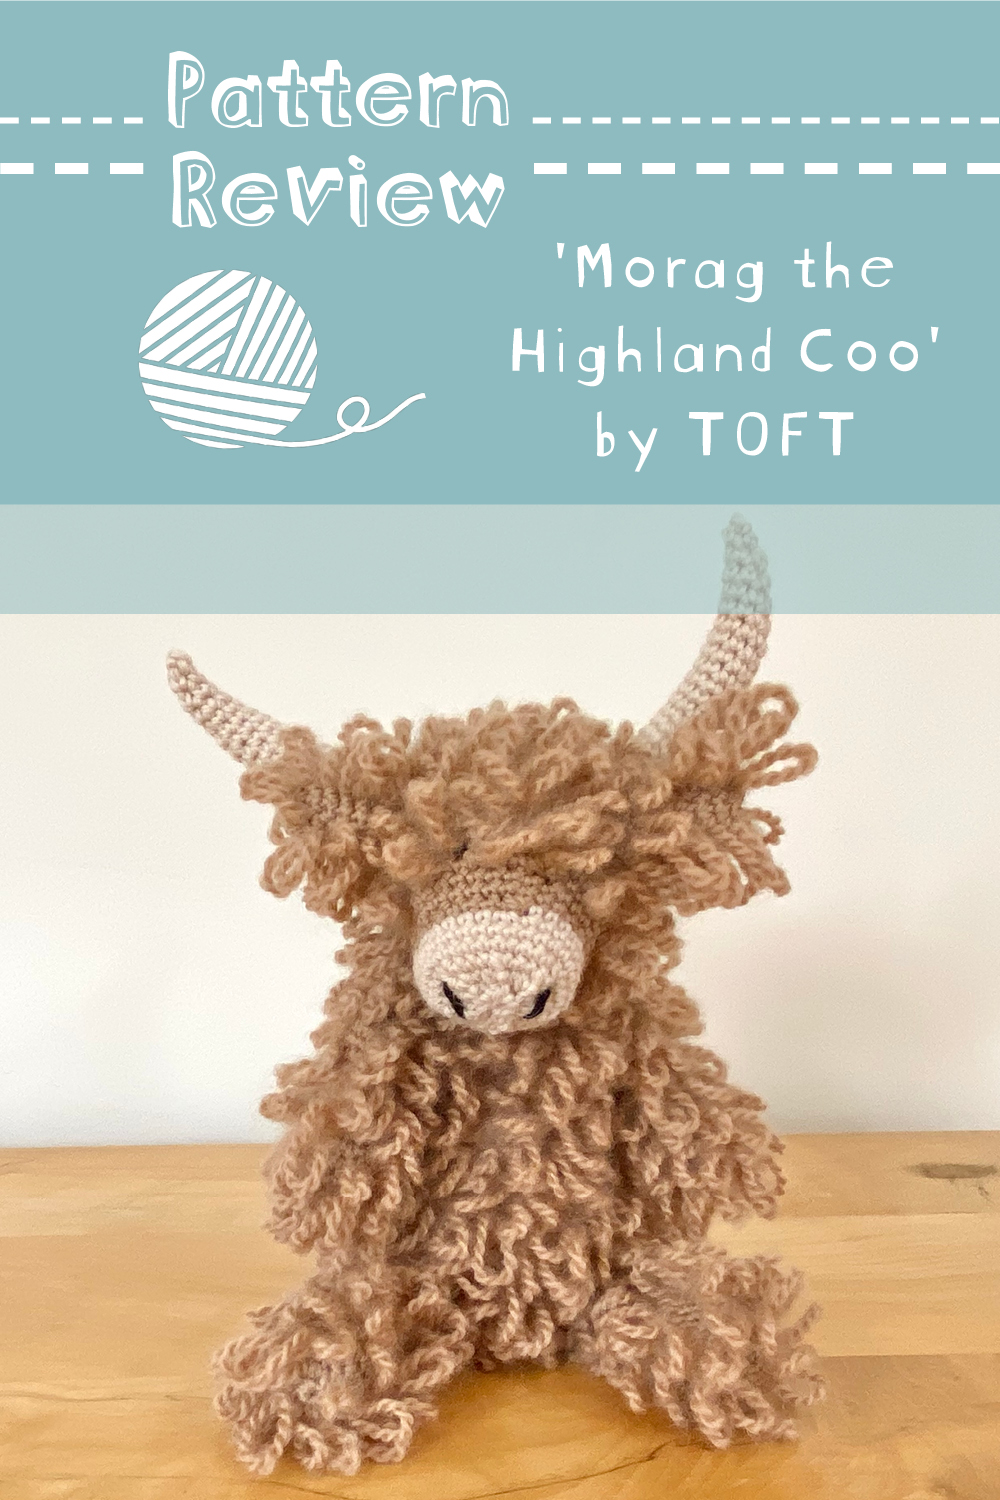
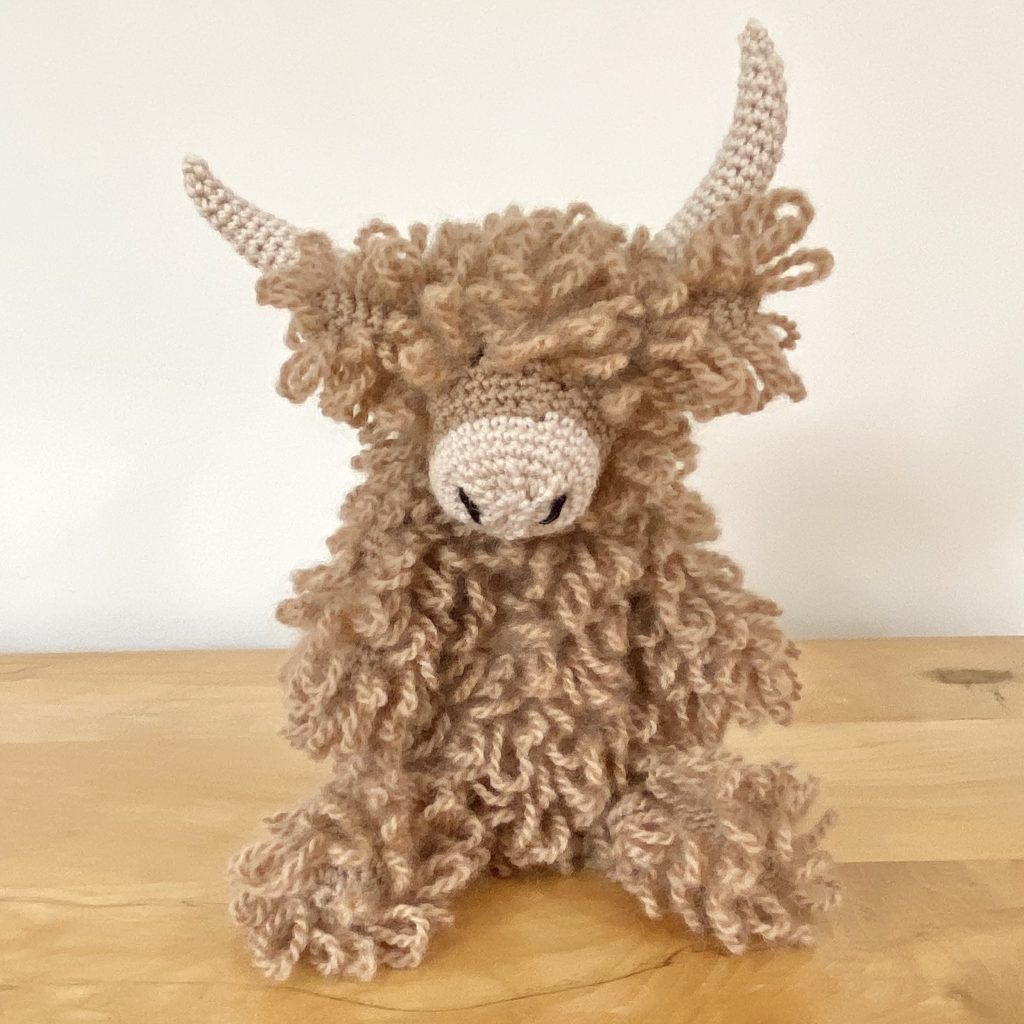
I first saw the TOFT kit for Morag the Highland Coo (many years ago) in John Lewis. I fell in love. I mean… it’s so cute! At the time, I was put off by the £30 price tag, but I did dream about the coo for a long time afterwards. This year, I finally gave in and bought (a slightly different version- more on that later- of) the kit. Today, I’ll be reviewing both the kit and pattern, as well as discussing my experience making my coo. I hope this will be helpful to anyone considering buying the kit themselves, or anyone who may be struggling with it.
You can buy the Morag the Highland Coo kit here, from the TOFT website.
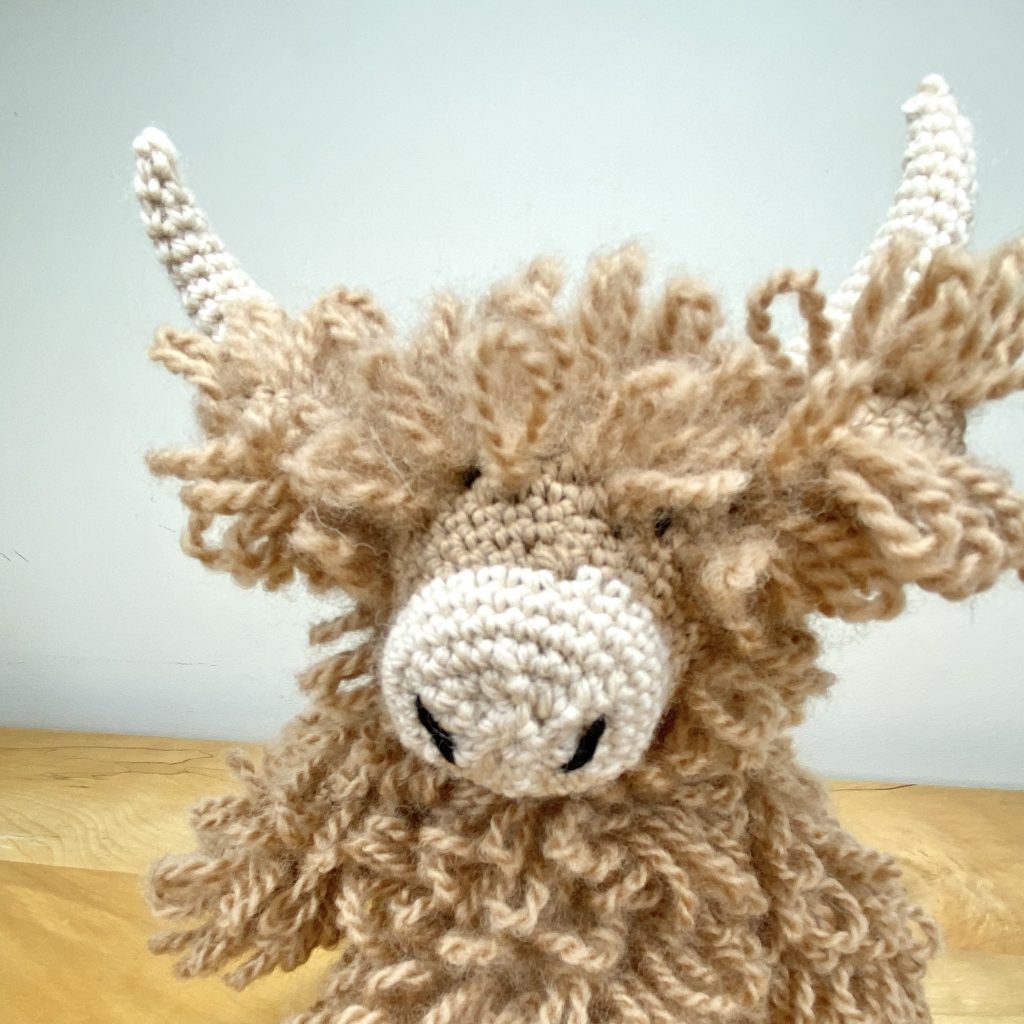
Table of Contents
- Complete Kit vs .pdf Download
- Price
- Yarn
- Thoughts on the Pattern Overview
- Thoughts on the Pattern
- Sewing Up
- Final Thoughts
Complete Kit vs .pdf Download
As I said in the introduction, I was initially put off by the £30 price tag for this kit. When I finally bit the bullet and purchased the kit direct from TOFT, it was at the lower (but still pretty steep, I feel) price of £25. At first, I thought this price drop was simply the result of buying direct from TOFT, but the two kits are actually different- in fact, TOFT has two separate products on their website: the complete kit (£30) and the ‘.pdf download’ (£25), which I bought. I have summarised the differences in the table below (these prices are for the regular-sized coo – prices vary for the different sizes).
| Complete kit | .pdf download | |
| Price | £30 | £25 |
| Main colour yarn | 100g DK (12 colour options) | 100g DK (12 colour options) |
| Contrast colour yarn | ‘A length’ DK (13 colour options) | 25g DK (13 colour options) |
| Black yarn | ‘A length’ | – |
| 3mm crochet hook | ✓ | – |
| Yarn needle | ✓ | – |
| Toy stuffing | ✓ | – |
| Pattern | Physical and digital – all 4 sizes included in 1 pattern | Digital only – all 4 sizes included in 1 pattern |
| ‘Getting started’ advice leaflet | ✓ | – |
Keep this in mind if you are planning to buy a TOFT kit- you’ll get very different packages based on which kit you order and it’s quite easy to not notice the distinction on the website. When you go to the coo page on the TOFT website, there are 3 drop down boxes. The first 2 are for your colour selections, while the final box asks you to select either .pdf pattern or complete kit.
Price
TOFT sells individual 25g balls of DK weight yarn for £6 each and 100g balls for £18. That means, for the .pdf download kit, you’re paying £24 for the yarn and £1 for the pattern, but will have had to, at some point, buy the other components needed. For the complete kit, you pay £18 for the main colour of yarn, plus £12 for the additional black and mushroom yarn, the hook, the yarn needle, the stuffing, the physical and digital pattern and the advice leaflet. We can also work this out a little more specifically: TOFT charges £3 for one of their own crochet hooks, £1 for a wool needle and £6 for a bag of premium toy stuffing (though I doubt you get a whole bag’s worth in the kit). The kit doesn’t specify how much you get of each extra yarn colour, but I would assume it is less than 25g of the nose colour and only a tiny bit of black, considering the price. You’ll pay a little extra for the benefit of a printed pattern, but otherwise it seems the kits are fairly standard across their pricing. There doesn’t seem to be much monetary benefit to buying one kit over the other.
Yarn
I made my highland coo in the regular size (there are 4: small, regular, large and giant), so I was using the TOFT DK yarn. I used the shades Camel (for the main colour) and Oatmeal (for the nose colour), which is the same colour scheme that is used for the promotional photos- both on the website and on the front of the kits.
I thought the yarn itself was very nice. It’s 100% wool, which does make the £25+ price tag (a little) less shocking, and it gave a lovely fluffiness to the finished coo. It is rather split-y, which isn’t the most fun when you’re doing something as intricate as amigurumi crochet, but it wasn’t unbearable. In fact, that same split-y nature actually helps the finished coo to look fluffier, because it helps the loops loosen out a bit.
I did, however, have quite a lot of yarn leftover after I finished my coo. Because I got the .pdf download version of the kit, I received 1x100g ball of Camel and 1x25g ball of Oatmeal. After finishing my coo, I had 27g (just over a quarter) of Camel and 18g (over half) of Oatmeal left. Obviously, with crochet kits it’s much better to have leftover yarn than to not have enough- but just be aware that you will probably be paying for more yarn than you need.
Thoughts on the Pattern Overview
Let’s start with the overview on the TOFT webpage. There are 2 things I want to comment on: the difficulty rating and the approximate time required. TOFT has 3 difficulty ratings for their patterns:
| 1 | Complete Beginner | Projects at this level are suitable for complete beginners who have never crocheted before and just require learning one or two types of stitch. |
| 2 | Easy | Projects at this level involve simple techniques and are a great next step for anyone who can understand a beginner pattern. |
| 3 | Intermediate | Projects at this level involve additional more complex techniques and are suitable for confident beginners or those with a little more experience. |
The pattern for Morag the Highland Coo is rated 3 – Intermediate, which is the highest level of difficulty. I would argue, however, that the term used for this ranking is a little misleading. I have quite a lot of experience in both crochet in general and amigurumi specifically, but I found this pattern to be very much on the difficult side. That is not (necessarily) a reflection on the pattern, more on the techniques that are required to make this coo look like its best coo self. I understand that the term ‘intermediate’ is probably used to encourage crocheters of all abilities and make the kit feel more accessible, but I do feel that it is not quite the right descriptor. I definitely do not think this kit would be suitable for a confident beginner (at least not one who did not want to end up in frustrated tears). Don’t get me wrong- making this coo is completely doable, but I do feel like the pattern underestimates its own difficulty a little bit!
The other thing from the webpage that I did just want to highlight is that the approximate time required is listed as 1-5 hours. I am a pretty quick crocheter, but there is no way I could make and assemble this coo in 1 hour. All in all, my coo took me about 4-5 hours. I think a more realistic approximate time required would be 3-6 hours.
Thoughts on the Pattern
Let’s talk about the pattern itself. All-in-all, the pattern is clear and laid out in a way that makes it easy to follow. If you’re making this coo, I would definitely recommend checking out the YouTube videos linked in the pattern (clicking any of the circular pictures in the ‘Basic Techniques and Stitches’ section will take you to the corresponding video- it took me longer than I care to admit to figure this out). With the videos, the techniques become much easier to pick up. I do wish that some of the written instructions for the specific techniques were a little bit more comprehensive (I’m looking at you, loop stitch and chain tail), independent of the video tutorials. I really relied on the videos for those two techniques, in particular.
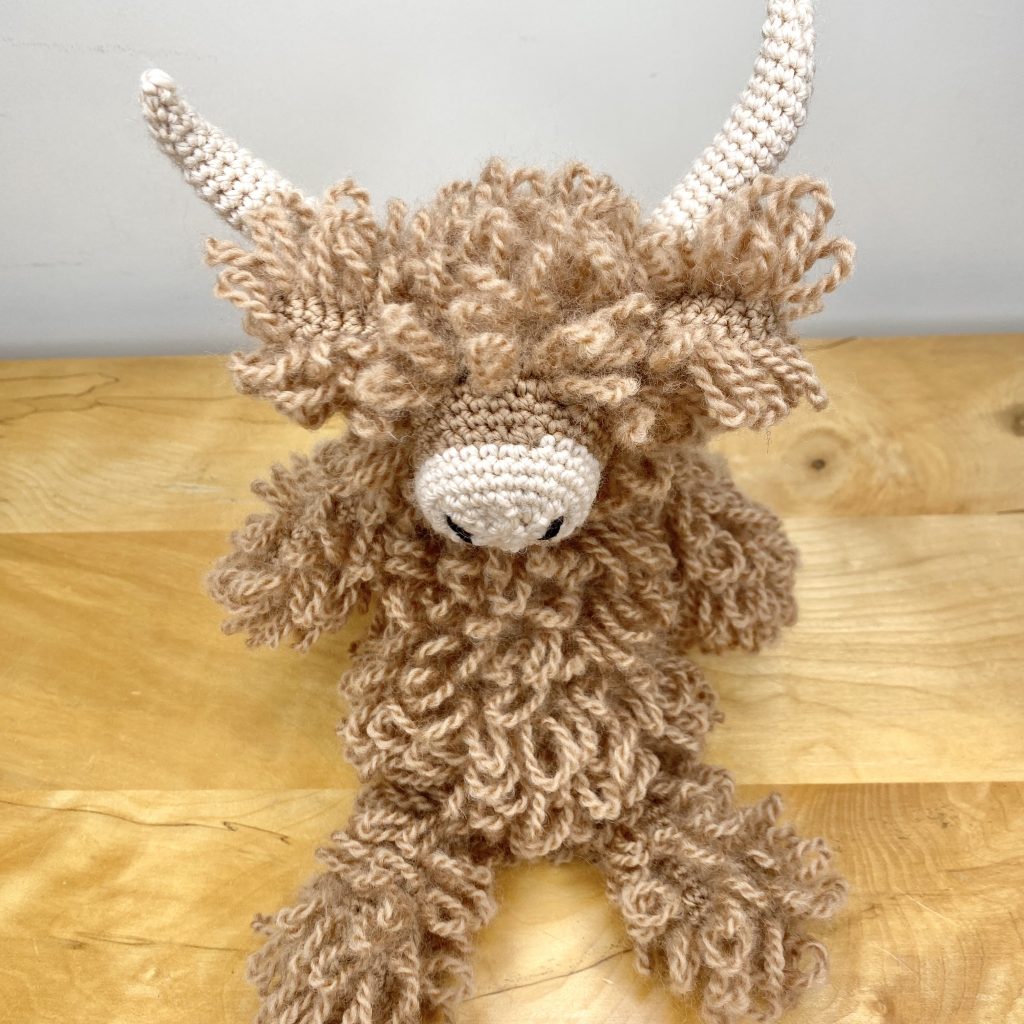
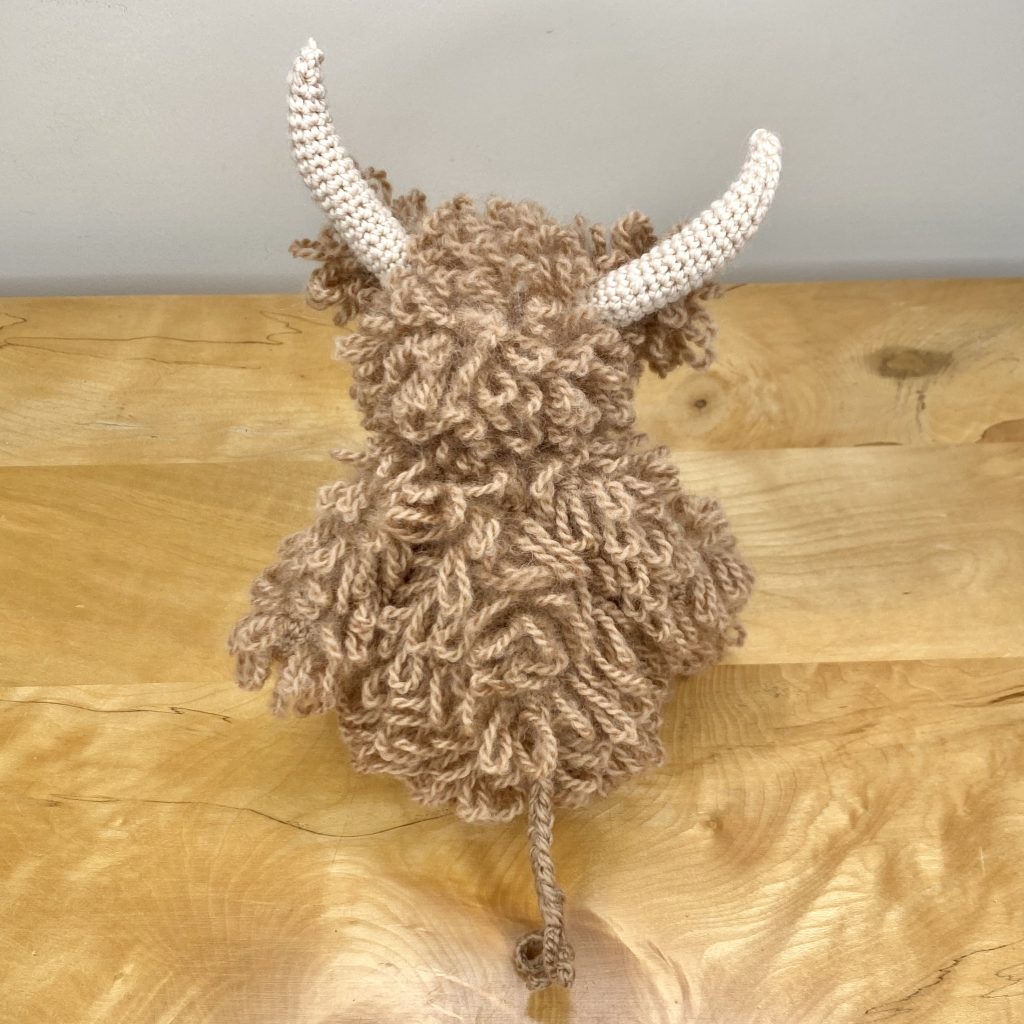
On the topic of loop stitches… I despise them. Obviously, this isn’t at all a criticism of the pattern- the loop stitches are essential for turning a regular ol’ cow into such a CUTE highland coo. And yet… Oh. My. God. I love crochet. Love it! But those loop stitches made me reconsider that love. It’s the loop stitches that make this project much more difficult than an average amigurumi project, both because they are a bit finicky to do and because they make it so much harder to sew up the coo (more on that later). You make so many loop stitches, however, that the finicky-ness does subside after a while. The problem that persists, however, is that the counting for the loop stitches and the counting for the increases/decreases in a round seldom line up, so you have to keep two counts in your head at the same time (again, I feel this would be particularly challenging for a beginner, who would inevitably have less experience counting within rounds anyway). It feels a little like patting your head and rubbing your stomach. This is not to say the loop stitches are not achievable, but they are the main reason why I feel that this pattern underestimates its own difficulty.
Sewing Up

In the face of all the excellent elements of this pattern- the cuteness of the finished coo, the clear layout and the helpful video links, I can’t help but feel that the sewing up instructions let it down a little. TOFT has an incredibly wide range of different patterns that all use the same basic format, so it makes sense that the sewing up page is very generalised, because it is designed to apply to multiple different projects (remember, as well, that you do only pay about £1 for the pattern itself). However, I did find myself wishing that some details from the ‘Sewing Up’ page were included on the specific pattern page and that there were more detailed, specific instructions for sewing up. Let’s talk about those two things now.
The process described in the ‘Finishing’ section on the ‘Sewing Up’ page is a fairly standard gathering technique. While I do appreciate the in-depth instructions for this, I would have also liked to see a simple instruction for that process at the end of the pattern for each body part within the coo instructions- just one line, so that the pattern can be followed directly, rather than needing to read that page (which comes after the pattern) beforehand. In terms of construction, I did struggle with my coo’s neck being quite weak- a concern that is highlighted in the TOFT sewing up videos and that I have seen discussed by many other makers. If I were to make this coo again- I would consider finishing the body after Rnd 28 and not gathering it, which would give you a clearer guide for where to sew the head to the body and, ultimately, a wider neck.
The one element this pattern is fundamentally missing is a set of detailed instructions for sewing up the coo specifically. I would have loved to have seen a step-by-step guide that explained how to position the ears and horns that are specific to the coo, as well as how and where to embroider the nostrils(/eyes? Even now, I’m not sure if my coo is supposed to have eyes or not? I gave it some, because it felt wrong not to, but I can’t for the life of me tell if the ones in the official photos have eyes!). TOFT has a great video explaining where to position the legs, arms and head, but the animal-specific elements fall a little by the wayside. Again, the loop stitches rear their ugly heads at the sewing up stage- they make sewing on elements SO MUCH MORE difficult. I normally don’t mind sewing up toys, but this one was not fun. One of the main issues was that the TOFT softies have a slightly bulging ‘tummy’, which has to be at the front to aid balance and general cuteness. However, with the coo, the loop stitches make it incredibly hard to find said tummy. Even now, I’m not sure if my coo is back to front or not…
Final Thoughts
Overall, I think this pattern makes for a super cute highland coo, which, ultimately, means that in my book, it’s a success! However, I did find this project difficult, even with my experience making crochet toys. For the most part, that difficulty was caused by the loop stitch- an unavoidable evil, unfortunately (even if it does make for an adorable coo…). If you have never done the stitch before, I would definitely recommend watching the TOFT video on the stitch, and playing around with it a bit beforehand to get comfortable!
I would recommend this pattern to pretty experienced crocheters, who have sewn up crochet toys before, because, as a result of both the loop stitches and the minimal sewing up instructions, this is not the project to be learning how to assemble amigurumi. However, the finished product is pretty unique- in fact, I haven’t seen a crochet pattern for a sitting highland coo that is as iconic and cute as this one at any point during my research. Using this pattern will reward you with the coo, as advertised, even if the process involves quite a bit of loop stitch-induced rage (definitely not speaking from experience…).
In terms of value, both variations of this kit are definitely on the pricier side. I would argue that the complete kit is a little bit better in terms of value for money, but, at the same time, it would be pointless to spend an extra £5 if you, like me, already had the stuffing, tools and black yarn on hand. If you were purchasing this as a gift for someone, though, I would recommend getting the complete kit, in case they don’t have one or more of the necessary components.
Finally, I’d just like to reiterate that I made this review purely with the intention of supporting other crocheters who, like me, want to make/are struggling with making Morag the Highland Coo. While I did have a few issues with this kit, I still absolutely loved my finished coo and am hugely in awe of the ability of Kerry Lord from TOFT to put together such a cute pattern.
Gemma
xxx