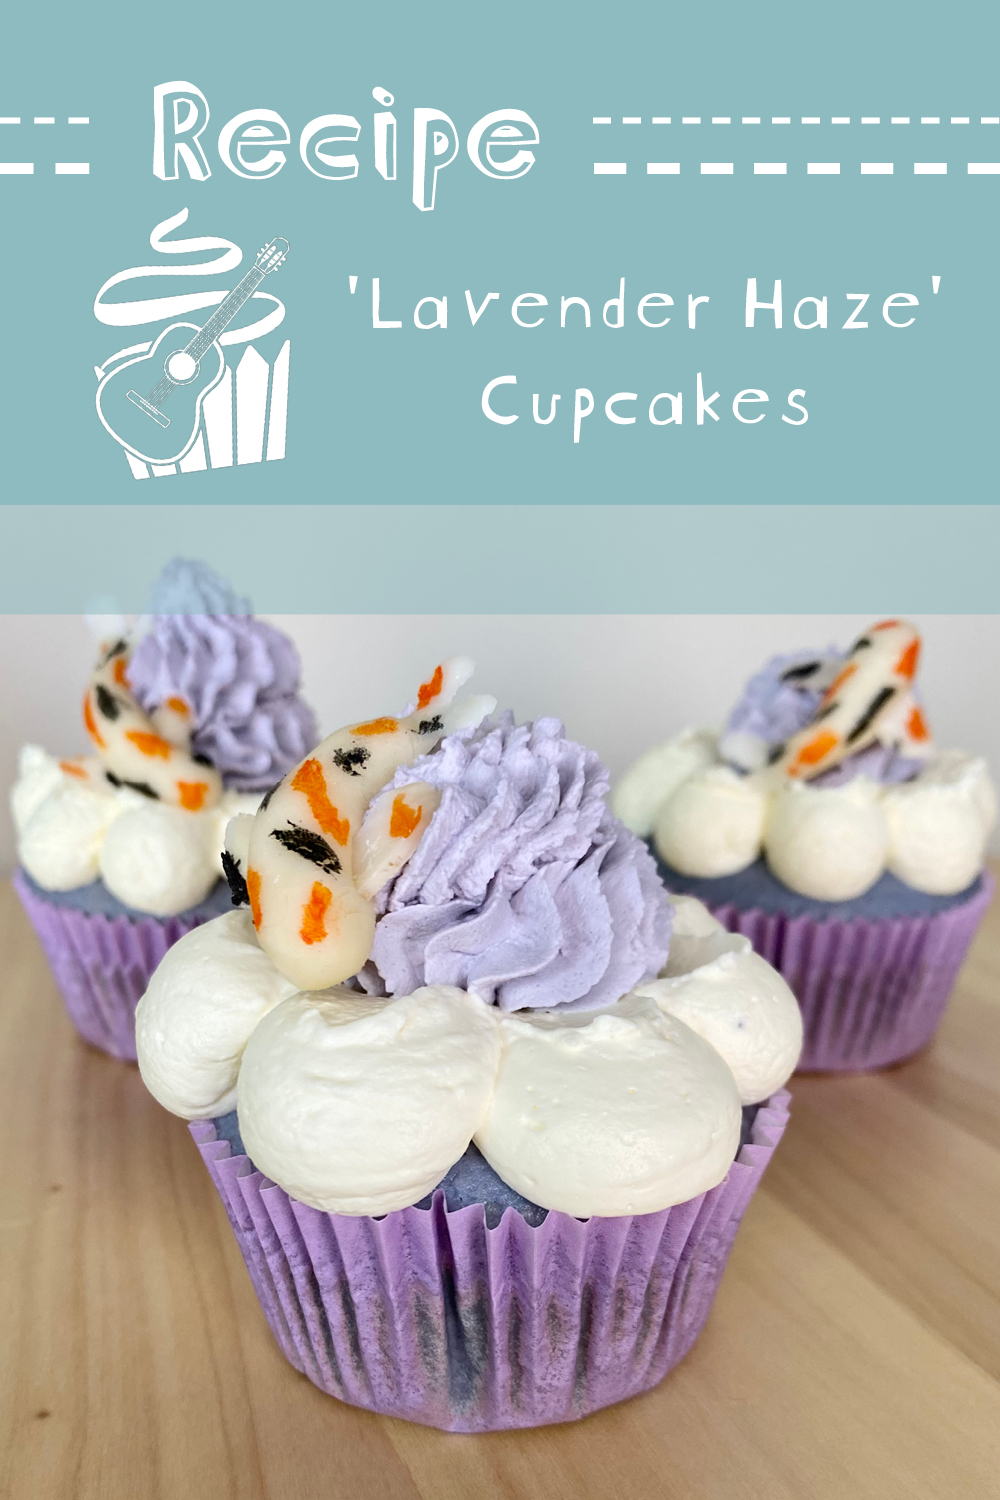
This post is the first in an upcoming series on the blog: Taylor Swift Cupcakes! I’ve always been a big fan of Taylor Swift’s music, so, throughout this series, I’ll be making cupcakes inspired by her songs. To start with, I’ll be going through her most recent album, Midnights, track-by-track. Today, I’m bringing you a recipe inspired by Track 1: Lavender Haze, and its music video.
Let’s get into it, shall we?
Table of Contents
- The Lavender Haze Cupcake: Explained
- Cold Infusion vs Hot Infusion
- How to Make Chocolate Koi
- The Reverse-Creaming Method
- Food Colouring 101
- Whipped Cream Icing
- Decorating the Cupcakes
- Recipe
The Lavender Haze Cupcake: Explained
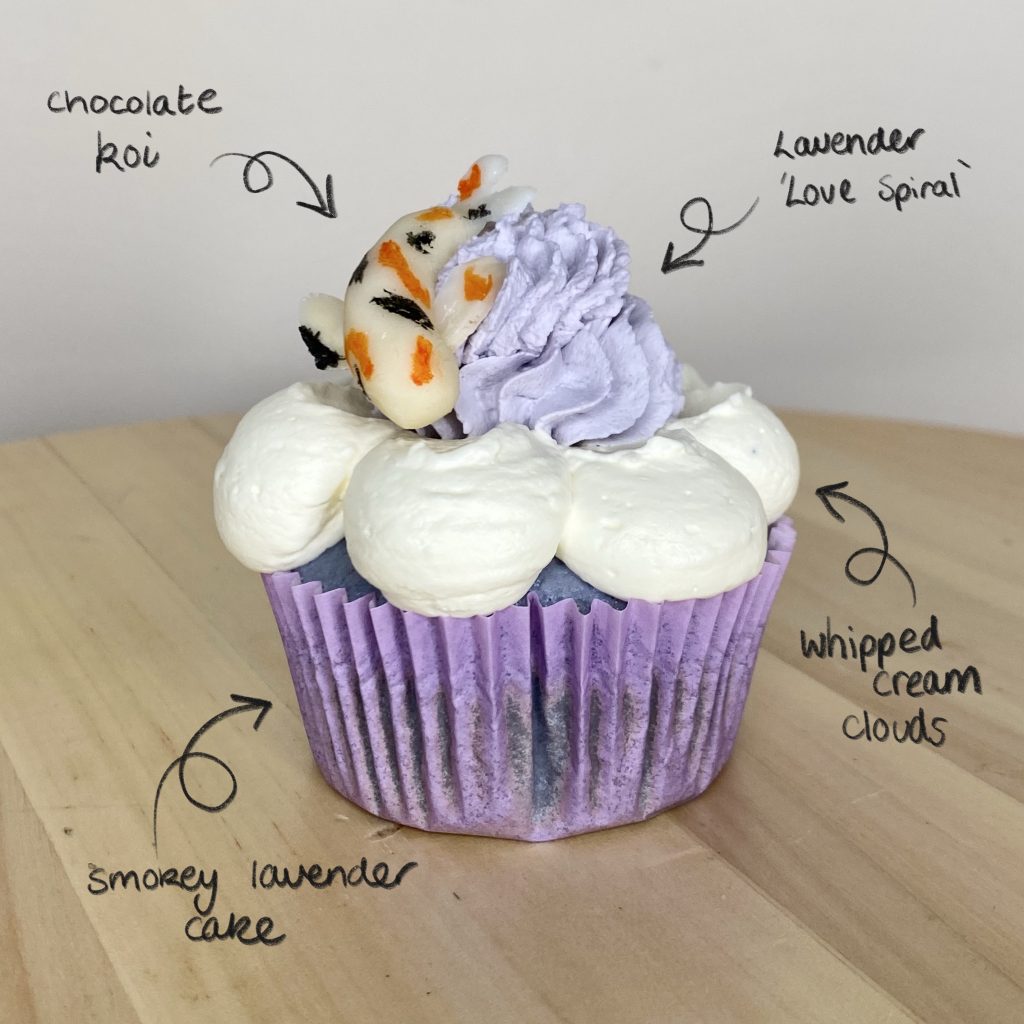
The Lavender Haze Cupcake has 3 main elements:
- Smoky lavender cake
- Smoky lavender whipped cream icing
- Chocolate koi decoration
Obviously, these cupcakes absolutely had to be flavoured with lavender. I mean- the song is literally called Lavender Haze. In the music video, the titular ‘haze’ is portrayed as a smoky purple mist- so, to get that ‘hazey’ vibe, I wanted to introduce a smoky element. To do that, I used lapsang souchong, which is a smoked tea. The combination of lavender and lapsang souchong makes for quite a mature flavour- think floral and a little musky. These cupcakes won’t be for everyone, much like how both lavender and lapsang souchong aren’t for everyone. However, I think the (admittedly, slightly unusual) combination of flavours embodies the song perfectly, so you should definitely give it a try!
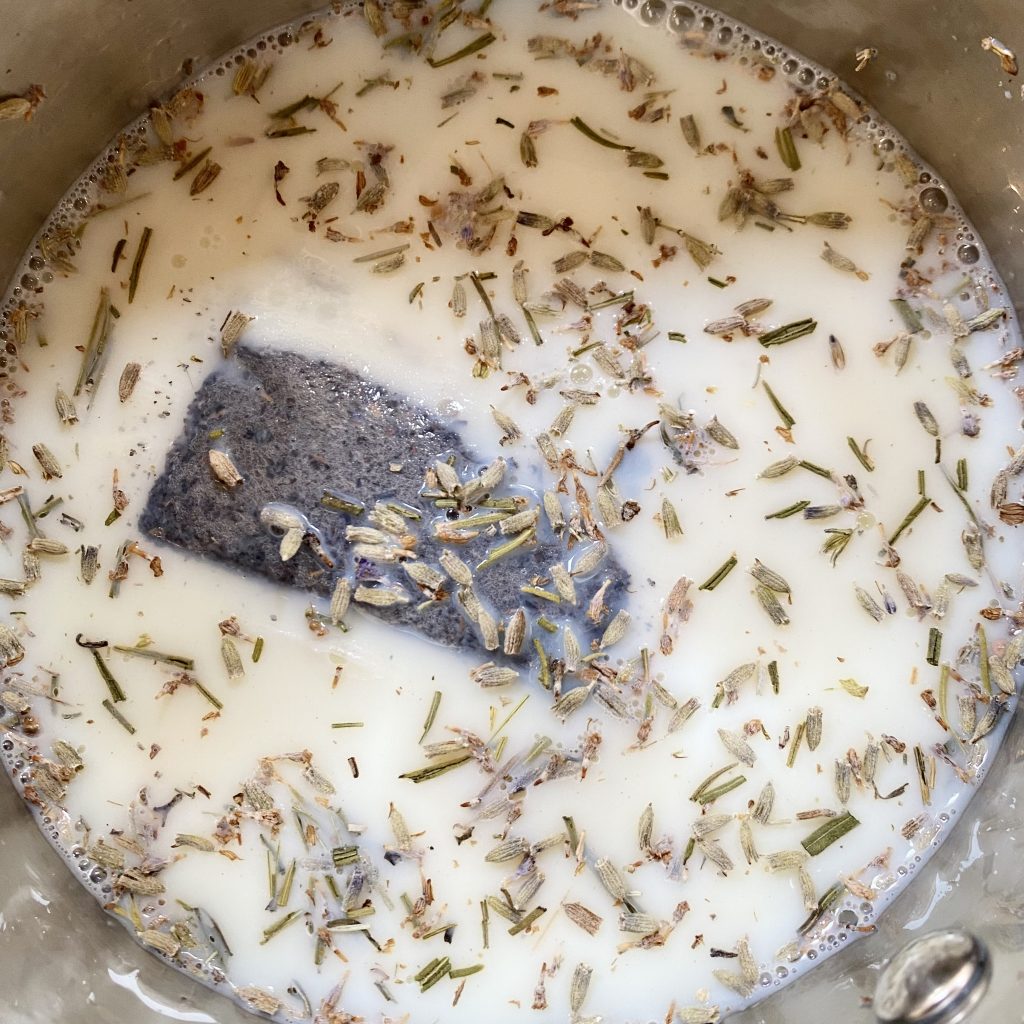
To get the flavours into these cupcakes, I infused the milk (for the cakes) and the cream (for the icing). To get the best results, I did this in two ways: hot infusion (the more standard method) and cold infusion. More on that later.
Instead of a typical buttercream, these cupcakes are decorated with infused whipped cream. I think this is the perfect topping for 2 reasons: firstly, whipped cream is inherently so much lighter and airier (dare I say… hazier?) than buttercream. As a result, it just fits with the vibe I was going for with these cupcakes. Secondly, the cold-infused whipped cream really helps to lift the flavours in the cake, making it the perfect topping for these cupcakes. I find the whipped cream icing gives these cupcakes a fresher, lighter taste, making them even tastier!
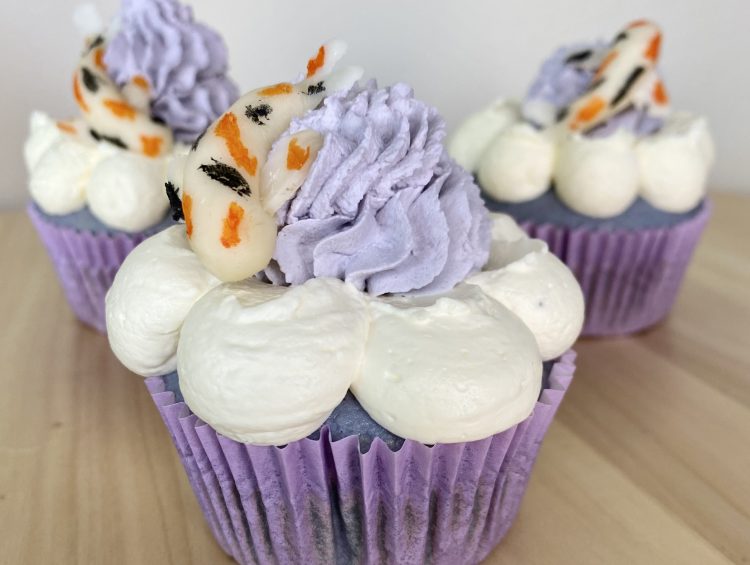
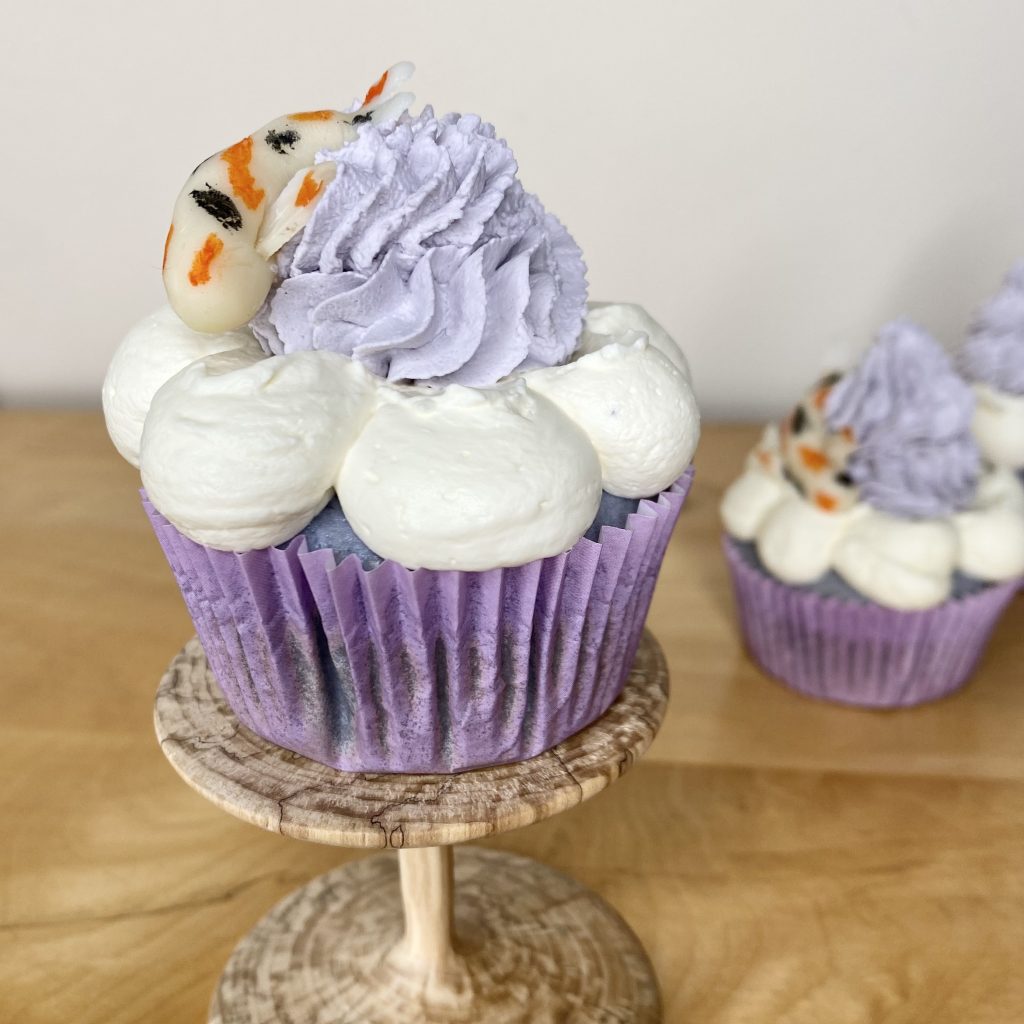
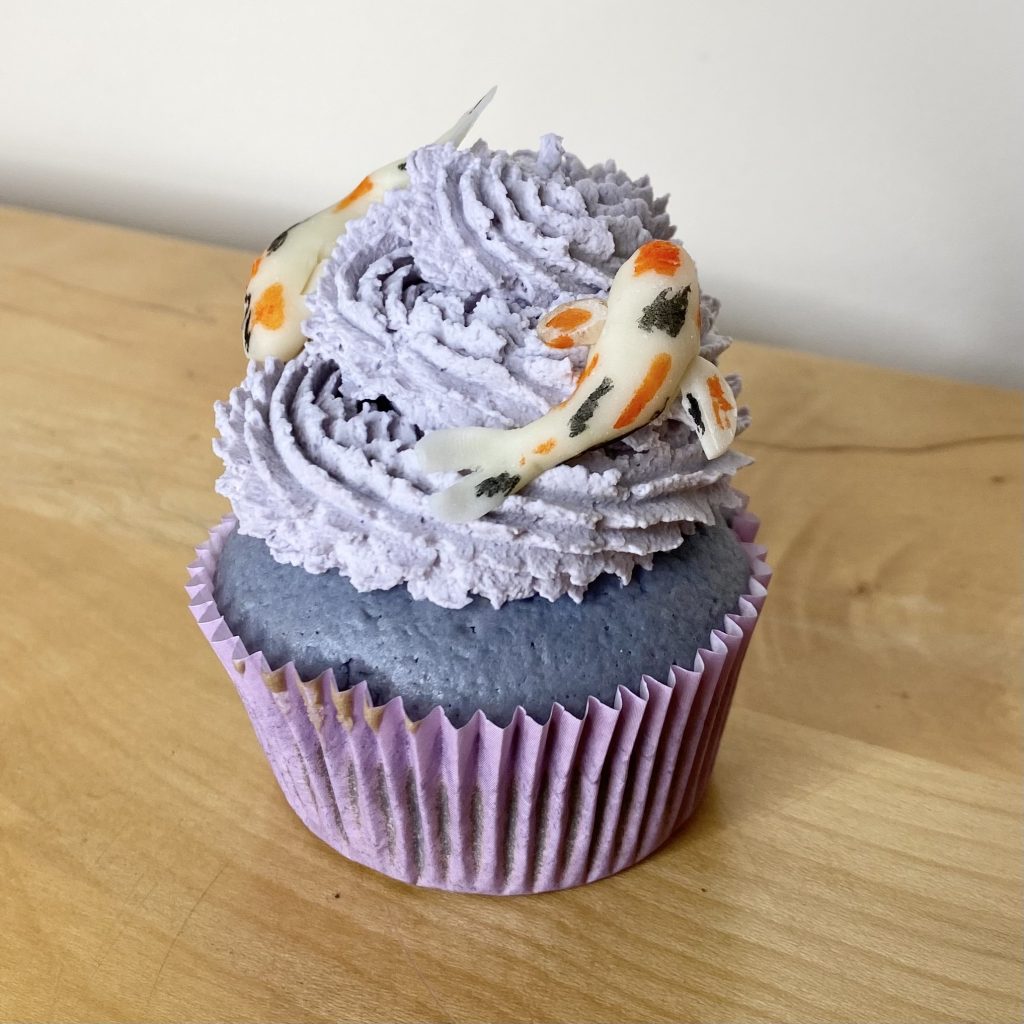
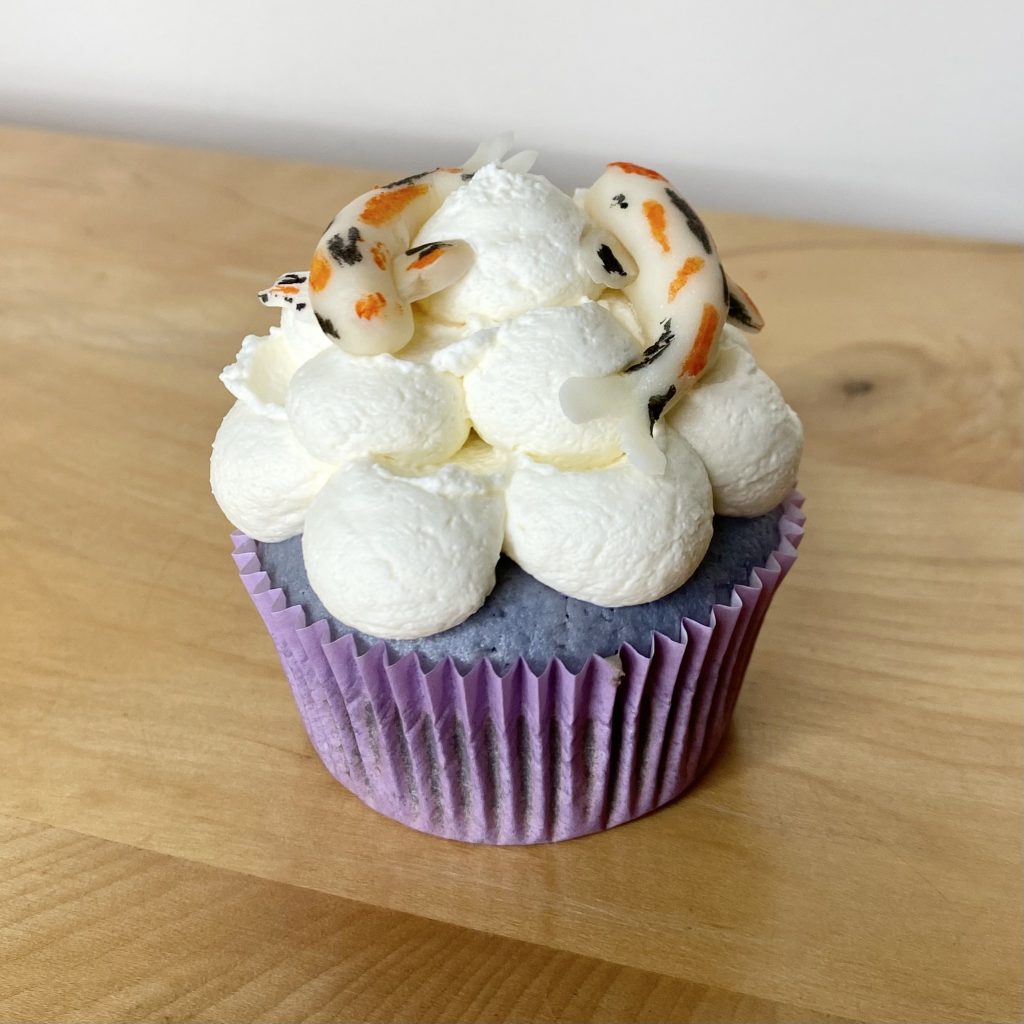
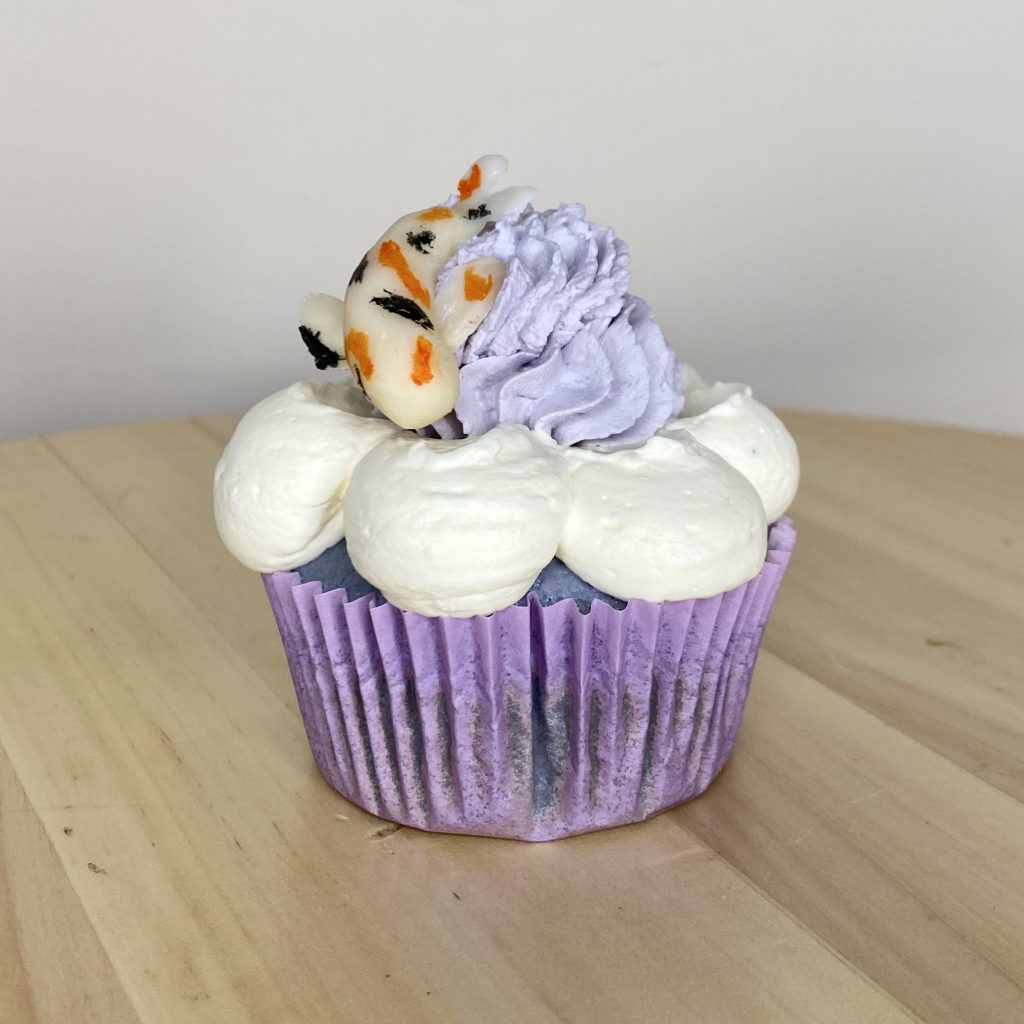
The decoration of these cakes is hugely influenced by the song’s music video- particularly the scene in which Swift sits among clouds, surrounded by floating koi (strange, yes, but we roll with it).

Even though the koi themselves appear to be an Easter Egg for the release of Speak Now (Taylor’s Version), I still wanted to include them on these Lavender Haze cupcakes, so I made little chocolate koi- there’s a full tutorial for this below. The cupcakes themselves are lavender-coloured (lavender/purple food colouring is a key ingredient in this recipe! You can read more on that below) and half of the whipped cream is purple too! In fact, the piping on top reflects two aspects of the song/its music video: the white ‘clouds’ (see koi scene, above) and the purple ‘love spiral’ in the middle (I even have a few different decorating variations for you!).
So, that’s the cupcakes explained. Essentially, they are smoky lavender cupcakes, topped with two colours of smoky lavender cream, decorated with chocolate koi. Obviously, you can make these cupcakes without the extra decoration (i.e. just the cupcakes and cream on top, with no food colouring), if that’s more your vibe. Now though, let’s get into some specifics…
Cold Infusion vs Hot Infusion
As I said before, this recipes uses both hot and cold infusion to get the smoky lavender flavour into the cupcakes. This is not to make life more complicated, but to ensure you get the best out of all of your ingredients! Let’s discuss the difference between the two methods first:
| Hot Infusion | Cold Infusion | |
| Method | Milk/cream + infusing ingredients combined in a saucepan, brought to just below a simmer, then left to infuse. | Milk/cream + infusing ingredients combined in a jug, then refrigerated. |
| Prep Time | Medium (heating) | Short (no heating) |
| Infusing Time | Short (approx. 15 mins) | Long (approx. 3 hours) |
| Flavour | Intense | Subtle |
For this recipe, you’ll use the hot infusion method to infuse the milk for the cupcake batter, while you’ll use the cold infusion method to infuse the cream for the whipped cream icing. Because flavours can change and become less intense during baking, it’s better to use a hot infusion for the cupcake batter. However, because the whipped cream is not baked, you don’t require as intense a flavour, so the cold infusion method can be used successfully. The benefit of using a cold infusion for whipped cream is two-fold: not only does cream whip up best when it is completely cold (meaning you’d have to chill it after hot-infusing anyway!) but, when you heat cream, you run the risk of splitting/curdling it, which would render it useless for whipping! Therefore, using both infusion methods for this recipe means you get the best flavour and the most successful results. It may seem like a bit of a faff, but, I promise, it will pay off!
One final note on the infusing process before we move on: both lavender and lapsang souchong are strong flavours. Don’t make your infusions too strong, because the delicate balance between the two ingredients is essential for these cakes. For the hot infusion of milk for the cake batter, I only leave the teabag in for 10 minutes and the lavender for 15 minutes– truly, that’s all you need! The cold infusion cream is a little more forgiving- I find 3 hours gives the perfect amount of flavour, but you can adapt this to your tastes by leaving it in the fridge for more/less time for a stronger/weaker flavour, respectively.
How to Make Chocolate Koi

My Lavender Haze Cupcakes are topped with little chocolate koi, in a nod to the song’s music video. These are actually pretty simple to make- they don’t even require any specialist tools (only some specialist ingredients)! Here’s what you’ll need:
Ingredients:
- Modelling chocolate
I used white modelling chocolate for the bodies of my koi because I love the taste (I used this brand). However, you could use any other pale, edible modelling paste, such as marzipan or fondant. You need 3g of your chosen modelling paste for each koi, and you’ll need 1 or 2 koi per cupcake, depending on how you decorate it. This recipe makes 12-16 cupcakes, so you’ll need 36-96g of paste in total (though it might be a good idea to have some extra to practise with!).
- Flaked almonds
I used flaked almonds for the fins of my koi. Admittedly, koi have a lot of fins in real life, but I settled for 2, just to give the general impression. If you need to make a nut-free version of the koi, make sure you use a nut-free modelling paste (definitely not marzipan!) and use scissors to ‘snip’ two little fins on the side of the body, which you can then flatten & shape using your fingers, instead of using flaked almonds.
For each koi, you’ll need 2x flaked almonds, but you’ll want a selection of almonds to pick from, so that you can get matching pairs. Because the koi are so small, you’ll need to pick out the smaller almonds to get fins that are in proportion to the body!
- Edible ink markers in orange and black
The koi in the Lavender Haze music video are white with black and red/orange splotches. To achieve that look, I used these edible ink markers by Sugarflair, in the shades Liquorice and Tangerine. Using edible ink markers gives you more control and means that your koi are less likely to stain your mouth when you eat them, but you can substitute them with regular or powdered food colouring, if you prefer.
- Icing sugar
Because you’ll be working with modelling paste, you’ll need a little bit of icing sugar for dusting your work surface and hands throughout the process.
Equipment:
- Small, sharp knife
- Baking tray lined with greaseproof paper
Step-by-Step Instructions:
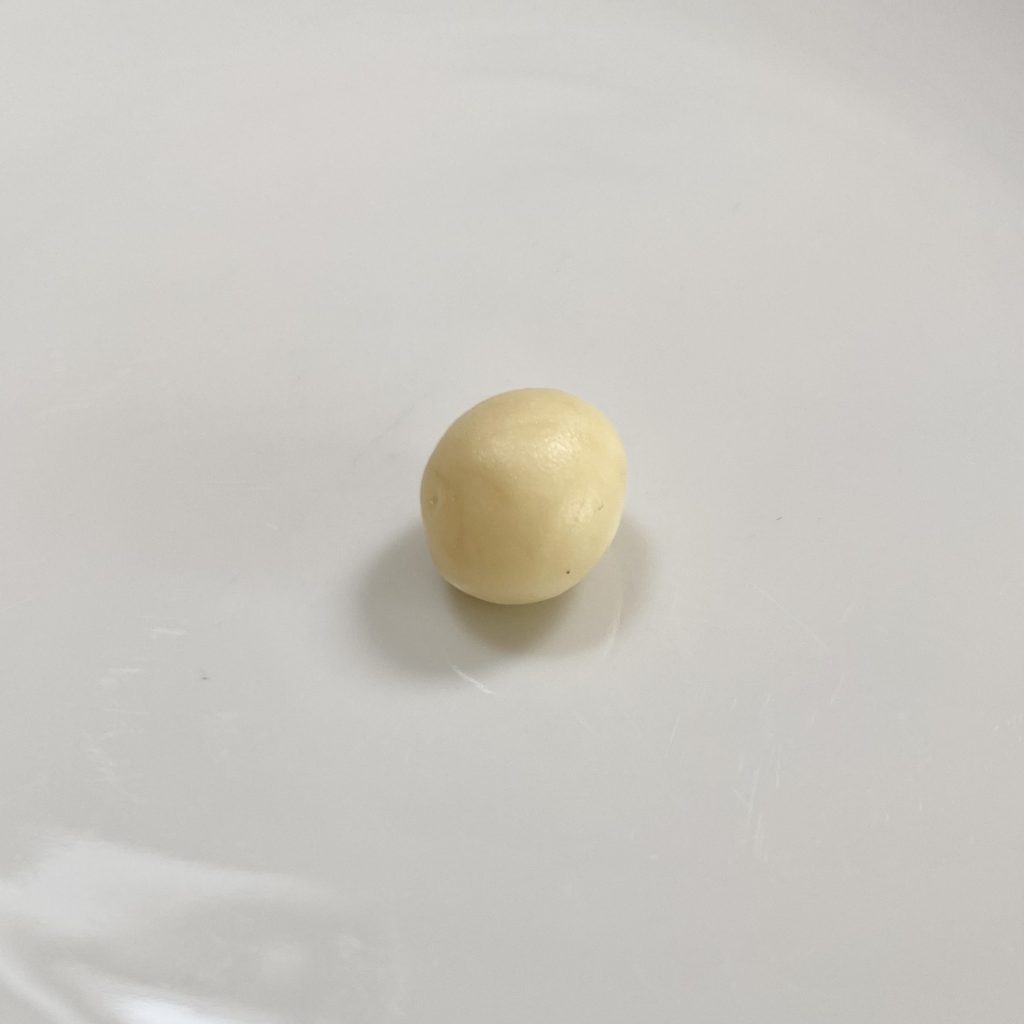
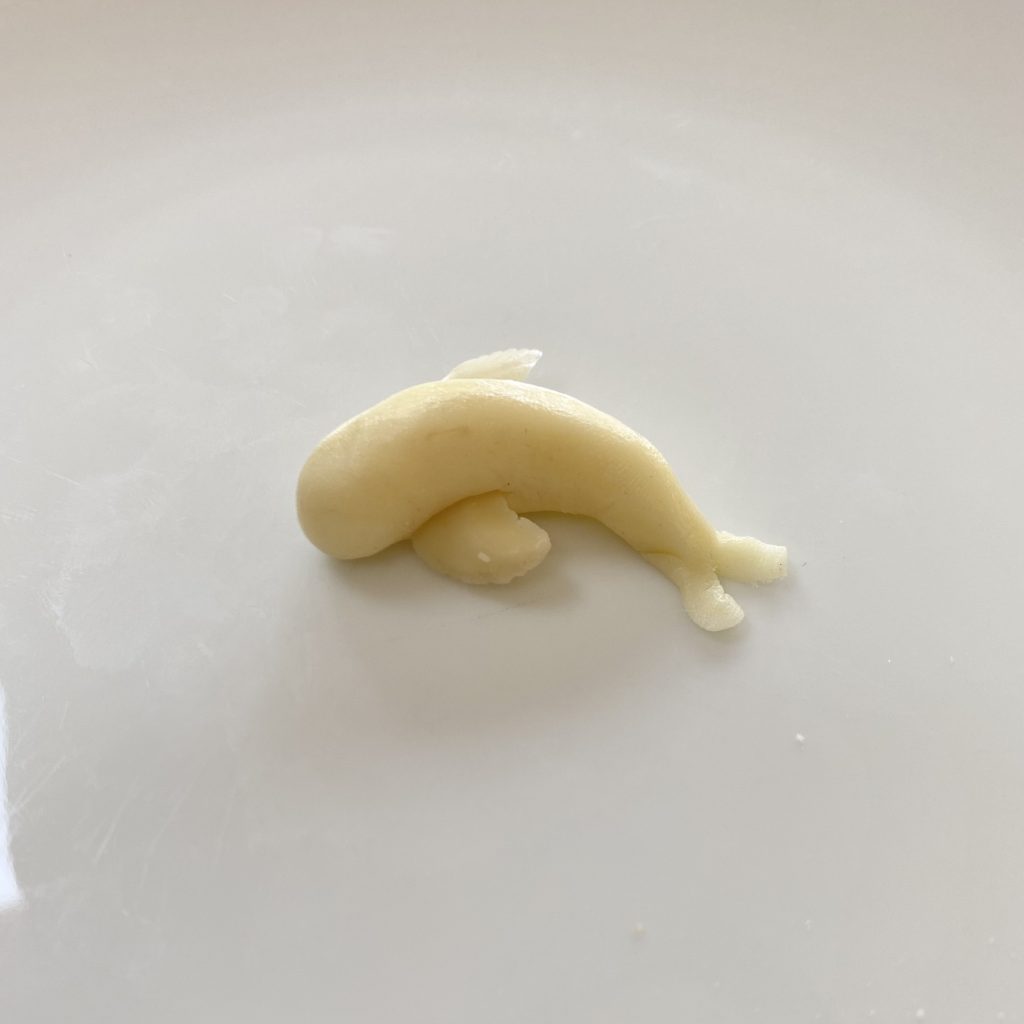
1. Weigh out 3g of modelling chocolate for the body. Knead on a clean surface, dusted with icing sugar, until smooth, then roll into a ball between the palms of your hands.
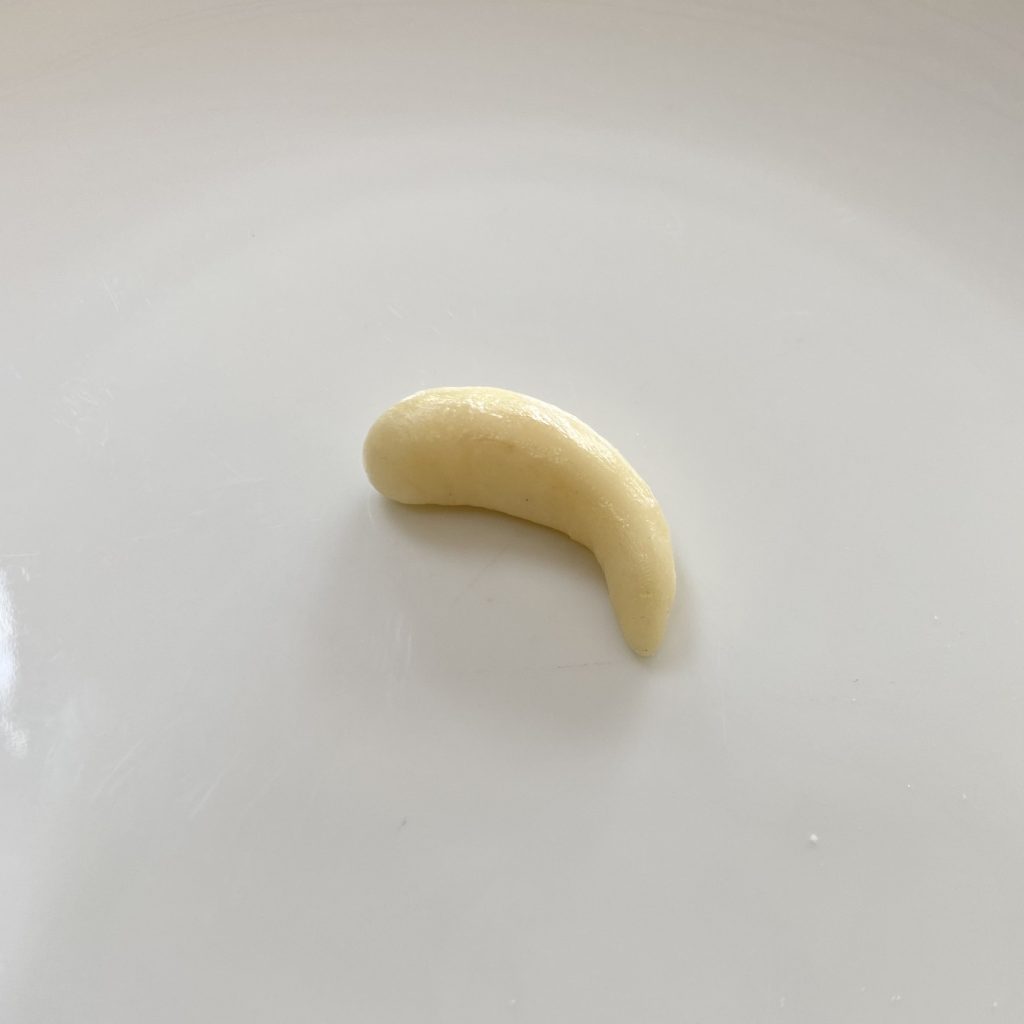
2. Roll the ball into a sausage shape, tapering one end slightly. Curve the tapered sausage slightly.
3. Use your finger to press down on the very end of the tapered part of the body, to flatten out the tail. Carefully peel the koi off of your work surface and dip the underside of the tail into some more icing sugar, to prevent further sticking.
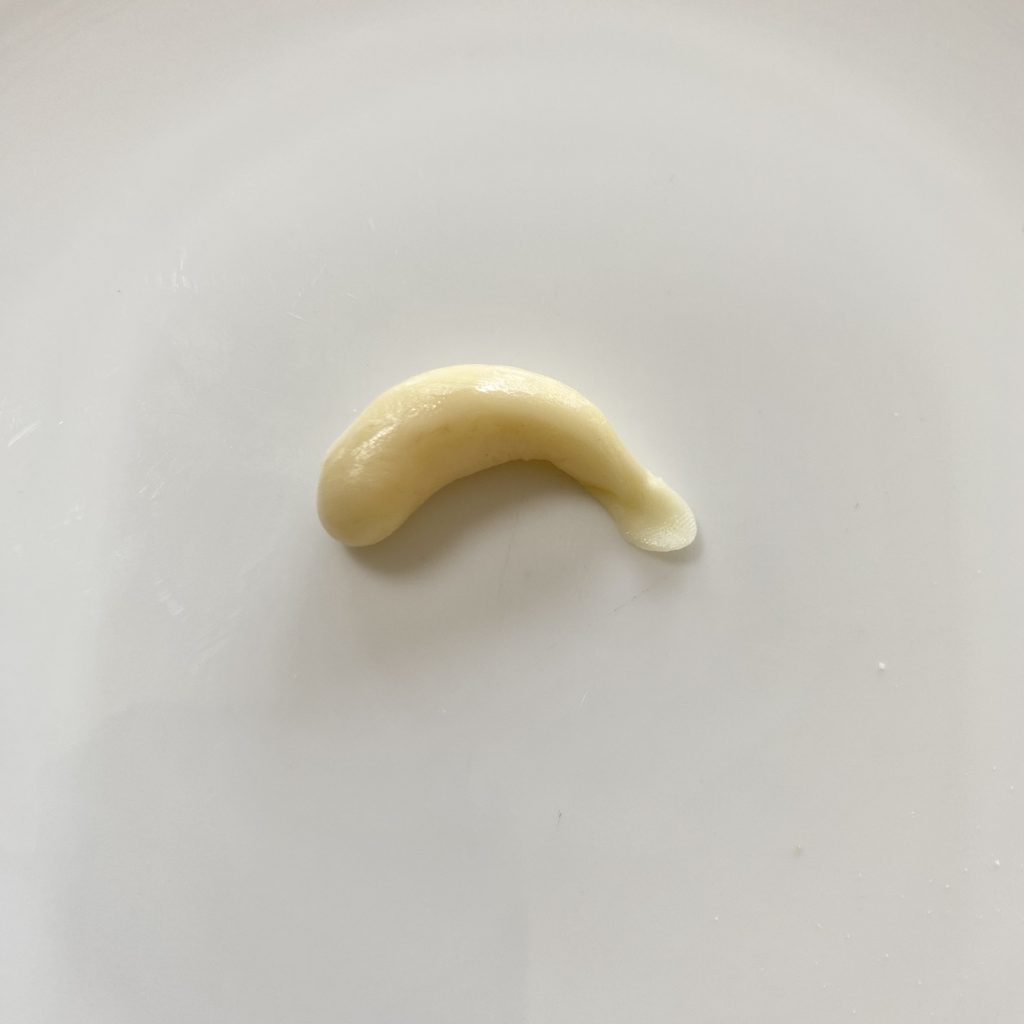
4. Use a small, sharp knife to make an incision in the flattened tail, separating the tail into two fins.
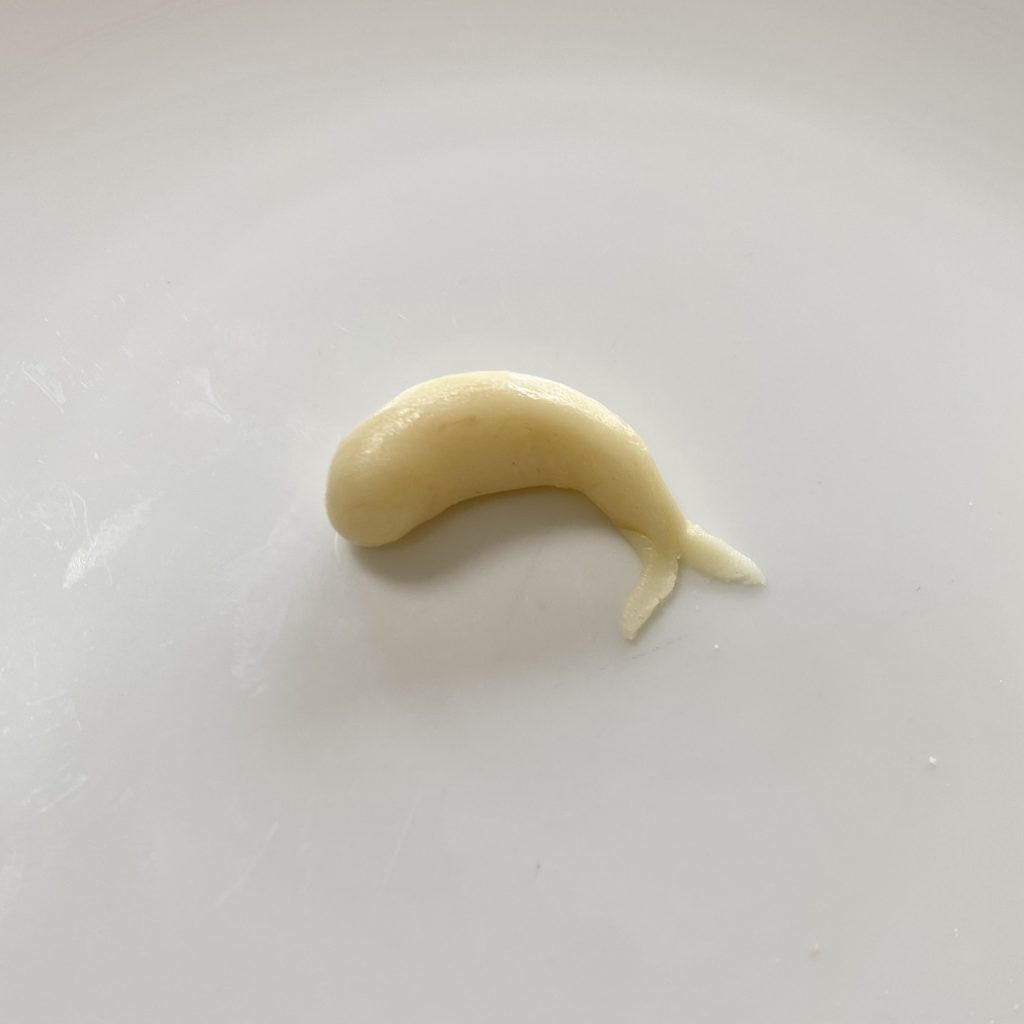
5. Select two similarly-sized and shaped flaked almonds for the fins. Gently press one into each side of the thicker part of the body. Set aside on a baking tray lined with greaseproof paper to dry out a little while you make more koi.
6. Once you have made all your koi bodies, you can add colour. Starting with the orange edible ink marker, scribble little patches of colour randomly over the body and fins of each koi. Set aside to dry for 10-15 minutes.
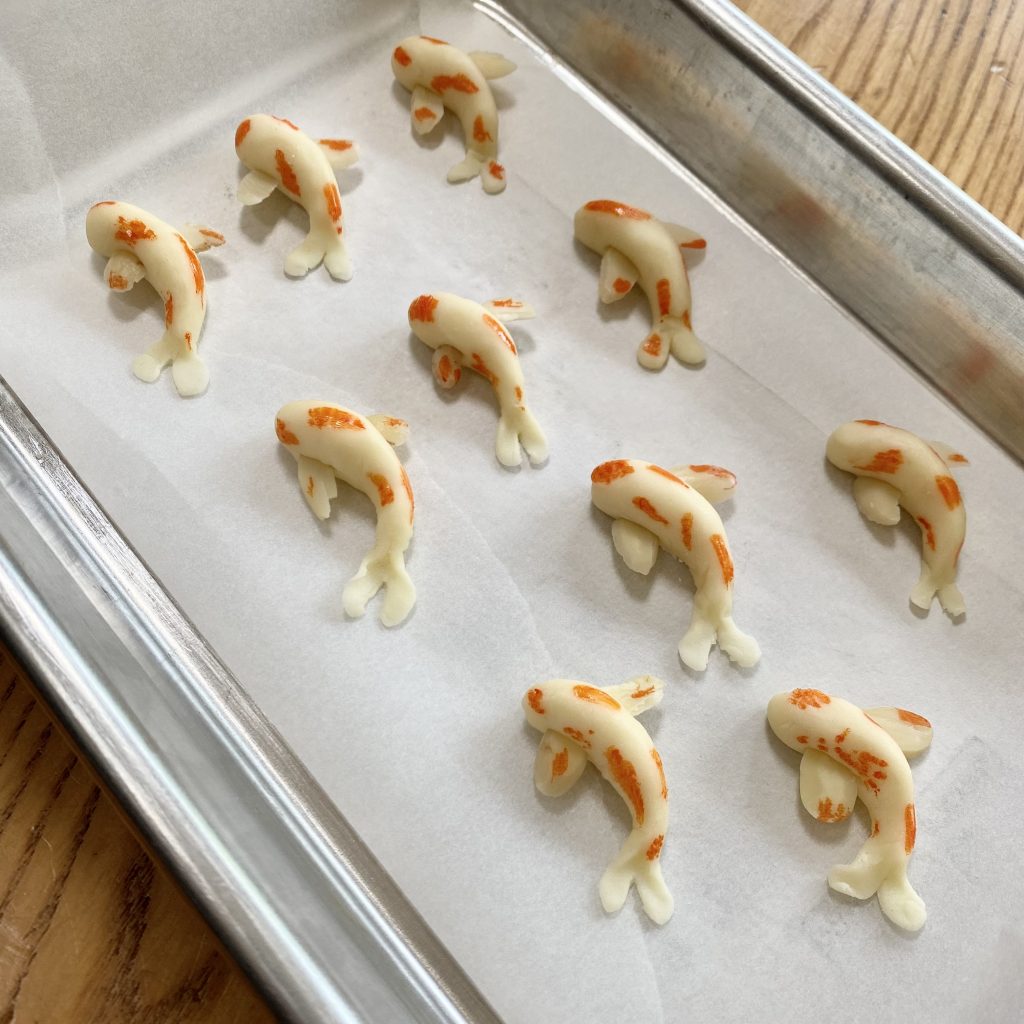
7. After the orange colour has dried for 10-15 minutes, repeat the process with the black edible ink marker. Set aside to dry for at least 30-40 minutes before using to decorate cupcakes.
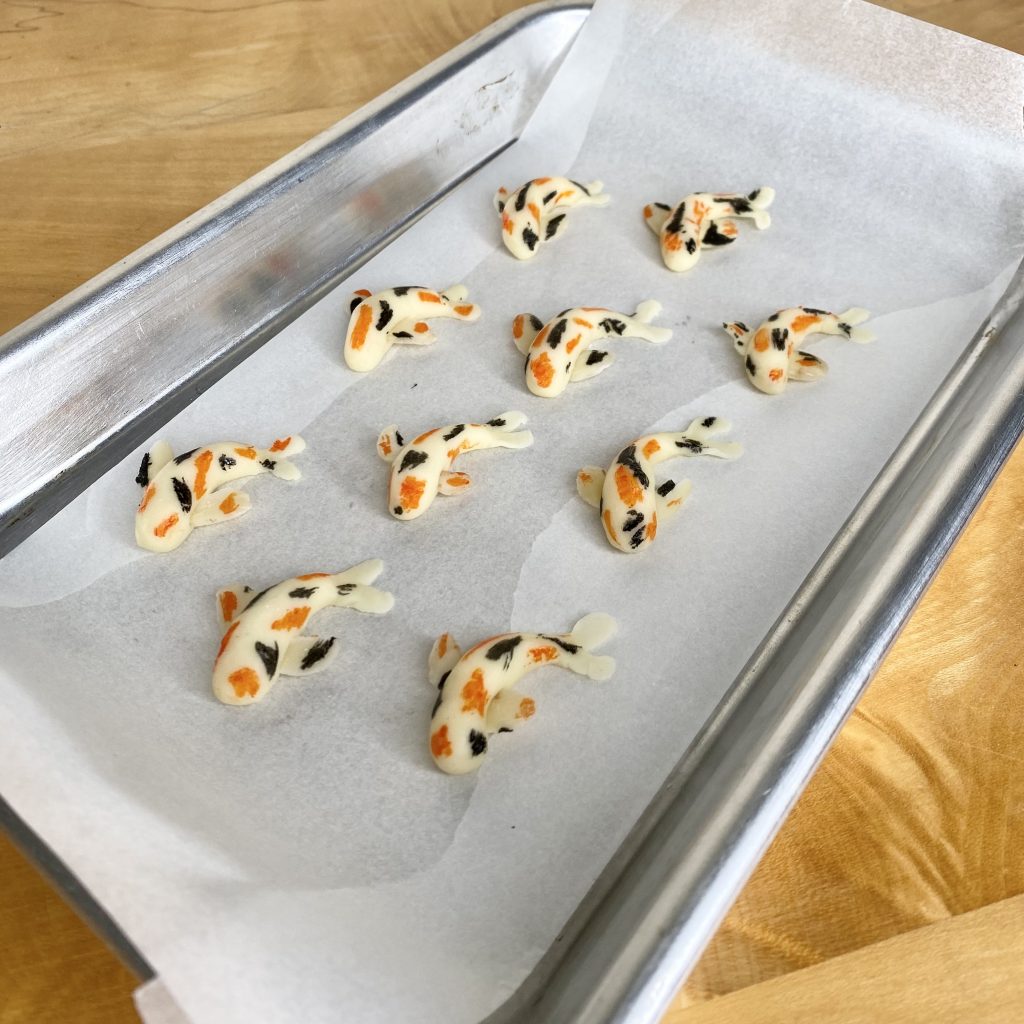
And there you have it! Handmade chocolate koi- ready to decorate your cupcakes with. These may seem a little fiddly at first, but with a bit of practise, you’ll be making them super quickly!
The Reverse-Creaming Method
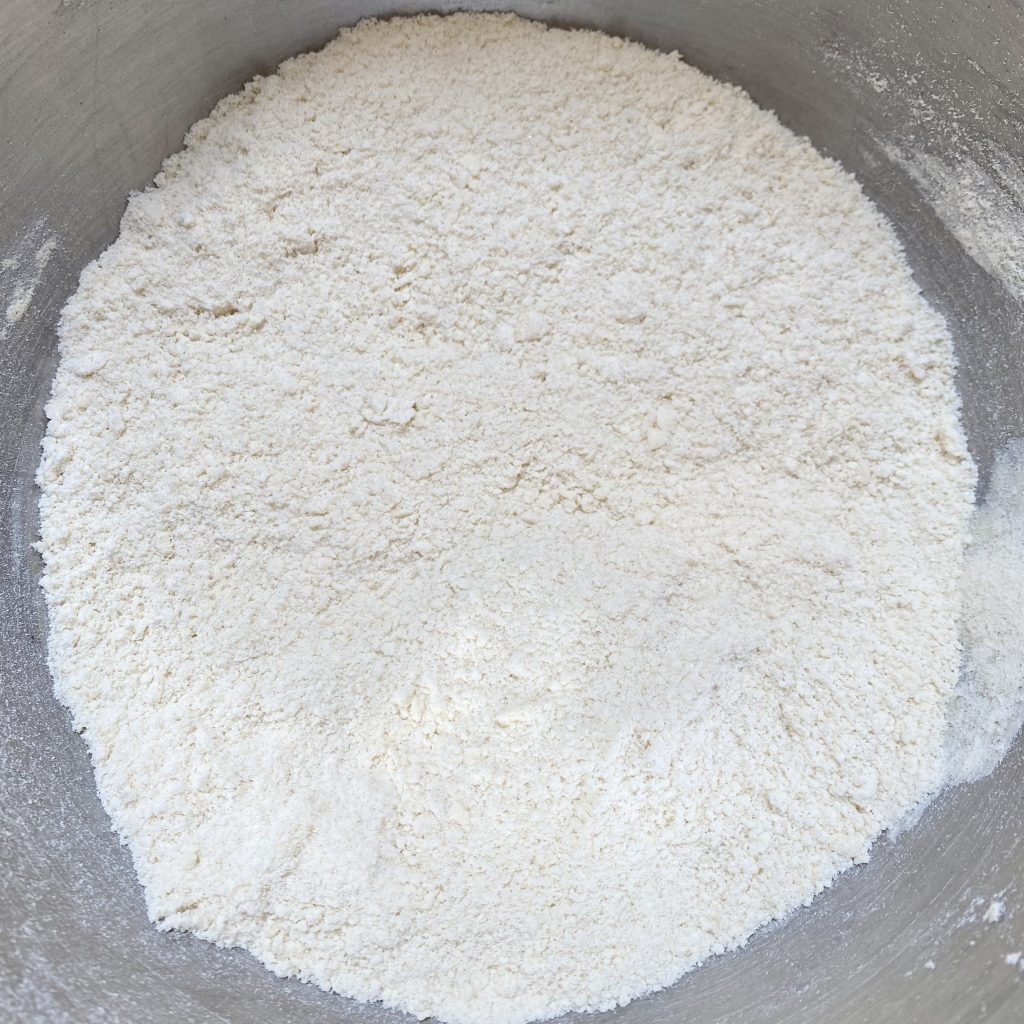
These cupcakes are made using the Reverse-Creaming Method. Typically, when you make a cake, you cream the butter and sugar together until light and fluffy, beat in the eggs, then fold in the remaining dry ingredients. With reverse-creaming, the process is flipped on its head. You start by mixing the butter into the dry ingredients (plain flour, caster sugar and baking powder), until the mixture resembles fine breadcrumbs, like this:
In a separate jug, you whisk together milk, eggs and vanilla, which you then pour into the butter/dry ingredient mixture in a slow, steady stream, with the mixer on low, before turning up the speed and giving the batter a final beat to smooth out all the lumps. The end result is a super easy, moist cake that is slightly denser than a typical sponge. I learned about the reverse-creaming method from The Scran Line, but it was popularised by Rose Levy Beranbaum in 1988.
While I usually use the standard creaming method for my cakes, I opted to use the reverse-creaming method for this recipe for a couple of reasons. Firstly, recipes made using the reverse-creaming method naturally have a larger quantity of milk in them. Because the infused milk is vital to this recipe and because it’s much easier to infuse a bigger quantity of milk (as opposed to a couple of tablespoons) without wastage, having more milk suits this recipe perfectly. The second reason is that I wanted the cakes themselves to be purple. Because cakes have a high sugar content, they tend to brown around the edges/top when baked, which obscures any colour used in the batter. You can get around this by baking your cakes at a very low temperature for longer- this recipe calls for 35-40 minutes at 140°C- a very low oven for cakes (this is another tip I learned from The Scran Line). The moister cupcake given by the reverse-creaming method can handle that low, slow bake much better than a typical sponge, which might dry out!
Although I learned about reverse-creaming from The Scran Line, I wasn’t crazy about the cake recipe from that website- it was a little too dense and tough for my taste (it did, however, look INCREDIBLE- no browning whatsoever AND a super smooth top and bake). Instead, I adapted the cooking time of this recipe, by Benjamina Ebuehi. These ratios, plus the low, slow cooking time, gave me the moistest, easiest cupcake that retained its purple colour during baking. It caramelised slightly more than The Scran Line’s recipe, but not so much that I was willing to sacrifice the delicious texture.
Food Colouring 101
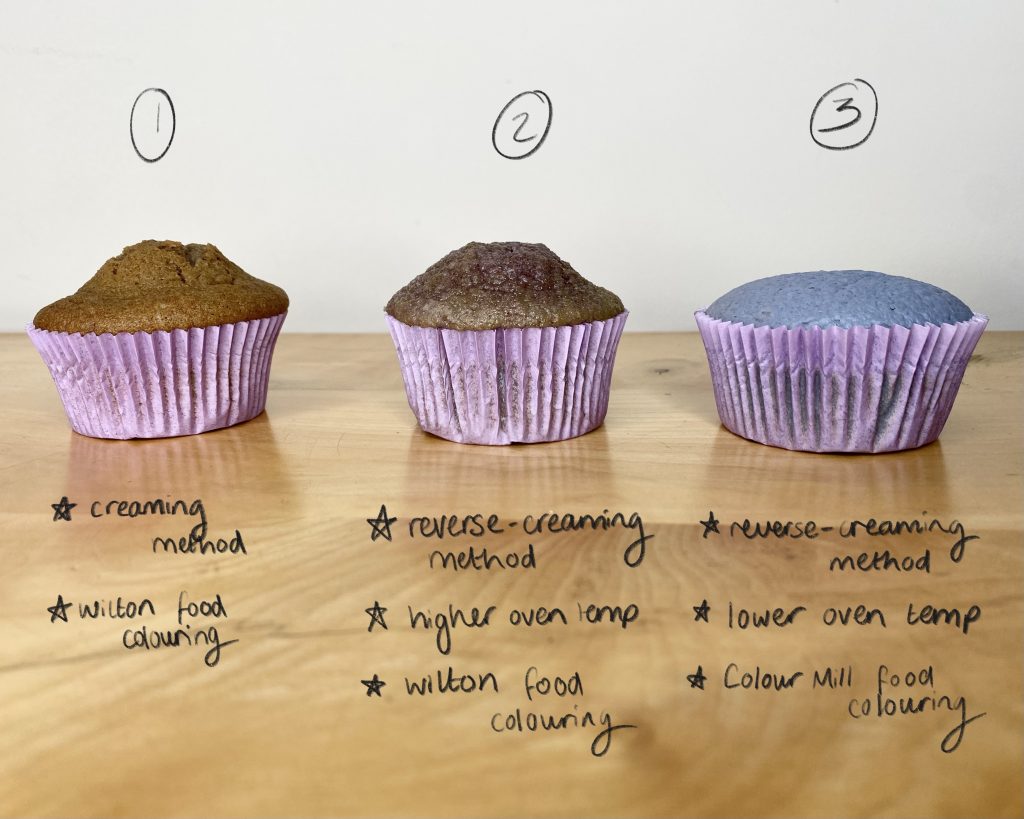
I learned the hard way that not all food colourings are made equal. When you’re colouring a batter, you need a food colouring that a) will not be affected by the heat of the baking process and b) is specially formulated to combine evenly into high-fat mixtures. I have always used food colourings from Wilton, which are great, but they are no good at all for baking with. I tried to get a pretty, lavender cake and I ended up with cakes that either had an off-putting grey tinge or a bizarre ombre of pink to blue (???). Anyway, infuriated, I tried out a new brand, Colour Mill, which even happens to have a specific lavender shade, which is apparently specifically formulated to work well with high-fat mixtures/baking.
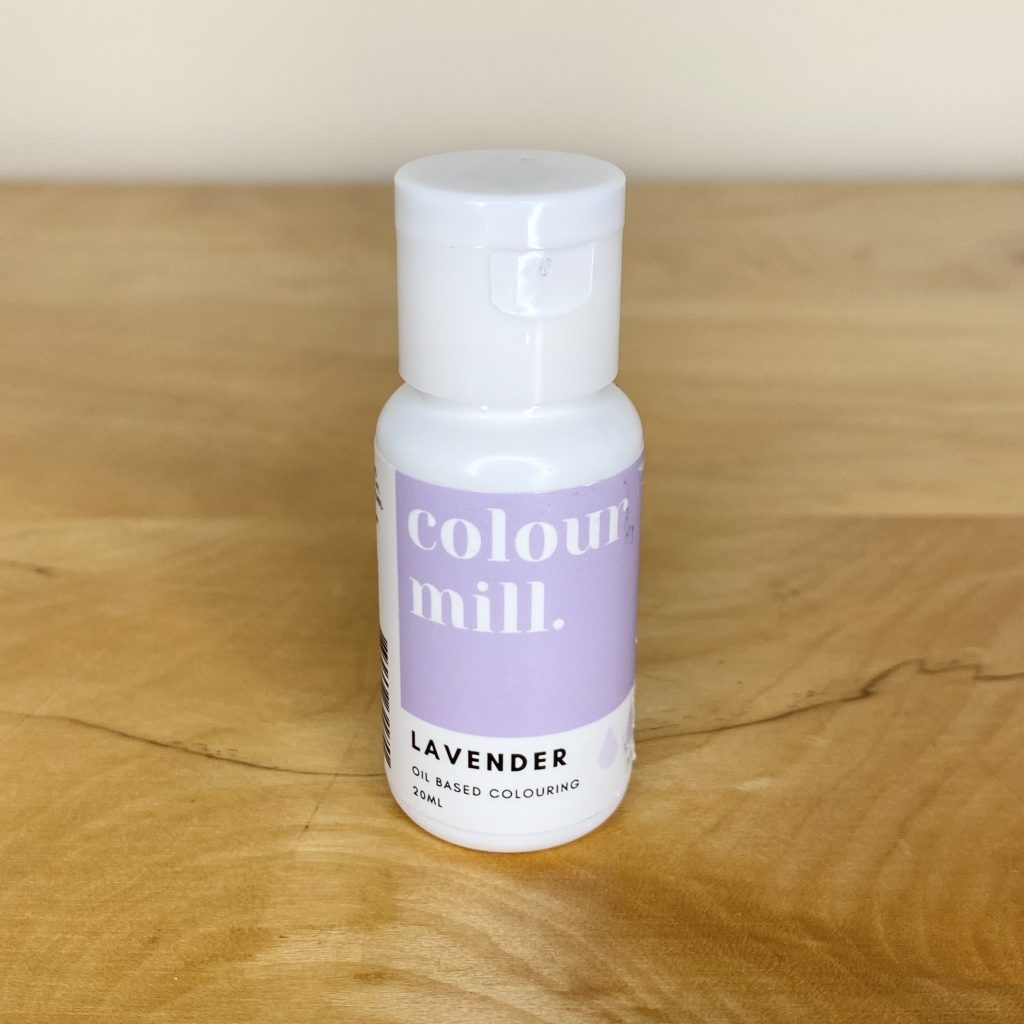
It was perfect! I used it for both the cake batter and the whipped cream, and I was so pleased with the results. Not only did it give a super even colour, but it was also incredibly easy to use because it comes in a squeeze-y bottle, so I didn’t have to faff around with cocktail sticks/spoons.
Whipped Cream Icing
Ah, whipped cream, the bane of my life. No, but in all seriousness- why is it so temperamental? You underwhip it and it slides off your cakes. You overwhip it by a second and you have butter. You pipe it and it loses its shape. You cannot win! There are whole YouTube videos out there comparing different ways of stabilising whipped cream, ranging from the pretty gross (cornflour (?!)) to the straight-up different food item altogether (surely adding cream cheese just makes it… cream cheese icing?). Anyway, after years of strife, I think I’ve cracked it- and it’s a lot easier than you might think!
I ‘stabilise’ my whipped cream with icing sugar. You only need a couple of tablespoons, but it really does help it keep its structure. I mean, this is not strictly stabilised whipped cream- you will need to refrigerate the cakes after decorating them, because, if your cream gets too warm, it will melt. Long story short, add the sugar, don’t leave your cakes out in the sun for hours (i.e., don’t be a silly sausage) and keep them refrigerated as much as you can. You’ll get great tasting whipped cream that stays firm. Win.
The other thing to consider is how much you whip your cream. Cream has this incredibly annoying habit of going from pourable to butter in the space of a few seconds. Once your cream is whipped, it will keep getting thicker the more you mess with it, whether you are just lightly stirring it or, yes, even piping it. Whip your cream so that it just hold stiff peaks. When you lift the whisk, it should just hold its shape, but the cream should still look soft and glossy. By the time you get it in the piping bag and onto your cupcakes, the cream will be perfect.
This recipe calls for half of the cream to be coloured lavender. In the recipe, I tell you to split your infused cream in half and add colouring to one bowl before whipping it and I strongly suggest you do this! I know it seems so much easier to whip all the cream and then colour it, but, by the time you have incorporated all of the colour evenly, your cream will be overwhipped and you’ll have to start again 🙁 . By adding the colouring at the start, you’ll have more control over the finished colour (you can still add more as you whip, before you get to stiff peaks!) and perfectly whipped cream.
Decorating the Cupcakes
You can decorate these cupcakes however you want! I tried out a few different styles, all of which use the same whipped cream and 1-2 piping tips, so you can easily mix-and-match, if that’s your vibe. Once you know the basics, they’re all super easy to achieve.
The ‘Love Spiral’
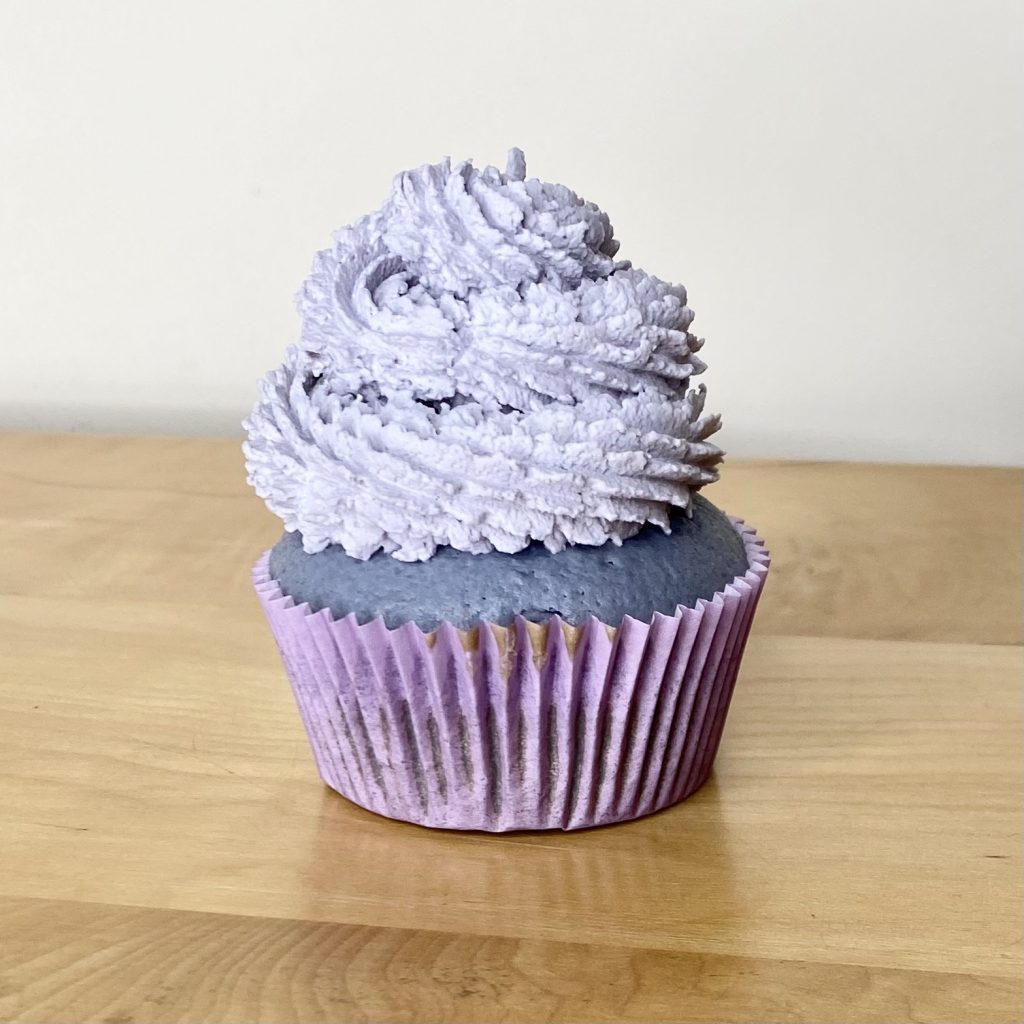
Named after one of the lyrics in the song, the ‘Love Spiral’ only uses purple cream in a piping bag fitted with a large, open star tip. If you want to use this technique, don’t divide your cream into two bowls and just colour the whole lot lavender. After that, it’s a very straightforward swirl of icing on top of each cake: hold the piping bag vertically above the centre of the cake and apply a gentle pressure. Keep applying that pressure as you move out from the centre of the cake and ‘draw’ a circle around the perimeter, then continue around in a spiral, building up the icing and coming back towards the centre as you go, until you reach the middle. At this point, release the pressure to finish off the spiral. Done!
The Cloud
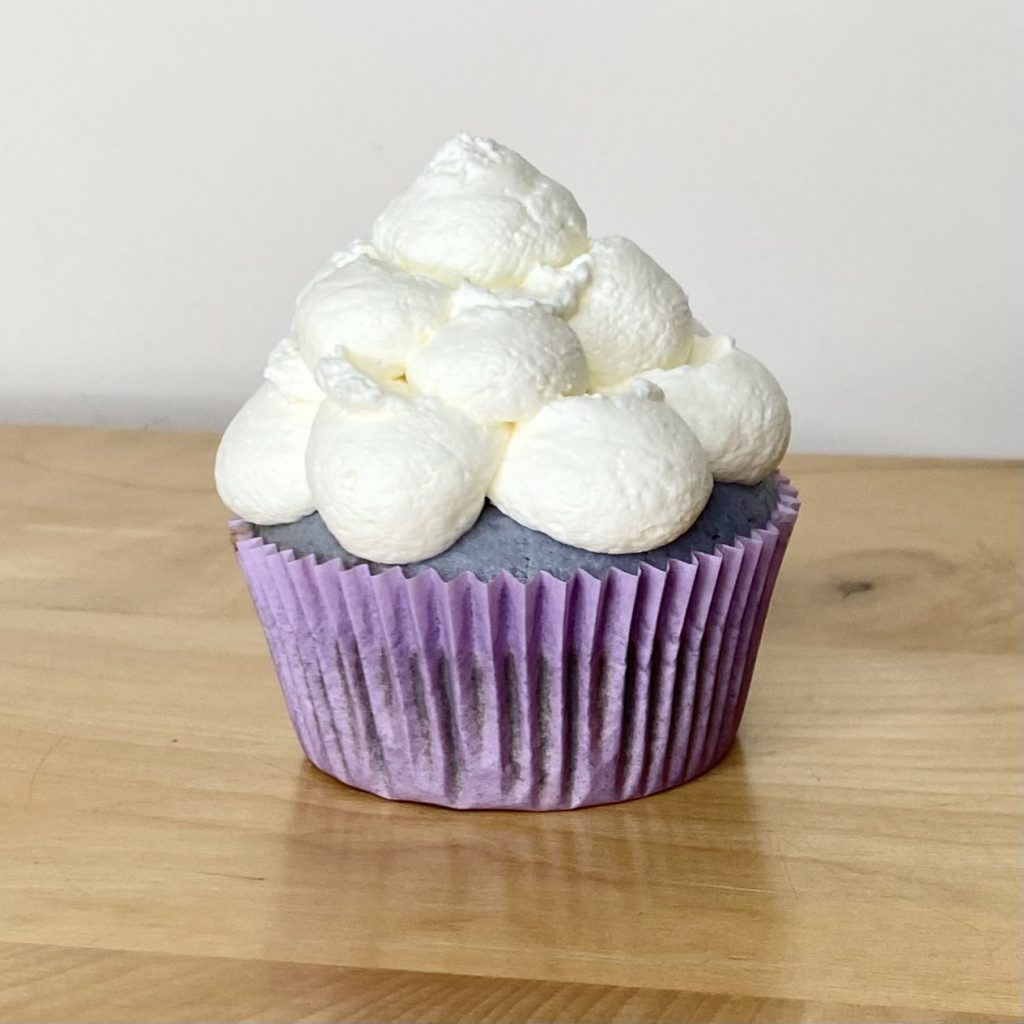
As further tribute to the cloud/koi scene in the Lavender Haze music video, this icing style makes the top of the cupcake into one fluffy cloud. Super dreamy! You only need uncoloured cream for this style, so skip the food colouring and whip up all the cream in one. Place the cream into a piping bag fitted with a large, round tip, and pipe little dollops of cream around the perimeter of the cupcake.
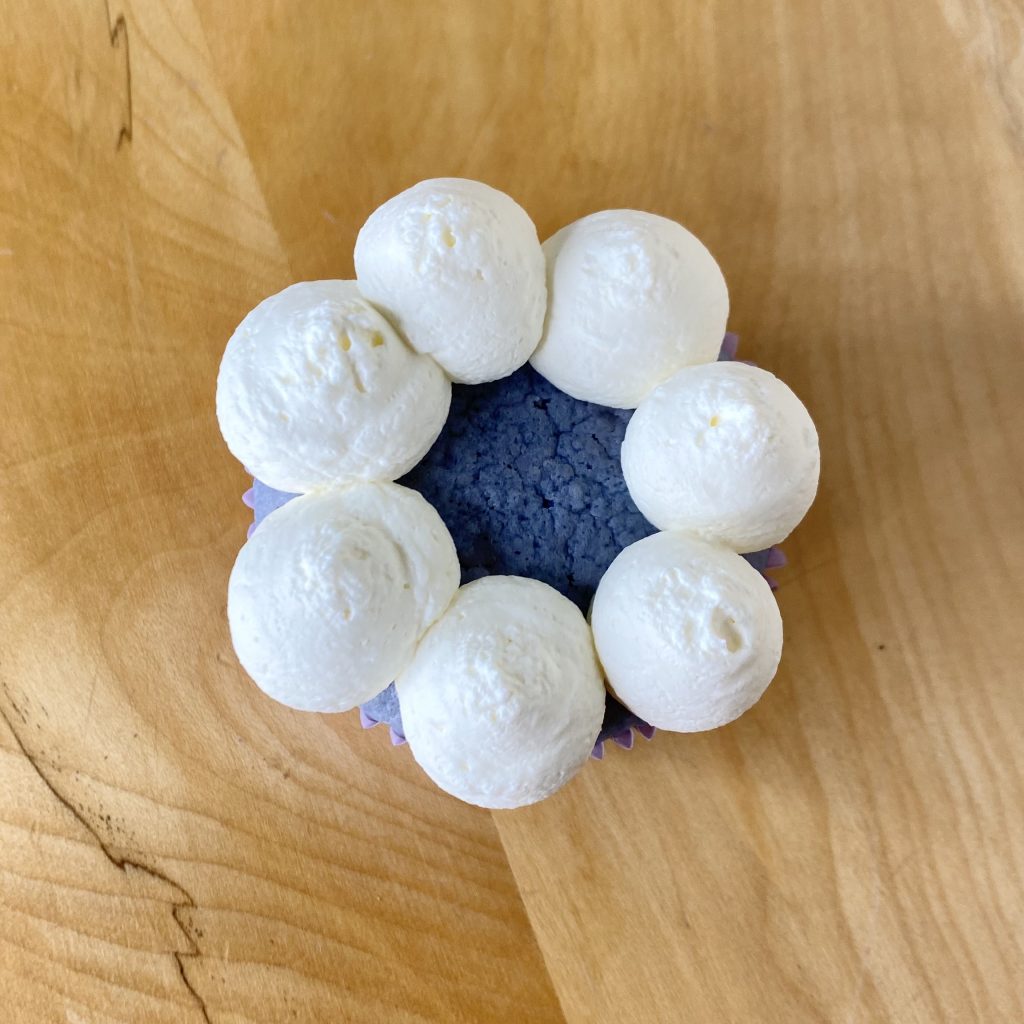
Use an angled palette knife (or teaspoon, if you don’t have one!), to gently drag from the centre of each dollop, into the middle of the cake, like in the photo below:
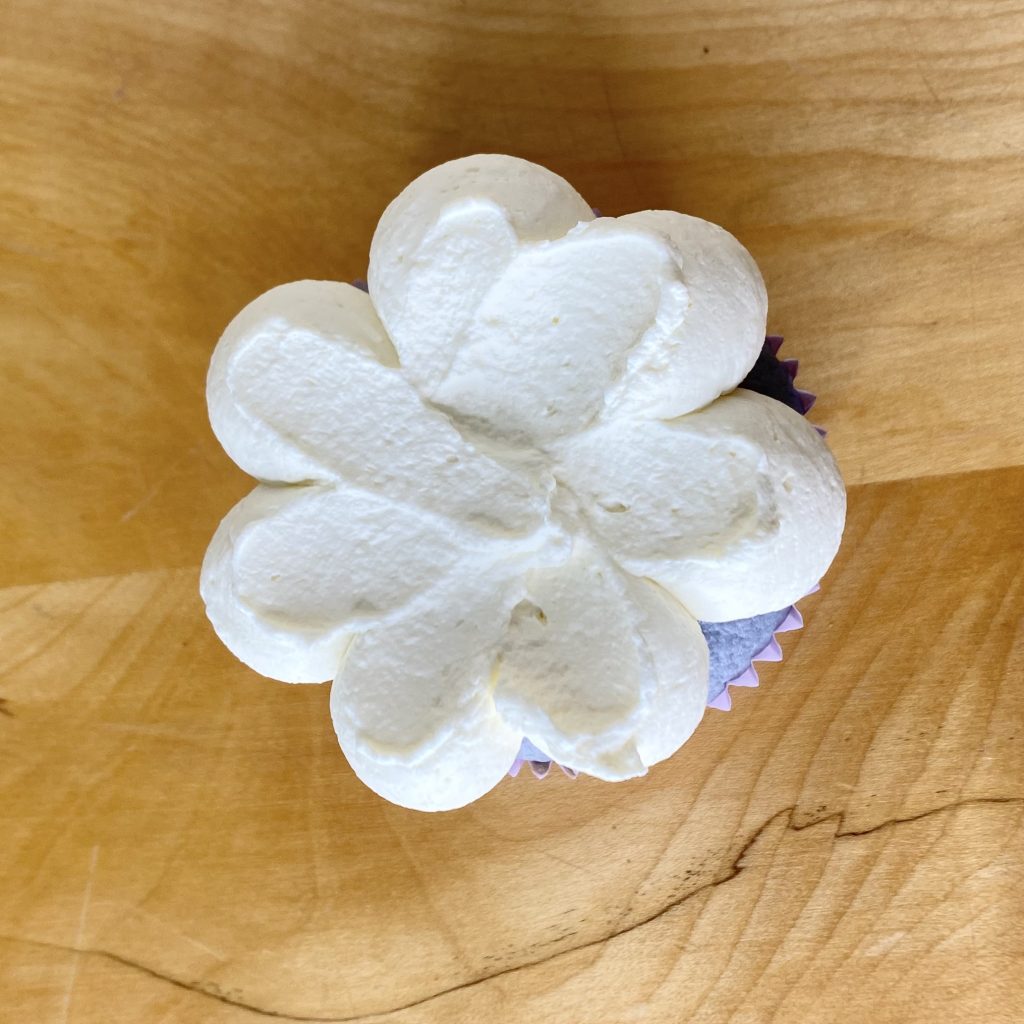
Once the bottom layer is done, repeat the process, piping dollops then dragging them into the centre, on top of the first layer, making sure to offset the dollops.

Finish off the cupcakes with a final dollop on top, in the centre, and you have a cloud cupcake!
The Combo
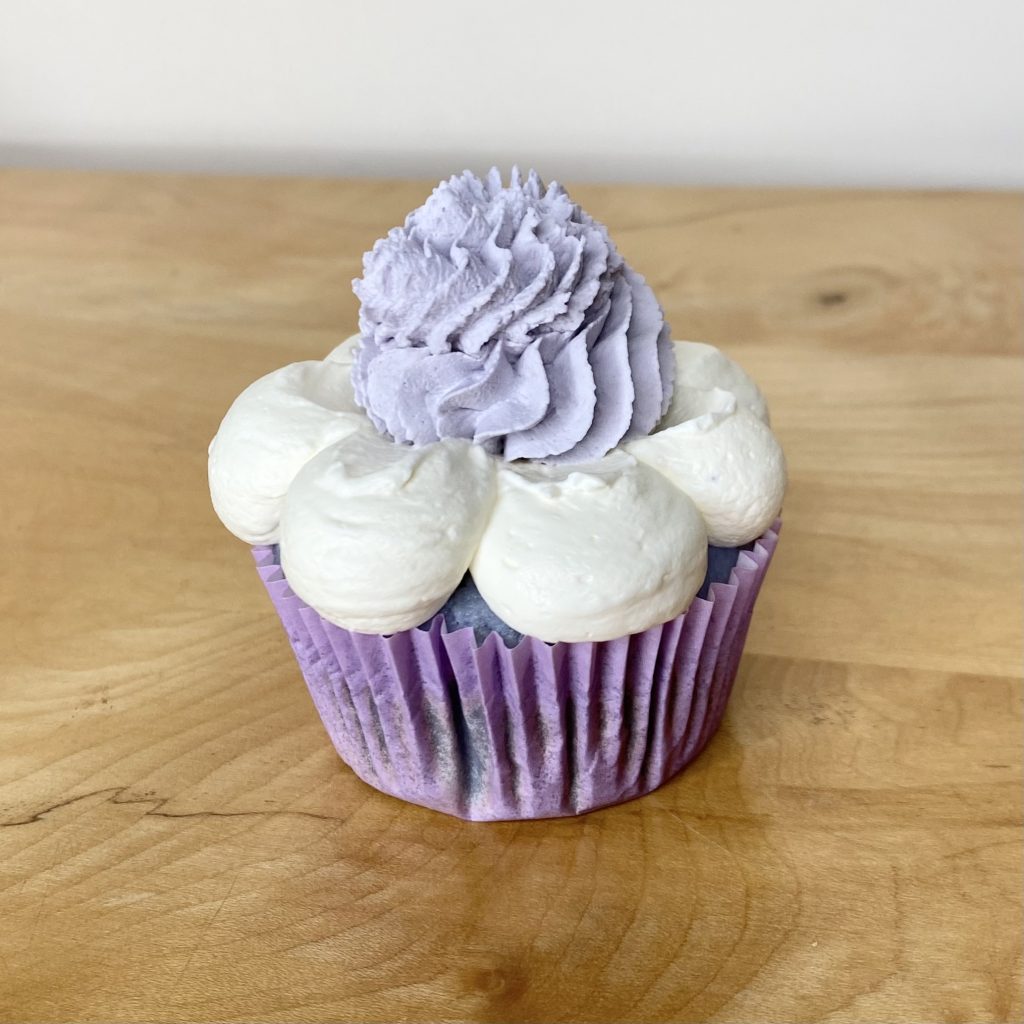
The cupcakes in the thumbnail were decorated with a combination of the two styles. For this style, you’ll need to colour half of your cream lavender, while leaving the other half white. Pipe the first layer of the ‘Cloud’ icing style as above, using the white cream in a piping bag fitted with a large, round tip, then make a smaller ‘Love Spiral’ in the centre, using the purple cream in a piping bag fitted with a large, open star tip.
Once you have iced all of your cupcakes, all that’s left to do is decorate each one with 1 or 2 chocolate koi and you have your Lavender Haze Cupcakes!
Recipe

Lavender Haze Cupcakes
Equipment
- 12-16 lavender cupcake cases
- 1 large round piping nozzle
- 1 large open star nozzle
- 2 piping bags
- 1 offset spatula
Ingredients
For the smoky lavender whipped cream:
- 500 ml double cream
- 1.5 tsp dried lavender (see note 1)
- 1 lapsang souchong tea bags
- 2 tbsp icing sugar
- Lavender food colouring
For the chocolate koi decorations:
- icing sugar , for dusting
- 36-96 g white modelling chocolate (see note 2)
- flaked almonds (see note 3)
- edible ink markers, black and orange (see note 4)
For the smoky lavender cupcakes:
- 240 ml milk
- 1 1/2 tsp dried lavender (see note 1)
- 1 lapsang souchong tea bag
- 250 g plain flour
- 250 g caster sugar
- 1 tbsp baking powder
- 100 g unsalted butter, at room temperature (see note 5)
- 2 eggs
- 1/8 tsp vanilla extract
Instructions
Make the smoky lavender cream:
- Begin by cold-infusing the smoky lavender cream, as it will need to infuse for about 3 hours. Add the cream, dried lavender and lapsang souchong teabag to a bowl, cover and place into the fridge. Leave for 3 hours, while you make the rest of the cake components.
Make the chocolate koi:
- Dust a clean work surface with icing sugar. Knead your modelling chocolate on the surface, until you have a smooth ball.
- Take 3g of the modelling chocolate and roll into a ball between the palms of your hands (dip it into the icing sugar if it gets too soft/sticky). Flatten your palms slightly and continue rolling to elongate the ball- you're aiming for a rough sausage shape. Gently taper off one end of the sausage for the tail. Bend the sausage slightly, so your koi has a curved body.
- Use your finger to press down on the very end of the tapered part of the sausage to flatten it and begin the tail. Carefully peel the 'tail' off the work surface, then dip the underside of it into icing sugar to prevent further sticking. Use a small, sharp knife to make a cut down the centre of the flattened tail.
- Select 2 small flaked almonds (try to find 2 that are a similar size/shape to each other). Gently insert one almond into the chocolate on each side of the thicker part of the body. Set this first koi aside to dry out a little while you make the others- you will need 1 or 2 per cupcake, depending on how you plan to decorate.
- Once you have shaped all of the koi, it is time to decorate them. Using the orange edible marker first, gently sketch rough patches of colour all over the body and almond fins of the koi. Set these aside to dry for 10-15 mins, before repeating with the black marker. Set the decorated koi aside to dry, at room temperature, while you make the cupcakes (at least 30-40 minutes).
Make the smoky lavender cupcakes:
- Preheat the oven to 140°C (120°C fan) and line a 12-hole cupcake pan with lavender cupcake cases (this recipe will make 12-16 cupcakes, so you may find you need an additional 4 cases to line another cupcake pan).
- Begin by infusing the milk. Place the milk, lavender and lapsang souchong tea bag into a small saucepan. Place over medium heat and bring to just below a simmer. When you see little bubbles forming around the edge of the pan and steam starting to come from the milk, turn off the heat, cover and set aside.
- After 10 minutes, remove the teabag from the milk (you can discard the teabag at this point). After a further 5 minutes, strain the milk into a jug through a fine mesh sieve and discard the lavender. Allow the infused milk to cool to room temperature before proceeding.
- Sieve the flour, sugar and baking powder into the bowl of a stand mixer, fitted with the paddle attachment. Add the butter and mix on low speed for 2-3 minutes, until the mixture resembles fine sand and no large lumps of butter remain.
- Add the eggs and vanilla extract to the cooled infused milk. Whisk to combine and then, with the mixer on low, add the wet ingredients to the butter/dry ingredient mixture in a slow, steady stream. Once you have added all of the wet ingredients, stop the mixer (the mixture will still look a little lumpy and undermixed at this stage) and add the lavender food colouring. Turn the mixer up to medium speed and mix until you have a smooth, evenly coloured batter- about 1 minute.
- Fill the cupcake cases about 3/4 of the way full (I use a regular-sized ice cream scoop). Bake for 35-40 minutes, until the cupcakes spring back when touched lightly. Carefully remove from the pans as soon as the cupcakes come out of the oven (this will help to prevent greasy cupcake cases) and transfer them to a wire rack to cool completely.
Prepare the whipped cream topping:
- Once the cream has been infusing in the fridge for 3 hours, strain it through a fine mesh sieve to remove the lavender and the teabag. Divide the cream into two equal parts (about 250ml each- though you will inevitably have lost a little cream in the straining process) and place each half in a separate, medium bowl (see note 6).
- Sift 1 tbsp icing sugar into each bowl of cream, then whisk (I prefer to use an electric hand whisk) the cream in one bowl until stiff peaks form (be careful not to overwhisk, or you will end up with butter).
- Colour the second bowl of cream lavender with food colouring, before whipping to stiff peaks, like the first bowl. Once both creams are whipped, you can proceed to decorating the cupcakes.
Decorate the cupcakes:
- Fit one piping bag with a large round nozzle, and another with a large open star nozzle. Place the uncoloured cream into the bag with the round nozzle, and the lavender cream into the bag with the star nozzle.
- Begin with the uncoloured cream. Pipe dollops of cream around the edge of each cupcake, then use the offset spatula to drag each dollop into the centre, to make the 'clouds'.
- Switch to the lavender icing. Pipe a spiral of cream into the centre of each cupcake, in between the clouds.
- Once the cupcakes are iced, place a chocolate koi on top of each cake to decorate. Once iced, the cupcakes must be refrigerated and are best eaten within 2-3 hours, though they will keep for up to a day. If you want to make the cakes in advance, you can bake the cupcakes and keep them, undecorated, in an airtight container for 2-3 days, then decorate just before serving.
Notes
- Make sure the lavender you purchase is culinary grade. You can buy the packet I got here.
- I used white modelling chocolate, but you can use any pale modelling paste, e.g. fondant or marzipan. You will need 3g of modelling paste per koi, so decide how many koi you want to put on each cake to work out how much paste you need.
- You will only need 2x flaked almonds per koi, but it is best to have more than you need. This will ensure that you are able to find matching pairs of flaked almonds that are on the smaller side, so that the fins are proportional to the bodies of the fish.
- I used edible ink markers for easier application (you can find the markers I used here– I used the shades Liquorice and Tangerine), but you can use regular or powdered food colouring if you prefer. Regular food colouring will, however, take longer to dry and be more likely to stain your mouth when you eat it.
- I prefer to use Stork in place of butter in my cakes, because I think it produces a lighter, softer crumb. If you’re using Stork, substitute the butter for an equal amount of Stork. If you’re using unsalted butter, make sure it is softened and at room temperature before you begin baking.
- Once cream reaches soft peaks, it will stiffen up incredibly quickly, even when mixing with a spatula by hand. It’s best to split the cream into two separate bowls and add the lavender food colouring to one bowl of cream before whipping it, so you can get an even colour distribution without worrying about overmixing the cream and ending up with butter!
I really hope you have enjoyed this post- I had so much fun coming up with the concept for these cupcakes and working out the recipe for them. Let me know what you think in the comments! I’d love to hear which Taylor Swift song you’re most excited to see in cupcake form!
Gemma
xxx