Today, we’re continuing on with my Taylor Swift Cupcake Series! If you missed the first post in this series, I’m baking my way through Swift’s latest album, Midnights, with cupcakes inspired by each song. Last time, we tackled Track 1: Lavender Haze (you can read that post here!). This time, we’re all about Track 2: Maroon. Maroon is one of my favourite songs on Midnights, so I really wanted to do it justice. It took a bit of perfecting, but I’ve finally got my perfect Maroon Cupcake. Let’s take a closer look!
Table of Contents
- The Maroon Cupcake: Explained
- Food Colouring 101
- Making the Cupcakes
- Making Pipeable Cream Cheese Icing
- Piping Buttercream Flowers
- Recipe
The Maroon Cupcake: Explained

The Maroon Cupcake is composed of 2 main elements:
- Burgundy velvet cake
- Cream cheese icing, piped into a two-toned carnation/rose hybrid flower
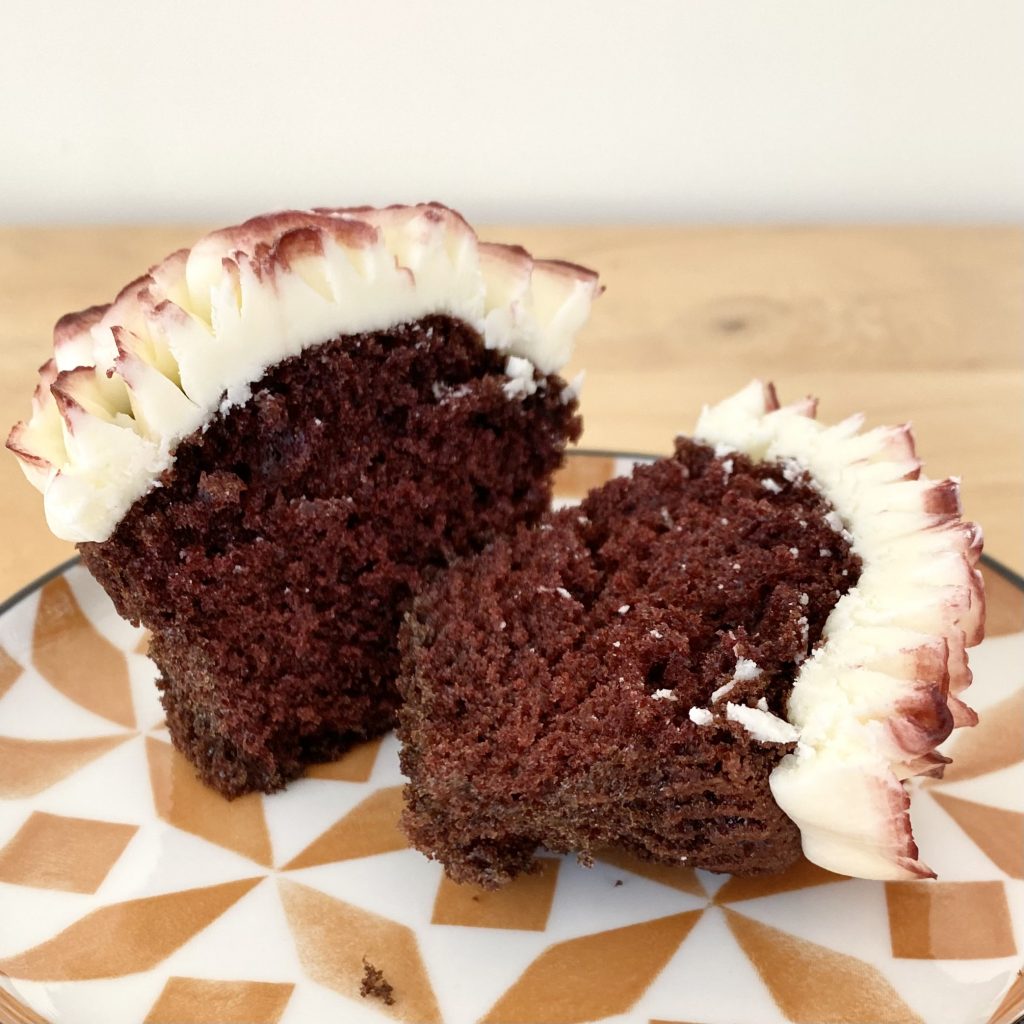
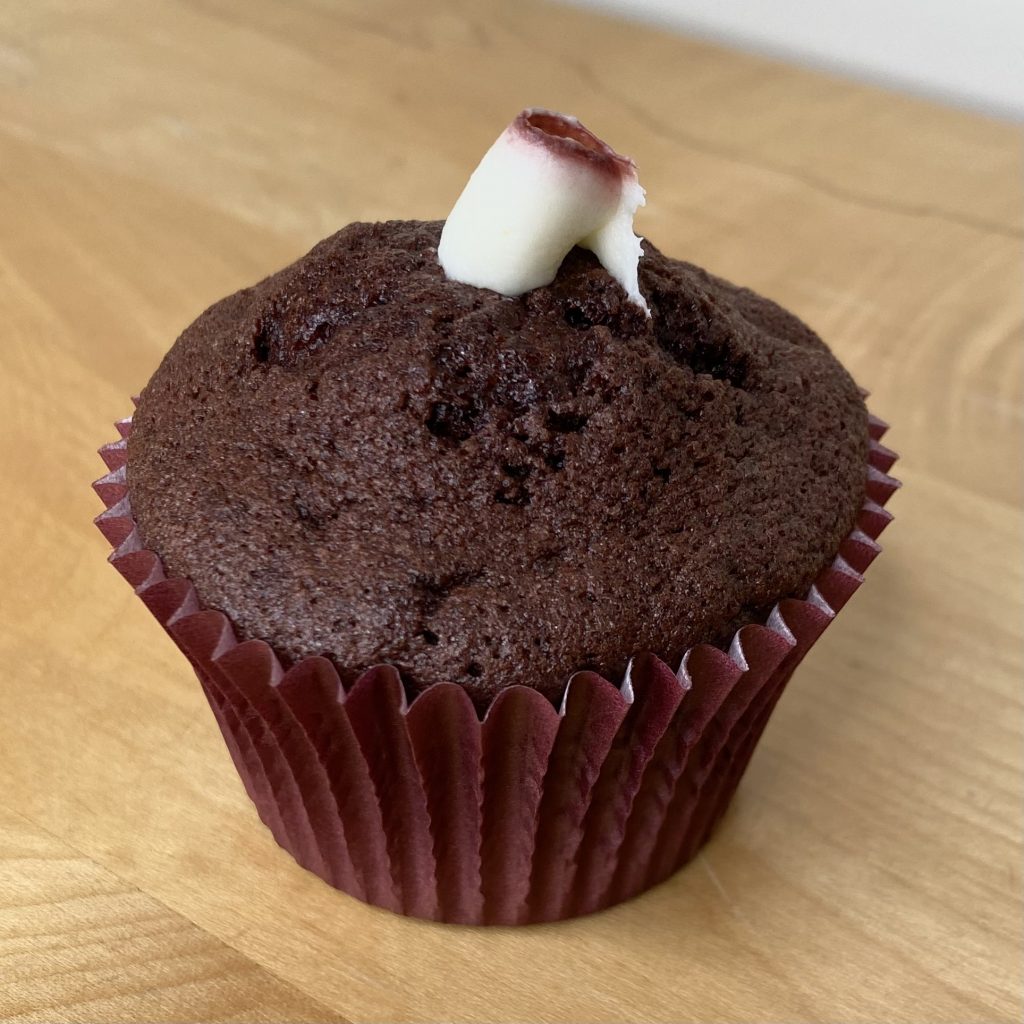
Taste-wise, these cupcakes are essentially just red velvet cakes: tangy vanilla cupcakes with a hint of chocolate flavour, topped with a rich cream cheese icing. The only real difference in the batter, which takes the cakes from red to burgundy velvet, is the cocoa powder.
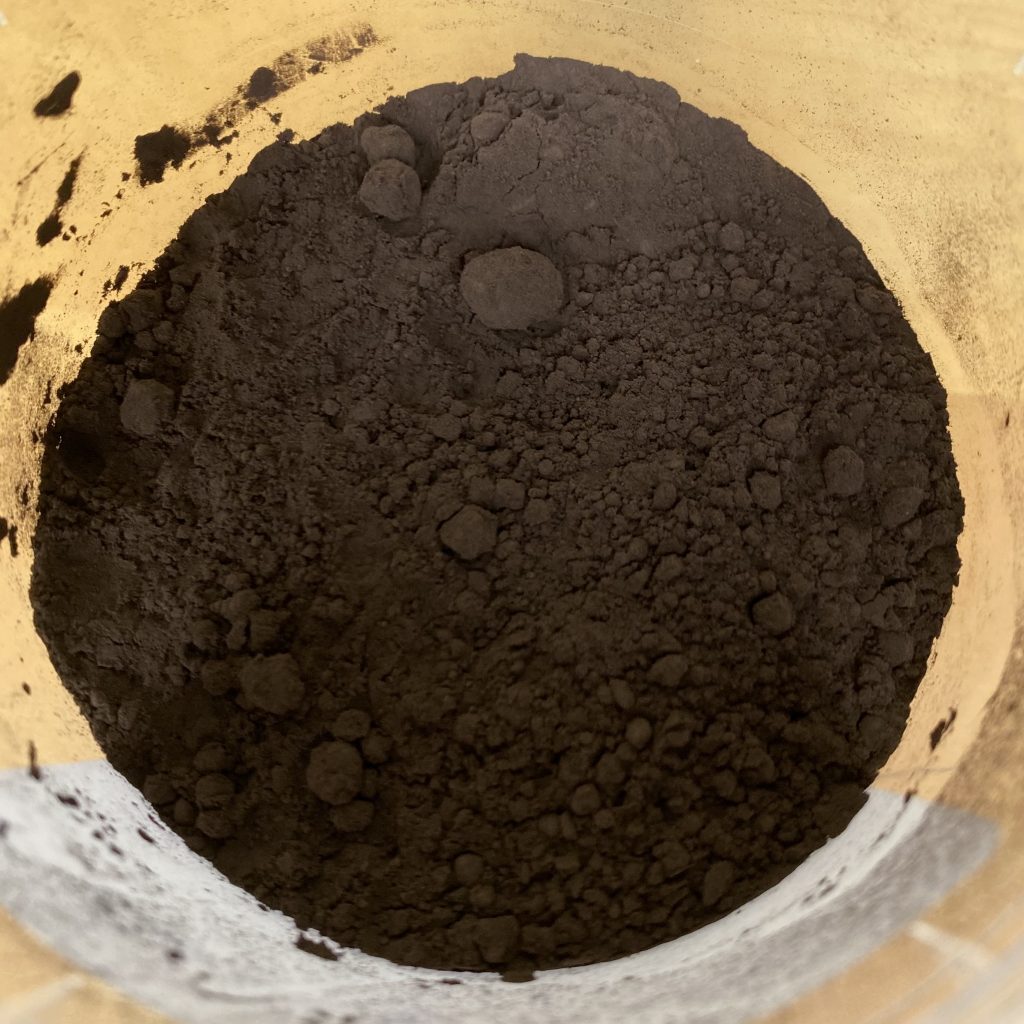
Black cocoa powder is the secret ingredient for these cupcakes. In the cocoa powder world, there is a process known as ‘Dutching’ (you might see some cocoa powders called ‘Dutch-Processed’). ‘Dutching’ is where the cocoa is treated with an alkaline solution, which neutralises some of the acidity, giving it a smoother flavour and darker colour. Black cocoa powder is cocoa that has been ultra-Dutched, making it super dark and super smooth. It’s not necessarily more chocolate-y, but it is definitely intense and pungent- as if you’ve extracted the underlying notes in a bar of dark chocolate. The ‘Dutching’ process actually prevents the cocoa from being too bitter, so you don’t need to worry about that. Long story short, black cocoa powder is still chocolate-y, just in a slightly more grown-up way than regular cocoa powder. It’s mainly used for the dark colour it imparts. I use it in this recipe, in place of regular cocoa powder, so that, when I add red food colouring, I end up with a deep, burgundy/maroon batter, instead of the vivid red typically achieved in a red velvet cake.
Black cocoa powder can be a little hard to find- I purchased a 100g pot from Purple Cupcakes, a baking supply store here in the UK. You can find the link here. If you can’t find black cocoa powder near you, or just don’t want to use it, you’ll need to use a combination of black and red food colouring to achieve the burgundy colour (but be warned, you’ll need a lot of colouring to achieve the same colour, which might affect the overall taste of your finished bakes!). You could also try substituting some of the flour for a little more cocoa powder, to impart a deeper brown colour, but this will also affect the overall flavour of the cake!
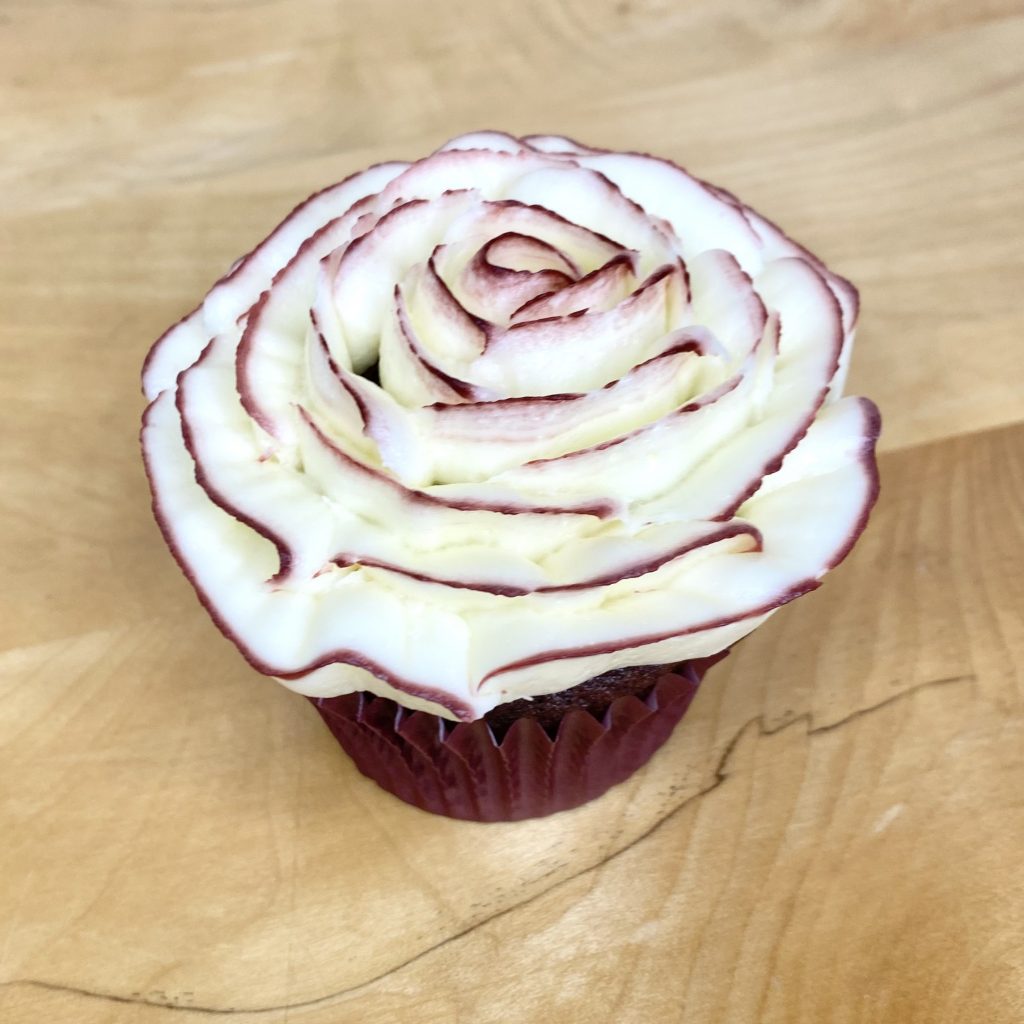
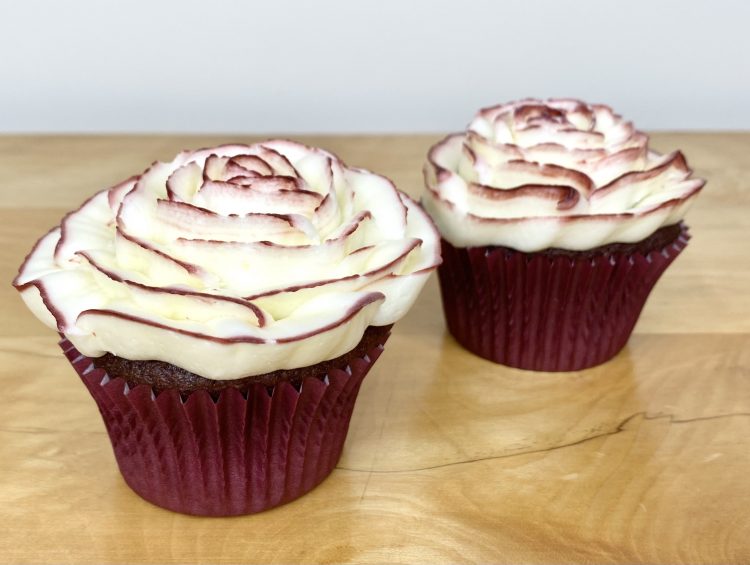
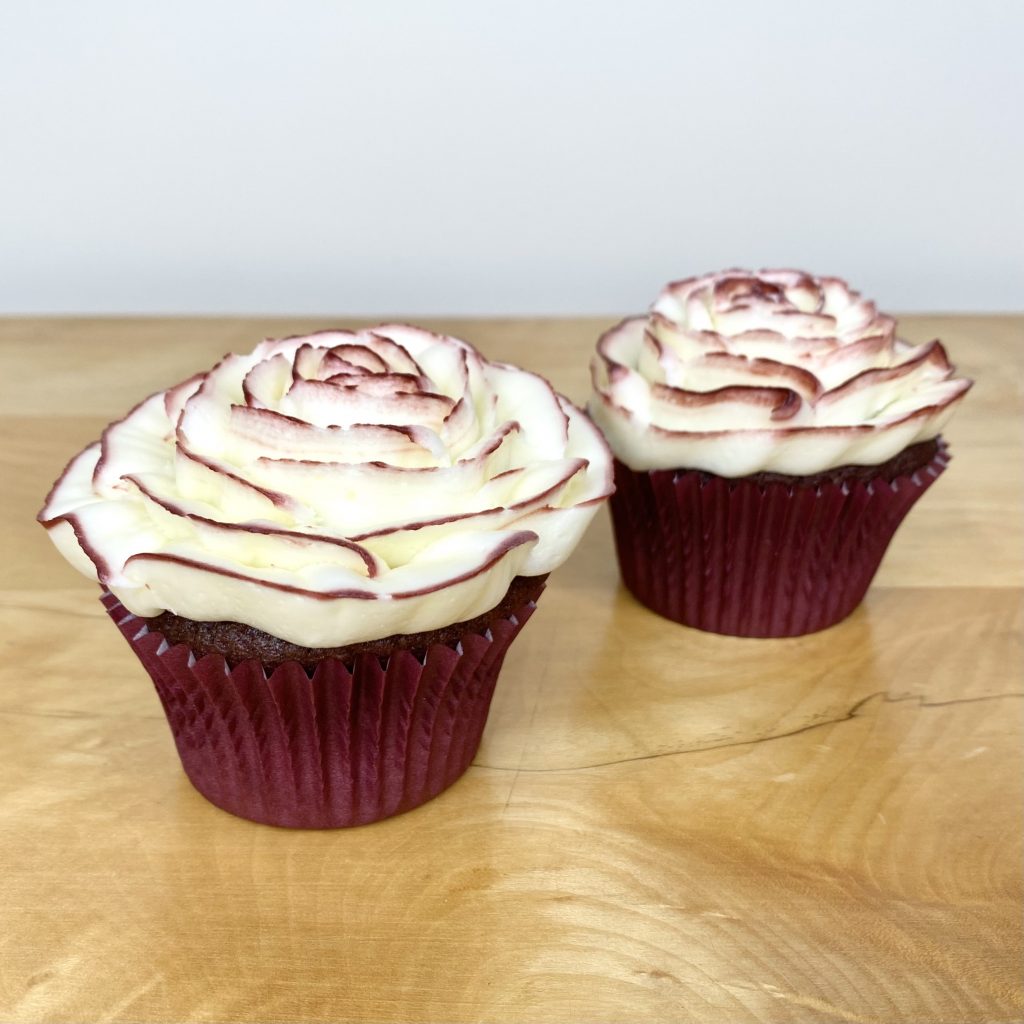
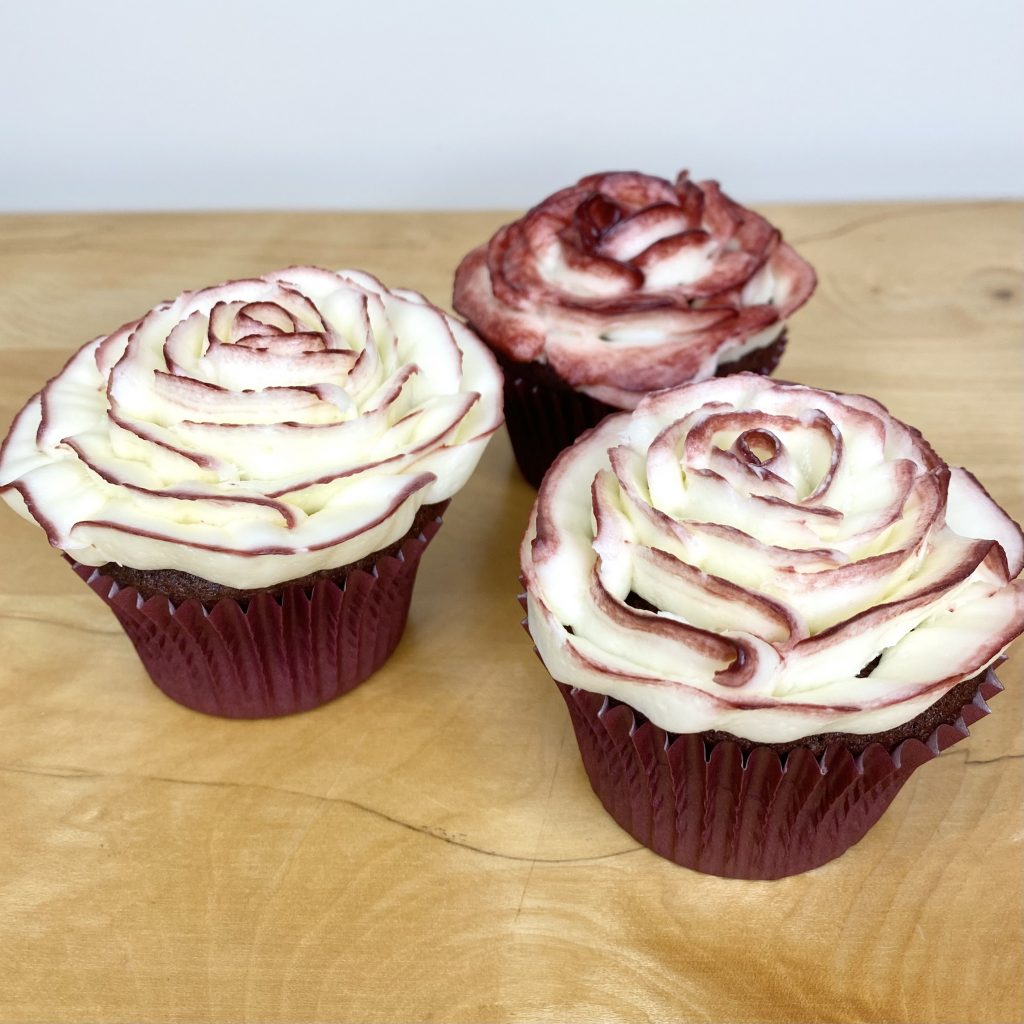
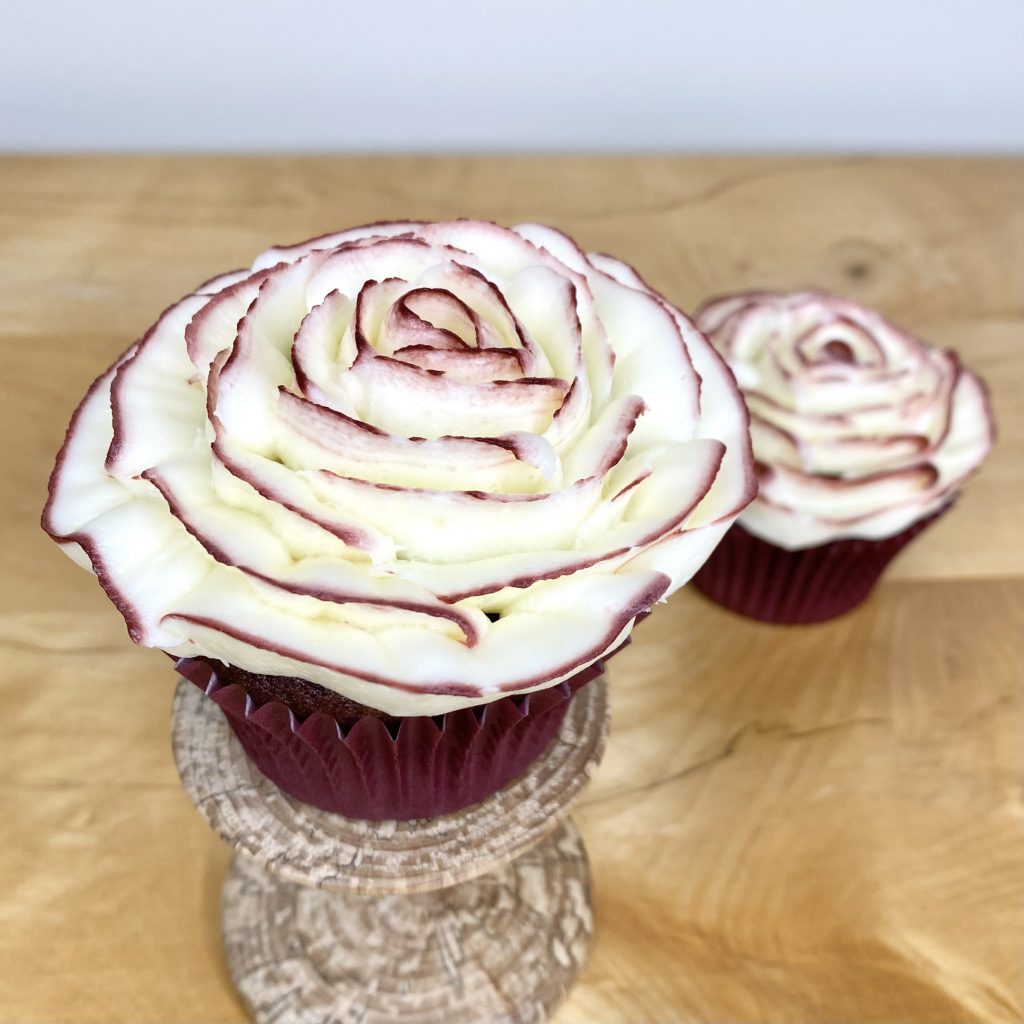
The decoration for these cupcakes is inspired by what might just be my favourite line in the song: ‘Carnations you had thought were roses, that’s us.’ I mean…. Miss Swift, PLEASE. Anyway, I had a vision for these cupcakes: they would be decorated to look like an ambiguous flower, that could be a carnation or a rose, in a nod to that line. It took a bit of practising, but, with the right tools, piping the buttercream flowers on top of the cupcakes ended up being pretty straightforward. To really draw out that ambiguous carnation/rose vibe, while still fitting in with the colour scheme defined by the title of the song, I opted to create white, rose-shaped petals that were edged with burgundy/maroon- like an iconic carnation (I think it’s called a Cream Viana carnation? Don’t quote me on that though!).
The classic topping for a red velvet cake is cream cheese icing- the tanginess of the cream cheese really draws out the tangy flavour of the cake. I wanted to continue that tradition with my burgundy velvet cakes, so I opted to use a standard cream cheese icing to decorate. The only slight problem with using cream cheese icing is that it can be a little runnier than your typical American buttercream- not ideal when you’re piping intricate details like these flowers! Luckily, I’ve done some testing and found a way to get delicious, perfectly pipeable cream cheese icing. More on that later.
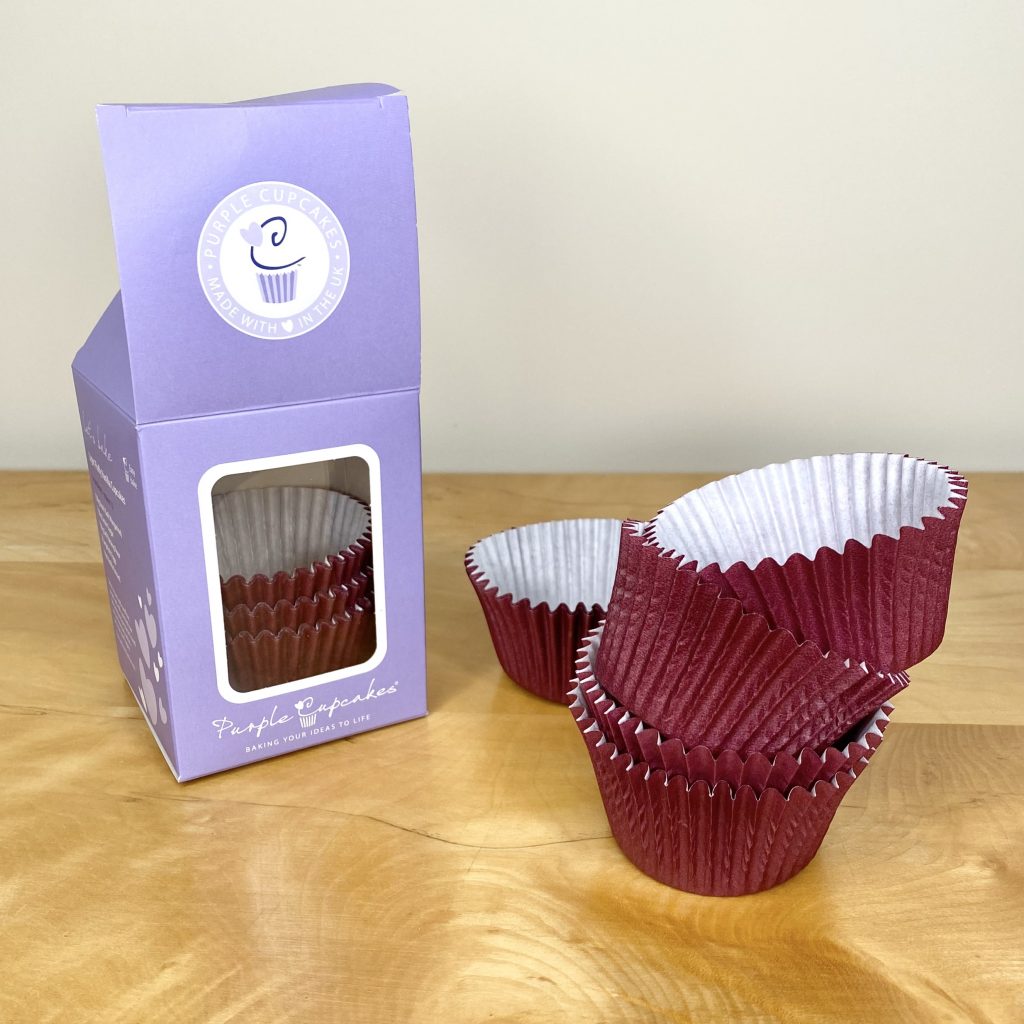
Finally, as always, I like to match my cupcake cases to my cupcakes. When I was purchasing the black cocoa powder, I noticed that Purple Cupcakes had some burgundy cupcake cases too, so, obviously, I bought them. Having tried them out with this recipe, I can tell you that I was really impressed! They’re thick and sturdy, with an even, deep burgundy colour on the outside and plain white on the inside. I will definitely be purchasing more cases in different colours from this shop.
Essentially, then, this is a recipe for burgundy velvet cupcakes. Even if you aren’t a Taylor Swift fan, or don’t want to bother with the piping on top, you should definitely try out the cakes and just spread some cream cheese icing on top! They’ll still look (and taste!) great! Anyway, let’s get into some specifics…
Food Colouring 101
It is a truth universally acknowledged that anyone making a red velvet cake for the first time will read the recipe, do a double take and exclaim to themselves: ‘How much?!’ when they see the quantity of red food colouring. It is a lot, yes, but it is the price we pay to honour the tradition of the cake and eat unnaturally red food. You can put less food colouring in (or skip the food colouring altogether, if you want), but your finished cakes will not be Maroon, like the title of the song, which does kind of defeat the point.
If you are willing to use food colouring in your bake, know that not all food colourings are made equal. I talked about this in my Lavender Haze Cupcake post, so you can check out the nitty-gritty of the discussion there, but try to find a food colouring that a) has been specifically formulated for use in high-fat content mixtures and b) won’t be affected by the heat of the oven. I recently discovered Colour Mill colourings and I have been really impressed with my experience of them so far. For this recipe, I used the shade Red. When combined with the black cocoa powder, the red colouring lends a deep, burgundy/maroon hue to the batter, which further deepens during baking.
Making the Cupcakes
My go-to red velvet cupcake recipe is a slightly adapted version of Cupcake Jemma‘s. It gives that classic, tangy, vanilla/chocolate flavour, but isn’t so heavily flavoured that it tastes like it came straight out of a supermarket. It’s also pretty quick and easy to whip up, which is great!
I like to get everything prepared before I start, because, once you start mixing, these cupcakes come together super quickly. Another quick tip here: this recipe (and all of the red food colouring involved) can get pretty messy if you’re not careful. Food colouring washes off eventually, but, just to be safe, opt for bakeware that won’t stain too easily (i.e. keep that white spatula far, far away).
First up, you want to line a 12-hole cupcake tray with your burgundy cupcake cases and preheat the oven to 180°C. Cupcake Jemma’s recipes always use a fan-assisted oven, but I prefer to use a conventional oven where I can, so I have adapted the recipe accordingly. With this recipe, I actually felt the cakes baked in the conventional oven were moister! Win.

Start by mixing the buttermilk, vanilla and red food colouring together in a small jug. Whisk it up until the colour is distributed evenly, then set aside. It will be vivid, but it needs to be that way! The colour will tone down a lot when you add the buttermilk to the rest of the batter.
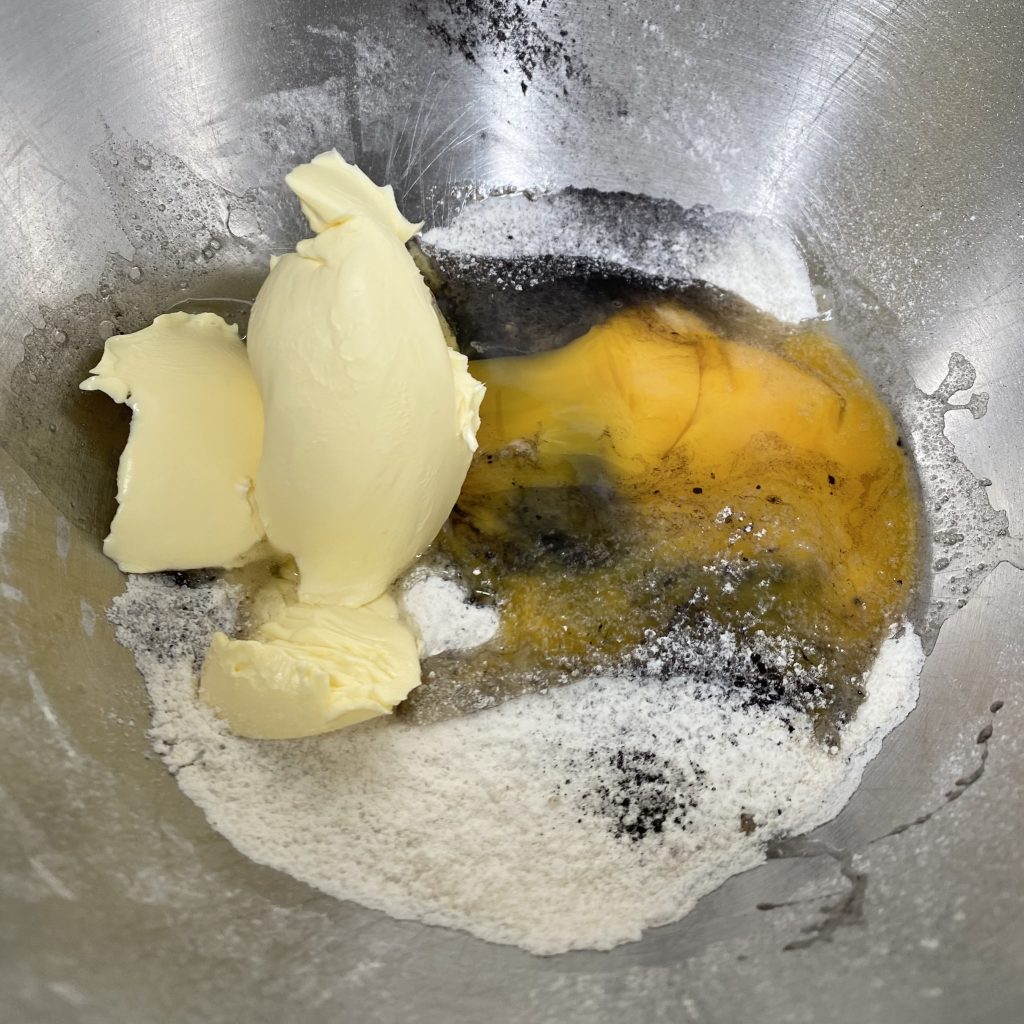
Sift the flour, black cocoa powder, sugar and salt into the bowl of an electric mixer. Add the butter (as always with my cakes, I prefer to use Stork because I think it gives a fluffier, moister cake, but you can use softened, unsalted butter if you prefer) and eggs.
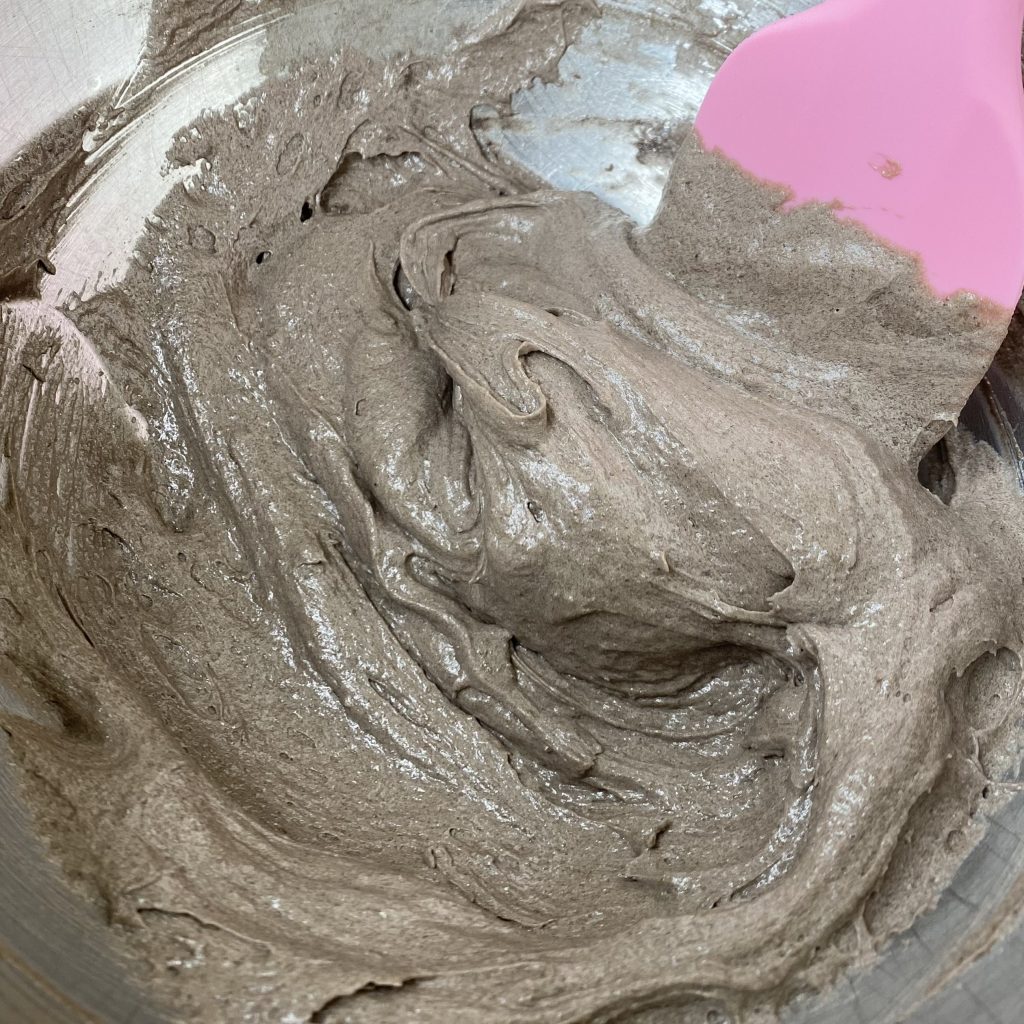
Using the paddle attachment, beat those ingredients together on medium-high speed for about 1 minute. I like to start on a slow speed, just to incorporate the flour, then work up to medium-high- that way, I’m not ambushed by a cloud of flour! When it’s ready, the mixture should be smooth, fluffy and an even, grey shade (from the cocoa powder), just like above.
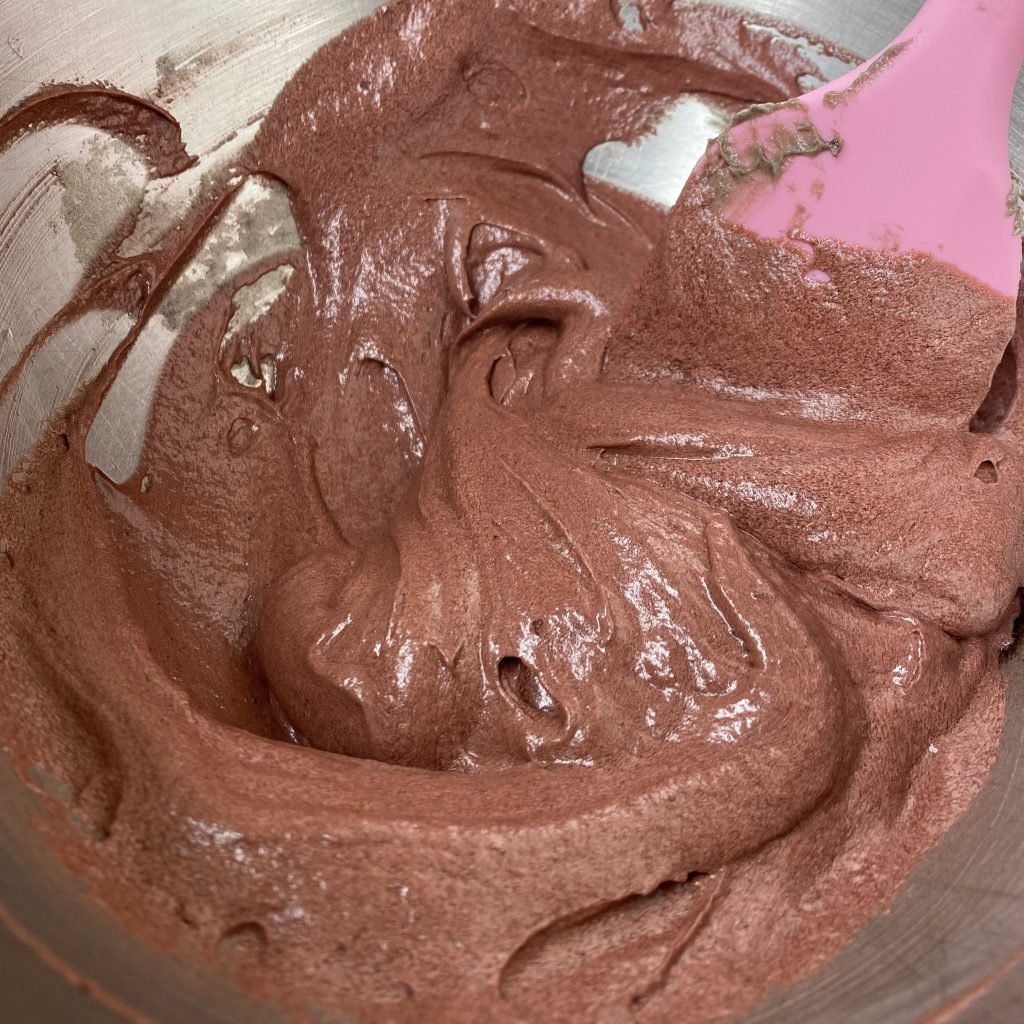
At this point, you’ll want to scrape down the sides and bottom of the bowl to make sure everything is well-mixed, then add the red buttermilk mixture. Beat the mixture on medium-high for a further 30 seconds, or until the red colour has been distributed evenly. Scrape down the sides of the bowl again, so you don’t end up with any pesky streaks of unincorporated colour later on.
From now on, you have to work quickly (like, not-enough-time-to-take-a-photo quickly). In a small cup, mix together the baking soda and the vinegar. It should fizz up immediately (if it doesn’t, check that your baking soda is in date- this batter relies heavily on the reaction between these ingredients to rise, so it’s important that the reaction occurs properly!). Working fast, tip the whole lot into the cake batter and give it a brief mix, just to incorporate everything.
Divide the batter between the 12 cupcake cases (each case should be about 3/4 full), then place into the preheated oven and bake for 20-25 minutes, or until the cakes spring back when touched gently.
I find it’s best to remove the cupcakes from the tray and transfer them to a wire rack to cool as soon as they come out of the oven- this helps to prevent the bottom of the cases from becoming greasy. Obviously, the tray and the cakes will be super hot, so be very careful while doing this.
Making Pipeable Cream Cheese Icing
As I mentioned, cream cheese icing can be a little softer than American buttercream. Because we’ll be using it to pipe flowers on top of our burgundy velvet cupcakes, it’s really important that the icing is firm enough to hold its shape. There are 2 main rules you’ll need to follow in order to get perfectly pipeable cream cheese icing, every time:
- Use full-fat cream cheese.
It can be tempting to use low-fat cream cheese, but it just won’t work for this recipe- you need the fat to keep the icing firm! Low-fat cream cheese has a looser consistency that just can’t be remedied by adding extra icing sugar (trust me, I’ve tried).
US recipes will tell you to use block cream cheese (from what I can tell, this is basically cream cheese that comes in a block, wrapped in foil/paper, much like butter), and avoid the spreadable stuff at all costs. Here in the UK, block cream cheese is rare- I’ve only ever seen/used the stuff that comes in a tub. Don’t worry- as long as it’s full fat, you’ll be fine!
2. Don’t overmix the cream cheese.
When I make American buttercream, I tend to whip the whole thing for a loooonnnng time to get it really light and fluffy, while helping to prevent it ending up like that cloyingly-sweet, super stiff/thick icing that you can get on some store-bought cakes. However, cream cheese does not like to be whipped to that extent. Over-whipping cream cheese can leave you with a soupy mess- not the vibe. I have specifically formulated the instructions for this recipe to minimise the amount of mixing the cream cheese undergoes, which will leave you with perfectly stiff, yet still soft and fluffy, cream cheese icing- ideal for the piping on these cupcakes.
You want to start with softened butter. You can leave it out at room temperature for a couple of hours, or, if you’re lazy like me, you can pop it in the microwave, on the lowest setting, for about 15-20 seconds. It should be soft enough that you can easily make an indent in it with your finger, but not melted. Once you have your softened butter, you want to whip it until it is completely smooth and noticeably paler. This will take about 1-2 minutes- I like to use an electric hand mixer. Make sure there are no lumps of butter remaining, otherwise your icing won’t be super smooth.
At this point, you can add the cream cheese. I like to mix the cream cheese into the butter by hand, to ensure I don’t overmix it, but you can use an electric mixer if you prefer- just be sure to only mix it until combined- as little time as possible! You’re looking to get the two fats completely incorporated, but that’s it.
Next, you need to add the icing sugar. I prefer to add all of the icing sugar in one and mix it in by hand (to prevent an icing sugar dust cloud!), before giving the whole thing a brief, final mix (literally only 10-15 seconds!) with the electric mixer, just to make sure it’s super smooth and fluffy. If you’re making a big quantity of icing, you might want to add the icing sugar in two stages.
And there you have it! Thick and smooth cream cheese icing, perfect for piping.
Piping Buttercream Flowers
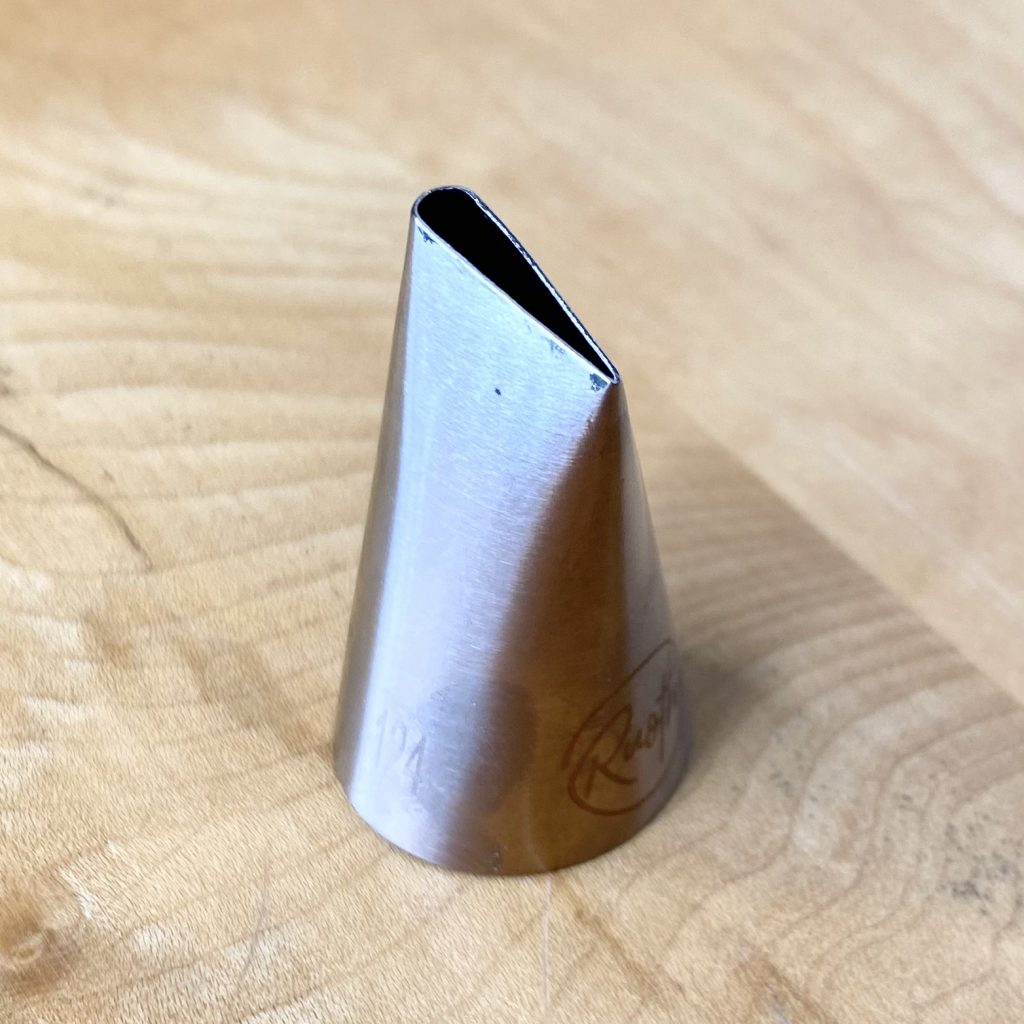
I admit, piping buttercream flowers looks scary. Be encouraged, though, by the fact that, before this week, I had never piped a buttercream flower, and I think these look pretty OK! Truthfully, it’s all in the equipment. For these flowers, you’ll need a #124 tip: this is a large petal tip, with one end slightly thinner than the other. As we just covered, you’ll also want quite stiff icing, so that it holds its shape when piped and maintains the definition of the petals. Finally, while you can use your hand to hold and turn the cupcake as you pipe, I find it easier to place the cupcake on a turntable/Lazy Susan instead, which can do all the spinning for you and leave you free to concentrate on the piping. If you do use a turntable, you’ll want to place the cupcake on a non-stick mat, to prevent it from slipping and sliding as you spin it!
By nature, buttercream flowers take quite a lot of buttercream, which is why this recipe calls for so. Much. Icing. Sorry! If you don’t want to make/use/consume quite so much, you can just pipe smaller flowers on top, rather than covering the whole surface of each cupcake. Having said that, I have a pretty low tolerance when it comes to eating cakes with lots of icing, but I don’t think these cakes have too much icing at all, so make of that what you will!
The two-tone petals are completely optional, I just wanted to a) incorporate more maroon into my Maroon cupcakes and b) really blur the line between carnation and rose. Those darker-tipped petals are very reminiscent of a carnation, but the piping technique for a rose is much easier! In fact, if you’re a bit shaky like me, your rose can end up a bit frilly and carnation-looking anyway, which works out because you can get roses with darker-tipped petals. Overall, I like to think of these flowers as ‘carnoses’ (or ‘rosations’? Unsure).
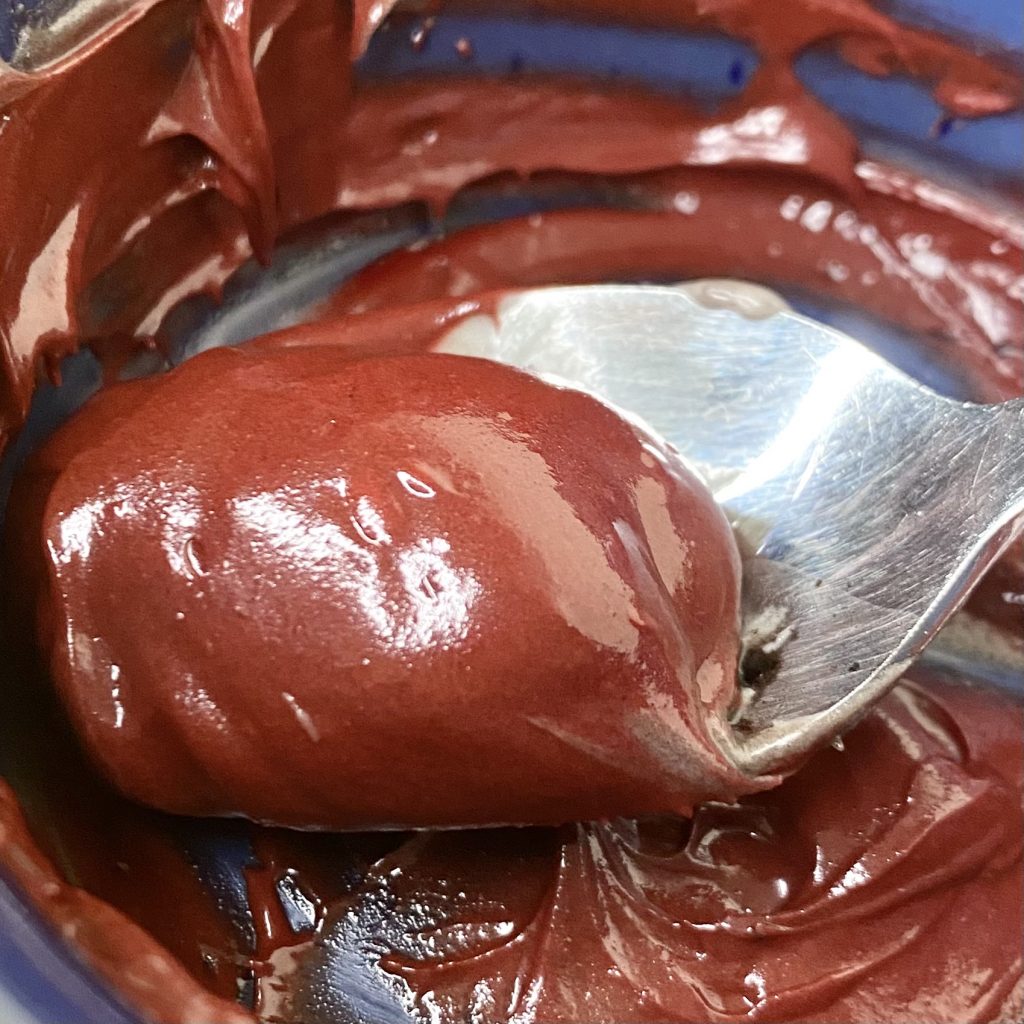
If you do want to make these two-toned petals, you’ll need to take a heaped teaspoon of your cream cheese icing and place it into a small bowl. To make it that burgundy colour, much like the cake batter, you’ll need to add some black cocoa powder and red food colouring, then mix it well to combine. It will get a lot thinner, as a result of all the extra mixing, but that doesn’t matter for this recipe.
Then, you need to fit your piping bag with the #124 tip. Line it up so each end of the thin tip lines up with one of the side seams of the bag.
If you want to make two-toned petals, you’ll need to add the burgundy icing at this stage. Use a skewer (or other thin implement) to carefully smear the coloured icing all the way down the seam of the piping bag, on the same side as the thinner end of the tip. The thicker this stripe of colour is, the more pigment you will get on each petal. I did a much thicker stripe of colour for the cupcake at the back of the above photo and, as you can see, it definitely makes a difference! If you want a similar effect to the two cupcakes at the front, try to keep the colour right along the seam.
Once you’ve got the coloured stripe, you can fill the piping bag with the white cream cheese icing. Be careful not to smear the burgundy icing at this point- add the white icing down the opposite side of the bag to prevent it dragging any of the pigment. Pipe a little icing back into your bowl, until you see the burgundy stripe emerge. Now you’re ready to pipe onto your cupcakes!
I learned this piping technique from this YouTube video. It is really helpful to see the process in action, so definitely check the video out before you start!
You’ll need to hold the bag horizontally to pipe these flowers, so that the opening of the piping tip is vertical. Make sure that the thicker end of the tip is at the bottom (closest to the cake). The burgundy stripe (if you are using it) should be on top.
Start by piping a cone shape in the centre of the cupcake. Holding the bag so that the tip is vertical, perpendicular to the bottom of the cupcake, apply a small amount of pressure while turning the cake, to get as thin a cone as you can manage, but don’t worry about being too perfect!
Now you can begin to make the individual petals. Keep the thicker end of the tip at the bottom, and press up close to the cone you have just piped. Apply pressure while moving tip around the cone, before stopping the pressure once you’re about 1/3 of the way around, to create a single petal. Wipe off the tip, then repeat the process to make another petal.
Keep making petals in this way, wiping off the tip in between each petal, making the petals larger as you work your way out. You also want to gradually decrease the angle between your piping bag and the surface of your cupcake as you go, so that, when you reach the edge of the cake, the ‘slit’ of the tip is almost horizontal. This will give your flower a fuller look.
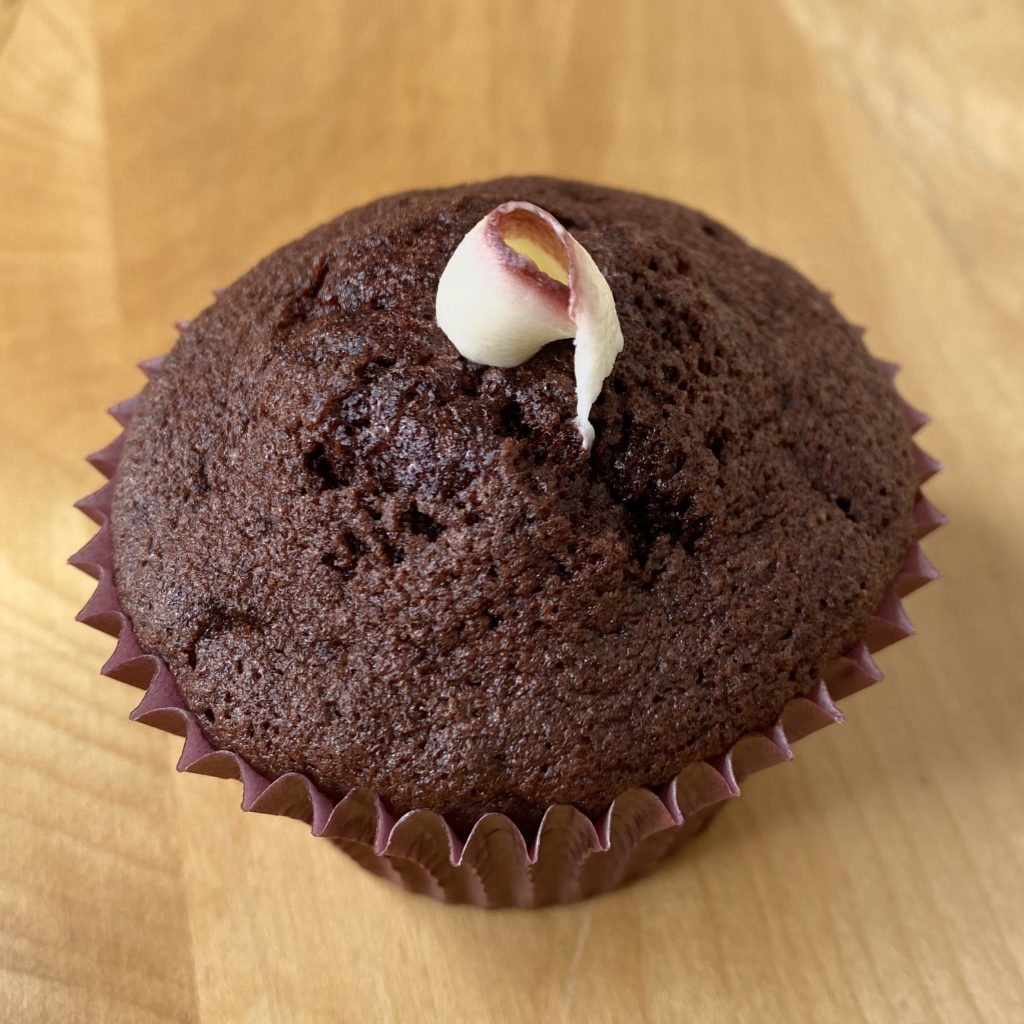
And there you have it! A buttercream rosation/carnose. It might look a little tricky, but the great thing about this method (and the two-toned petals!), is that it looks impressive even when it is not perfect, so don’t worry too much! As with all things, practice makes perfect, so just keep trying. If you want, you can fill the piping bag with plain cream cheese icing and practise on clean, upturned ramekins until you get the hang of it. When you’re done, just scrape the icing back into your bowl, cover it with clingfilm and place into the fridge to firm back up for 30 minutes or so before giving it a quick mix and going again. Just don’t practise with the burgundy stripe in the bag, because you won’t be able to mix the icing back together afterwards!

I hope you like my Maroon-inspired cupcakes! Let me know if you give them a try!
Gemma
xxx
Recipe
Maroon Cupcakes
Ingredients
For the burgundy velvet cupcakes:
- 2 1/4 tbsp buttermilk
- 3/4 tsp red food colouring paste (see Note 1)
- 3/4 tsp vanilla extract
- 175 g self-raising flour
- 3/4 tbsp black cocoa powder (see Note 2)
- 190 g caster sugar
- 1 pinch salt
- 200 g Stork (see Note 3)
- 3 eggs
- 3/4 tsp bicarbonate of soda
- 1 1/4 tsp white wine vinegar
For the cream cheese icing:
- 150 g unsalted butter, softened
- 240 g full-fat cream cheese
- 840 g icing sugar
- 1/16 tsp black cocoa powder
- 1 drop red food colouring paste
Instructions
For the cupcakes:
- Preheat the oven to 180°C. Line a 12-hole cupcake tray with burgundy cupcake cases and set aside.
- In a small jug, whisk together the buttermilk, red food colouring and vanilla until the colour is evenly incorporated. Set aside.
- Sift the flour, black cocoa powder, caster sugar and salt into the bowl of a stand mixer, which has been fitted with the paddle attachment. Add the Stork and eggs, then beat on medium-high speed (you may want to start on a slow speed, just to incorporate the flour and prevent a cloud) for about a minute, until the mixture is smooth and fluffy.
- Scrape down the sides of the bowl, then add the red buttermilk mixture to the batter. Mix for a further 30 seconds, or until the red colour has been evenly distributed. Scrape down the sides of the bowl again, to prevent any red streaks.
- In a small cup, whisk the baking soda and vinegar together. The mixture should fizz up immediately. Quickly pour this into the batter and give the whole thing a brief mix to incorporate. Divide the mixture between the 12 cases (each case should be about 3/4 full), then place into the preheated oven and bake for 20-25 minutes, or until the cakes spring back when touched. Remove from the tin straight away and allow to cool completely on a wire rack, before decorating.
For the cream cheese icing:
- In a large bowl, beat the softened butter for 1-2 minutes with an electric mixer, until smooth and noticeably paler.
- Add the cream cheese and mix by hand until incorporated.
- Sift in the icing sugar and mix by hand until incorporated. Use electric mixer to beat for 10-15 seconds only, until fluffy, but still thick and stiff.
To decorate:
- Remove 1/2 tsp of the cream cheese icing and place in a small bowl/ramekin. Add the black cocoa powder and red food colouring and stir well to combine.
- Fit the piping bag with the #124 petal tip. Use a skewer (or the blunt edge of a dinner knife) to smear the burgundy icing all the way down the seam of the bag, on the same side as the thinner end of the tip.
- Being careful not to smear the burgundy icing already in the bag, fill the piping bag with the white icing. Pipe a little icing back into your bowl, until you see the burgundy colour come through along the top.
- Hold your cupcake in your non-dominant hand (alternatively, place the cupcake on a non-stick mat, on top of a turntable). Hold the piping bag in your dominant hand, ensuring that the petal tip is vertical, with the thicker end facing the bottom (the line of burgundy icing should be on top).
- Pipe a cone in the centre of the cupcake. Work your way out, adding petals around that centre cone, gradually increasing the size of each petal, while decreasing the angle between the tip and the cake's surface, as you go. Wipe the tip off in between each petal. By the time you reach the edge of the cake, your piping tip should be close to horizontal.
- Repeat the process for all of the cupcakes. Because of the cream cheese icing, these cupcakes will need to be stored in the fridge, where they will stay fresh for 2-3 days.
Notes
- Make sure the food colouring you use is a) formulated to work in mixtures with a high-fat content and b) won’t be affected by the heat of the oven. I like to use Colour Mill colourings in my bakes. Don’t use a liquid food colouring, as it won’t provide enough pigment/will alter the consistency of the cake batter.
- Black cocoa powder is an ultra Dutch-processed form of cocoa powder. This recipe relies on it to achieve a deep, burgundy colour. I purchased mine here, but, if you cannot find it near you, you can substitute regular cocoa powder. You will, however, need to add (quite a bit of!) black food colouring, or replace the red colouring with even more burgundy colouring, to achieve a similar burgundy colour.
- As always with my cakes, I prefer to use Stork (a baking margarine) in place of butter, because I think it makes for a fluffier, moister cake. If you do not want to use Stork, you can substitute with an equal amount of softened, unsalted butter.