Welcome back to my Project Knitwear series, where I’m documenting my journey into the world of knitting my own clothes! This time, I’m making my third jumper: the Braidy Loop Sweater by Other Loops.
Table of Contents
The Pattern

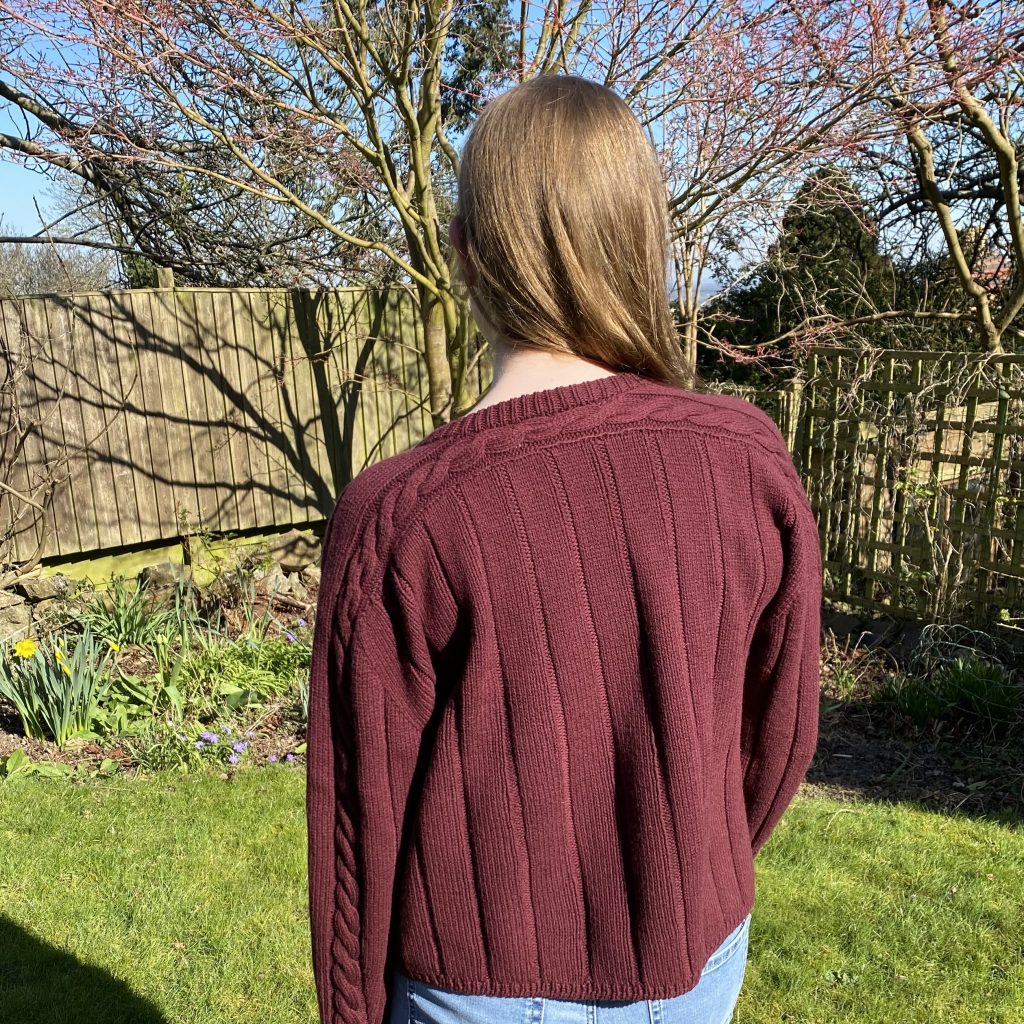
The Braidy Loop Sweater is worked with a saddle shoulder construction, which was a completely new technique for me. The jumper has a wide, ribbed pattern, with two cabled sections that run along the back/top of the sweater and down the sleeves. The hem and cuffs are worked in a finer rib and finished with a tubular bind off (another new technique for me). The neckline is made in the same rib pattern as the cuffs, but folded over and knitted together with the cast on (instead of using a tubular bind off).
I’ve been wanting to make a pattern by Other Loops for a while now— initially, I’d planned to make the Twist Loop Sweater, but there was something about the shoulders in that pattern that just threw me off a little, so I opted to make the Braidy Loop Sweater instead. I admit, I did think this was going to be a nice, chill jumper knit and… it absolutely was not, mainly because the construction style was so new to me! It did get a little easier once I’d got through the saddle shoulder section, but it wasn’t exactly the low-stress project I had hoped it would be.

I made a Size 2, which has a bust circumference of just over 20cm larger than my actual bust size. The pattern suggests opting for a size with a bust circumference of 10-20cm larger than your actual bust for a classic fit, or up to 40cm larger for an oversized fit. Part of me feels like I should have made the next size up, just for a slightly more slouchy, comfy fit, but my finished jumper is by no means tight or overly fitted, so I’m happy.
The Yarn
For this jumper, I decided to use Knitting for Olive Merino yarn in the shade Bordeaux. This yarn is definitely on the pricy side, so it was definitely a treat to myself, but I really wanted to try it out! I’m glad I did, because it’s such a soft, smooth yarn— it was really lovely to work with! Because Bordeaux is such a dark shade of yarn, I have found that the colour runs ever so slightly when I wash it, but that’s to be expected: I’ll just have to remember to wash it by itself!
To get the right gauge for the pattern, I held the yarn double (which, unfortunately, meant I had to buy twice the amount of yarn… sigh). I bought 12 x 25g balls and had 79g (spread across 2 skeins) leftover once the jumper was all finished. In total, I used 540g (about 2700m) of yarn for this project. I wasn’t a huge fan of knitting with doubled yarn, only because I kept accidentally picking up only one of the stitches as I knitted them, so I did have to be extra careful and keep checking my work as I went along. It did, however, give the jumper a really lovely effect, because it has the look of a sweater knitted with fingering weight yarn and the weight/feel of one knitted in DK (so, the best of both worlds!).
Burgundy was the colour of the season this autumn/winter and it’s one of my favourite colours to wear, so I really wanted to knit a project in that shade. Naturally, I finished this sweater just in time for… spring… which is unfortunate, but I know I’ll wear this colour every autumn/winter (even if it’s not quite so on trend), so I’m not too bothered. Because of the popularity of the colour, Knitting for Olive actually sold out of the Bordeaux shade in their merino yarn, so I had to wait until they had a restock to buy it, but it was definitely worth the wait.
The Knitting Process
I won’t lie: this pattern was pretty difficult to follow. Admittedly, I say that about most patterns I use (your girl likes to be spoon-fed her instructions), but I have seen a lot of other people saying that they struggled with this pattern too, which makes me feel a bit better. Honestly, I think I’m just not a huge fan of the formatting of the pattern— I know it’s just a stylistic choice but all of the underscores and such kind of distracted me!
I also had to make a lot of separate lists to remind myself which rows to increase, decrease and cable on, which I realise is fairly standard, but it somehow felt a bit more onerous with this particular pattern. Similarly, there’s a lot of ‘work as the stitches show’ instructions, which (I’m told) is also standard, but frustrated me a little as I would have liked a few more opportunities to cross-reference my work with the pattern to ensure that I’m on the right track. It’s probably not the pattern to choose if you’re a slightly under-confident garment-knitter like me!
Saddle Shoulder Construction

As I mentioned, this was my first time ever making a jumper with a saddle shoulder construction and… I didn’t love it. I just couldn’t visualise how it was supposed to work as I knitted it up, which made me a bit uneasy. However, as with most knitted projects, I just followed the instructions, step by step, and, lo and behold, it worked out.
I was a bit sad at first because, when I tried on my finished jumper, I felt like it looked a bit odd across my shoulders— just a little puffy and kind of unflattering? Naturally, I left it in a heap for a few days while I lamented all of my hard work, then gathered myself and decided to give it a gentle iron, just to see if I could get it to relax a little. I ironed it from the inside and I do think it really helped— the jumper definitely feels more relaxed and slouchy now (just more flattering in general, really). I’m not sure if the problems with the shape were caused by the saddle shoulder construction (and whether that’s just not a style that necessarily suits me), or by the cables along the shoulders, but I was really glad that the ironing helped, because I was feeling quite dejected after I first tried it on!
I do also think that the instruction for “1 row_” on the right shoulder (page 3 of the pattern) contains a mistake: I’m pretty sure that it should be ‘p1tbl and k1′ instead of ‘k1tbl and k1′, so that it follows the ribbed pattern.
Yoke

The yoke was actually my favourite part of this pattern to knit— I think the construction is really smart and looks super neat. There’s a significant amount of knitting in it, but it was interesting enough that I didn’t really mind that. I have seen a lot of other knitters comment on how deep this yoke is, but honestly, it doesn’t really bother me— the shoulders were much more of an issue for me personally.
Body

The main body of this jumper was the simplest part of the whole thing— just round and round in that basic, wide rib pattern. It wasn’t at all complicated but my goodness did it feel endless! It just seemed to take ages and, after the intense and involved shoulders/yoke, I was expecting this part to be much more relaxing and speedy. Alas, that wasn’t really the case…
Neckband

The neckband is worked as a double-length piece of ribbing, then folded over and knitted together with the cast on edge of the neck to form a folded neckband. In theory, I like the neatness of that, but I just feel it’s a little… bulky? in reality (which I don’t think it particularly helps with the shoulder issues).
I did adjust the neckband ever so slightly, in that I picked up and knitted the stitches as I did so (as opposed to just picking them all up and leaving them unknitted), then skipped the purl round (moving straight onto the first knit round), so that I didn’t have the purl ridge. The latter choice was just a matter of stylistic preference, but the former was a result of me being a little fearful of picking up all those tight stitches without knitting them at the same time…
Again, in theory, I like the idea of knitting the neckband together with the cast on edge to fold it over and secure it but, honestly, I just didn’t feel like I was able to get the neatness I wanted with this method, and I do feel like it added even more bulk to the neckband. I’m wondering if I would have preferred it if I had stitched it down by hand (or even if I’d worked the neckband like the sleeves/hem, with the tubular bind-off, instead of being folded over?).
Sleeves

The sleeves were super quick to make (particularly after that endless body) and really flew off my needles— perhaps because they had the extra interest of decreases and cables? I did have to make a lot of notes to keep track of when to work the cables/decreases but, again, that’s probably unavoidable.
I made my sleeves a little longer than suggested and, if I made this again (which, truthfully, I probably won’t), I’d consider making them even longer— I do have quite long arms, but even with the added length, these sleeve are a little short on me. I worked the sleeve until it measured 20cm (as opposed to 18cm) before working the decreases alongside the cables, which, at my gauge, worked out as exactly 50 rows.
After working the decreases, the pattern says to work until you’ve knitted between 4 and 8 rows since the last cable. After my decreases, I’d worked 7 rows since the last cable, so I didn’t work any further rows before adding the ribbing for the cuff.
Tubular Bind-Off

The cuffs and the hem of the main body are all finished with a tubular bind-off. This was my first time ever working a tubular bind-off and… like, it’s fine, but I didn’t love it, you know? It just seems like a lot of faff? I’m not amazing at grafting anyway, and the fact you have to work 2 setup rows (which I could never seem to get into the hang of because, by that point, I was so settled into the 1×1 rib process) just makes it feel a little tedious. It’s a pretty neat bind-off, but I just feel that, for the amount of effort, I’d want something perfectly neat, you know?
Weaving in the Ends
Ah, the ends. My nemeses. I decided to sew in all of my ends individually (i.e. not doubled, like the yarn I’d been using), so I gave myself twice as many ends to sew in (go figure, right?). Admittedly, this did make everything super neat, so I’m glad I did it, but it did take a bit longer. There was also quite a number of ends to sew in, which was sad, but what can you do?
New Techniques
There were quite a few new techniques to me in this pattern, as well as some opportunities to practise techniques I’ve previously met (as always, previously encountered techniques are marked with an *):
- Provisional cast-on*
- Saddle shoulder construction
- Cables*
- Folded neckband (knitted together with cast-on edge)
- Tubular bind-off
- Double knitting*
- M1L & M1R*
- M1L-P & M1R-P (purlwise increases)
- Purling through back loops
Final Thoughts

Honestly, I’m a little… disappointed with this project? I’m not obsessed with the fit (particularly across the shoulders— though the ironing definitely helped, I feel it’s at least wearable now?), I feel like I should have made the sleeves (and maybe even the body?) a little bit longer and it just wasn’t the relaxing knit I was expecting it to be! Overall, I’m okay with it, but it just wasn’t everything I dreamed it would be.
I did struggle with the pattern— I wonder sometimes if these kind of struggles are just a result of a pattern-writer and pattern-knitter being on different wavelengths, but I found it quite hard to follow and not at all intuitive, which was sad, because I was SO excited about it! There were a number of instances where I wasn’t sure how to interpret an instruction or started second-guessing myself and had to ask my mum for assistance (not unusual, but still not ideal). The finished jumper is fine, and the knitting process was fine, but I guess I was just hoping for a little more than fine with this project?

Having said that, I did really love using the Knitting for Olive Merino yarn! The colour is rich, but still matte, in a way that makes it feel a little less rich and a little more… dusky, particularly up close. It’s such a soft, smooth yarn— it was really nice to work with (though I can’t say I loved working with two strands of it, but that wasn’t specific to the yarn itself!).
I have learned a lot from this project though, and I’m sure I’ll still wear my Braidy Loop Sweater anyway. They can’t all be absolute winners, right?
If you're interested...

You can purchase the Braidy Loop Sweater pattern by Other Loops on Ravelry here.

You can find the Ravelry project page for my Braidy Loop Sweater here.
Gemma
xxx