


Welcome to Wedding Cake Week!
If you missed yesterday’s post, I made the cake for my brother’s wedding last month and, over the next week, I’ll be sharing all of the recipes that I developed for it (as well as some fun, behind-the-scenes content too)!
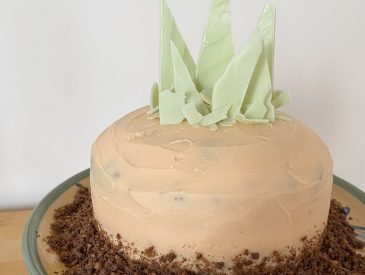
Today, we’re starting with the largest tier of the cake itself: the Chocolate Tier. This 10-inch tier was made up of three layers of a deep, rich chocolate sponge and copious amounts of chocolate-y, American-style buttercream. This was a super popular tier at the wedding (which is good, because there was a lot of it!), so I’m really excited to share the recipe with you!
Table of Contents
- A Bit of Recipe Backstory
- Making the Cake Layers
- Making the Chocolate Buttercream
- Assembling the Chocolate Cake
- Decorating the Chocolate Cake
- Scaling Down the Recipe
- Recipe
A Bit of Recipe Backstory
As you’ll have seen in the intro post to this series, I’ll be sharing a whole post on how I went about developing these recipes on Saturday, but I did want to share a little bit of chocolate cake-specific backstory here too!
I started out with a recipe that I had used in the past, which vaguely resembled the style of chocolate cake I wanted for this. However, when I made that, it just… wasn’t good, like, at all? The bake was bad and the flavour was significantly un-chocolate-y. It was… a bad start (to say the least!) and it did throw me a little bit, but it also made me more determined to get this cake right.
A few iterations later, after trying a plethora of adaptations to inject some more chocolate flavour into that sad, sad sponge, I decided to go back to square one and do some more research into different recipes.

In the end, I started working from the chocolate cake recipe in the Crumbs & Doilies Cookbook (which was, coincidentally enough, bought for me as a present by my new sister-in-law: a fun, full-circle moment that I have only just realised!).
Using that recipe as my starting point, I tweaked and changed and basically pretended I was a mad chocolate cake scientist, until I had (what was, by that point, essentially a brand new), ultimate chocolate cake recipe. Also, I discovered that good-quality cocoa powder actually does make a difference (who knew?), so I decided to splurge and use fancy, Valrhona cocoa for this cake for the best, richest chocolate flavour (I mean, if you can’t go all out for a wedding, when can you?)!
It was, if I do say myself, perfect.
And, as a bonus, it was incredibly easy to make!
Making the Cake Layers
Once I had my recipe nailed down, (multiple) practices made and fancy cocoa powder obtained, it was time to make the final cake. The chocolate cake was the moistest (so sorry for the use of that uncomfortable word— but it was!) of the three sponges and I actually felt that it improved with age, so I decided to make it first.
For reference, the wedding took place on a Saturday and I made the whole chocolate cake (layers, assembly, and final icing) on the Wednesday.
If you’re making the cake ahead, you do need to cover the whole thing in icing as soon as you’ve assembled it, because any cake that is exposed to the air will start to dry out (not the vibe). If you want to make the cake layers the day before you ice it, you can, but I would recommend wrapping each cooled layer individually in clingfilm to protect it from the air overnight.
I only had one 10-inch tin (and I could only fit one 10-inch tin at a time in my oven!), so I baked each layer separately. Cake batter doesn’t like to be left sitting around for too long before it is baked (and these cakes take a good while to bake), so I made the batter for each individual cake separately too. Honestly, this batter is so easy to make that it wasn’t that labour-intensive, just a little repetitive! While a bit of a faff, doing it this way was quite handy because it did ensure that all of my cake layers were exactly the same size, which made the finished cake feel very perfect.
Photo Tutorial: Chocolate Cake Layers
After a whole load of waffle then, we finally get to the recipe! Here’s how you make the cake layers for the chocolate cake tier…

Start by greasing a 10-inch sandwich tin with softened butter. Line the base of the tin with a circle of greaseproof paper, then set aside. Preheat the oven to 165°C (conventional setting, not fan-assisted).

Dissolve the instant coffee granules in the boiling water.

Add the cocoa powder and whisk until the mixture is smooth. The hot water will bloom the cocoa and helps make the cake taste extra chocolate-y.

Gradually add the diced, salted butter to the hot cocoa mixture, stirring each addition in until it has melted before adding more. Keep going until all of the butter has been added and everything is melted and smooth.

Next, add the buttermilk, oil and vanilla extract. Whisk again to incorporate.

By this point, the hot mixture will have cooled down to room temperature (the addition of all those cool ingredients really speeds this along), so you can add the egg without risk of scrambling! Add the egg and whisk one final time until you have a homogenous, chocolate-y mixture. As delicious as it looks, you shouldn’t eat this (if not for the raw egg, for the fact that there’s no sugar in it at this stage, so it will definitely not taste as good as it looks!).

Sift the flour, sugar (here it is!) and bicarbonate of soda together into a large bowl. Whisk briefly to combine everything.

Pour the wet ingredients (i.e. the forbidden chocolate mixture) into the dry ingredients, whisking as you go, until all of the chocolate mixture has been added and you have a smooth, liquid batter.

Use a spatula to stir through the batter one final time, just to make sure that there are no lumps of flour. If there are any lumps, they will bake into the cake as little flour-y pockets, which is not the vibe, so don’t skip this step!

Once you’re happy with the batter, pour it into the prepared tin. The tin will be quite full, but it shouldn’t overflow in the oven (though, if you want, feel free to place the tin on a cold baking tray on the oven shelf, just in case).


At this point, give the filled tin a few taps on the work surface, just to get rid of any large air bubbles. I don’t usually condone this with cakes, but this particular recipe does seem to end up with some large crater-ish holes if you don’t do this!

Bake the layer in the preheated oven for 55-60 minutes, or until a skewer inserted into the centre of the cake comes out clean, or with just a few moist crumbs.

Leave the cake to cool in the tin completely, then use a large, serrated palette knife to level off the cake, using the rim of the baking tin as a guide. It’s easier to cut a cooler cake, so don’t do this while it is still hot from the oven. I like to do it this way because it ensures that all of the cake layers are the same height, but you can level the cakes using your favourite method.
If you are using the tin method, I recommend keeping the flat of the palette knife pressed gently against the top of the tin as you gently ‘saw’ your way around the whole circumference of the cake before carefully sawing back and forth right across the surface. This will make it easier to cut through the crust of the cake and get a neat, even finish.

Once levelled, turn the cake out onto a wire rack (the cake is so large that there might still be a bit of warmth in the centre of the underside and you don’t want it to sweat if you turn it out onto a solid surface!), making sure to peel off the baking paper circle from the bottom.
Wash out the tin and dry it thoroughly, then repeat the whole process twice more, until you have three, perfectly even, levelled and cooled, chocolate cake layers.
Making the Chocolate Buttercream
Once the cakes are baked and cooled completely, you can make the buttercream. This is a super easy buttercream to make: it really is just a basic, American-style, chocolate buttercream, with the chocolate-y flavour turned up a notch through some extra little additions (and made extra smooth and creamy with a super simple technique!).
You need a lot of buttercream for this cake! I recommend making it in (at least) 2 separate batches (unless you’re using an industrial-sized stand mixer, which, who is?), just to make things easier on yourself.
You’re always supposed to use ‘room temperature’ butter for icing, but I must confess, I always microwave it gently to ‘soften’ it instead. My house isn’t the warmest, so ‘room temperature’ for me isn’t really warm enough!
To soften the butter (and this is specifically for a large amount of butter like this), weigh it out beforehand, then place the whole block in a heatproof bowl in the microwave and warm it for about 30 seconds on the medium heat setting. You should be able to press your finger into the surface quite easily (and, if it’s slightly over-softened, don’t worry: the beating stage will bring it back to a smooth and cohesive consistency!).
Photo Tutorial: Chocolate Buttercream
Now to make the chocolate buttercream!

Fit an electric stand mixer with the paddle attachment. Add the softened butter and beat on medium-high speed until smooth, significantly paler in colour and super creamy, pausing every now and then to scrape down the sides of the bowl.

This will take about 3-5 minutes— you can’t really over-mix it at this stage, so I like to just leave the mixer running while I prepare the other ingredients.

While the butter is mixing, sift the icing sugar and cocoa powder together to remove any lumps. I also like to give these dry ingredients a little whisk at this stage, just to ensure that they are nicely combined, so that the cocoa flavour/colour distributes evenly throughout the icing later on.

Warm the milk gently, just enough so that you can dissolve the instant coffee granules in it (I gave it about 20 seconds, on the high setting, in the microwave).

By this point, the butter should be looking super light and silky, so you can get on with the buttercream. Turn the mixer down to low, then start adding the icing sugar/cocoa powder mixture, a spoonful at a time, until you’ve incorporated about half of it. This may sound tedious, but it’s just to protect you and your kitchen from an icing sugar mushroom cloud! It also helps to ensure that the icing is completely combined, with no sneaky patches of unincorporated ingredients.

Scrape down the sides of the bowl with a spatula, then turn the mixer back to low and add all of the milk/coffee mixture, as well as the vanilla extract.
With the mixer still on low, add the remaining icing sugar mixture, still going a spoonful at a time.
Once everything has been incorporated, scrape down the sides of the bowl again, then turn the mixer back up to high and beat the icing for about 1 minute, until fluffy and well-mixed.

Take a generous amount of the icing (about 2-3 dessertspoon’s worth) and put it into a small, microwavable bowl.

Melt this in the microwave (on high heat, this will only take about 10-15 seconds), until it is super runny.

Give this a quick stir, then use a spatula to mix it back into the rest of the icing by hand.

This sounds like a weird step, but it really does help to smooth out the icing (which is particularly important if, like I was, you’re aiming for smooth sides on your cakes!). Additionally, it also helps to bloom the cocoa powder a little, which darkens up the icing and intensifies the chocolate flavour (it’s a win-win!).
If you’ve split the icing into two batches, you will need to repeat the whole process again once you’ve used up the first lot. The first half will be enough to fill the cake, but there won’t be quite enough to finish the crumb coat, so you’ll need to make the second batch before moving onto that stage.
Assembling the Chocolate Cake
With the cake layers and buttercream made and ready, it’s time to assemble! I’ll be sharing a detailed tutorial for how I assembled these layer cakes on Thursday, so be sure to check that out then!

To assemble this, particular cake, I used the following equipment:
- Cake lifter.
- Cake turntable.
- Piping bag and large round piping tip (I used a #1A tip).
- Offset palette knives (I used an 8-inch AND a 4-inch one, but you could get away with just one or the other).
- Cake dowels (I used these ones).
- Icing smoother (I used this one by Wilton).

Because I knew I would need to transport this cake to the venue, I assembled it directly I onto a cake drum (a thick cake board that could withstand the weight of the cake), which was the exact same size/shape as the cake. This meant that I could move the cake around more easily.
To keep the cake from sliding about in the transport box in transit, I temporarily adhered the cake drum to a thinner, square cake board that fit exactly into the box. When I arrived at the venue, I just slid my cake lifter (though you could also use a palette knife) between the boards, cutting through the adhesives in the process and separating them.
If you want to do this too, you’ll also need the following equipment:
- 10-inch, circular cake drum (the same size/shape as the cake layers).
- 12-inch, square cake board (the same size/shape as the cake box I planned to transport the cake in).
- Adhesive paper stickers (I used these, folded in half to make them ‘double-sided’ and easy to cut through with a cake lifter, but any thin, temporary adhesives will work).
- 12-inch, heavy duty cake box.
To assemble the cake, I spread a thick layer of chocolate buttercream in between the cake layers, added 4 cake dowels (for extra stability), applied a crumb coat and, finally, added a smooth layer of buttercream all over the top and sides of the cake (including the cake drum, for a clean, seamless look). As I mentioned, a detailed tutorial for this will be coming on Thursday, so keep an eye out for that!

Then, the cake was done! I set the cake aside at a cool room temperature until it was time to transport it. As I mentioned, I made this cake on the Wednesday, transported it on the Friday, then set it up at the venue on the Saturday (the day of the wedding!), so it can definitely be made in advance.
Decorating the Chocolate Cake
My brother and sister-in-law wanted very little in terms of decoration on the cake: aside from the gingerbread toppers on the coffee tier, the only extra adornment on each cake was a little arc of dried & pressed edible violas on the top. I used these ones, from Nurtured in Norfolk (in the shades: ‘Cream’ and ‘Midnight Blue and Cream’).

I didn’t want the violas to re-hydrate too much and look limp and sad, so I opted to put them on the cake at the venue, on the morning of the wedding. Once I had manoeuvred the tier onto the cake stand, I laid the flowers out on top of the hardened icing. This was actually really handy, as it meant that I could rearrange them if needed, before committing to sticking them down.
Once I was happy with the layout, I used some extra chocolate buttercream on the end of a skewer to attach each flower individually to the cake. I brought the icing to the venue in a piping bag, sealed using food bag clips back on Wednesday, when I made it, which worked really well. It did, however, need a little bit of warming up between my hands to bring it back to buttercream consistency!
Scaling Down the Recipe
This is a big cake: the biggest one I’ve ever made! If you’re not making it for a wedding/other event, you probably won’t need to make one this big. On the bright side, it’s quite an adaptable batter and icing, so you can easily scale the recipe down!

For reference, for 1 x 6-inch, round cake layer, the batter ingredient quantities are as follows:
- 3/4 tsp instant coffee granules
- 75ml boiling water
- 25g cocoa powder
- 35g salted butter
- 75g buttermilk
- 30g oil
- 1 egg
- 1 splash vanilla extract
- 100g plain flour
- 115g caster sugar
- 1/3 tsp bicarbonate of soda
For this size cake, you can bake it at a slightly higher temperature (170°C), for 45-50 minutes, or, again, until a skewer comes out clean.
To make enough icing to frost the top and sides of this single, smaller cake layer, use the following quantities:
- 55g unsalted butter
- 105g icing sugar
- 10g cocoa powder
- 2 tsp milk
- 1 generous pinch instant coffee granules
- 1 splash vanilla extract
If you want to make a multi-layered 6-inch cake, simply multiply both the batter and icing ingredients by the number of tiers you want.
Recipe

The Chocolate Tier (Wedding Cake Week)
Equipment
- 10-inch, circular cake tin (see Note 1).
- 1 piping bag
- #1A piping tip (or similar, large, round nozzle).
- 10-inch, circular cake drum
- 12-inch, square cake board (see Note 2).
- Temporary adhesives (I used paper adhesive stickers) (see Note 2).
- Cake lifter
- 4 cake dowels
- Icing smoother (see Note 3).
- Offset palette knife
Ingredients
For the 3 cake layers (quantities for 1 layer in italics):
- 2 tbsp + 3/4 tsp instant coffee granules, decaf (2 1/4 tsp).
- 675 ml boiling water (225ml).
- 225 g Valrhona cocoa powder (75g) (see Note 4).
- 315 g salted butter, diced (105g), plus extra for greasing (see Note 5).
- 900 g plain flour (300g).
- 1035 g golden caster sugar (345g).
- 3 tsp bicarbonate of soda (1 tsp).
- 675 g buttermilk (225g).
- 270 g sunflower oil (90g).
- 3 splashes vanilla extract (1 splash).
- 9 eggs (3).
For the chocolate buttercream (quantities for half batch in italics):
- 600 g unsalted butter, softened (300g).
- 1200 g icing sugar, sifted (600g).
- 110 g Valrhona cocoa powder (55g) (see Note 4).
- 110 ml whole milk (55ml).
- 1/4 tsp instant coffee granules, decaf (1/8 tsp).
- 2 splashes vanilla extract (1 splash).
To decorate:
- Pressed, edible violas (see Note 6).
Instructions
Make the first cake layer:
- Preheat the oven to 165°C (conventional, not fan-assisted). Grease a 10-inch round sandwich tin with butter and line the base with a circle of greaseproof paper. Set aside.
- Make the batter for one cake layer at a time, using the single layer quantities listed in italics in the ingredients list.
- Place the instant coffee granules (2 1/4 tsp) into a large jug. Cover with the boiling water (225ml), then stir to dissolve. Add the cocoa powder (75g) and whisk until smooth.
- Gradually add the diced butter (105g) to the hot cocoa mixture, stirring in each addition until all the butter has been added and everything is melted and smooth.
- In a large bowl, whisk together the flour (300g), caster sugar (345g) and bicarbonate of soda (1 tsp) to combine. Set aside.
- Add the buttermilk (225g), oil (90g) and vanilla extract (1 splash) to the cocoa mixture. Whisk until incorporated.
- Add the eggs (3) to the wet ingredients and whisk again until completely incorporated.
- Pour the cocoa mixture into the dry ingredients and whisk until fully combined and you have a smooth batter. Stir with a spatula to make sure everything has been incorporated.
- Pour the batter into the prepared tin (it will be quite full, but it shouldn’t overflow. Place on a cold baking tray on the oven shelf just in case), then bake in preheated oven for 55-60 minutes, until skewer inserted into the centre comes out clean, or with just a few moist crumbs.
- Leave baked cake to cool completely in tin, then run a knife around the edge of the the tin to loosen the cake before levelling and flipping out onto a wire rack.
Make the chocolate buttercream:
- I recommend making the buttercream in two separate batches (use the half quantities listed in italics in the ingredients list).
- Fit mixer with paddle attachment. Beat butter (300g) until smooth, pale and creamy (about 3-5 mins), scraping down the sides when necessary.
- While the butter is beating, sift together the icing sugar (600g) and cocoa powder (55g) to remove any lumps. Whisk to ensure evenly combined. Warm the milk (55ml) in the microwave (20 seconds on high), then add the coffee granules (1/8 tsp) and stir to dissolve.
- With mixer on low, add half of the icing sugar mixture to the butter, a spoonful at a time, pausing to scrape down the sides of the bowl as you go.
- With mixer on low, pour milk mixture into buttercream, then add vanilla extract (1 splash) and mix until incorporated.
- Add the rest of the icing sugar with the mixer still running, a spoonful at a time.
- Once everything has been added, turn the mixer up to high and beat until fluffy and fully mixed (about 1 minute). Add a little more milk if icing is too stiff.
- Remove a spoonful of icing and microwave on high for 10-15 seconds to melt. Stir to ensure evenly melted, then mix into the rest of the icing by hand to smooth and darken (this also helps to bloom the cocoa powder slightly).
Assemble the cake:
- Secure the 10-inch cake drum to the 12-inch cake board (if using) with paper adhesive stickers (or other similar, temporary adhesive). Set on a turntable, with a layer of non-slip fabric in-between the turntable and the boards.
- Spread a dollop of icing onto the cake drum, then set the first, cooled cake layer on top, making sure it is level and centred on the drum. It should line up with the sides of the drum.
- Place some buttercream into the piping bag, fitted with the large, round nozzle. Pipe an even layer of chocolate icing all over the surface of the cake layer, making sure to go right to the edges. Use an offset palette knife to spread the icing out evenly, ensuring there is some overhanging icing at the edges.
- Place the next layer of cake on top, making sure it is centred and level. Repeat the icing process, adding another even layer of icing on top, then topping with the final layer of cake.
- Smooth the excess icing around the sides with a palette knife/icing smoother, then chill in the fridge for 15 minutes.
- Insert 4 cake dowels, if using.
- Apply a thin crumb coat, then chill again for 15 minutes.
- Apply a generous layer of icing all over the top and sides of the cake. At this stage, cover the sides of the cake drum with icing too. Smooth out the top, making sure to leave some overhanging icing all around the top edge, then use the icing smoother to smooth out the sides, moving the turntable, rather than the smoother, for best results. The overhanging icing should be pushed upwards and inwards during this process, forming a nice 'lip' around the top of the cake.
- If needed, apply more icing to any uneven sections and smooth again.
- Once happy with the finished cake, set aside at cool room temperature to firm up, until ready to eat/transport.
Decorating the cake with pressed flowers:
- As close to serving as possible, lay the pressed flowers onto the surface of the cake (on which the buttercream has hardened), making sure you are happy with the arrangement before sticking them down. Use a small amount of icing on the end of skewer to stick down each flower individually.
Notes
- I use the Silverwood 10-inch sandwich tin.
- You can skip the extra board/adhesive if you don’t need to transport the cake— these just make it easier to manoeuvre the cake without worrying about it slipping/sliding.
- If you want smooth sides on a cake, you really need to invest in an icing smoother. I use this one by Wilton.
- The cocoa powder you use makes a huge difference to the taste/chocolatiness of the finished cake, so, if you can afford to, I definitely recommend splashing out on the fancy stuff (I used this one, by Valrhona)!
- I’ve used salted butter here, because salt really brings out the flavour of the chocolate, but you can use unsalted butter and add some fine sea salt separately, if you prefer.
- I purchased the violas from Nurtured in Norfolk. On this cake, I used the colourways ‘Cream’ and ‘Midnight Blue & Cream‘.

Hands down the best chocolate cake I’ve managed to make! So chocolatey and stayed moist for days. I made this 4 days before a wedding and brushed with simple syrup, wrapped, and stored in the fridge. Thank you so much for this recipe!
Annie, thank you so much for your lovely comment! I am so glad you loved this recipe— it’s one of my absolute favourites!
Hi,vid like to make this for my son’s wedding but I’m struggling to get the same cocoa powder. Can I use something else?
Thank you in advance
Hi Bernadette, you can absolutely use a different cocoa powder for this recipe! The quality does make a big difference (if you can find a cocoa powder that has been ‘Dutched’ or ‘Dutch-processed’, that’s a good indicator that the flavour will be extra good!), but this cake will still be delicious with a regular cocoa powder. The Valhrona one is my personal fave, but whatever you normally use/is available near you will be great!
Thank you I managed to find a Dutched cocoa powder at Amazon thankfully. I didn’t want to risk my normal bournville cocoa powder.
Also, may I ask what size eggs you used? Medium or large?
Many many thanks
That’s brilliant— I hope your son loves the cake! I use large eggs for this recipe (for all of my recipes, actually!).
Hey me again
One or three tsp of vanilla extract per layer. It says two different things in you list and then description.
Many thanks x
You’re right— my mistake! It should be fixed now. In each individual layer of the cake it’s just the 1 splash of vanilla extract (so 3 splashes total across all 3 layers). I’ve listed the amount in ‘splashes’ rather than a specific measurement because you don’t need a whole lot (and vanilla is definitely a flavour that people have strong personal preferences about!): if I had to put a number on it, I’d say 1 splash = about 1/4 tsp here!
Has anyone used stork instead of butter for the main cake part? 🙂
Hi Bethany! I haven’t tried using Stork in this recipe, but I probably wouldn’t recommend it (as much as I am usually a major proponent of Stork in cakes!). Stork usually makes for a lighter, fluffier cake, which doesn’t quite fit with the… fudgier (for lack of better word!) vibe of this recipe. If you did want to give it a go though, I’d definitely suggest using the block version (as opposed to the tub— I find the block behaves more like standard butter) and adding a pinch or two of salt to the batter!
Hi Gemma – I am hoping to make the cake for my daughter’s wedding later this year and have started practising! The coffee tier was brilliant, but disappointed with the first layer of the chocolate tier, which cracked really badly. I have put it in the freezer and now want to try a second layer (aiming for just 2 layers for the finished “practice” cake, which I plan to serve as her birthday cake in a couple of weeks’ time!). I followed the instructions religiously EXCEPT (1) could not get Valrhona so used Naturya cacao powder and (2) have Aga (electric) so could not be precise about the temperature (though am used to baking cakes in it and have not previously had this problem). Any advice/suggestions as to what I might do differently? Thinking of trying Green & Black’s cocoa powder, kefir instead of buttermilk and using a cold shelf above the cake to reduce oven temperature. Sorry about the length of this…
Hi Janet, HUGE congratulations to your daughter (and happy birthday to her, in advance!). I’m so sorry that the chocolate tier has been causing you problems. The baked cake will have a few cracks (like in the photo in the tutorial: is your cracking much more dramatic than that?), but it’s usually just on the surface, so once you level the cake it’s absolutely fine.
However, excessive cracking is usually caused by too high an oven temperature. This cake is baked at a lower temperature than most, which could be the problem here? I have to admit, I’ve never used an Aga (I wish I had!), but I do think your cold shelf idea sounds like it should help! If that doesn’t work, you might be better off using one of the slightly cooler compartments of your Aga and baking the cake for a little longer? This cake really benefits from a low and slow cook— it’s super moist so it shouldn’t dry out.
I’d also recommend being really precise when you’re measuring the bicarb (too much raising agent can sometimes contribute to cracking too!). I probably would recommend using the Green & Black’s cocoa as opposed to the cacao, just in case the slightly different composition is having an effect on the batter? Otherwise, Kefir should be a fine substitution for the buttermilk (though I think it’s unlikely that the buttermilk is the culprit here).
I hope that’s helpful? My instinct is that the baking temperature is the issue, though I realise that’s not so easy to remedy in this case!
Hi Gemma….I’m using your recipe for my sons wedding cake…I’ll be making a 9 inch round cake…what quantity of ingredients should I use? Thank you 😊
Hi Sharon, how exciting! Congratulations to your son. For a 3 layer, 9 inch cake, I’d scale the recipe down to use 7 eggs (the layers will be ever so slightly thinner than the original recipe, but I think that’s preferable to them overflowing!). If you multiply each of the ingredient quantities listed for the 10 inch cake by 7/9 (0.777777…etc) you’ll get the right amounts! Hope this helps 🙂