Welcome to Day 6 of Wedding Cake Week!
In today’s post, I’m sharing a behind-the-scenes look at how I developed each of the three cake recipes for the wedding cake, from start to finish!
If you’re planning on making your own wedding/event cake, fancy giving recipe development a go or just like reading about cake (and who doesn’t?), this is the post for you. If you just want the recipes themselves (get straight to the cake and all that), you can find them here:
Let’s get into the fun, behind-the-scenes stuff, though, shall we?
Table of Contents
- Wedding Cake Criteria
- Planning/Development Schedule
- Cross-Referencing Against the Criteria
- Learning When to Stop
- The Week Before the Wedding
Wedding Cake Criteria
Before I started working on the recipe for the chocolate cake, I made a list of criteria. Obviously, this was my brother’s wedding, so it was super important to me that this cake was everything that he (and my new sister-in-law!) dreamed it would be. Because of this, we spent a lot of time discussing their likes, dislikes and general, cake-related preferences from the get-go, so I could be confident that I was on the right track. I also had some additional criteria of my own, that, in truth, was mainly centred around minimising the last-minute stress as much as possible (a girl’s gotta protect her mental health, right?).

In the end, this was my master list of criteria:
- Size + Shape
The bride and groom really wanted a three-tier, round wedding cake, so, of course, that is what this cake had to be! The size of the cake was determined by the number of guests attending the wedding (67), so the largest, chocolate tier needed to be 10″ in diameter, the middle, coffee tier needed to be 8″ in diameter and the smallest, lemon tier need to be 6″ in diameter, with all 3 tiers being made up of 3 individual layers of cake.
- Tastes AMAZING (and like what they’re supposed to taste like)
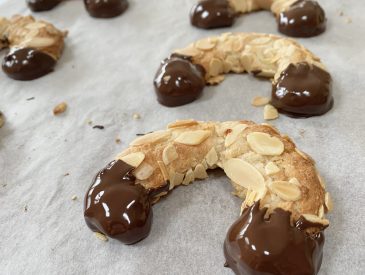
Obviously, this was the most important thing: the cakes HAD to taste good and, by extension, they had to taste like what they were supposed to taste like. I mean, if you’re having a chocolate cake you absolutely want it to taste like chocolate, right?. Chocolate cake is my new sister-in-law’s absolute favourite, so this was especially important to get right. Similarly though, the coffee cake needed to taste like coffee and the lemon cake needed to taste like lemon: what’s the point of calling a cake a certain flavour if you can’t even taste it?
- American buttercream
This was a specific request from both the bride and groom: no fancy Italian or Swiss meringue buttercreams here: only the butteriest of American icings was allowed (not that I’m complaining: American buttercream is by far the easiest icing to make!).
- Strong, durable cake layers
This was one of my personal additions to the list: I wanted all of the cakes to be super stable and secure, because I’d had literal nightmares about dropping them/them toppling over before we even got them to the venue. The wedding was taking place about an hour and a half away from my house, so it was vital that the cakes were able to travel well.
- Moist sponge
Again, one of my own additions: I knew I’d need to make the cake as far in advance as I possibly could, to limit the amount of last-minute stress on myself AND ensure that I wasn’t too tired to enjoy the actual wedding itself! It was super important, then, that all three of the wedding cakes had a much more moist and rich sponge base, so that I could make them in advance.
- Lemon curd filling (for the lemon tier only, obvs)
This was a specific request from my brother and who am I to deny him lemon curd?
Planning/Development Schedule
My brother and sister-in-law got engaged just over 20 months before they got married and, if I remember correctly, asking me to make the cake was one of the first wedding-related decisions they made, so I had a good long time to develop these recipes.

I tackled each cake flavour individually, working on each one until I was happy before moving on to the next. For each flavour, I went through the following steps:
Step 1: Recipe Research
I started by researching cake recipes, looking in particular for recipes that had similar attributes to what I had already decided (in my criteria list!) was important for my cakes. I compiled a big bank of recipes for each flavour (making sure to note down things like size, bake time/temp, ingredient quantities and basic methods) AND keeping a reference of where each recipe was from (both for checking back AND for ensuring recipes are properly credited when necessary— this is something I always try to do, particularly now that I have this blog!).
Step 2: Recipe Draft
Using those recipe banks as a reference, I pieced together my own recipe: one that (I hoped) would fulfil all my criteria. This is something that I do quite a lot, so, while it can seem overwhelming at first, it is definitely something that gets easier with practice! You just have to trust your baking instincts (or build them up enough so that you can trust them) and be prepared to make some mistakes: recipe development is all about fixing problems and correcting errors! In anticipation of Step 3, I drew up each recipe to make enough for one, single-layer, 6-inch round cake.
Step 3: First Single-Layer, 6-Inch Test
As much as I hate to admit it, there’s only so much cake a person can eat and, since I knew there would be lots of recipe testing for this project, it seemed prudent to make the initial test cakes as small as possible. This way, I could test my recipes for flavour/texture as many times as necessary without being completely overrun by cakes! I baked up a single -layer, 6-inch version of the initial recipe draft for each cake, to see how it went.
Step 4: Recipe Adjustments and More 6-Inch Tests
After evaluating the first test, I made adjustments to my recipes and tried again, baking and tweaking until I was happy with the flavour and texture of the sponge. For two of the cakes, this step took a while (I’m looking at you, chocolate and lemon tiers), but for the other cake, this step wasn’t even necessary (coffee cake, I’m so proud of you!).

Step 5: Single-Layer, Full-Size Test
Once I was happy with the basic sponge recipe, it was time to convert it to the right size for each tier. For the chocolate cake, this involved scaling up from a 6-inch to a 10-inch layer, while the coffee cake was from a 6-inch to an 8-inch layer. I didn’t need to do this for the lemon cake, because that was always going to be a 6-inch tier! Funnily enough, this time around, it was the chocolate cake that was super easy and only took one try, while the coffee cake caused me no end of grief! Ah well, a few extra cakes floating around didn’t hurt anyone.

Step 6: 3-Layer, Full-Size, Decorated Test
Finally, once I was happy with the flavour, texture AND bake time/temp on each of the cake layers, the last step was to try making a full, 3-layer, decorated cake. This was important, as it gave me a chance to see how the cakes held up under their own weight, as well as an opportunity to taste the finished cakes AND practise all of the techniques involved.
And, with that, I had my three cake recipes!
Cross-Referencing Against the Criteria
Just to ensure the cakes were exactly how I wanted them, I cross-referenced my final recipes against my initial criteria list:
| Criteria | Chocolate Cake | Coffee Cake | Lemon Cake |
|---|---|---|---|
| Size + shape | 3 layers, 10″ diameter, round | 3 layers, 8″ diameter, round | 3 layers, 6″ diameter, round |
| Taste | Added coffee, salt, vanilla and hot water to enhance chocolate flavour. Used Valrhona cocoa powder to make even more chocolate-y! | Used a combination of brewed espresso and instant (caffeinated) coffee granules for the best combo of flavour + colour. | Used the reverse creaming method so that I could add more lemon juice to batter. Added plenty of zest to batter, plus lemon juice in icing. Added lemon curd filling. |
| American buttercream | Yes! + Valhrona cocoa powder, coffee and vanilla. | Yes! + coffee. | Yes! + lemon juice. |
| Strong + durable layers | Absolutely: a super liquid batter baked low and slow that rises, but not too much, so has a soft and tender, yet quite dense crumb. | Yes: a less liquid batter than the chocolate cake, but still bakes up into a relatively dense texture that is still (somehow) super light and fluffy! | … Not so much! The reverse creaming method gives this a slightly tighter crumb than most cakes but it’s still definitely in the sponge category. |
| Moist sponge | Yes: the addition of buttermilk and hot water, as well as the low + slow baking time makes this cake insanely moist. | Yes: the low and slow bake, plus the addition of sour cream and hot water in the batter makes this cake very moist. | Yes, but not as moist as the other two: it’s not a dry cake, but it’s still more in sponge-territory: it will last for the least amount of time. |
| Lemon curd filling | n/a | n/a | Of course! I made the filling with 1 whole egg and 1 egg yolk to keep it nice and thick. |
Learning When to Stop
As you can see from my criteria cross-referencing, my lemon cake recipe didn’t quite fulfil my criteria: it’s definitely more of a fluffy, sponge consistency, rather than the slightly denser, moister cake layers I was aiming for. However, it does satisfy all of the other criteria, tastes AMAZING ( super lemon-y!) and I knew that, because the other cakes fit the criteria so perfectly, I could afford to have one cake that needed to be made closer to the date of the wedding than the others, so I decided to just go with it and save myself some more testing!

Don’t get me wrong, though: I LOVE this lemon cake, it’s just that I think, for a wedding cake, there are probably better lemon cake recipes out there. Maybe one day (after a nice break from the world of lemon wedding cakes), I’ll work on finding the ideal recipe for one!
The Week Before the Wedding
With all of my recipes developed, tried, tested and ready to go, I was ready to make The Actual Wedding Cake. I thought it might be helpful to share what my schedule for the week before the wedding looked like, so you can get an idea of how I allotted my time (and how long the respective cakes were able to last!)
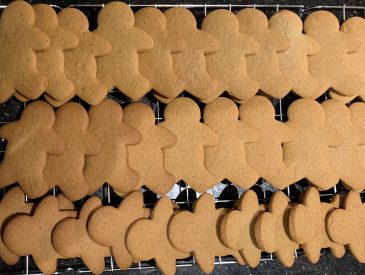
| Sunday | – Made gingerbread dough – Baked gingerbread dough – Cut out florist paste daisies |
| Monday | – Made lemon curd filling – Made royal icing – Piped yellow royal icing into centres of florist paste daisies |
| Tuesday | – Decorated gingerbread toppers |
| Wednesday | – Made chocolate cake layers – Made chocolate buttercream – Assembled chocolate cake – Iced chocolate cake – Made 2x coffee cake layers (and wrapped in clingfilm overnight) – Sandwiched gingerbread toppers with royal icing + cake pop sticks |
| Thursday | – Made final coffee cake layer – Made lemon cake layers – Made coffee buttercream – Assembled coffee cake – Iced coffee cake – Made lemon buttercream – Assembled lemon cake – Iced lemon cake |
| Friday | Travel day – Packed up cakes, toppers, pressed violas and emergency icing repair kit |
| Saturday | Wedding Day! – Transported cakes to venue – Placed cakes onto stands – Decorated with pressed violas – Inserted gingerbread man toppers – Drank lots of prosecco |
Obviously, this schedule won’t work for everyone (especially people who don’t work from home), but it worked for me and this particular cake, so I still thought it might be helpful to share!

I hope you’ve found this post helpful/interesting! The whole process was definitely a labour of love, but most crafty, creative things are, so, really, the whole thing was right up my alley.
I’ll see you tomorrow for the final post in this Wedding Cake Week series, where I’ll be talking about everything I’ve learned from this experience (and sharing every tip/trick I’ve accumulated throughout the process with you!).
Gemma
xxx